
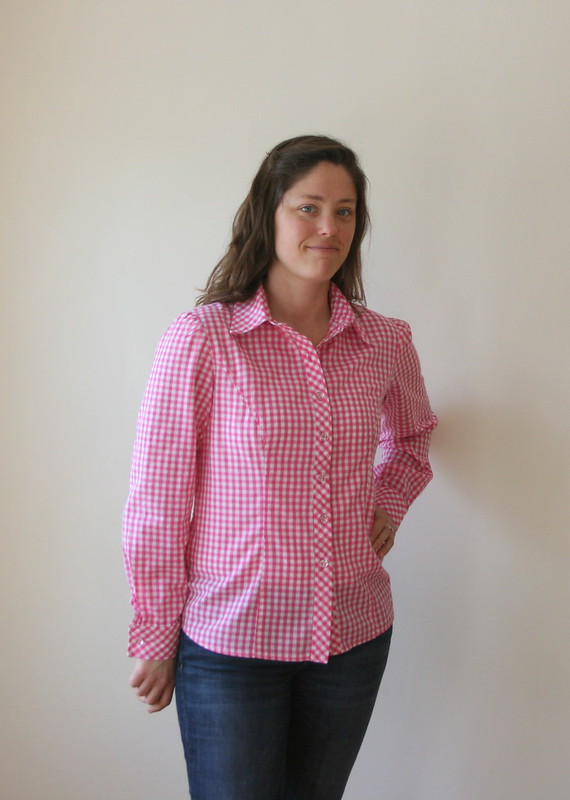
Hi, friends! Here we are today with lots of pictures and words on Butterick 5526, which is a women’s button down shirt.


After my last button down, which was a little bit tight through the back/shoulder area, I decided to learn about how to do a broad back adjustment and measure things on the pattern before I cut my fabric. The ever-helpful Maggie from Pintuck & Purl put me on the right track, and I found my final and very detailed answer courtesy of The Perfect Fit volume of the Singer Sewing Reference Library. I cannot recommend these books enough! One of the best parts is that they are often easy to find used at a very low price! Mine were a gift, but I have bought one or two volumes that I didn’t have.

Now is the point where things will get technical. If you are just here for the pictures and general stuff, feel free to start scrolling at this point. I’ll let you know when it’s over.
The book instructed me to have someone measure my back between the creases of my arms.

I measured about 6″-7″ down from the prominent bone at the base of my neck. The instructions said to measure 4″-6″ down, but I went a little lower so I could measure at the top of my arm creases. My back width was 16 3/4″, and the book advised a minimum ease of 1/2″-1″ for a blouse, meaning my garment should measure 17 1/4″-17 3/4″ across the back. The back width of the pattern was 16 1/2″, so I needed to add 1 1/4″ total or 5/8″ to the pattern piece (since the pattern piece was only half of the back of the shirt).
The book gives you instructions for making a minor adjustment and a major adjustment.

Because of the amount I needed to add, I used a major adjustment. The minor adjustment was appropriate for a total addition of 1/2″ for sizes under 16 and 3/4″ for 16 and larger. The major adjustment is good for 2″ total in sizes under 16 and 3″ total in sizes 16 and up. By ‘total’ I mean the amount across a full size back pattern piece. If you are adding to a pattern piece representing half of the back, as I was, you would cut those ‘total’ amounts in half. I chose the major adjustment because the amount I needed was more than the amount listed under the minor adjustment instructions.

One puzzling part that I ran into is that the example shows a pattern piece without princess seams. My pattern has princess seams. I was a little worried since this was my first time making this adjustment. What I ended up doing was taping the pattern pieces for the back and the side back together where they would be sewn together at the underarm and doing the adjustment across both pieces. Then, I just crossed my fingers and hoped for the best. The good thing was that, although I love the fabric I chose, it was also very inexpensive (it may have been around $3-$5 a yard), so if I really messed up, I wasn’t out too much money.

The above picture probably isn’t the most helpful because I set the pieces together after the fact. I should have taken in-progress pictures, but I didn’t think of it. Below are the individual back and side back pieces after the adjustment.


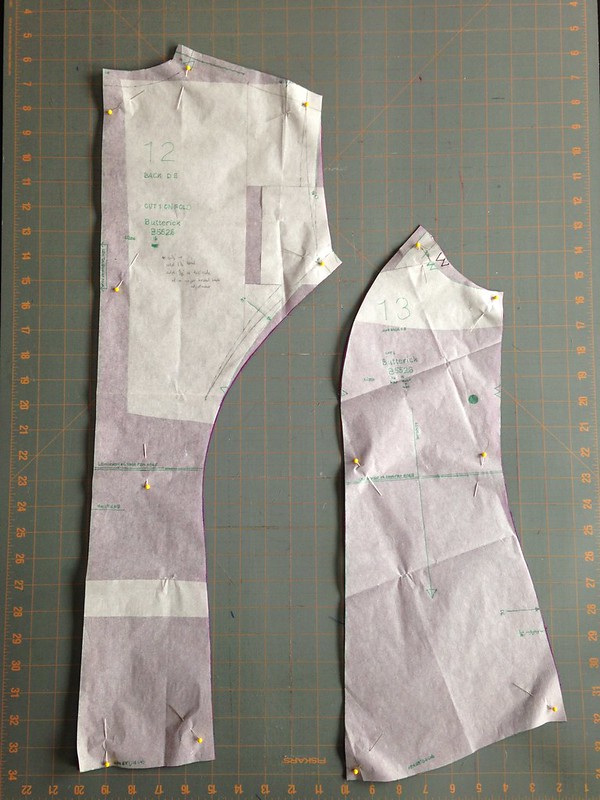
After making the adjustment to the pattern, I cut everything out, and sewed it all up. This wasn’t a difficult pattern, but I was really happy that I had my last shirt under my belt. It helped me to have an idea of how long things were going to take. Shirts have a lot of little steps, but they are really satisfying to make. I followed the directions as written, with the exception of going back and zigzagging my seam allowances that hadn’t been topstitched down. At some point I may use a more polished finish.

In my initial tracing of the pattern, going by my measurements, I made a 16 in the bust and graded out to an 18 for the waist and hips. I found this to be very comfortable, and I wore it to the wedding I mentioned in the last post, but I sort of felt like there were little “wings” at the sides. So, after getting home, I basted the side seams to be a little smaller, guessing how the shirt might have fit had I cut a straight size 16.

I was worried that it would be tight across the middle, but it’s not at all. It still has plenty of ease, but it removes the “wing” effect. For my next shirt, I retraced the waist and hip part of the pattern and cut it down to a 16.

The most technical parts are done! Read on for less detailed information. 🙂
For others interested in making this pattern, I would say that this still has a fair amount of ease. If you like your shirts to fit more closely, you may want to measure the pattern pieces and decide if you want to size down further.

The less technical details of the shirt include pink topstitching. I got some nice Gutermann thread for this. I also found some crystal buttons at a nearby quilt store, Loom ‘N Shuttle. I like the fanciness it gives the shirt. 😉

I also cut the cuffs, collar, collar stand, and plackets on the bias. I was hoping it would work out ok since I was going to interface those parts with a fusible interfacing, and it worked out great. You can see that a little bit in the picture below. I really like the effect.

I found out about this pattern by reading Lauren’s blog, Lladybird. She has the power to make me want to try out just about any pattern, and she wasn’t wrong on this one. I’ve got another one in progress with more of the fabric I bought last summer, and I’m contemplating future versions in basic white and black. This pattern is a winner.


Now I just have to go back and try the broad back adjustment on Simplicity 1538. I think that one needs a larger adjustment, though, so I put it on the back burner while I work on a few other projects.
One last thing before I go…I love getting recommendations, sewing and otherwise, from other bloggers. If you’ve ever listened to the While She Naps podcast, you’ll notice Abby and her guests sharing recommendations at the end of the show. I love that. So, when I have something fun that I am really enjoying, sewing or otherwise, I’m going to put it at the end of the post in case you want to try it, too. This isn’t advertising. No one is paying me to write this blog. It’s just stuff that is fun for me right now or a really great reference that I like. That’s why I’m going to call it: This is fun now…at least until I think of a better title. Feel free to suggest titles–I’m listening.
This is fun now: Today’s recommendation (other than the Singer Sewing Reference Library) is an etsy jewelry shop called Adam Rabbit. I’ve been a fan for a few years now and my family has been nice enough to get me some of the jewelry in the shop the last few Christmases. If you like chunky, rough gemstones and a style you might find in Free People or Urban Outfitters, you may enjoy this one. The owner occasionally has deals for Instagram followers, too. Enjoy!

Love how the shirt turned out!!! You did a great job. I also love your tenacity in getting the perfect fit. Love you….Mom
LikeLike
Thanks, Mom! I really appreciate that! My next step is to convince you that this fabric can go with that crazy colorful fabric I got at Hancock’s. Stay tuned! 😉
LikeLike
Oh boy! Can’t wait!!!
LikeLike
Lisa, thank you for posting this! I’m staring at your adjusted pieces with awe and bewilderment, haha. 🙂 I see what you did and will have to try it out myself to really understand the process. I recently added some width to a 2-piece sleeve by overlapping the pieces on the seam lines, and I guess this is the same concept. Very interesting!
Love your shirt, by the way. I’m a huge fan of bright colors and think the pink looks great on you. 🙂 Isn’t shirt-making so fun and addicting??
LikeLike
Thanks! Yes, it IS fun! I had no idea. 😀 If you get stuck, let me know and I can find a way to get this info to you.
LikeLike
Great shirt, Lisa! Fun colors!!
LikeLike
Thanks, Kris!
LikeLike
Lisa….I’m so proud of you that you understand reading the pattern directions. Your shirt looks very professional…..love gingham plaid and the color pink. Keep up the good work. Luv ya bunches, grama
LikeLike
Thanks! That means a lot to me. 🙂 ❤️
LikeLike
Shirt looks great! I’m going to be trying to make my first button down shirt one of these days soon so I’ll have to make sure to come back to this post to focus a little more on how you did the back adjustments.
LikeLike
Thanks! I hope it goes well when you do. I was surprised that it was easier than I thought it would be if I just followed the directions. And it’s fun. Feel free to come back and put a link in the comments when you make yours. I’d love to see it!
LikeLike
Thank you for detailing your adjustments! I am working on getting a decent fit for wovens across my back and after trying three different broad shoulder adjustments not very successfully (fit improved but still pulls a bit) started thinking of exploring broad back adjustments. It felt serendipitous to see you writing just what I wanted to know right on my blog feed 🙂
LikeLike
Thanks for that! I was feeling like this was both overly wordy and not enough explanation. I appreciate your kind thought and really hope this sets you on the right path.
LikeLike
Great post. Thanks. I have ordered myself the Singer book!
LikeLiked by 1 person
Thanks! I hope the book is helpful. 🙂
LikeLiked by 1 person