 in Robert Kaufman Shetland Flannel")
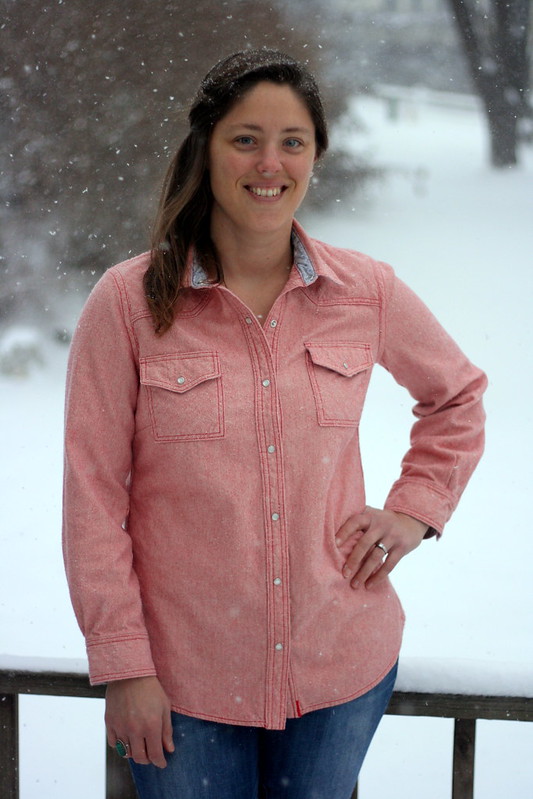
Hey…I bet you guys are going to be super surprised…I made Simplicity 1538! Again!
It’s good to know I finally have a TNT (Tried ‘N True) pattern.
This version is made from Robert Kaufman Shetland Flannel in the Peach colorway with pearl snaps from Pintuck & Purl. Thread, pattern, and interfacing came from Jo-Ann Fabric.
This shirt has the same added length (two inches) that my last one had, but for this version, I also used the pockets and front yoke in View A. I swapped out my favorite buttons that look like pearl snaps for actual pearl snaps, something I’d never worked with before.

Here are my notes. This fabric has a very subtle right and wrong side. It’s actually made up of red and ivory threads, and one side is a little lighter while the other side is a little redder. I chose the lighter side as my right side. Either would look great as long as you are consistent (or intentionally inconsistent, I suppose). It also feels like a lighter weight flannel than the Mammoth Plaid I used for the last shirt, although it’s the same weight according to the Robert Kaufman website. It also feels a little bit softer to me. I did prewash and dry my fabric, but it may not be a bad idea to throw this one in twice, just to be safe. When I finished the shirt, I noticed that the front near the bust is very slightly tighter than I would like. You can see it in the picture at the top of the post. It could also have been the addition of the front pockets and yokes or maybe, as Maggie at Pintuck & Purl pointed out, the difference between using pearl snaps and buttons. Who knows? It’s not something that will keep me from wearing the shirt, but it’s definitely interesting.

l

During construction, I used flat-felled seams for my arm and side seams. They definitely aren’t perfect, but I think topstitching and seams like these are just some of those things that take practice. Overall I tried not to get too picky and only ended up redoing my topstitching in one or two places.
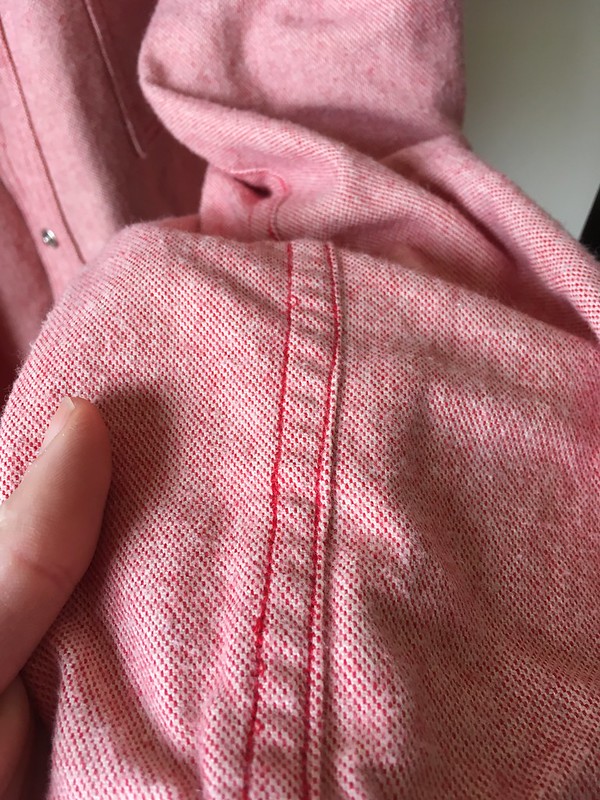
I also tried out the triple stitch on my machine. I know Lauren of Lladybird has talked about loving that more than using topstitching thread, so I thought I would give it a try. It really does create a beautiful stitch.

For another interesting detail, I used a coordinating quilting cotton for my cuff and collar stand facings as well as for the undercollar. I wish I had more of these quilting cotton prints. I won a few in a giveaway around the time I started to sew, and they coordinate with so many things. Unfortunately, I don’t even know the company, designer, or line they are from. Do any of you?

l
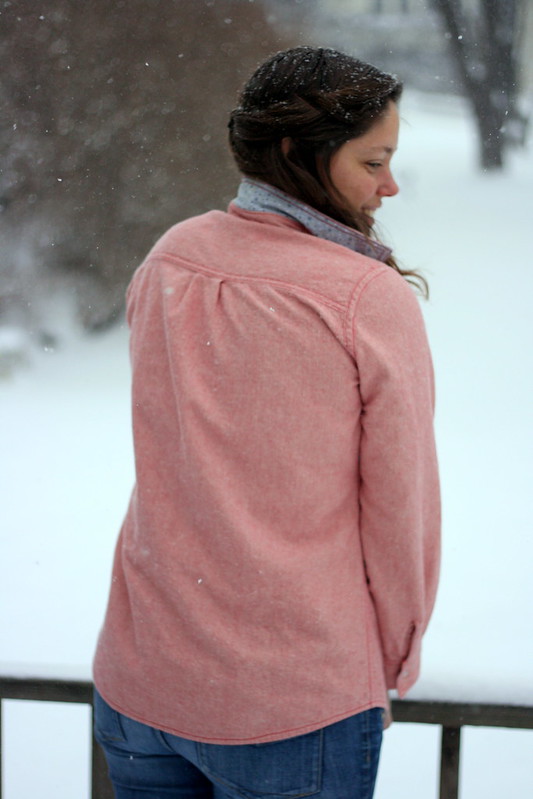
By the time I took this picture, the snow was getting to be a little much, but it gives you the idea. Below is a clearer picture.

Finally, pearl snaps.

I used size 16 ivory snaps for this project. I was given the gift of my husband’s grandmother’s sewing things when she passed away, and I found two different kinds of snap setters among the bounty. One is this blue plastic setter. I looked around on youTube for a tutorial on how to use it (which was harder to find than I expected), and I gave that a try on some scrap fabric. I also tried out this metal setter using directions on the back of some vintage snaps. That was the tool I liked the best, and the instructions were excellent. I got all of my snaps in without too much trouble with the exception of my first one, which cracked due to insufficient padding underneath it. Lesson learned on that one!

So here’s my shirtmaking question for you. When you are putting in your cuffs or collar, if you are instructed to pin the facing down from the outside and then topstitch from the right side, catching the outside and the facing in the topstitching, are you successful? If you are, how do you do it? I’ve given up and now I just hand-stitch those facings down and then topstitch on the outside because I could never catch the whole facing. Thanks for any help you can give on that!
That’s it for this shirt! I have some more Robert Kaufman flannel that I was going to use to make one more, but I’m trying to force myself branch out. We’ll see what happens! My latest thought is maybe Simplicity 8014.
Recommendations:
- Ticket to Ride. Have you ever played this game? You try to build trains to complete your goals (“tickets”). The more tickets you complete, the more points you get! It’s a lot of fun.
- Grandma’s House Patterns. I can pass a lot of time looking through all the past and current sewing patterns on this website. It’s also exciting to threaten to make some of the funnier styles of decades past for friends and family! 😉
- The Labyrinth is one of my favorite movies from childhood. As soon as I saw this Labyrinth worm pin from The Foxy Hipster, I knew I wanted it for my growing collection, and one of my friends got it for me for my birthday!
- Lexi’s. Fortunately (or unfortunately) there is one both next to where I work and within a relatively short distance of where I live. The burgers, shakes, and fries are awesome.

This shirt is such a success! I love the contrast facings and snaps you used. Shirts like this are so much work, you did great job on it.
LikeLiked by 1 person
Thanks, Bianca! I really appreciate that. You are right that shirts like this are a lot of work. I was always surprised when people said they loved making them, but now I get it. They ARE work, but they are so satisfying and fun.
LikeLike
Great job on all the topstitching! I’m making a button down myself at the moment and I just started with the flat-felled seams on the side. I definitely need practice on this because with the last two shirts, they unraveled a bit. I really need to make sure the material catches! I ended up re-doing one on the current shirt, just so I can get this one right. We’ll see how it goes.
I may have to invest in a metal snap setter. I have the plastic one and it’s…meh. Works okay, but something to look for. Great job on the shirt – it looks very professional!
LikeLiked by 1 person
Thanks so much! I still need practice on my topstitching, but I’m not in a rush. I’ll get there eventually. Good luck on your shirt. The Reader’s Digest guide to sewing from the ’70’s and the Thread Theory blog were helpful to me with the flat-felled seams. I hope it comes out in a way that you like! As far as the snap setter, I bet the metal one isn’t expensive. I really thought I’d like the plastic one better, but I was wrong. I’m glad I tried both.
LikeLike
Thw shirt looks great – I love all the top stitching. not sure if I can really help with the stitching – I do it, but I’m not always successful. All I can say is that I use a lot of pins and make sure each one looks right from the back side as well as the front before stitching. There’s usually still at least one place were I don’t catch the underside but I usually just live with it.
LikeLiked by 1 person
Thanks Jenny. I probably haven’t been as careful with my pinning, so maybe that’s most of my problem. I appreciate you weighing in on that.
LikeLike
I love the shirt and I used to hand sew my facings in and then top stitch……just as you did.
LikeLiked by 1 person
Oh, good! That makes me feel better. And thanks!
LikeLike
Lisa your shirt is AWESOME!!! It looks so great. Wow. Just WOW.
I love the snaps too!
LikeLiked by 1 person
Thank you so much, Kim!
LikeLike
Oh, I inherited a ton of snaps with different sizes of the plastic setters. But I haven’t been consistently successful using them. Is that the metal setter in the photo above? I’ll have to look for one of those. I hate to use the snaps until I figure this out so I don’t ruin a garment on one of the final steps.
LikeLike
Yes, that’s the metal one in the picture. I’m hoping to do a tutorial on how to use it soon.
LikeLike
But, also, your shirt looks very impressive. You’re really getting good at them!
LikeLike
Thank you so much!
LikeLike
Looks awesome! Once again, GREAT work!!
LikeLiked by 1 person
Thanks!
LikeLike
This looks so cosy and soft, what a great make for winter 🙂 And the topstitching looks so professional!
LikeLiked by 1 person
Thanks so much. It is really cozy. It’s nice of you to compliment my topstitching. I feel like I have a long way to go before I’m really good at that, but it’s better than it used to be! 🙂
LikeLike
I really have to get my hands on some pearl looking snaps. They look extra special! Great job with the shirt. I think the more you make such detailed garments with all the topstitching etc., the quicker it becomes and more professional looking too. I love you shirt and your fabric!
LikeLiked by 1 person
Thanks, Linda! I really appreciate that. I got my snaps at my local store, but I think Wawak (and I’m sure many other places) also carries them. Thanks for your kind words.
LikeLiked by 1 person
It’s so nice to see people sewing more structured garments. I work in an office with a lot of men and although stretchy knits are comfortable, they just don’t suit the shirt (and occasional tie) dress norm. Thanks for the inspiration!
LikeLike
Thanks, Lisa! I love sewing woven garments and I’ve found button up shirts really fun to make. I read other blogs where people said that, and I was skeptical, but there is something so satisfying about them.
LikeLike