This is post number three of the process of making my daughter a prom dress. Find post one on inspiration and ideas here and post two about the fitting shell here.
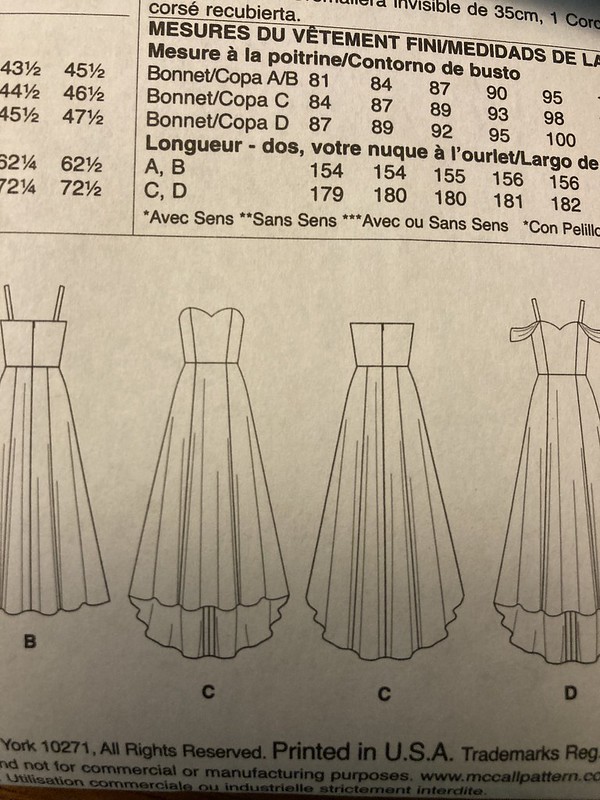
In case you are just joining us, here is the pattern the dress will be based off of, although it will have numerous alterations:
McCall’s 7718
We’re aiming for something similar to a strapless view A or B.
After making the fitting shell, fitting it, and then making another fitting shell to check my changes and make further tweaks, I was ready to make the actual inner bodice foundation layer of the dress. Weeks Two and Three of the sew-along I am using on Pattern Review detail this process. Fitting it felt complex, overwhelming, and exciting. The sewing itself was not crazy, but as anyone who has spent much time sewing knows–fitting is always the biggest hurdle and marker of quality.
At the point that I began working on the final version of this layer, it was the beginning of March. While I had thought I could steadily chip away at this dress, it has ended up being more of a project of stops and starts. Sometimes you put in time sewing or fitting, and sometimes you spend time thinking about exactly what you are supposed to do or waiting on fabric or supplies to arrive. A lot of the thinking times go something like this: There is a hurdle or something I don’t understand in the directions. I don’t know what to do. Think, think, think. Look in sewing books and online. Think, think, think. Maybe I know what I should do! I’m scared to do it. It might not work. Now I am starting to feel the pressure to get back to work! I finally dive in…and it usually works out just fine (with the possible detour of a few sessions with the seam ripper).
To make the foundation layer, I had planned to use muslin, but ended up finding some cream silk lining that I had in my stash, so I combined them.
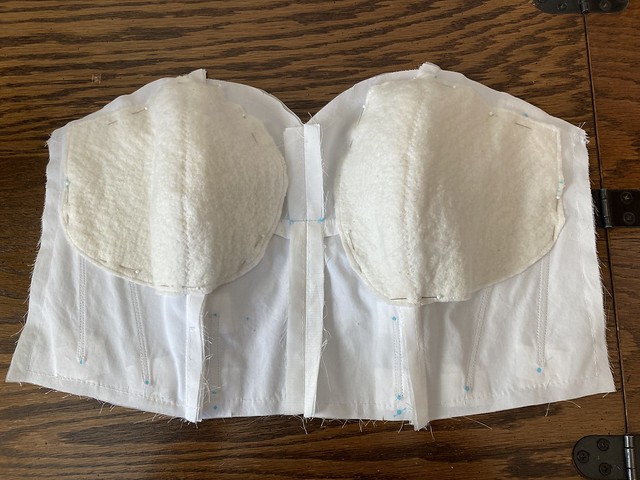
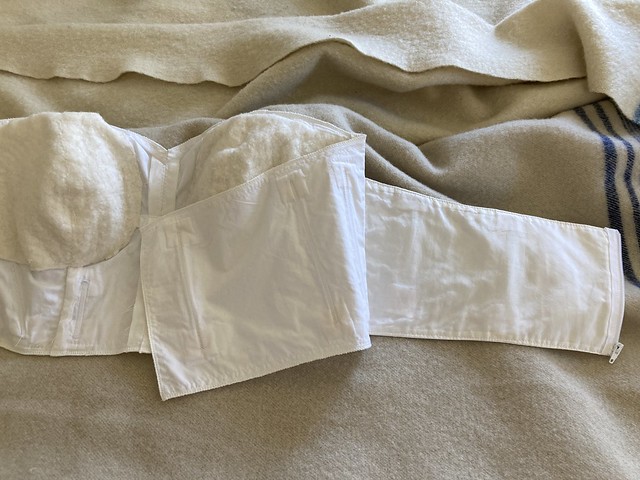
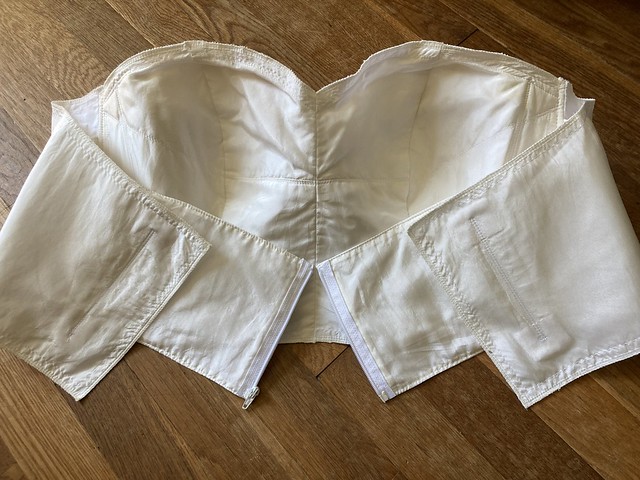
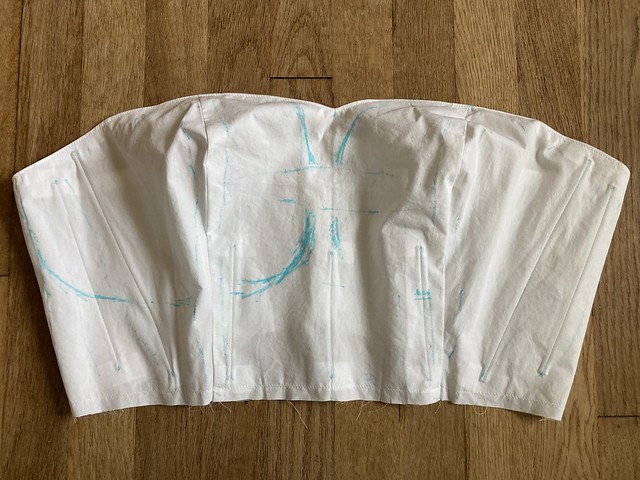
The crazy thing is, each “layer” of this dress is often comprised of multiple layers of fabric. This particular layer is meant to look finished on the inside, where my daughter will see it when she puts it on, with the less finished side facing out. That will be covered by the next layer–another separate lining layer. This layer has silk lining facing the body, with boning sewn in.
The pretty silk inside of the foundation layer
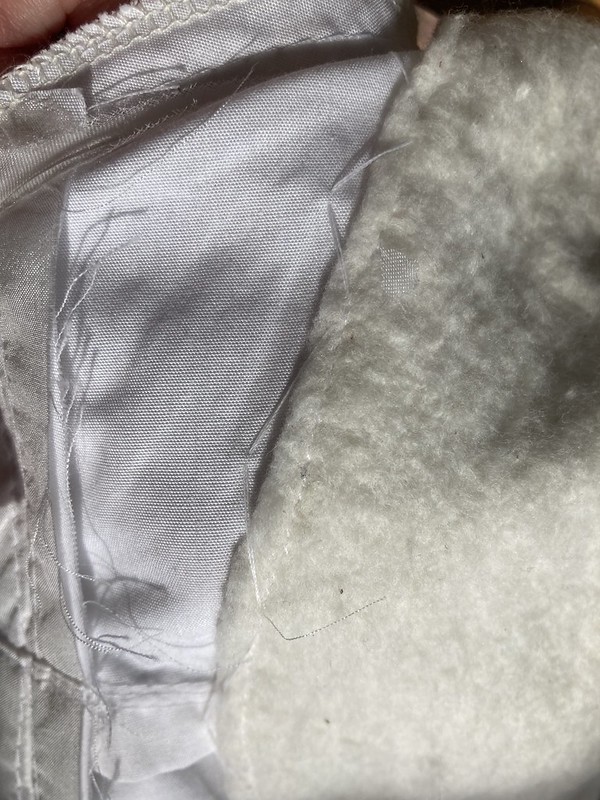
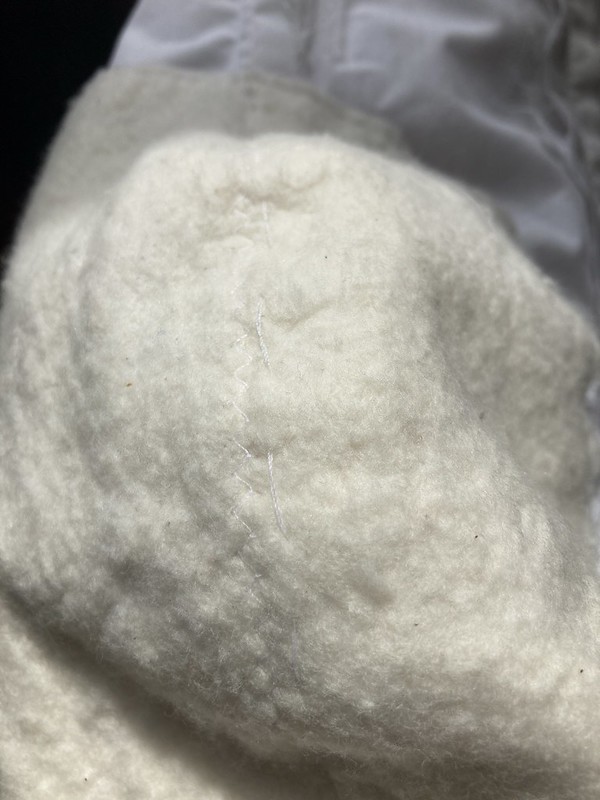
It’s backed by muslin and thin, custom bust pads that are hand-tacked to the muslin.
The muslin side of the foundation layer
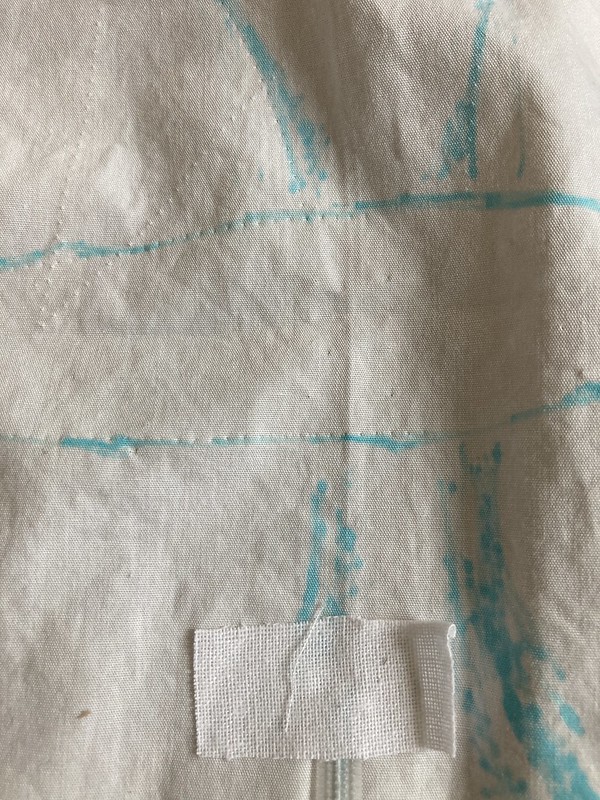
Bust pads are hand-tacked in around the edges…
And down the seam allowance at center. The stitching doesn’t show on the silk side.
And a few more pictures of the front in progress…
The sides/back are a little different.
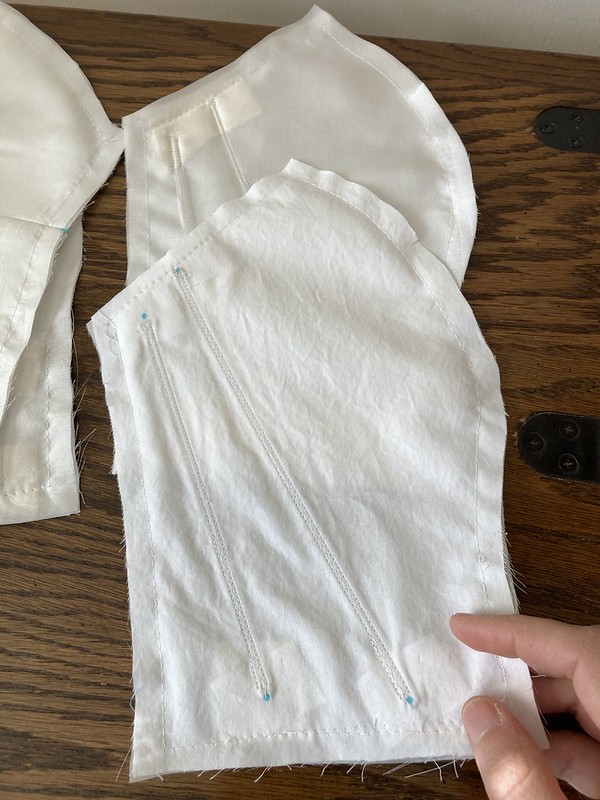
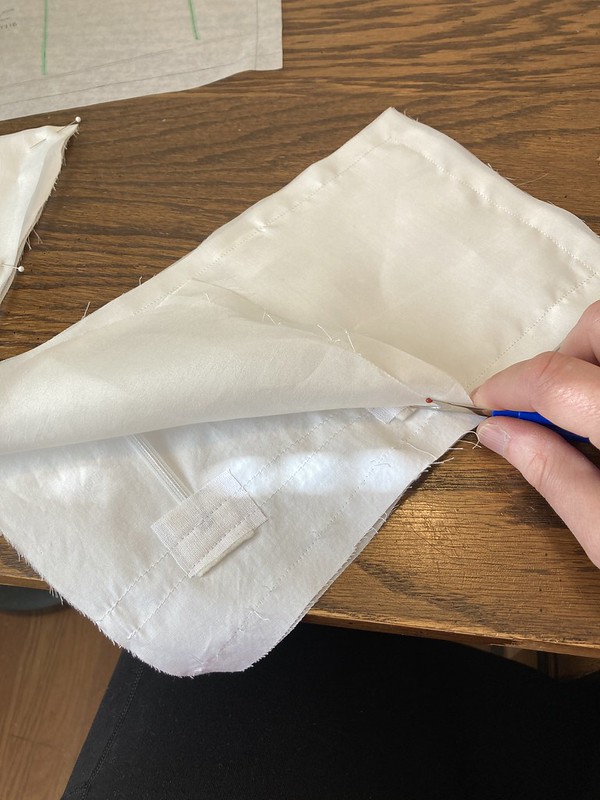
There is a shorter part that functions as an internal closure. This is made up of silk lining on front and back with muslin interlining that contains boning.
The cotton muslin is sandwiched between the silk lining.
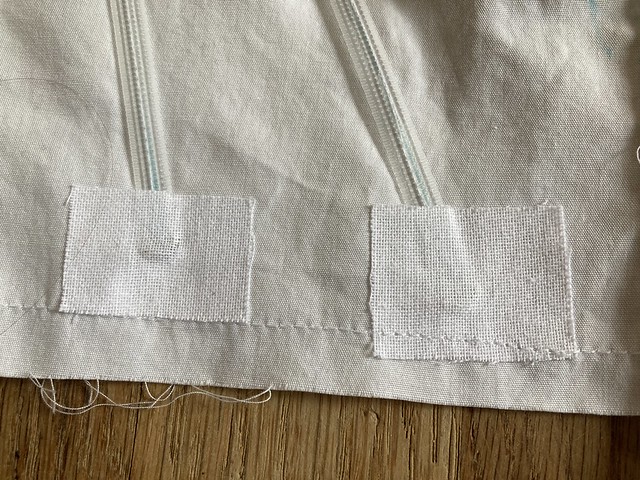
The muslin interlining with boning, plus padding and interfacing over the ends of the boning for comfort
The nearly finished internal closure sections
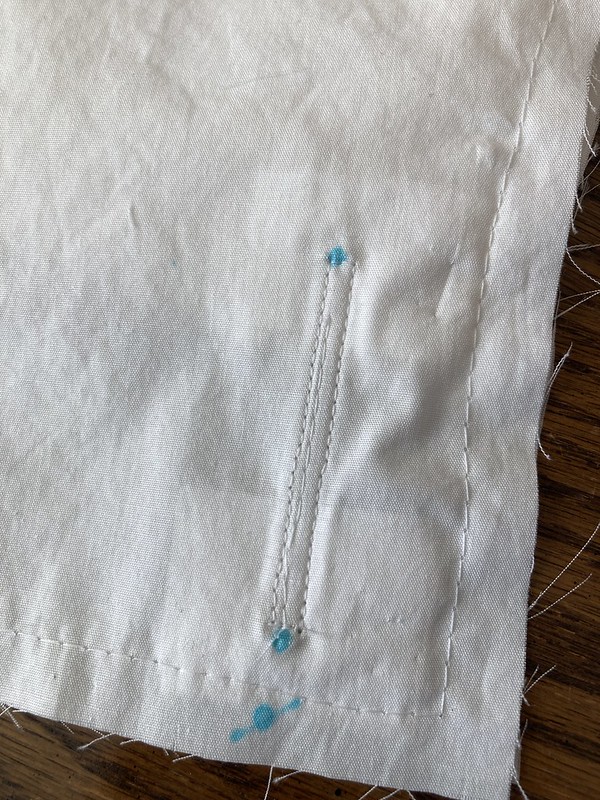
You can feel the boning, but you can’t see it. I initially sewed the layers wrong and had to redo them. Happily, I got something acceptable in the end. This section also has a short separating zipper sewn to it.
A cream zipper wasn’t an option, so I went with white.
The outer dress layers will have their own zipper, but this close-fitting layer will help to carry much of the weight of the dress. The zipper edges could have been covered more beautifully, but this innermost layer was taking FOREVER, and I needed to move forward.
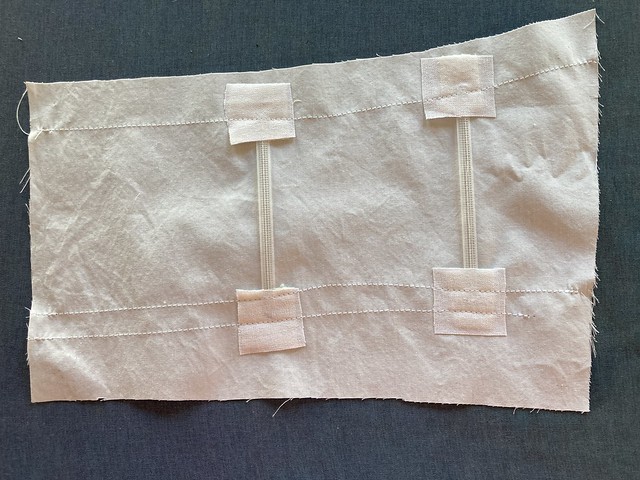
In addition to the internal closure, there is also a taller side/back section made of muslin and silk lining with boning sewn in that mirrors the fitting shell.
This will be attached to the other layers of the dress and, as I am typing this, I’m wondering if I should have reversed which side the silk was on. Too late now (by which I mean, I am not going back into this section, and I’m nearly out of silk lining). Both the taller and shorter side/back pieces are sewn into the side seams. If necessary, these could be slightly taken in or let out. Throughout all these inner layers, there will never be boning placed on top of other boning. In this innermost layer, there is none in the seams.
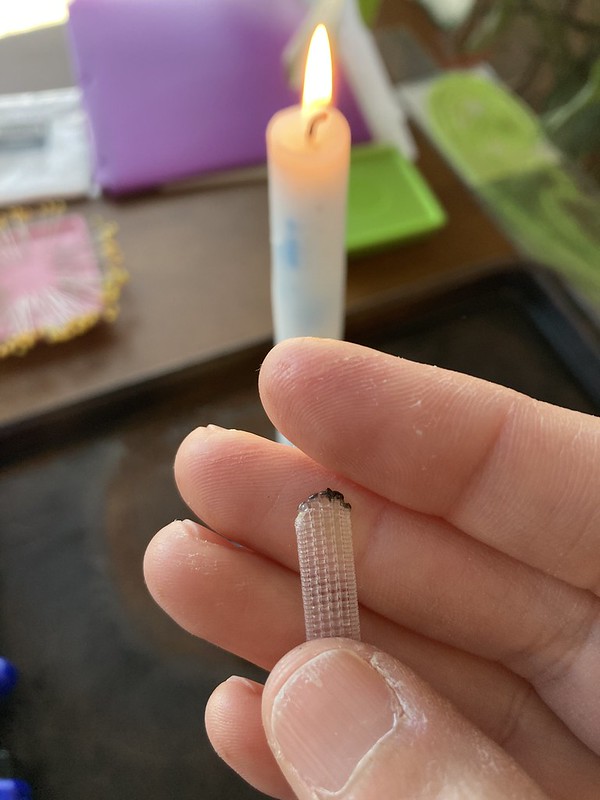
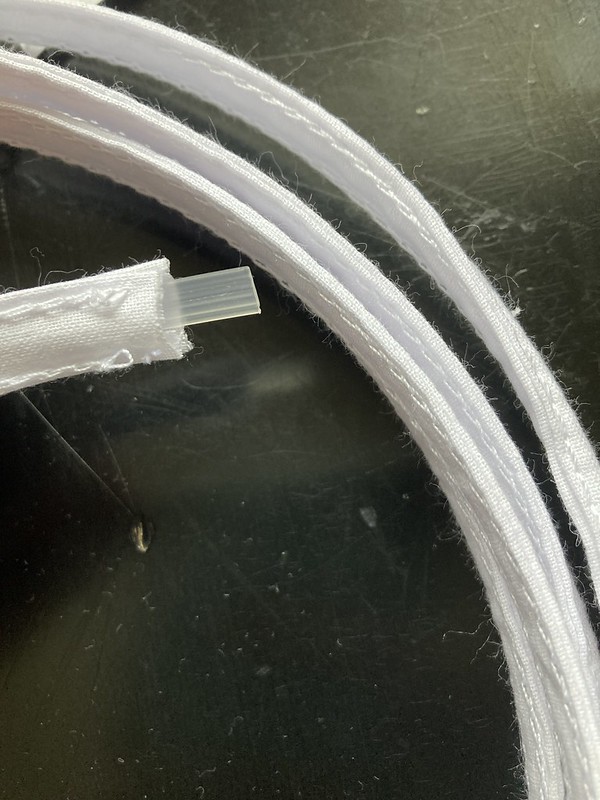
And guess what? I found my pictures of preparing the boning! This was fun! You burn the edges to make them smooth.
Before burning…
Waving it in the flame
Done!
Just stick the ends in the fire for a second, and it will melt. It takes a tiny bit of practice, but it’s pretty fun.
You can also see the layers of padding (the same thin quilt batting I used for the bust pads) and woven interfacing that go over the tips of the boning so the wearer stays comfortable and doesn’t have to deal with boning digging into her torso all night.
It gets sewn in through muslin and silk.
The muslin side–I didn’t bother to remove my basting stitches since no one will really see them.
The silk side
It takes a little practice to keep your stitching on the boning and not to slip off to the side.
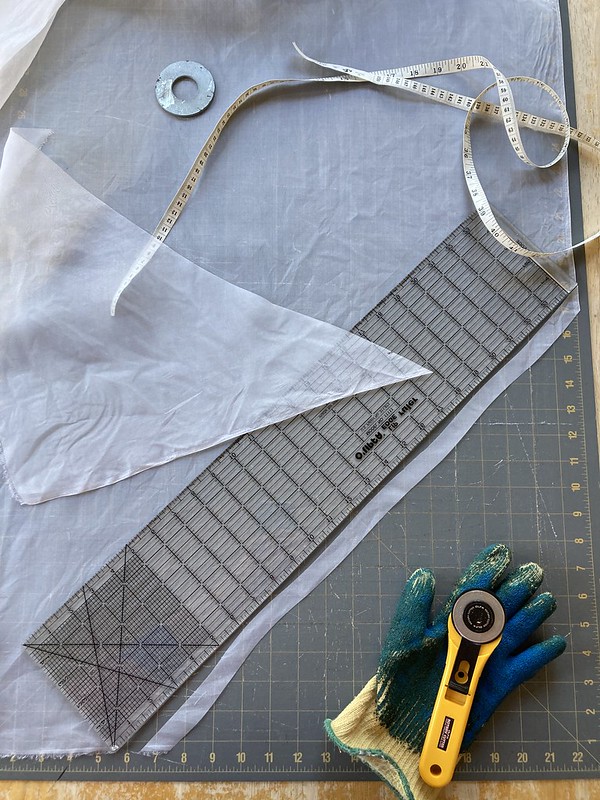
I also added a silk organza bias strip that had been stretched and ironed to the top seamline of the front to stabilize that area (as per sew-along directions).
And I serged all my pieces to give them a nice, finished look.
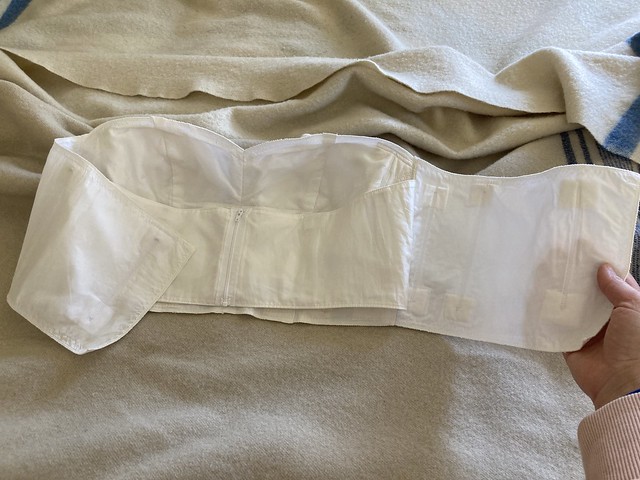
To be honest, it felt like this foundation layer took AGES. Every time I thought I was done, I had to go back in and do more. It didn’t feel methodical. I’m used to following pattern directions that move forward in a step-by-step manner, but this has been more of a back and forth. It’s just a different sort of process. And, of course, there is much more I could have done–covering the zipper more beautifully, adding some special hand embroidery, thinking through and redoing things…but at some point, you just have to move forward because there is a deadline! (Ack!)
I’m really happy with how this innermost layer looks.
We’re both happy with how it fits. We’re still not sure if it will support things in the way we hope, but we do have backup plans if the weight of the dress is more than we calculated or things just slip down.
This is post number two of the process of making my daughter a prom dress.
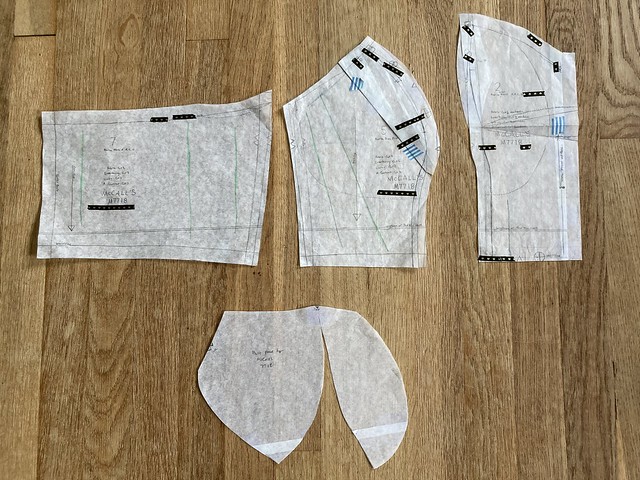
After gathering inspiration and ideas (see last week’s post), the first step was to trace out the bodice pieces of our chosen pattern, McCall’s 7718.
The main pieces of the bodice are the same for all views.
There were three: a back piece, a center front, and a side front. There were also cup sizes, which was nice. My daughter was between sizes, so I traced the larger size so that I could pinch out fabric rather than potentially having to add it in.
At this point, it was the middle of February. My plan to start at the beginning of the month was delayed because I got sick. Being sick probably helped me procrastinate since, at this point, I felt like I had no clue what I was doing. But, there’s no way to learn without getting going, so it was time to jump in. My plan was to use a sew-along for a strapless bodice with boning, padding, and an inner closure on Pattern Review rather than the directions in the pattern.
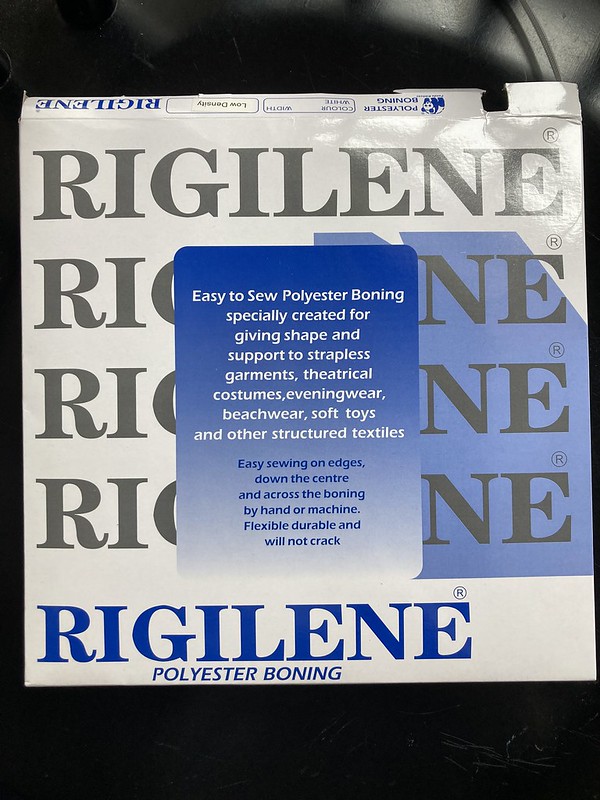
Had I even read Week One of the sew-along at that point? Probably not in depth. Once I actually started reading, I realized that what I needed was some sew-through plastic boning, called Rigilene. I was able to order a big box of 1/4″ (6mm) wide Rigilene from Wawak, which was great.
1/4″ Rigilene
Having a 50-yard box gave me the freedom to try things without worrying about running out. In a previous order, Wawak had sent me a free sample of their PROFUSE Flexible Fusible Woven, which turned out to be very fortuitous.
Once I had traced the pattern, I drew in my seam lines and tried to mark the boning positions by looking at the pictures on the sew-along. This sew-along is from 2015, so I wasn’t able to get the practice pattern or ask questions, really. I would look at pictures, read comments, and do my best to think things through when I wasn’t quite sure what to do. I’m really glad I didn’t tackle this one as a beginner.
The blue and white striped washi tape is where I planned to put boning.
I decided to keep the original 5/8″ seam allowances, rather than going down to 1/2″ as recommended. Once I had the paper pattern ready, I cut the pieces out of muslin and marked where I wanted the boning to go on the fabric. Since this was just for fitting, I didn’t sear the ends of the boning. I just basted them in by sewing right through the plastic. Then I ironed pieces of the fusible woven interfacing over the ends so it wouldn’t be uncomfortable to try on.
I don’t normally have fusible woven interfacing in my stash, so that free sample was a real gift.
Next I constructed the seams and sewed a strip of muslin cut on the straight grain into my top seam line to stabilize it. This area then got turned under so I could get an idea of how it would look, and the sewing part was done!
Before the fitting–all pretty and clean
During this time I took a little field trip to Fabric Place Basement in Natick, MA. I knew I was going to need some silk organza for the base layers, and the last place I had bought it had been out for ages, so I needed to go somewhere larger. Fabric Place Basement is (for this area) a huge fabric store that carries garment fabric, quilting cotton, and home decor fabric, plus yarn. I figured I could see if they had any potential fashion fabric for the outer layer of the dress while I bought my silk organza. I found what I needed in ivory, AND I had a coupon, which was great, because that stuff isn’t exactly cheap. I also had a great time checking everything out. I brought home lots of fabric pictures for my daughter to look at.
Back at home, I did the first fitting with my daughter, and marked and pinned that pretty fitting shell all up. The goal was to make this as close-fitting as possible while still being comfortable, in order to provide support to the dress and the body.
This shows markings after I took out all the pins and transferred my changes to the pattern.
I also attempted to mark out the shape of some bust pads which I would have to make a pattern for (as directed in the sew-along). I liked learning how to transfer my markings to my pattern. It sounds simple, but not having done a lot of close fitting, I had never really learned that. I just laid my fabric over the corresponding pattern piece, and rolled my spiky wheel tool over top of the fitting lines so it would make an impression on the paper.
You wouldn’t do that on a delicate fabric, but over muslin and tracing paper, it was great.
You can see all the little holes from where I transferred fit changes to my pattern as well as all the marking, and the covered end of some boning.
I decided I needed to test out my changes, so I made a second fitting shell. One of the things I did was to turn the center front piece into two pieces so that I could more easily make fit changes there and put in the center front dart that helps to keep this layer close-fitting. This time I practiced searing the ends of my boning with a candle flame so things would melt nice and smooth. That was pretty fun! I made trial bust pads out of a thin cotton batting from the pattern I had created so I could trial those, too. Then I basted in a separating zipper.
Fitting shell one (top) and two (bottom); “right side” view
Fitting shell one (top) and two (bottom); “wrong side” view
This second fitting shell proved that my changes had been good. I also tweaked numerous other small things at this point to get as close a fit as possible without my daughter losing the ability to move and breathe. 😉
These pattern pieces underwent a lot of changes before the fitting was just right. On the bottom is the pattern for the bust pad.
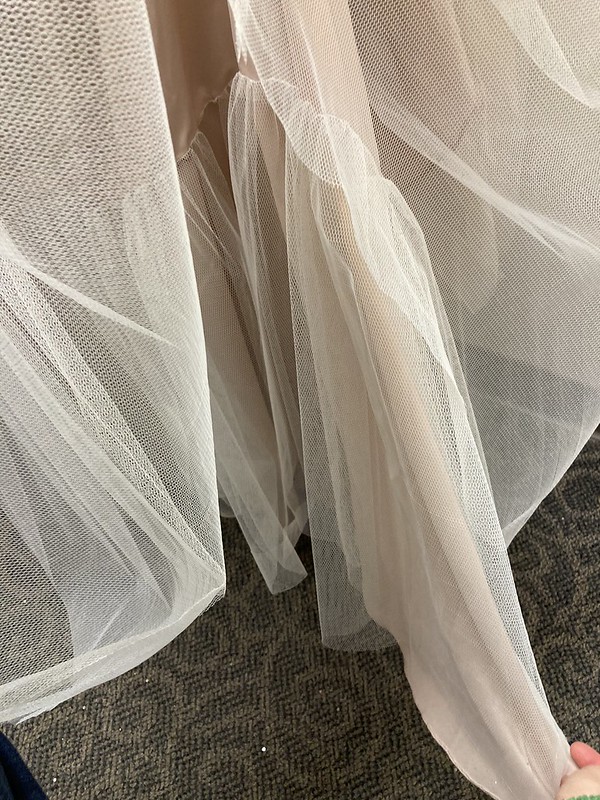
After this test, I felt like I was ready to cut the actual base layer. My plan was to cut it from two layers of muslin, so it would be strong and breathable. Somehow or other, though, I remembered or found a little bit of ivory silk lining fabric that I had in my stash. A friend’s mom, who had it left over from making her daughter’s wedding dress, gave it to me and, despite the small amount, it has come in handy on multiple occasions. I could do one layer of muslin and one layer of the silk lining to create a pretty inside. Yay! Cutting out is usually my least favorite part of sewing, but cutting out these small bodice pieces has been quite pleasant. The skirt will be another story, but we’re not there yet.
The hope is that the various layers, going from glove-fit closeness to skimming the body on the outside, will provide support for the dress as a whole and the bust, internally. If that doesn’t work, we talked about several possibilities, including adding straps if necessary.
This is a really fascinating process. It’s a real blend of best practices and intuitive problem-solving (or science and art?). If you could take away the pressure of the deadline and the detailed wishes of the client, it would be pretty fun…but it would probably also never get done.
It’s finally time to talk about the big sewing project I have been working on little by little for the past few months. I am making a prom dress for my oldest daughter! I typically don’t talk a lot about my kids on the blog. I don’t want them to look back later with embarrassment because I posted something about them when they were little that they now wish wasn’t on the internet, not to mention that there are plenty of creepers out there who don’t need to see pictures of my kids. This has proven to be a really sound decision as they have gotten older, but in this case, my daughter gave me permission to post about this project. Actually, she told me I should. 🙂
And it’s a big undertaking.
I have been hesitant to write about it because it has felt less linear than most of my other projects, where there was a more defined beginning, middle, and end. This one is often a few steps forward and one step back as we have looked for inspiration, fabric, and worked on fitting. And as any sewist knows, fitting is the most challenging part of sewing. As someone who makes a lot of clothes, I tend toward casual, everyday clothing that isn’t super close-fitting. This is not one of those projects.
What my daughter wanted was a very fitted, boned bodice, a long, swishy skirt (with pockets!), and fabric draped across the shoulders. She also wants lacing in the back.
Have you seen this dress?
Lily James as Cinderella in Kenneth Branagh’s adaptation of the fairy tale
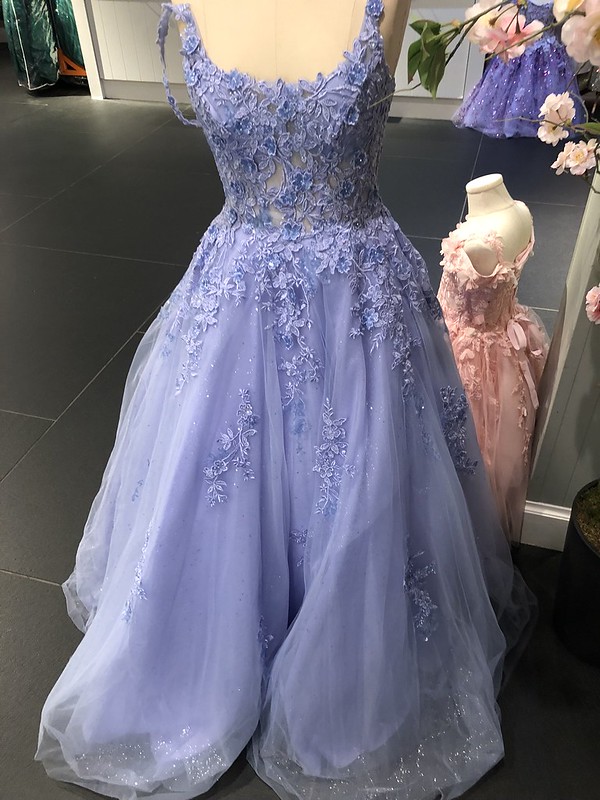
This is one of our main inspiration dresses. Who wouldn’t be inspired by such a thing of beauty?
There are other inspirational pieces as well. She likes the way the embroidery flows from the bodice onto the skirt in these dresses from Glitterati:
She also loves a general fit and flare style. I wanted her to try some dresses on just to make sure that what she liked the look of was also what she liked wearing. Glitterati was disappointing for that purpose–they often didn’t have a full size range of their individual dresses. David’s Bridal, on the other hand, was a win! They had numerous dresses in the general style she was interested in, and in a good range of sizes. We had a fun day of research where she tried on a number of options so we could get a feel for what she did and didn’t like. I also got some structural ideas for things we might want to add to the dress.
Pockets are a must–as long as I don’t forget to add them
And I checked out a lot of skirt layers to see how they worked.
Providentially, we found a giant (probably bridal) crinoline at the thrift store that should save us time and materials when it comes to those skirt layers.
I took the risk of washing it in the washer and hanging it to dry, and it came out great!
And lest you think that I just dove in, I will tell you, truthfully, that I have approached this project with fear and trembling. As a mother who loves her daughter, I want to create something that makes her feel absolutely stunning. But it’s hard not to let the fear creep in. What if I can’t get it done in time? What if, despite my best efforts, I can’t get it to fit well or look right? Numerous people have given me pep talks, including a woman I met during Pattern Review Day in Boston/Cambridge who was kind enough to e-mail me resources she had used in making her own daughter’s prom dress. In fact, she was the one who recommended the pattern we decided to use as our base: McCall’s 7718.
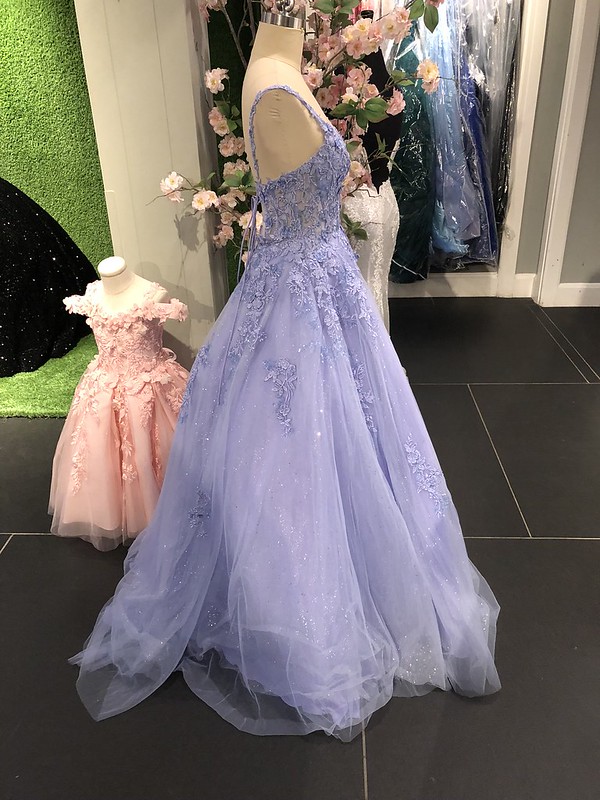
We’re thinking probably something along the lines of View C, but without the train.
Completely atypically for me, though, I am not following the instructions for this dress. After some searching, I found a sew-along in the forums on Pattern Review from 2015, where a woman who sewed bridal and formal gowns for a living detailed how to create a structured strapless bodice. She goes over boning, layers, fitting, everything to make the bodice. I could not have followed these instructions as a beginner. There are definitely times where I need to think for a day or two before moving forward, to make sure I really understand the next steps. But that sew-along is saving me and is my main guide.
Per her instructions, I am making a very fitted foundation layer based off the bodice in the pattern, followed by a middle lining layer, and then the outer fashion layer (at least I think that’s how it will all go). Despite my fear of things not turning out right, and in time, I really love learning these techniques. There’s a real blend of art and science to it all. Maybe the eleven-ish years I have put in learning to sew was all leading up to this? We’ll see, I suppose. I hope to share some of the construction process in the following weeks. I’m currently working on the last details of the innermost layer and the middle layer. So…wish me luck! More details to follow…
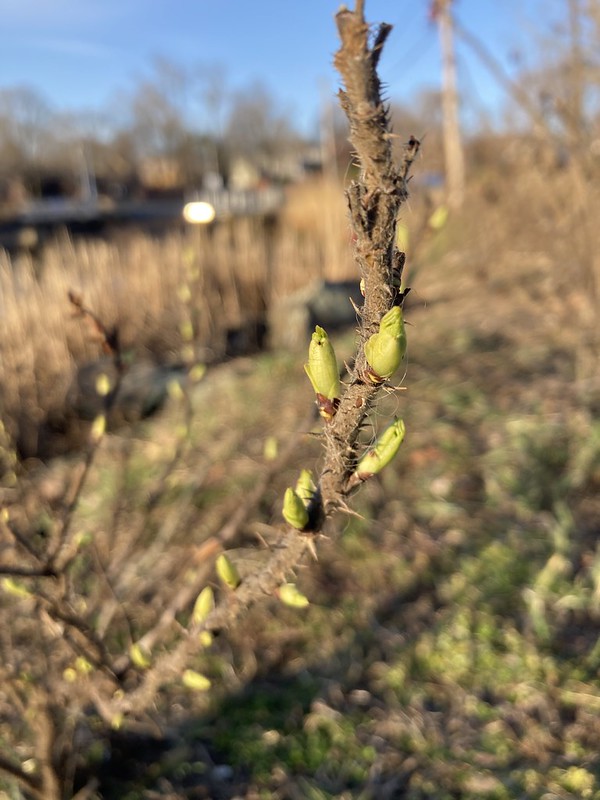
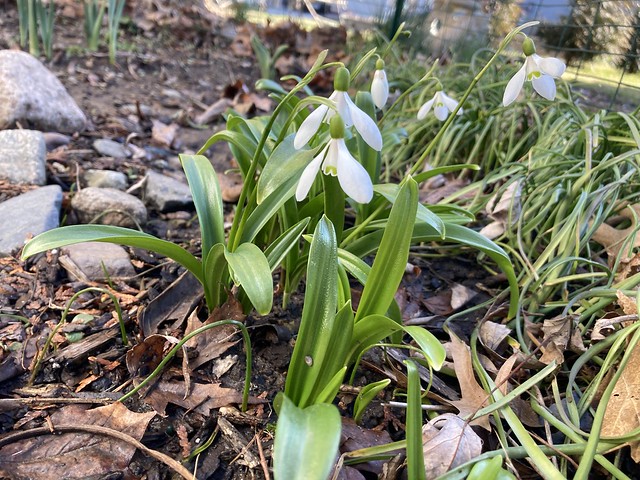
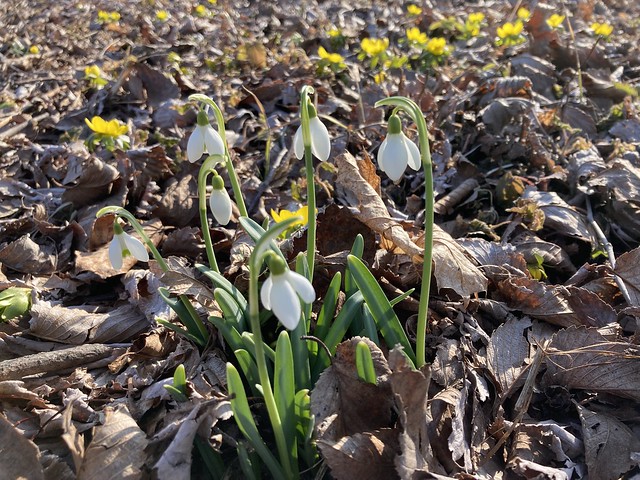
It’s time to look for signs of spring! We have had a few warmer days here and there, and then winter reasserts itself. Regardless, flowers are starting to break out of the earth and buds are inching their way into the air. Spring is here, even if its greatest herald is currently mud.
Buds of one kind and another
Snowdrops
And all the crocuses
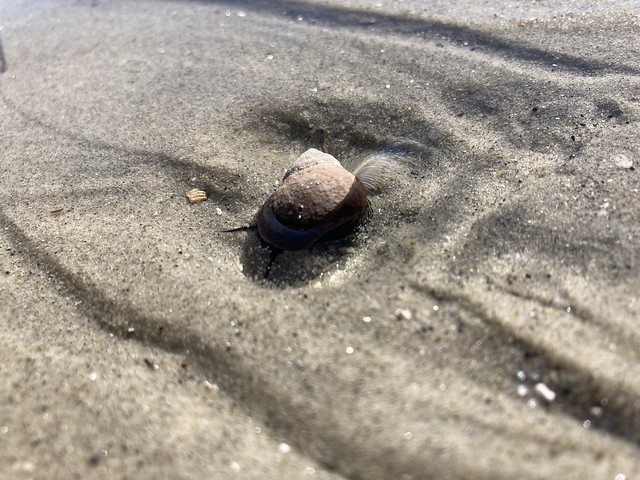
Back on the beach…
Periwinkle
Things are surely busy over here, although I’m only working on ONE sewing project at the moment! I hope to share some of the progress on my big sewing project soon–just need to get a little further first.
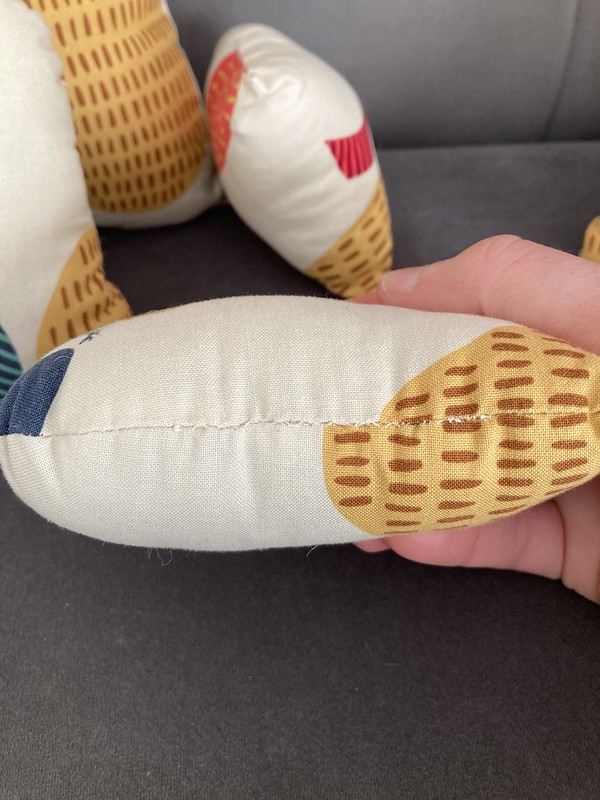
As I mentioned in another post, after I finished my modified barn jacket, I did a bit of gift sewing. I made a yellow linden leaf blanket for a friend’s new baby and I also made some cute and very easy stuffed animals for the baby’s older sibling. You don’t want to forget the older sibling!
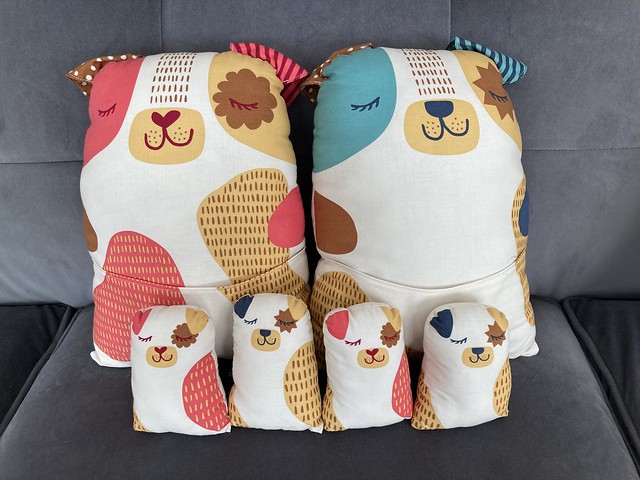
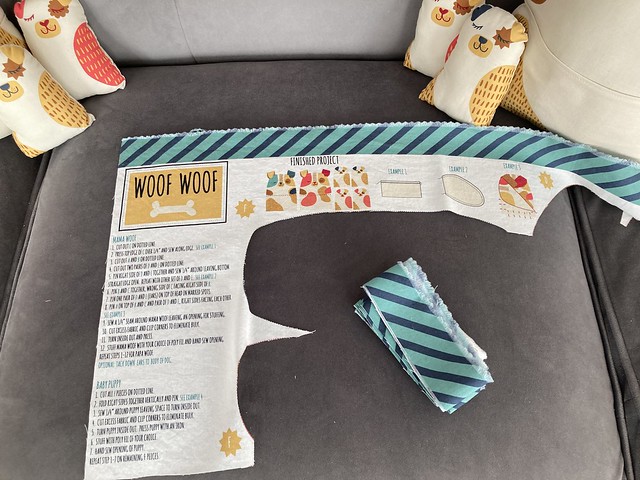
Back in October 2023, I participated in a Pattern Review Boston-Area Meetup, where we met at Gather Here, which is in Cambridge (right next to Boston). Gather Here is a fun store filled with garment sewing, quilting, knitting, and other fiber arts supplies, tools, and patterns. That was my first visit! While I was there, I bought a Woof Woof Panel of quilting cotton, designed by Stacy Iest Hsu for Moda Fabrics.
You know what? I don’t think I took a picture of it before I cut into it! Wow. That is so unlike me.
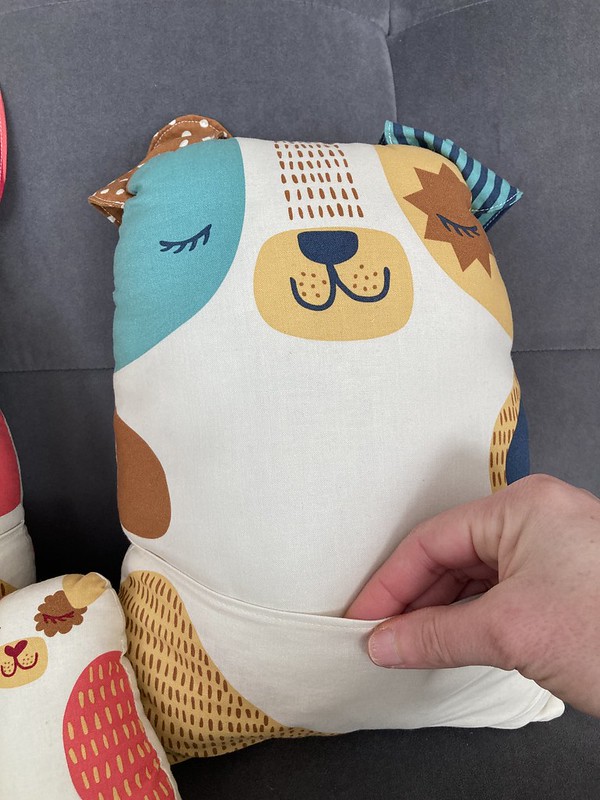
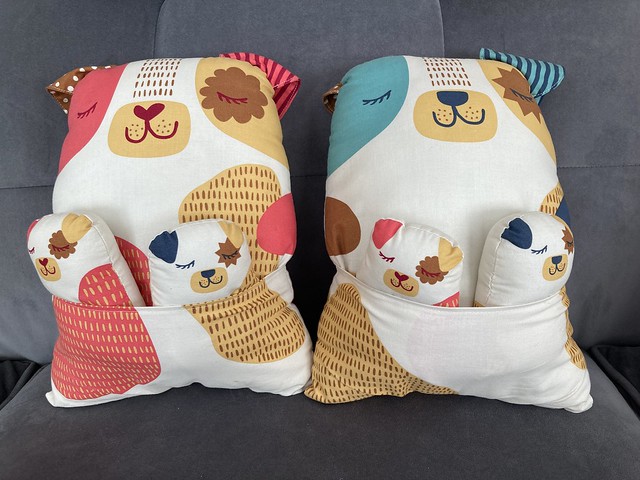
Well, let me tell you about it! This one-yard panel of fabric had fronts and backs of a mama and papa dog as well as four little puppy dogs printed on it. It also had instructions and diagrams printed on it, so that you could cut and sew these cute and simple stuffed animals with only some thread and this one yard of fabric. It looked like fun, and I bought it with the baby in mind, until deciding that it would fit an older sibling better.
What was left of the panel after sewing the dogs.
The directions were clear and easy to follow, although that didn’t stop me from sewing the dogs’ ears on inside-out the first time. Oops.
Luckily it was pretty easy to fix.
I like that they even have little printed tails.
I marked the letter of each piece on all the back sides of the fabric with a washable fabric marker. Unfortunately, when I threw them in the wash after sewing them, they came out with weird drag lines around the hand-sewn spots.
Annoying, but not something a child who is playing with them will really care about, thankfully.
The puppies fared much better. No drag lines there!
The mama and papa dog have pockets on their front sides that you can put the puppies in if you want to carry them around more easily, which is a fun detail.
It sounds like the dogs’ new owner had lots of fun playing with this cute little family, so I’m happy! It was enjoyable to make a different kind of project than I usually do and have it find an appreciative audience. Mission accomplished!
On the very day I finished my big jacket project, January 31, 2024, I managed to crank out one baby gift and start another! You see, I had promised my daughter I would start on a BIG (and nerve-wracking) project for her, but not until February, after I was finished with the jacket. And I was hoping I could squeeze two quick and easy baby presents in between.
One of our family friends had a new little baby and also has an older child, so I wanted to make them both a little something. First up was one of my favorite quick and fun projects, a large leaf blanket! This pattern comes from Twig + Tale in New Zealand. They have released numerous leaf blanket pattern collections, each with several leaf shapes that you can make in sizes large and small. I have three of the collections, and I love making them–they are fast, there is no fitting involved, they’re great scrap busters, and it really does look like a leaf when it’s done! This delights me every time.
I decided to make the Large Linden Leaf Blanket, because I haven’t made that one yet, and Google told me lindens turn yellow or gold in the fall, which gave me some good color direction.
While some of my leaf blankets have been stash or scrap busters, I wanted to buy plain quilting cotton in natural colors for this, since it is a gift, and the baby’s mom and dad are big nature-lovers.
I chose my fabric when I was at Pintuck & Purl in North Hampton, NH, picking up my sewing machine from being serviced. I chose 1.5 yards each of Kona cotton in “Banana Pepper” and “Curry”. I still had some Pellon Natural Cotton Batting from Joann in my stash at home–not that I realized that at the time, but I do try to keep some for leaf blankets, since I have made numerous ones for numerous people.
I did end up picking up some matching thread when I was at Joann’s since after checking my thread stash, I could see that I might run out of matching colors.
And so, the very day I finished my jacket, I got started on this. I had already printed and taped the pattern together while watching TV one night, so I just had to lay out my fabric on the floor, right sides together with my batting on top, and I could cut out everything in one fell swoop, just as I was going to sew it.
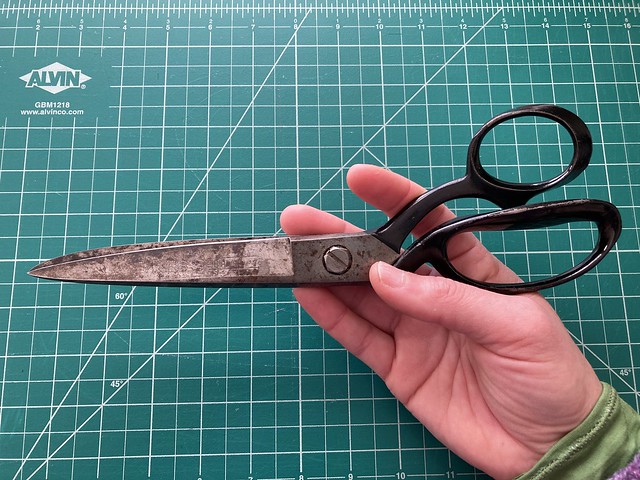
I’m a big rotary cutter fan, but for this, I pinned my pattern to my fabric layers and got out my giant, 10.5″-long vintage Wiss scissors. They are wonderfully sharp (thanks to Gordon’s in Beverly, MA), and really fun to use.
I think I found these at an estate sale or something similar.
Even though I have made these blankets several times now, I got out the directions to remind me of when and where to clip my seam allowances. Once prepped, I sew the layers together, leaving an opening for turning, and then flip everything right-sides-out. I push out all the leaf points to get them as pointy as possible, just using a chopstick or mechanical pencil without the lead sticking out. Then, rather than hand-sewing the opening shut, I topstitch around the edge, which closes the opening for me, and looks really nice.
Using sewing chalk, I look at the pattern, eyeball the leaf veins, and draw them onto my blanket. I don’t do any careful or exact transfer method. I find I can get it close enough that I’m happy by just looking at the pattern.
I use quilting (bent) safety pins to pin-baste the blanket and then stitch down the central spine. I nearly always have my walking foot on my machine, so I definitely use that, and I usually like to use the thread that matches the bottom on the top, and the thread that matches the top in my bobbin for some nice contrast. I sort of work from the middle out when sewing down the leaf vein lines. It doesn’t take long until I am done!
Bright yellow side (“Banana Pepper”?)
Once finished quilting, I take out the safety pins, and then throw the leaf blanket in the wash to get rid of the chalk and fluff and crinkle things up. I always prewash my fabric without fabric softener before starting a project, and I find that you still get some of that satisfying crinkle on the leaf blankets that are in quilting cotton, even with that. I know some quilters wash after finishing to heighten that effect rather than prewashing, but I don’t think I can bring myself to start a project without prewashing my fabric. I just don’t want to do it. I am a dyed-in-the-wool prewasher. :)
Golden yellow side (“Curry”?)
The linden leaf blanket was finished super fast! That very night! It was such a gratifying project and a great palate-cleanser between some large projects. I even managed to start on a little present for the baby’s older sibling, but more on that later…
I know a leaf blanket might not seem to be the most practical of blankets for a baby, and you could definitely argue that, but my hope is that this will not only be used as a blanket, but also as a play mat, a decoration, maybe a rug, or a little mat to sit on as the baby gets older. I sleep with the warmest one I made most nights in the winter since I sometimes get cold only on my shoulders. They make great lap blankets, too. Anyway, I hope the baby (and, really, the baby’s parents) like this new leaf blanket for their sweet little one. :)
Here is a project that I wasn’t planning on making…but I’m so glad I did! Someone I met at the Pattern Review Weekend in Lowell, MA last June invited me to join her and a few others in a coat sew-along. It’s been one of my goals since chucking Instagram to meet more sewing and knitting people in real life, so after thinking it over, I decided to go for it.
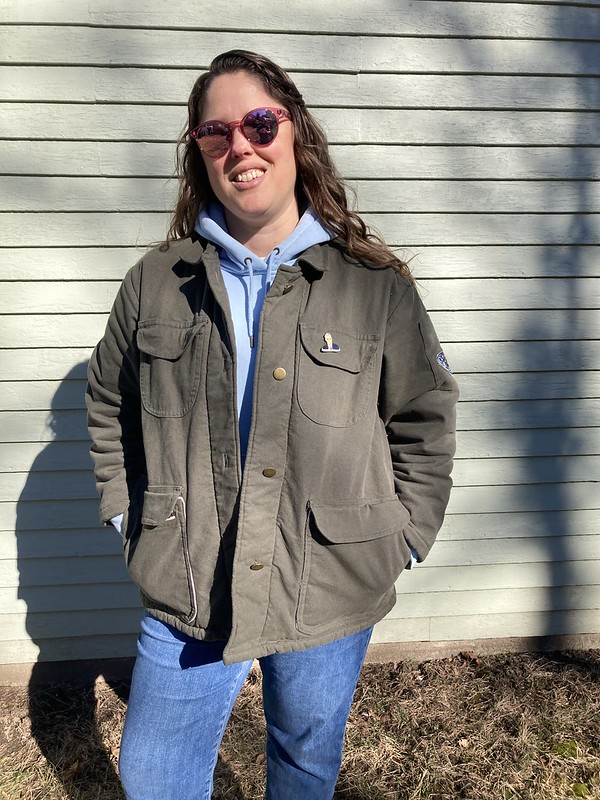
What to sew was the question. Of course, with every new project, there is so much potential. I went down a major Pinterest path. What could I do to make the best coat EVER?! I could transform a wool blanket, I could include many super cool, AMAZING details I had saved as ideas… I really got into the planning! In the end, I came up with a much more pedestrian idea that I could add some nice extra details to: the humble barn jacket.
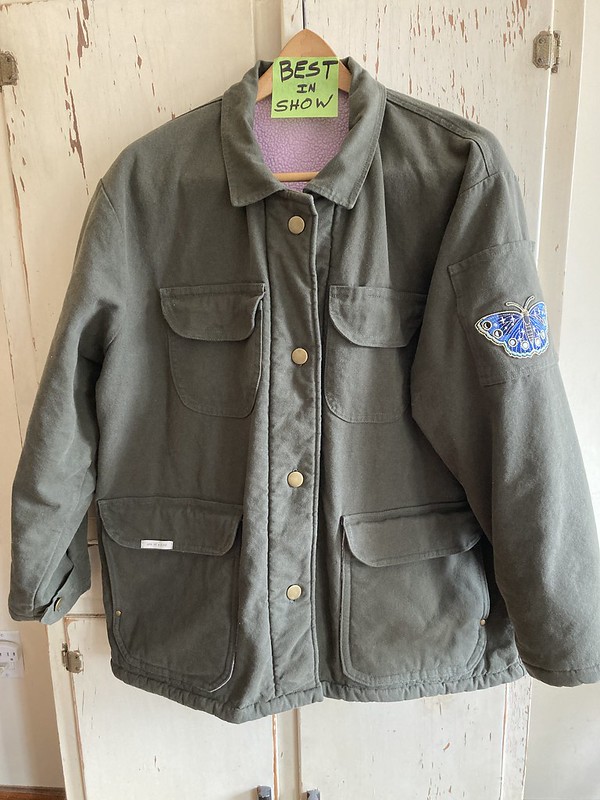
My husband awarded me Best in Show. Aww!!!
The Green Pepper, a pattern company I have used before and like, has pattern #537, the Frenchglen Barn Jacket, with some great hip pockets and the option to line your jacket, so that seemed like a good base.
You may not be surprised, considering what you just read, when I tell you that once I decided on a barn jacket after turning my gaze away from wool blanket coats, I decided to make this THE BEST BARN JACKET EVER! Yep, I went nuts on this idea, too. All the pockets! All the details! I compared my pattern to my favorite vintage men’s Woolrich hunting coat that I thrifted and a Dickies work jacket that I also thrifted, and my beloved wool shirt jacket that I thrifted and embellished. Ah…the planning stage is the best! All the possibilities are before you, just waiting to overwhelm you with their glory.
After indulging my planning love, I edited my ideas down. And in the end, I made a fairly normal looking jacket. Haha. So much for taking the fashion world by storm. :) That being said, there are some little details and surprising elements that I am really proud of and that keep the coat from being way too normal to suit me. I can buy normal, but I rarely want to sew it.
The goal for this project was to have it finished by January 31, 2024 so that we could actually wear our coats/jackets during the colder months. In order to accomplish this, I sat down with a cup of coffee and planned out a tentative schedule for myself, week by week, with what I wanted to accomplish. Normally I just let my sewing happen as I have time and energy, but that often means that projects drag on beyond the season they are meant for. I really wanted to try to make this deadline.
The Pattern
I bought my pattern from Field’s Fabrics on Etsy, which had cheaper shipping than ordering directly from the store. This is a unisex pattern, and my measurements put me in a size large for the bust, large/extra large for the waist, and extra large for the hip. I chose to use the square collar. In an absolutely uncharacteristic move, I made a muslin out of old sheets. I wanted to make sure my jacket would fit over other layers like sweaters, so that is how I tried on my muslin. It was pretty good. I definitely could have made it in that size, but I had a few questions. Should I lengthen the sleeves? Did I need a broad back adjustment? How about a forward shoulder adjustment?
Even more uncharacteristically, I made a second muslin in a straight extra large. I blame the fact that I was in a sewing group–didn’t want to be too much of a slacker! ;) Amazingly, the extra large took care of a lot of my fit issues. It didn’t look as fitted, but I no longer felt I needed a broad back adjustment or that a forward shoulder adjustment would make a huge difference. And the sleeves only needed maybe 1/2″ more length.
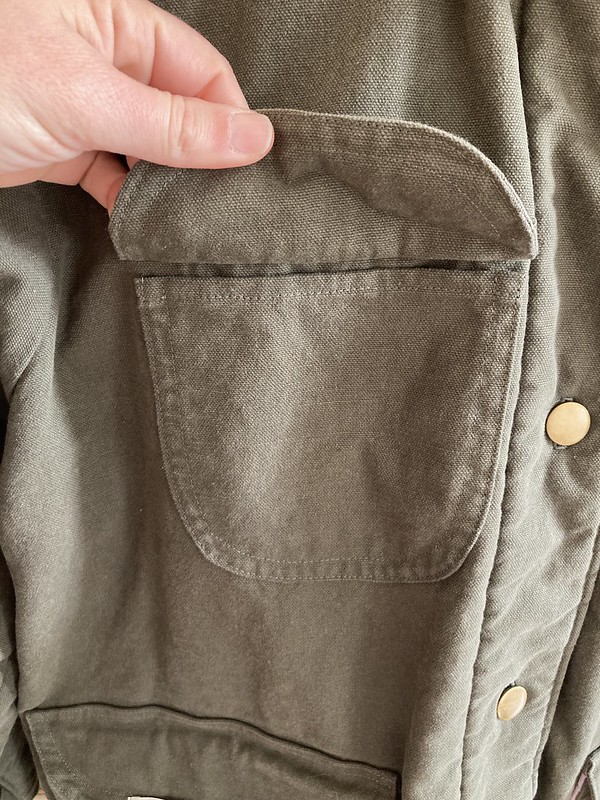
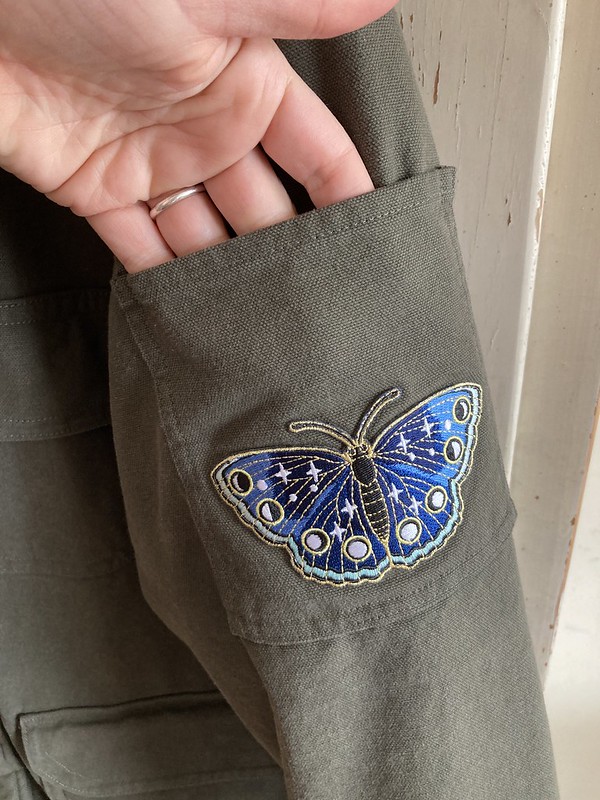
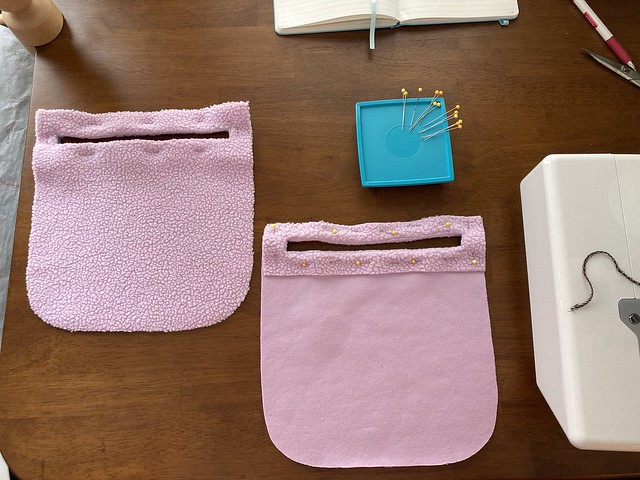
Then it was time to edit my plans for extra details. I soon nixed the idea of an interior chest pocket. The pattern came with great double pockets both inside and out at hip level, so I didn’t feel like I needed another interior pocket, and I didn’t want to weigh my fleece lining down too much. I settled on adding two outer chest pockets with flaps and a sleeve pocket.
Chest pocket
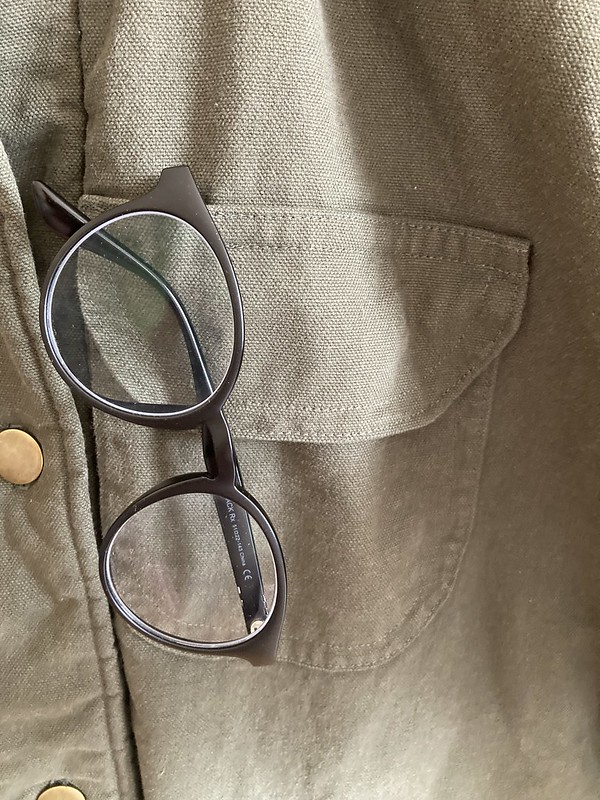
I wanted a little opening in the flap of one of the chest pockets so I could slide in the arm of my glasses or a pen or pencil.
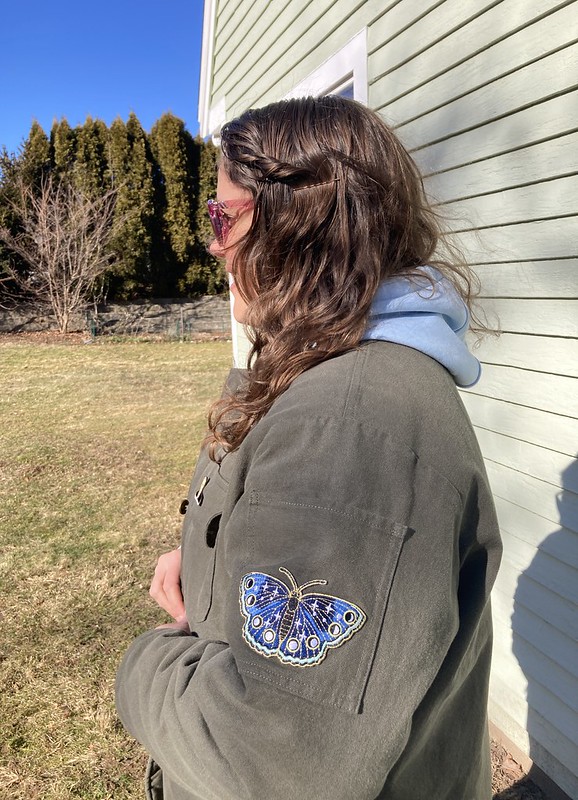
I have this feature on my thrifted wool shirt, and it’s great. I was also hoping to use an embroidered butterfly patch I had been saving for just the right project.
The Fabric
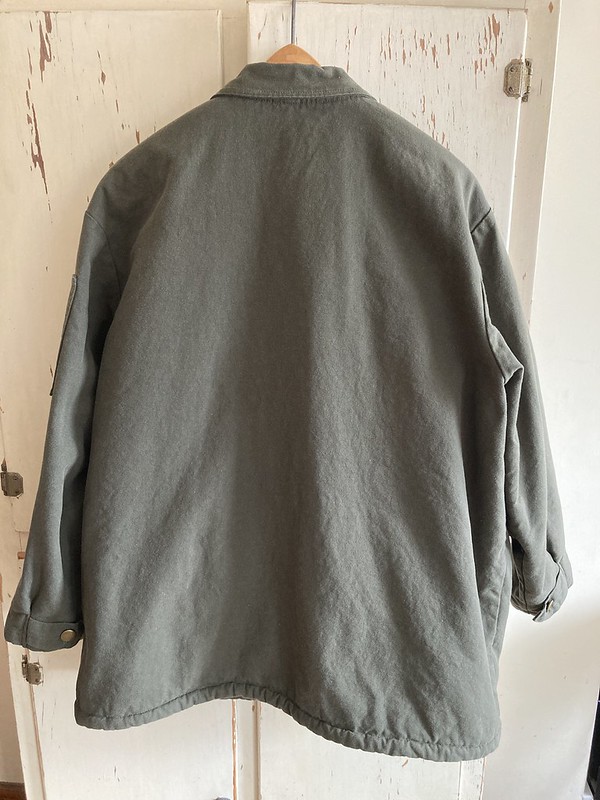
For my outer fabric, I chose some dark olive green cotton duck canvas from Big Duck Canvas, an online store I have ordered from before. I like olive green–it goes with a lot, but isn’t the same color as most denim, so there is good contrast when I am wearing jeans. I think I ordered three yards of this fabric, which was 58″ wide and 10 oz./yard. It washed and dried great, without the color loss that I sometimes see in cotton canvas.
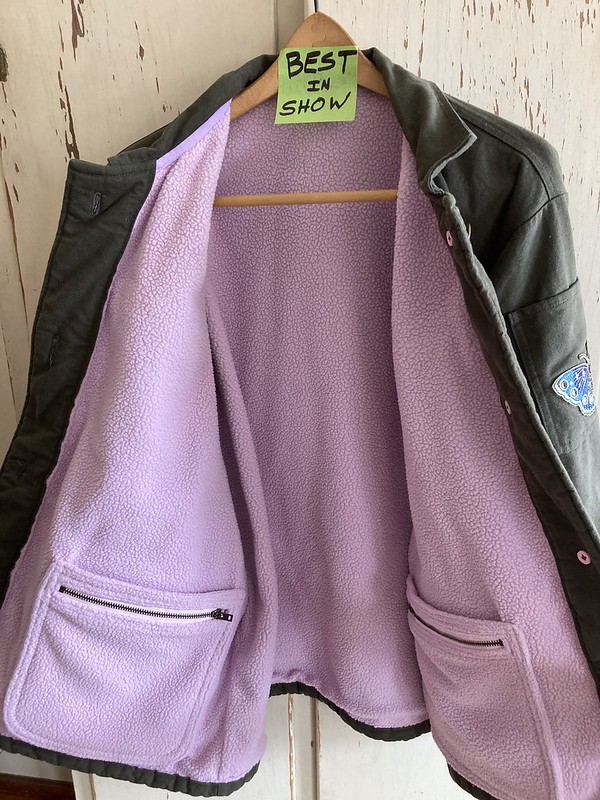
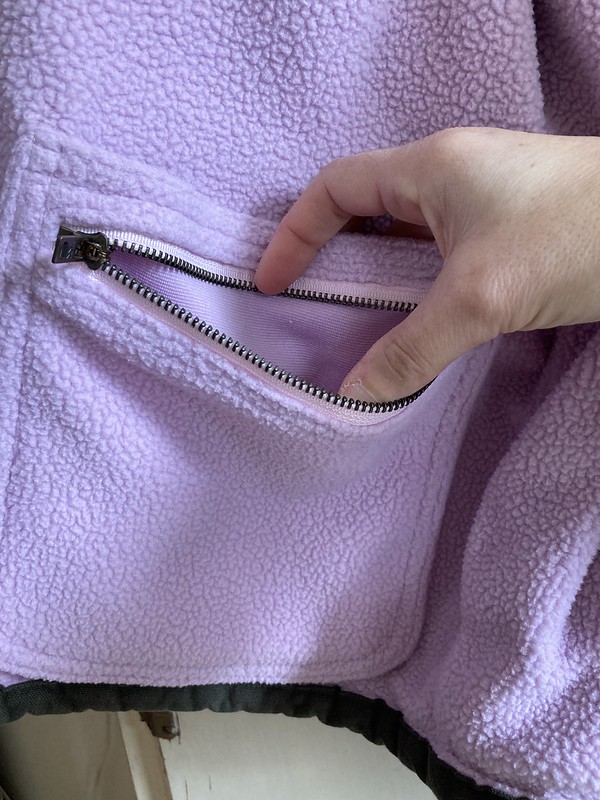
My lining is a Polartec ThermalPro Shearling Jersey lining fabric from Mill Yardage in NH. I really like olive green and pink, and this fabric straddles the line between a pink and light purple. I also like green and purple, so it was a win. The idea of a fun-colored lining in an otherwise utilitarian-looking jacket was so appealing! In fact, seeing this fabric on sale is part of what got me thinking about different coat options from what I had first considered.
Unfortunately, shipping such a bulky fabric has gotten pretty cost prohibitive, but luckily this place was within driving distance from where I live. My husband offered to buy it for me for a Christmas present, and I happily took him up on it and told him I would drive to pick it up. While I ordered my canvas and pattern in November and had started planning before Christmas, I knew I wouldn’t start sewing until after Christmas, so this worked out really well.
While I very briefly thought about using a more slippery fabric in the sleeves of the jacket, I didn’t consider it for long. My Woolrich hunting coat is lined entirely in flannel, and I never have trouble getting it on. Similarly, I sometimes wear fleece zip-up jackets over my sweaters, and I have no problems getting them on, so I was pretty sure I didn’t have to worry.
Notions and Extras
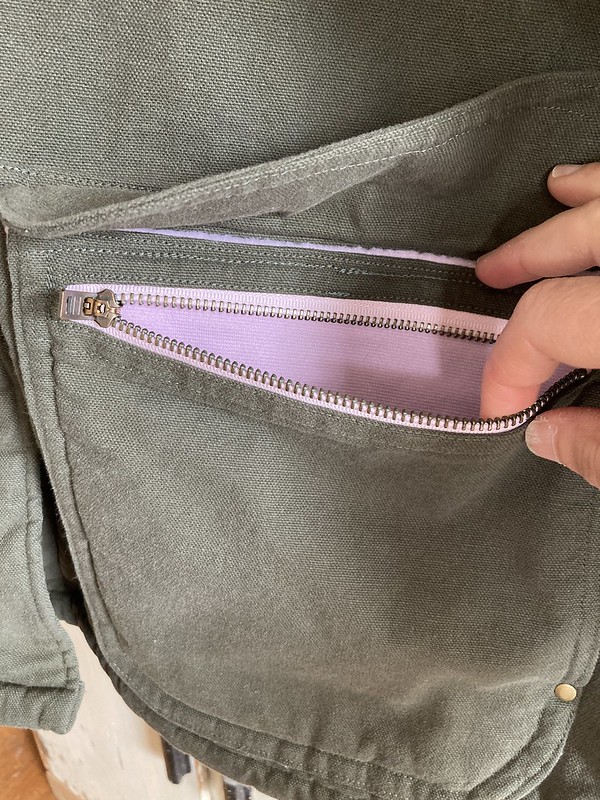
I really wanted all my hardware to match. I have noticed that some of the ready-to-wear clothing and bags that I like and find most striking stand out because of good details and good hardware, which means matching metal parts! I was hoping for zippers with colored zipper tape to coordinate with my lining and a metal color that would work with whatever I found for front closures. Wawak had zippers in the size I needed in a pink that would look good with my lining, and I really liked the antique brass metal option.
Buttons were my front closure of choice since they would be easy to replace if lost and would be easy to install. I didn’t want to have to worry about messing up when putting in snaps or jeans tacks or having them rip out down the line. It’s not like this is a huge problem that I regularly battle, but I was trying to think not only of problems while installing my front closures, but also being able to keep my coat in repair over the long haul. Luckily, I found some antique brass metal shank buttons from kabooco on Etsy that matched with the antique brass metal of my zippers. I even had some 5/16″ antique brass rivets that I had bought from Wawak when I was making my MidnightSUN bag. Yes!!! Total coordination!
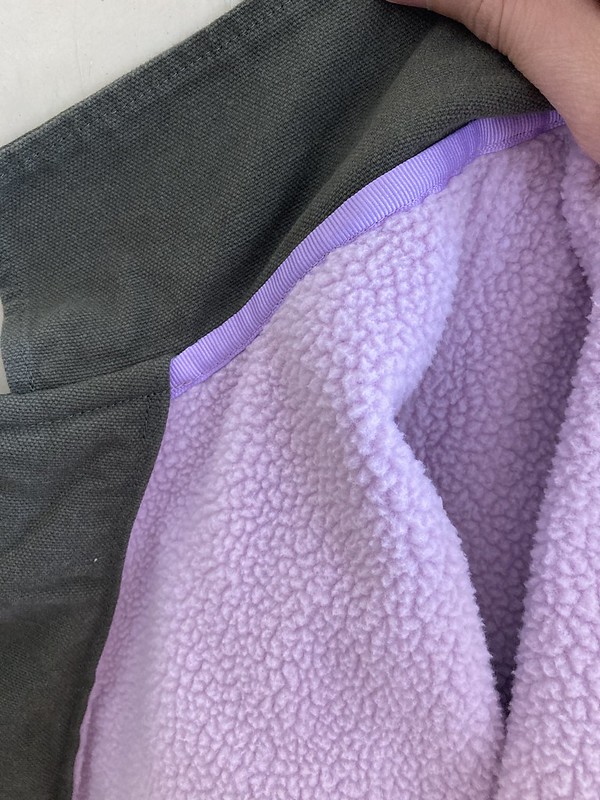
For the ribbon to finish the inside neck edge and create a hanging loop, I found a light purple grosgrain at Joann’s that looked great with the pink/purple lining that I had.
Look how nice and clean that finish is! I even switched out my thread to match when I was sewing on the ribbon versus the canvas.
Unfortunately my grosgrain ribbon was 5/8″ instead of the 3/4″ they called for. If you are making this and run into that problem, erring on the side of wider is probably better than narrower. I could easily have used a 1″ ribbon to finish the neck. In order to get my 5/8″ ribbon to work, I offset it by 1/8″ so it would be low enough to cover things and I only barely made it. I suppose you don’t want it too wide for the hanging loop, but that’s an easier problem to solve.
My hope for the Velcro on the sleeves was that I could replace it with buttons. It seemed like those would look nicer and last longer.
Pattern Manipulation
As I mentioned before, most of my fitting issues ended up not being issues, although I did lengthen my sleeves by 1/2″. This was surprising, because it’s not a normal adjustment for me, but I’m glad I did it. They came out to be the perfect length. You’ll have to take my word for it, though, because I apparently forgot to take a picture of that. Oops!
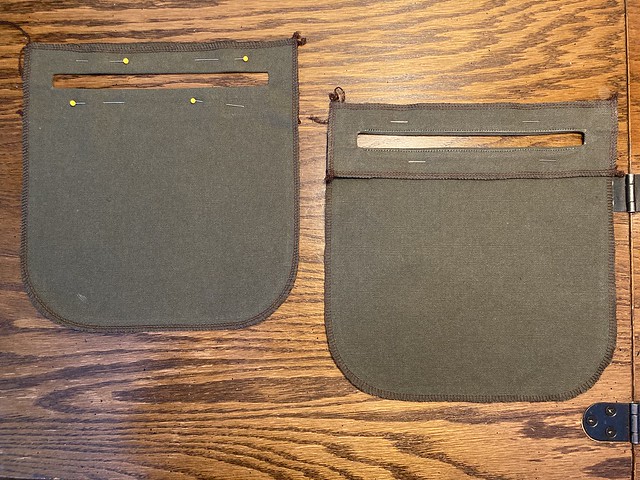
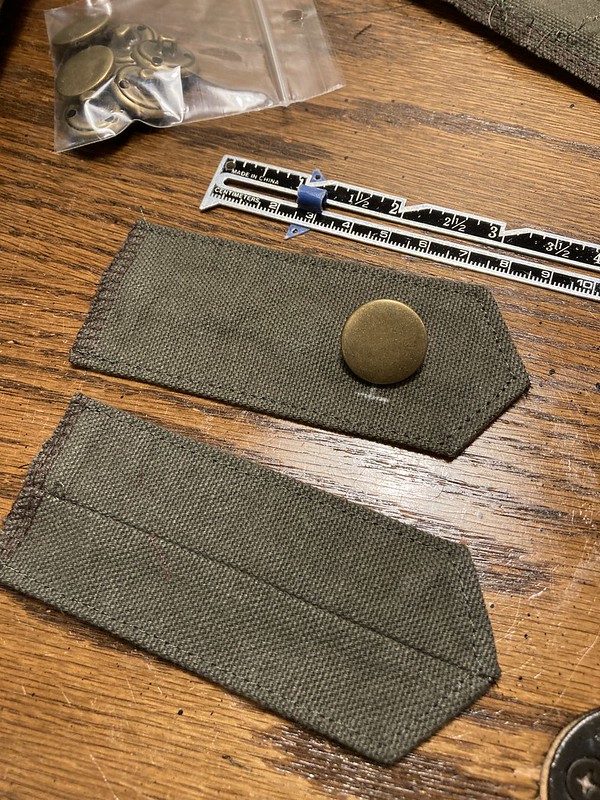
To make my chest pockets, I took the suggestion of one of the members of the group, and made smaller versions of my hip pockets. I traced an extra set of pattern pieces, cut them in half vertically and overlapped them, taped them, and then cut them horizontally and overlapped and taped them.
Once I liked how they looked, I traced new pocket pattern pieces from the taped up bits. I did the same sort of thing with the pocket flaps, although they didn’t need to shrink as much. I also drew myself out a little patch pocket for my sleeve.
I had to recut my pocket flaps and my patch pocket once I started sewing because they weren’t quite right. I had made the flaps too short and the patch pocket too narrow to put the butterfly patch on. Once I start sewing, I confess I hate going back and re-cutting anything, but these were small fixes, and I made myself do it because I knew I would be happy with the results.
I’m not really sure why I didn’t sew that in the middle of the pocket, but oh, well!Too late now!
Cutting and Sewing
I finally cut my outer layer on January 10. From there, I just kept cutting when I had time until it was finished. On the 17th, I marked all my pieces as instructed, and started serging edges the next day. Then it was on to sewing! Finally! When sewing just canvas, I used a universal 80/12 needle and when sewing only fleece, I used a ballpoint 80/12. When it was both fabrics together, I used the universal.
At that point, I actually did sew pockets for days. There was some very dodgy topstitching during construction. Sometimes it was me–I didn’t do a perfect job, but decided I could live with it. Sometimes it was trying to sew some very tricky fabric layers. And sometimes it was that there just wasn’t enough space for all the topstitching within the given area. The nice thing about sewing for yourself, though, is that you get to decide how much imperfection you can live with, and I would usually rather have some imperfection within a finished garment than a “perfect” garment that never gets finished because you are using your seam ripper more than your sewing machine. I also realized that once I had everything sewn together and wasn’t looking at it all so closely, I wouldn’t think about it any more (and that has proven true!).
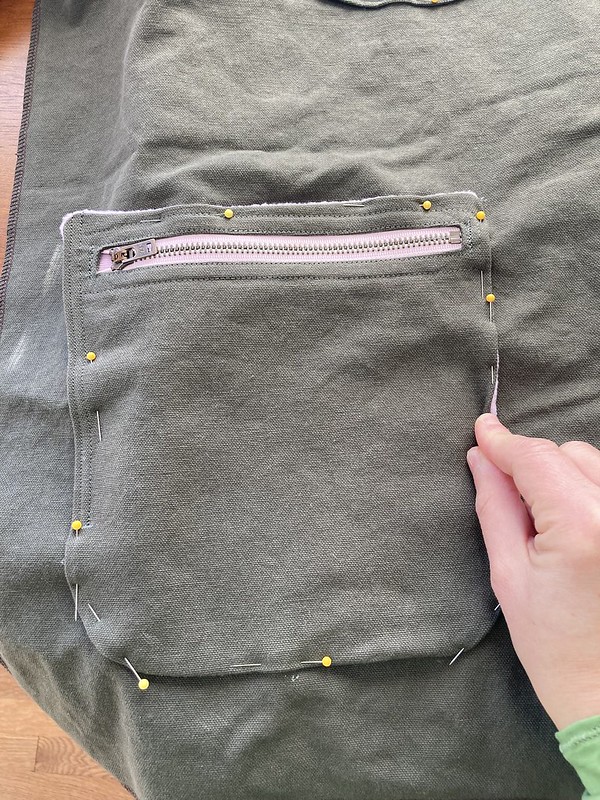
On the zipper pockets, I didn’t love the idea of my zipper facings being all fleece. I wanted to follow the directions as given because The Green Pepper’s instructions have been generally trustworthy, but this seemed like too much bulk, so I used canvas zipper facings for the outer canvas pockets and fleece zipper facings for the inner fleece pockets.
It was very tricky to hide my lining fabric underneath my outer hip pockets when sewing those to the outside of the coat. I actually preferred to have it show and would have made it more obvious except that I was worried about the fleece getting dirty over time. I love fleece, but once the lighter colors get dirty, it’s hard to get those stains out. I sort of ended up somewhere in the middle with the fleece just barely peeking out.
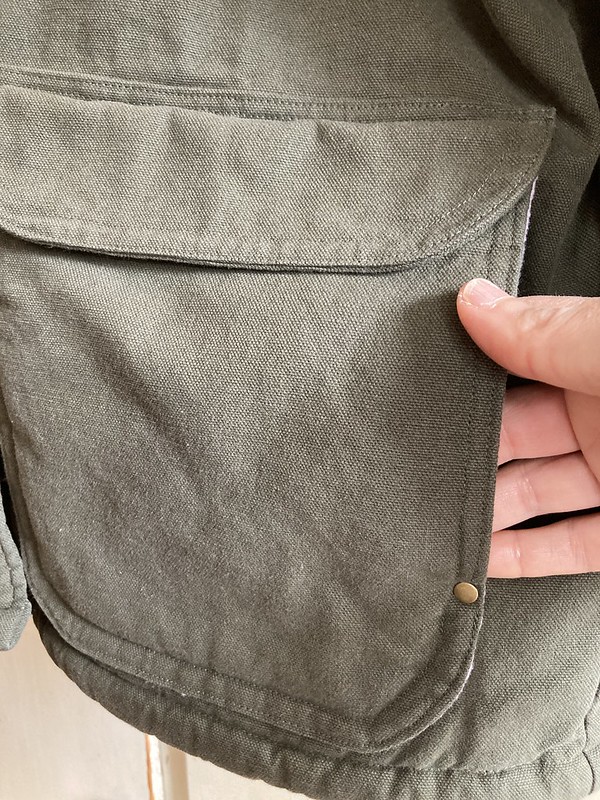
One of my favorite tiny details was adding the rivets below the handwarmer pocket openings on the outside instead of sewing bartacks. I know it’s small, but it looks so nice and professional to me. It makes me glad I have a bunch of rivets left from that bag project! It was hard, but I resisted the urge to put rivets all over. Oh, it was so tempting…
I worked on those dang pockets for nearly a week! I really couldn’t believe it! Now that it’s done, though, it seems worth it. I love all my amazing pockets. The outer and inner hip pockets have zippers, and the outer ones also have side-entry handwarmer pockets behind the zipper pocket. The inner hip pockets have top-opening pockets behind the zipper pockets. Love them!
With a week left to go, I got busy attaching my lining to my outer fabric. While I was happy not to constantly have to trim my excess seam allowances, using the prescribed 3/8″ and often 1/4″ seam allowances was not always easy or fun. I think, for ease of sewing, wider seam allowances might have been better, if for nothing else than to provide a more level sewing surface when joining bulky layers.
There was also a weird part with the collar. To make the collar, you cut two identical pattern pieces, sew them together, leaving the neck edge open, and then sort of make one layer stick out further at the neck edge in hopes it will help the collar roll the right way, but at that point, you’ve already topstitched the outer edges. I don’t know much about drafting and I just typically follow instructions for collar installation, but that seemed kind of weird to me. Why not make two different pattern pieces, or trim one down slightly before sewing or wait to topstitch until you have extended the undercollar? I also wonder if the collar could be a slightly different shape. It’s a rectangle, and canvas is fairly moldable, but I do feel like I am always smoothing out the fold on the finished collar. It’s fine, but I bet it could be better.
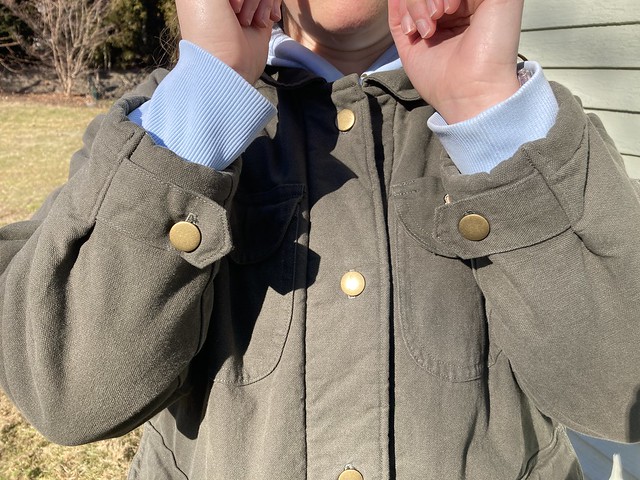
As for my sleeves, I did manage to substitute buttons for the Velcro on the sleeve tabs.
My buttonholes had to go perpendicular to the long edge of the sleeve tab because there is a seam hidden in the back of the tabs, and I didn’t want to sew buttonholes in line with that seam.
If I were doing this again, I would maybe move my sleeve tabs to a more visible place, since mine are more for show, but they are fine. Honestly, once they were done, I just didn’t feel like going back in and trying to move them.
Also, it is absolutely ridiculous to expect a home sewing machine to easily go through all the layers to sew down the pleat on the sleeve. You don’t want to skip this, because it hides the end of the sleeve tab, but it’s really bulky. I used the handwheel to walk my machine through that. It was not my best sewing, but I got through it without breaking a needle or my machine!
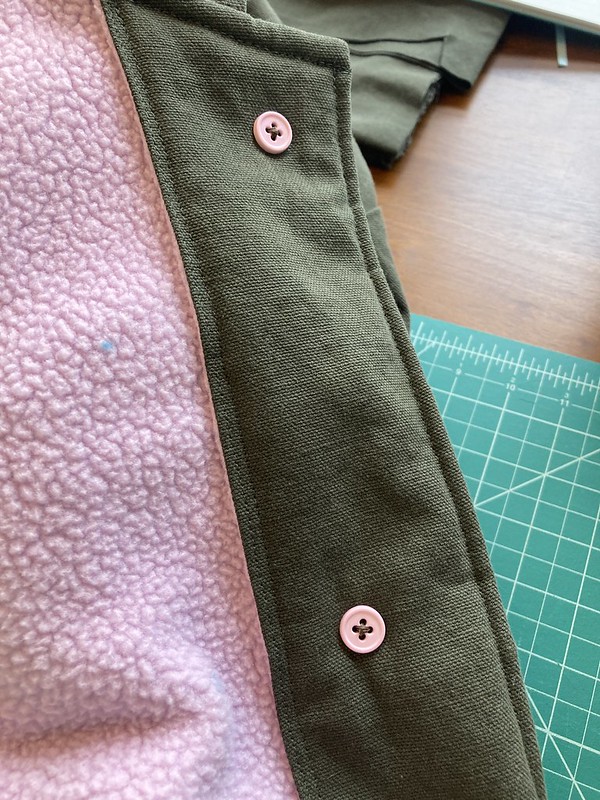
I sewed down the facings in the front because I hate having facings flapping around or partially open. I just imagine lint building up in the edges after years of wearing and washing the garment. I also opted to try using small buttons behind my main ones for added strength. I just happed to have some pink ones in my stash. I don’t think I have ever done it before, but I saw one of the women in the group put them on a cardigan she knitted and it seemed smart, so I wanted to try it out.
I wonder if it would have been a good idea to trim out some of the lining from the facings and hems. You really just keep them all as one and fold them up, which lends a nice squishiness to those areas, but it also seems kind of like overkill. Maybe you could trim out half of it, so it would just be two layers of canvas and one of fleece. And maybe there is something to be said for taking even generally solid instructions with a grain of salt.
On January 31st, I finished my last bits of sewing. I barely had enough thread to finish!
I added a label to an outer pocket hip flap, and then I threw my jacket in the washer and dryer.
Just like knitters wash and dry their garments before declaring them finished, I really like to wash off all the sewing marker and chalk in a sewn garment.
Final Thoughts
My assessment of this project is: solid construction with some dodgy topstitching. Hahaha. I love it. This has the warmth and feel or a really sturdy insulated shirt jacket.
While I wouldn’t expect it to keep me warm with a below zero wind chill, it’s great when the temperatures are around freezing and above. It helps that I can layer sweaters and sweatshirts underneath. I like that it’s fairly lightweight and very cozy, and the pockets are so, so awesome.
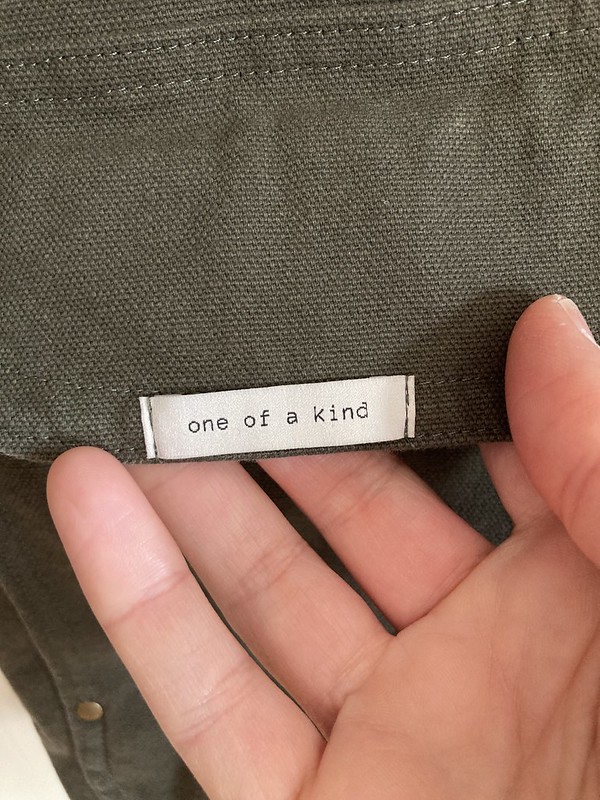
I never notice the crazy topstitching areas, and I love the butterfly patch, the “one of a kind” label from Kylie and the Machine, and the fact that even though it looks fairly normal on the outside, it has a brightly-colored lining on the inside.
It’s just possible that I have been wearing it for the past week, and telling people that I made it, even people that I don’t know that well. I’m so excited to have finished it, and my sewing enthusiasm knows few bounds. I won’t say no bounds. I’m sure there are boundaries somewhere. But not in wearing what I have made. :D
I’m so thankful that I was invited to participate in this group, or I never would have made this jacket. After all my years of thrifting jackets that *almost* fit, it’s really nice to have a slightly longer jacket that does fit.
Time for a roundup of some accessories I have knitted over the past little while! My favorite things to knit *at the moment* are sweaters, hats, and cowls, but this time I expanded just a tiny bit and tried out a headband and some mittens along with my seemingly ever-present hat project. Let’s dive in!
Yarn: Yates Farm Yarn from Yates Farm in Vermont, no longer available as I purchased it, but I think Wool on Wheels may be the next generation. 100% Shetland wool, worsted weight, although I think it knits more like an aran or bulky (but I’m a loose knitter).
Needles: US 10 and US 6
Gauge: I didn’t do one!
Size: 1; I would have been a size 2, maybe, but as a loose knitter, it seemed best to go down a size
Date knitted: March 19, 2022 to April 10, 2022; the second mitten only took me three days, from April 7 to April 10
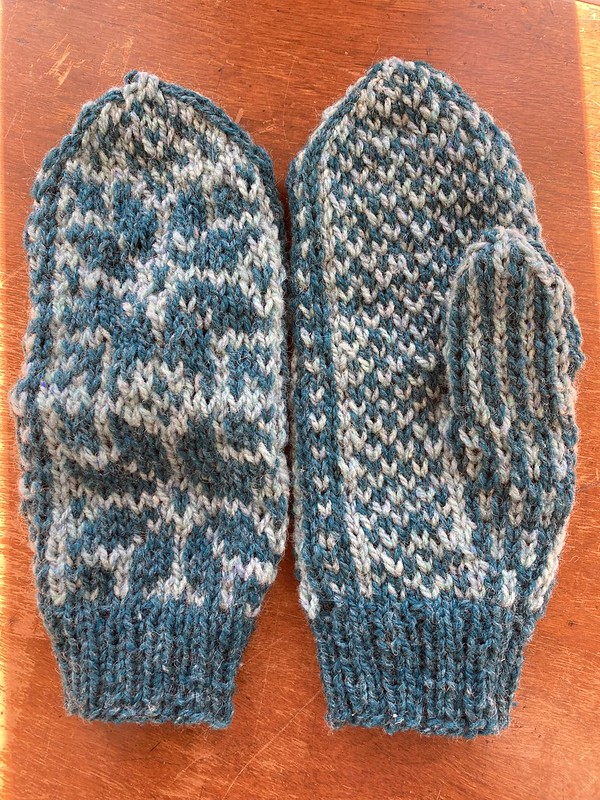
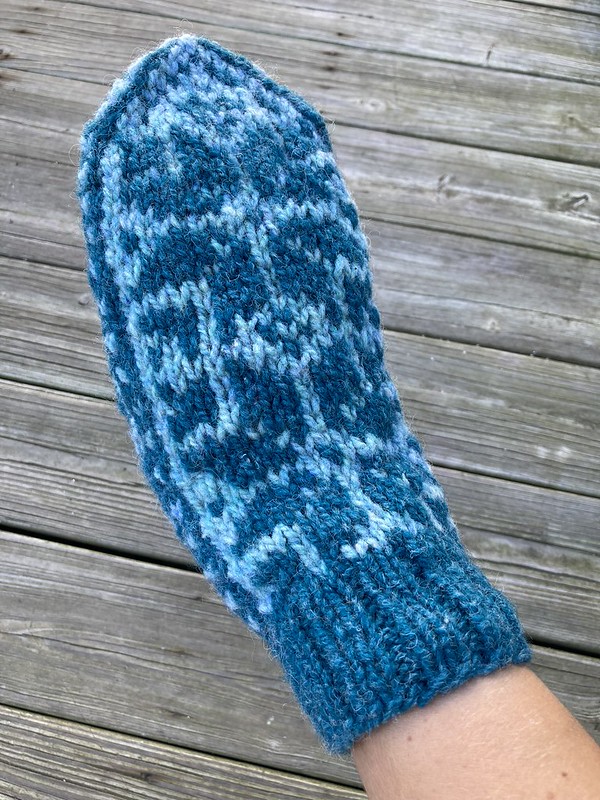
The mittens before blocking
The mittens after blocking, and obviously in different lighting
Thoughts: I wasn’t sure how these would go, and I admit to having that completely illogical aversion to making two of something like socks or mittens even though I have done plenty of sleeves. I really wanted to try making mittens, though, and colorwork ones looked like lots of fun plus added warmth from the two strands of yarn used to make the design.
The directions were nice and clear, and I didn’t have any problems except one. My loose knitting and refusal to make a swatch came back to bite me and turned mittens that were supposed to fit me into mittens clearly made for larger hands.
They would probably fit many men’s hands. Unfortunately, there are no men in my family that love this style. They turned out beautifully, but I knew I wouldn’t wear them, so I donated them to a handmade goods charity auction in the hopes that they would find their perfect home there.
I’m glad I made them, even if they weren’t for me, and I hope to make more mittens in the future. It was also a good chance to use my beloved Yates Farm Yarn from way back when I started knitting the first time. I still love it, but I sometimes have a hard time pairing it to projects since I tend toward brighter colors now, and it’s not always the weight I need these days.
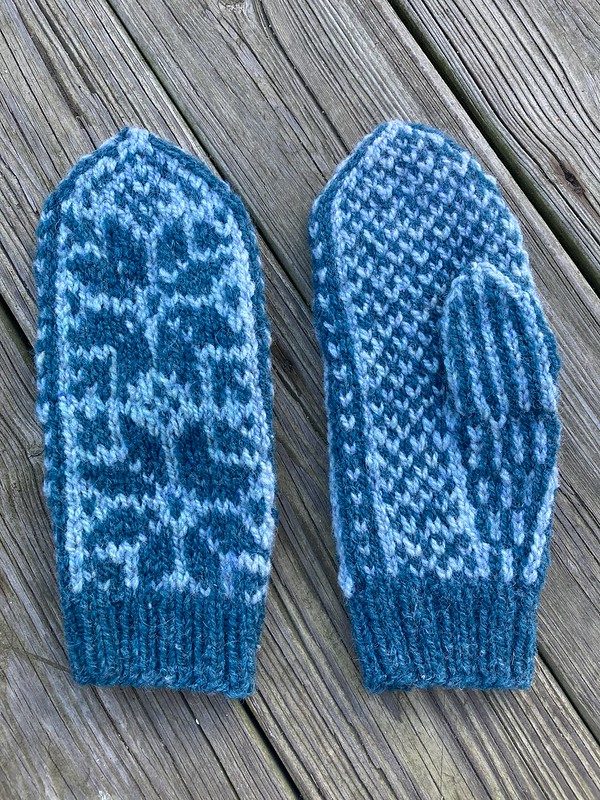
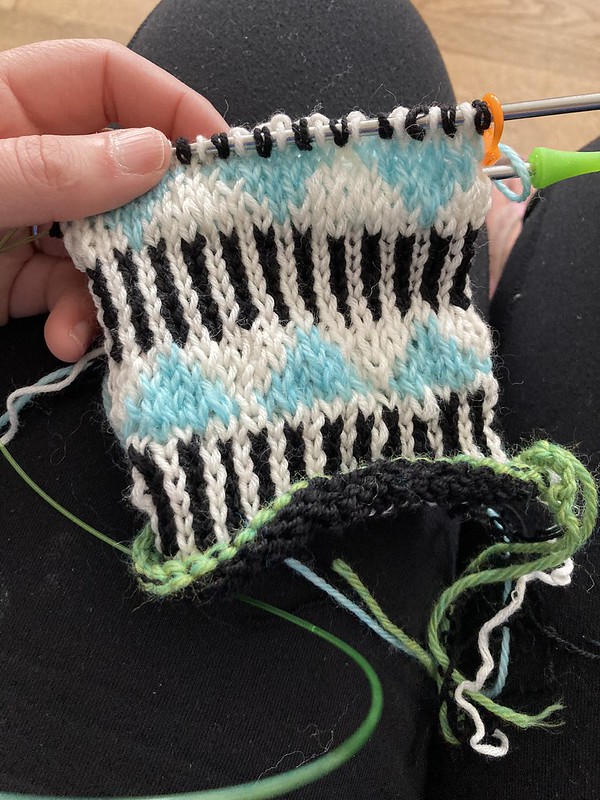
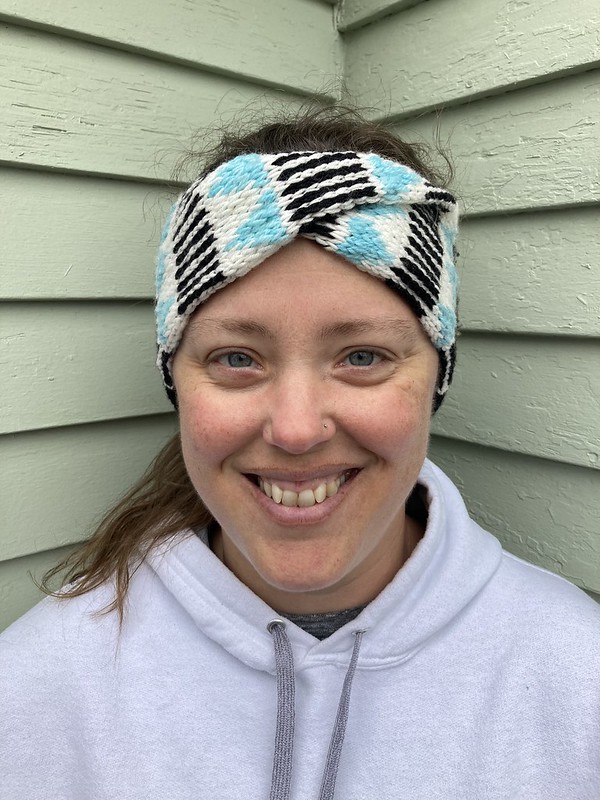
Yarn: The recommended yarn is light worsted, although it looks like the sample was a mix of DK and worsted. I used DK. My white was a mystery yarn that I think is DK wool superwash. The black is leftover Malabrigo sock held double (fingering + fingering = DK). The light blue/aqua is Berroco Ultra Wool DK, color #83163 from Coveted Yarn in Gloucester, MA.
Needles: US 5 for colorwork and US 4 for non-colorwork
Gauge: Still living on the edge over here and skipping the gauge swatch
Size: There’s only one size–8″ wide with a 20″ circumference
Date knitted: January 24, 2023 to February 24, 2023
Thoughts: This headband is a tube with a twist in it, just like some of Andrea Mowry’s cowls. I used several techniques from Andrea Mowry’s Moonwake Cowl pattern like the provisional cast-on, leaving my ends loose inside rather than weaving them in, and blocking before joining with the Kitchener stitch. After casting on, I knit a few rounds in the black yarn before beginning the colorwork.
The green yarn is my provisional cast-on.
I also wish the first color chart instruction had been clearer. It tells you to knit chart one and work twice–does that mean twice after I have done the chart for the first time or twice total? I opted for twice total.
This wasn’t a bad pattern, but I think those details could have made it even better. I’m really happy with how my headband turned out. It actually fits me! Haha. The yarn I used feels nice, the pattern didn’t take too long, and I love having a headband to wear when my hair is up or I’m going to be moving around a lot outside, and a hat is just too warm.
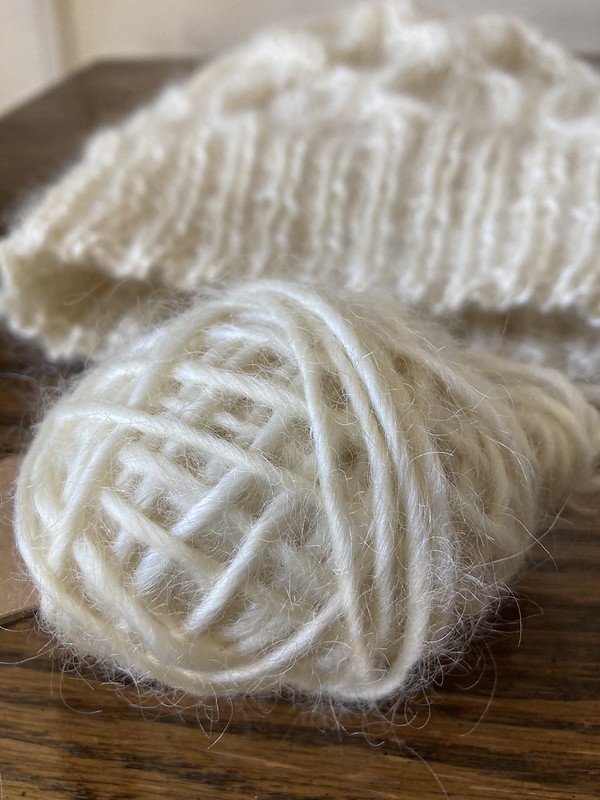
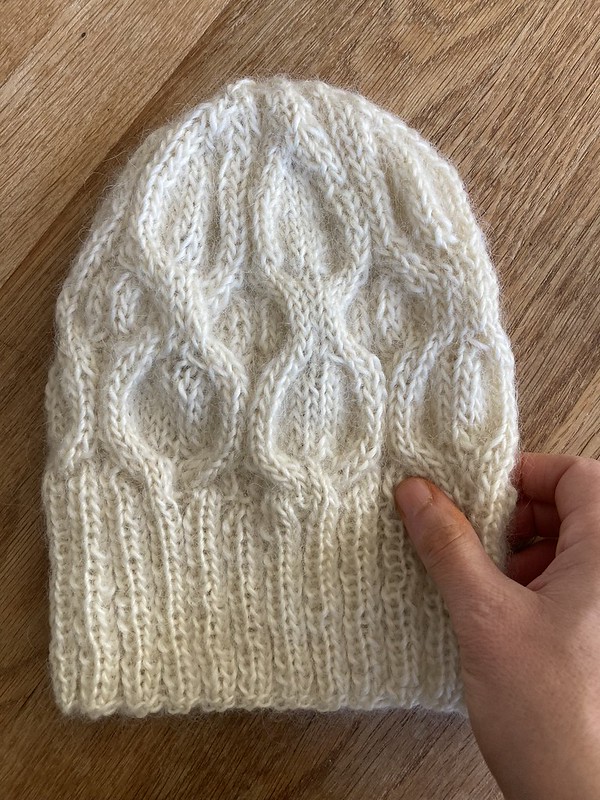
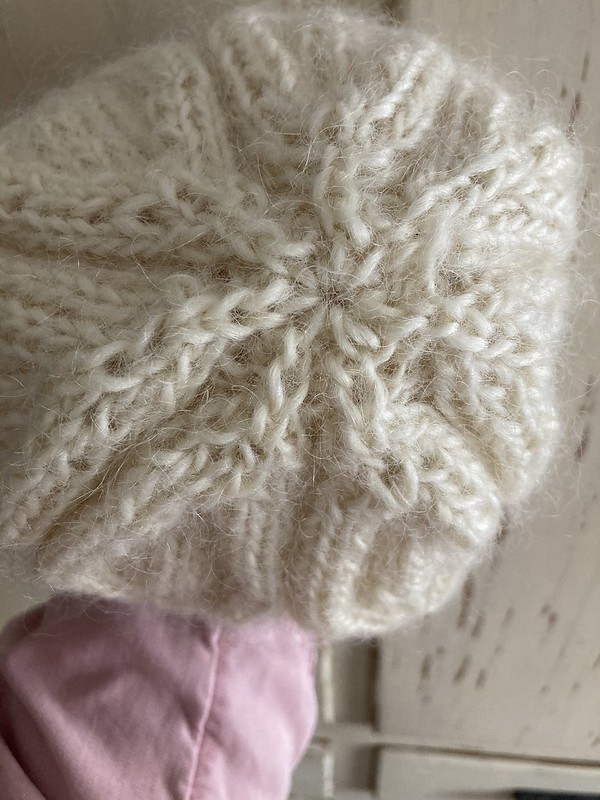
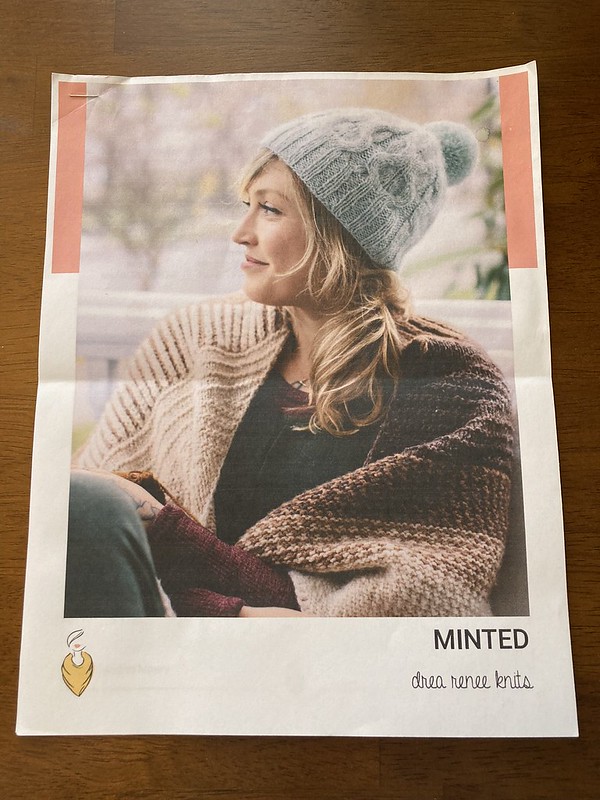
Yarn: Leicester Longwool Yarn from Ashford Heights Farm that I bought at the New England Farm & Fiber Festival in Boston in 2023. They call their yarn Salt and Pepper Wool, and it’s a single ply, Lopi spun yarn with only 150 yards in the skein. I was sucked in by its luminous beauty, halo, and my curiosity to try a different breed’s wool. I was told this was a bulky weight, but to me it knits more like a worsted/aran weight.
Needles: US 3 and US 5
Gauge: Will you be surprised at this point if I say I didn’t swatch? I promise I do for sweaters!
Size: one size
Date knitted: Sometime in fall 2023 to maybe November 28 or 29, 2023. I finished knitting on Thanksgiving (November 23), but it took a few days to block it and let it dry.
Thoughts: Didn’t you just see this pattern on my blog? Yes! But at least this time it’s in different yarn. Haha. I was really determined to use this special yarn I had bought, and after trying it out in another pattern and not being happy with how it was looking, I switched to Minted. Thankfully, it worked.
The fabric isn’t quite as stretchy as in my other versions, but it still fits pretty well and I’m so happy to have a cream-colored hat in my wardrobe that I made and that goes with everything. The yarn itself is not as soft as some yarns, but it’s not too scratchy, either. I find it comfortable to wear, and it was fun to knit because it’s so beautiful.
I kind of want to start a little yarn sample book for myself for when I actually try single breed yarns like this, but I am not quite sure what format I want. At this point, I have at least tried Merino, Shetland, Gotland, and Leicester Longwool. :)
It feels good to get these projects to the blog! Sometimes it takes me awhile to photograph things and sometimes, like with these, I let them linger in the “to blog” line until the season is a bit more appropriate for them.
Thanks for reading and I hope, if you are a maker of things, that you have some fun projects lined up for the weekend!
Before January is gone, I want to share the couple of Christmas presents I made. I rarely put pressure on myself to sew or knit Christmas presents, but sometimes the right project presents itself, and it seems like a good idea to go for it.
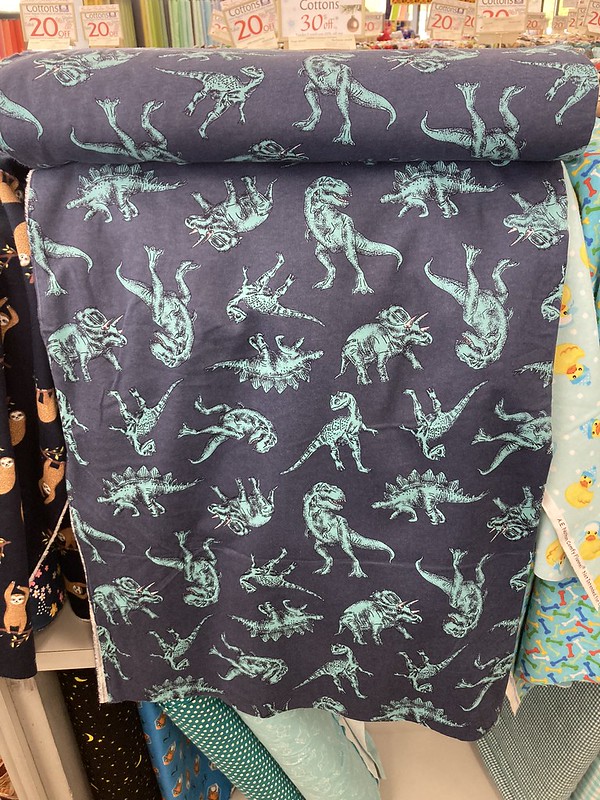
I knew my husband was in need of some new pajama pants way back in the summer, so he picked out a fun dinosaur print cotton flannel at Field’s Fabrics in Kalamazoo when we were in Michigan last summer.
I had hoped to make these for him before Christmas, but creative projects always take longer than you think they will, and there were several things in line before these pants. They were a great palate cleanser once I got my other projects finished.
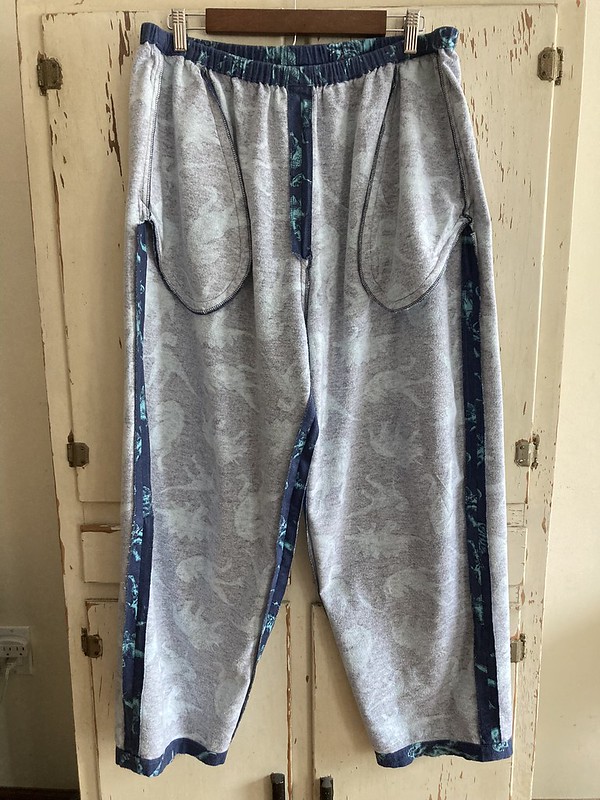
I used our tried and true McCall’s 3019 from the ’90’s, a pattern that my mom used for our family when I was growing up.
She gave it to me after I started sewing, and it’s my husband’s favorite. The pants are loose and easy-fitting with an elastic waist and pockets. The pattern was already traced out in his size from the last time I made pajama pants for him, so when it came time to sew, this was a quicker-than-usual project.
Front view
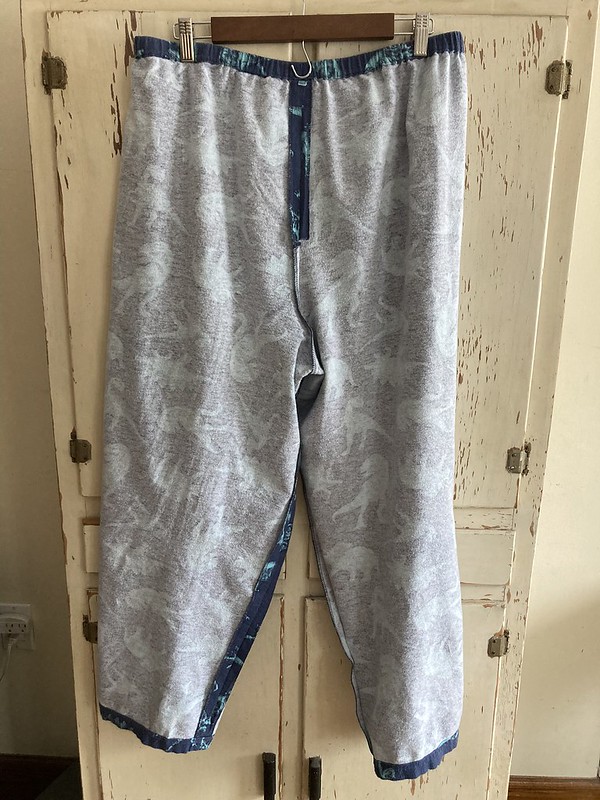
Back view, almost identical to the front view, but I’m sharing it because I’m thorough.🙂
Right before I started sewing, I glanced at my fabric and had a moment where I thought, “Wait. Did I cut these out with the dinosaurs facing the wrong way?” I thought I had been so careful! Luckily, this print isn’t directional. The dinosaurs face in every direction. I had done it right after all. Thank goodness!
I decided to try serging all my cut fabric edges before sewing. I know that serging them together after sewing would be more durable, but I thought this would be nice and quick since nearly all my seams would be finished as soon as I sewed them. I was right–it was great!
Inside front view; the one seam I did serge together was the lower crotch seam
Inside back view
A quick bit of sewing and they were nearly done. I find the waistband casing on the snug side for inserting the recommended elastic, so I skipped the line of topstitching you are directed to do at the top of the casing.
I barely remembered to add a little tag at the back!
My husband was really happy with them. Good thing he was so patient! They made a great Christmas gift.
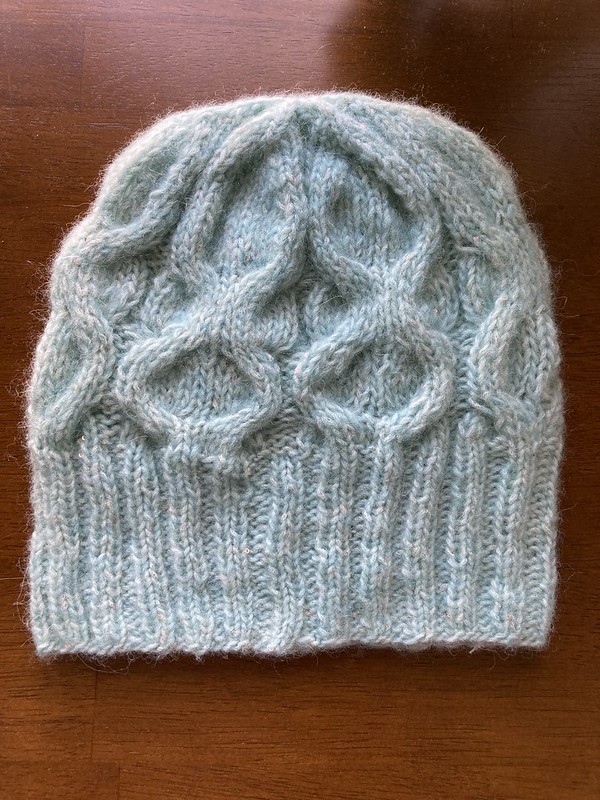
It’s identical to the one I made myself. After making mine, I still had a ball plus a partial ball of my special Katia Concept Sky Paillettes yarn that I got in Webs’ sale area when I visited.
I like this pattern because it’s a quick knit that gives good impact for very little effort/cabling.
Andrea’s patterns are some of my favorites because they are so clear and helpful. She always has YouTube videos available for any skills in the pattern that you may not have learned yet or need a refresher on.
The yarn’s really pretty and I thought my mom would like it. It’s one of those blow yarns that has a sort of net tube structure, with fiber blown in, making it nicely fluffy. This one also has little paillettes attached, which is so pretty, and gives the yarn a subtle sparkle.
Happily, my mom liked it, and it fit her great! She reminded me of how she was always trying to make us all match when I was little, something I was not a fan of growing up, but I guess I don’t really mind any more. ;) Twinsies!
And that’s it! I had the hat done before Thanksgiving and, while I cut it a little close on the pajama pants, I still got them done with a few days to spare. Hooray!