Tag Archives: Megan Nielsen patterns

Swimwear Sewing: the Continuing Journey…This Time with the Cottesloe Swimsuit and the Core T-Shirt

Standard
Swimwear Sewing:  the Continuing Journey…This Time with the Cottesloe Swimsuit and the Core T-Shirt

In trying to think up the title for this post, I kept thinking of the Muppets’ “Veterinarian Hospital: the continuing stooorrrrrrrry of a quack who’s gone to the dogs.” Haha. My continuing stoooorrrrrry of swimsuit sewing might also be about a quack who’s gone to the dogs. But you know what? Someday, I WILL create the perfect swimsuit that brings together the right fabric, the right fit, and the right style. It will be great. For now, I keep striving.

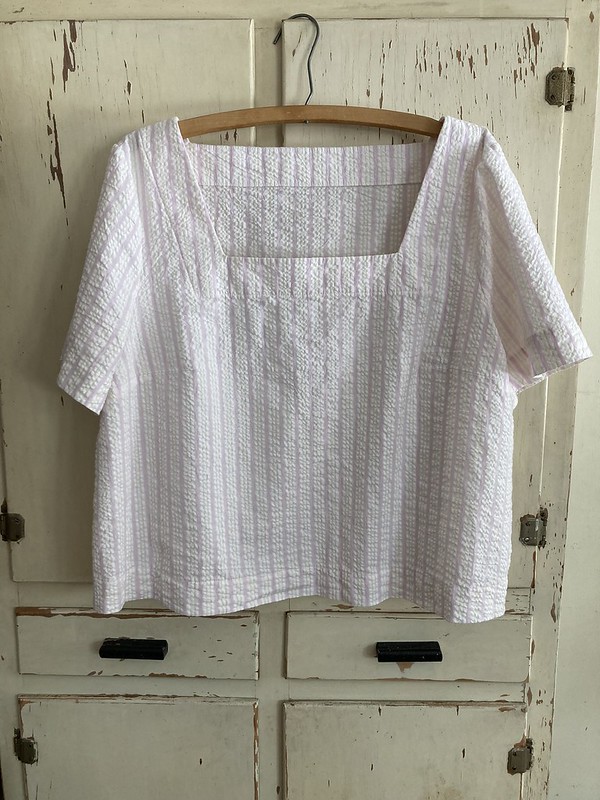
Today’s swimsuit is pretty good, but not quite there yet. This time around, I chose to try the Megan Nielsen Cottesloe Swimsuit paired with the Closet Core free Core T-shirt as a rash guard.

Swimwear Sewing:  the Continuing Journey...This Time with the Megan Nielsen Cottesloe and the Closet Core T-Shirt

Like in 2021, when I made Butterick 4526 and Tilly & the Buttons’ Romy I wanted the convenience of a tankini with the look of clothes, so I could wear my swimsuit on adventures with my kids and be ready to swim (or not) at any time.

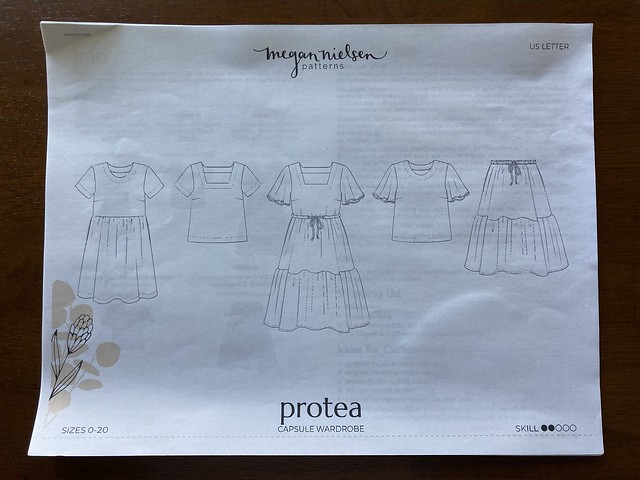
Because I was a pattern tester for the Megan Nielsen Protea Capsule Wardrobe pattern, I got to choose a free pattern, and I knew I wanted to try the Cottesloe. This pattern is, in many ways, nearly identical to Butterick 4526. It’s got a few slight differences, but I was hoping that this would have more appropriate ease. I was interested in all the views, but wanted to try the high waisted bikini with bands, View D, for my first attempt. My measurements were on the high end for the 0-20 size range and the low end for the 14-30 range. I went with the 14-30 pattern (16 bust, 18 waist and hips), but I’m not sure it was the right choice. Fortunately, the suit is functionally great.

Swimwear Sewing:  the Continuing Journey...This Time with the Megan Nielsen Cottesloe and the Closet Core T-Shirt
Cottesloe, front
Swimwear Sewing:  the Continuing Journey...This Time with the Megan Nielsen Cottesloe and the Closet Core T-Shirt
Cottesloe, back

It’s more that when I made it and tried it on, I was underwhelmed. The top didn’t look great. I think it would look better on a fuller bust, and I wonder if I would have been happier with the top in the 0-20 size range. The good news is, I am the only one who will see that, since I will always wear this with a rash guard, but regardless, I want to like all the elements of my outfit on me. You know?

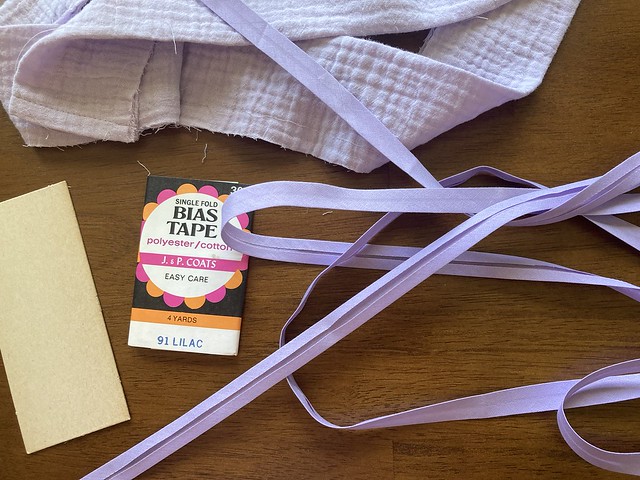
I managed to just fit the pattern pieces onto leftovers of some of my favorite swimwear fabric (from this project), which I was happy about. The shoulder straps feel slightly wide and the back elastic tends to flip out, but I only notice that when I’m putting the suit on. Happily, the suit feels secure when I’m wearing it, and it has full coverage on the bottoms and the front of the top. I did swap in 3/8″ elastic where it called for 1/4″ on the neckline and armholes, since I find this to be much more secure. I also took my leg, waistband, and underbust elastic lengths from the Jalie 3023 tankini since Jalie has a proven activewear record and I like my suits to stay put.

Swimwear Sewing:  the Continuing Journey...This Time with the Megan Nielsen Cottesloe and the Closet Core T-Shirt
Cottesloe inside, front
Swimwear Sewing:  the Continuing Journey...This Time with the Megan Nielsen Cottesloe and the Closet Core T-Shirt
Cottesloe inside, back

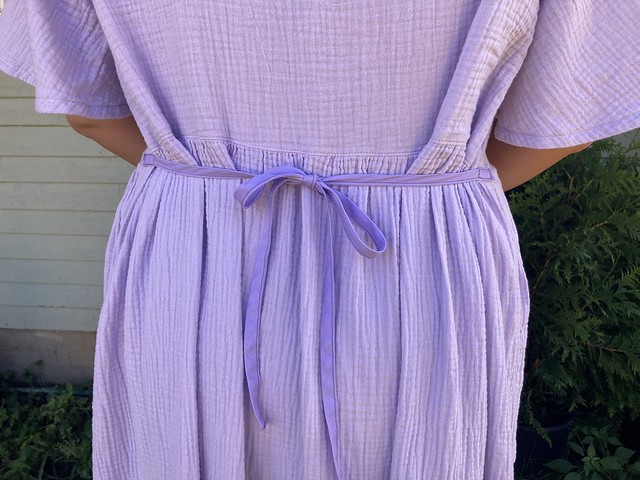
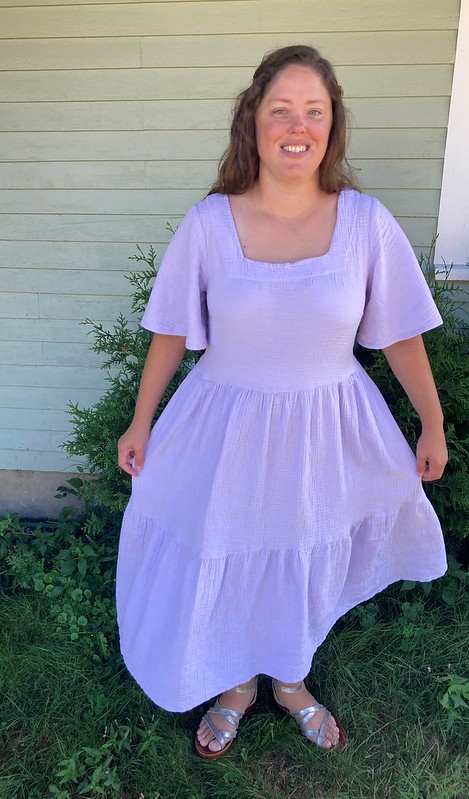
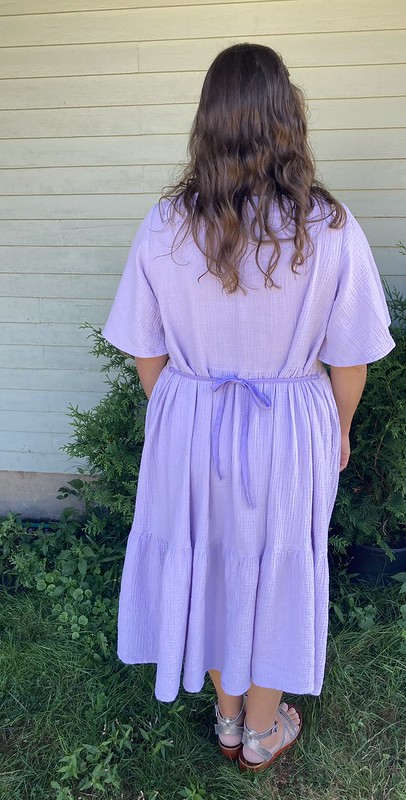
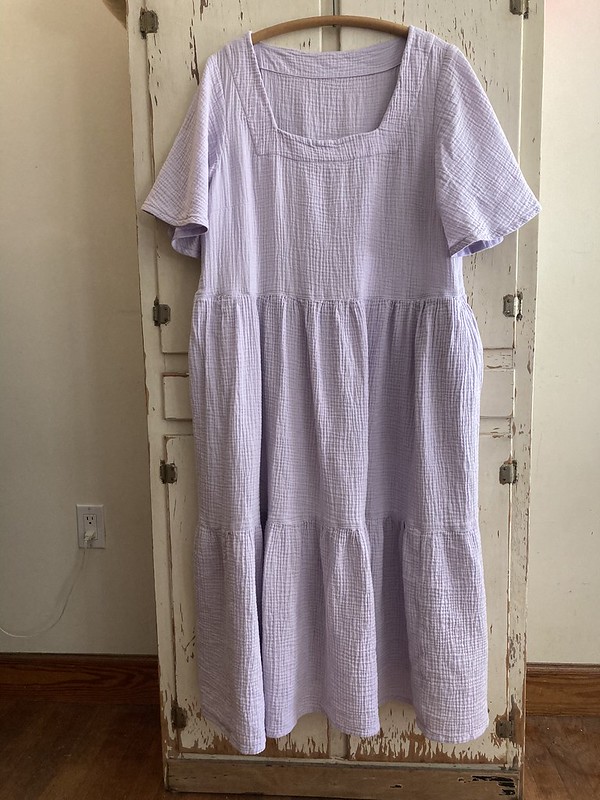
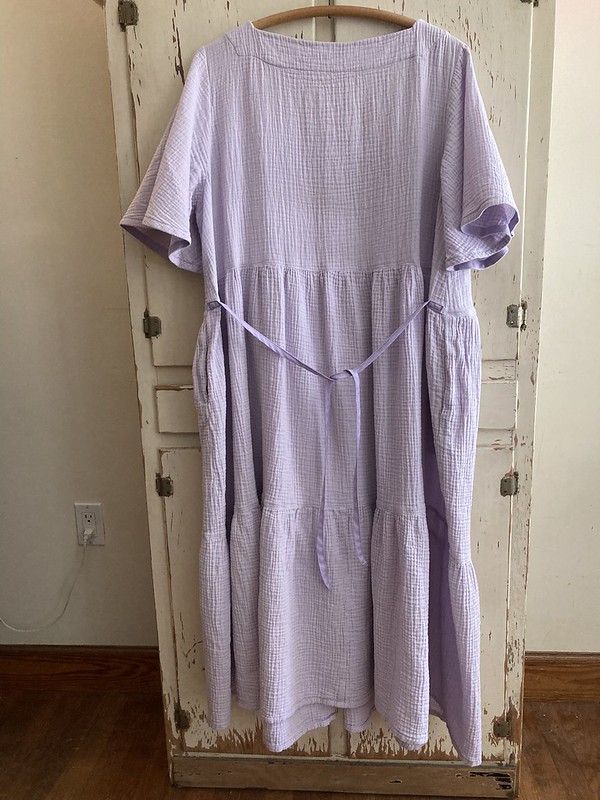
I paired the suit with the Closet Core Core T-shirt pattern, which is a free pattern I have been wanting to try. I used View A, the cropped length with short sleeves and no pocket in a 16 bust and 18 waist and hip in the 0-20 size range.

Swimwear Sewing:  the Continuing Journey...This Time with the Megan Nielsen Cottesloe and the Closet Core T-Shirt
Core T-Shirt, front
Swimwear Sewing:  the Continuing Journey...This Time with the Megan Nielsen Cottesloe and the Closet Core T-Shirt
Core T-Shirt, back

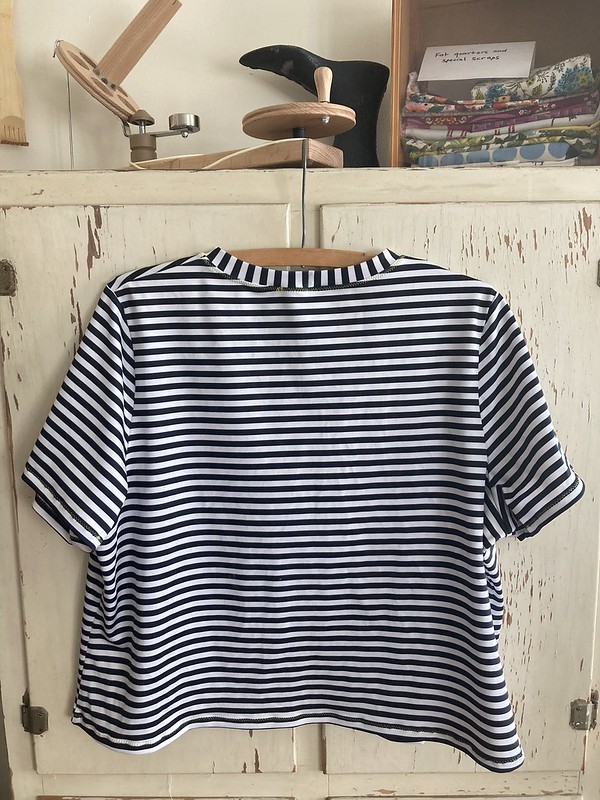
I still have lots of striped swimwear fabric from 2020 from SpandexbyYard.com, and I really like it with the floral I used for the suit. I knew the top might be a little boxy, and it is. I could have made a straight 16 and it would have brought the sides in a bit. Length-wise, it’s not bad with the high rise bottoms of the suit. When dry, it’s a good match.

Swimwear Sewing:  the Continuing Journey...This Time with the Megan Nielsen Cottesloe and the Closet Core T-Shirt
Core T-shirt inside, front
Swimwear Sewing:  the Continuing Journey...This Time with the Megan Nielsen Cottesloe and the Closet Core T-Shirt
Core T-Shirt inside, back

When swimming, it floats up quite a bit. I knew this would probably happen, and it doesn’t bug me too much most of the time. It’s definitely an improvement on the Tilly & the Buttons Romy I tried to use as a rash guard in 2021, which has been relegated to the thrift store.

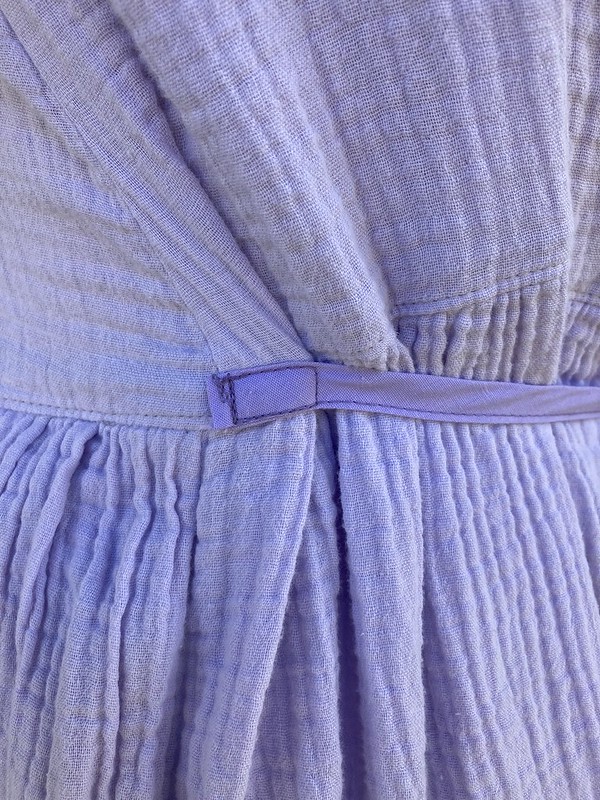
I had a few nice details come together on the rash guard:

Swimwear Sewing:  the Continuing Journey...This Time with the Megan Nielsen Cottesloe and the Closet Core T-Shirt
Look at that neck band seam, ending at the edge of a stripe!
Swimwear Sewing:  the Continuing Journey...This Time with the Megan Nielsen Cottesloe and the Closet Core T-Shirt
My side seam pattern matching actually worked!

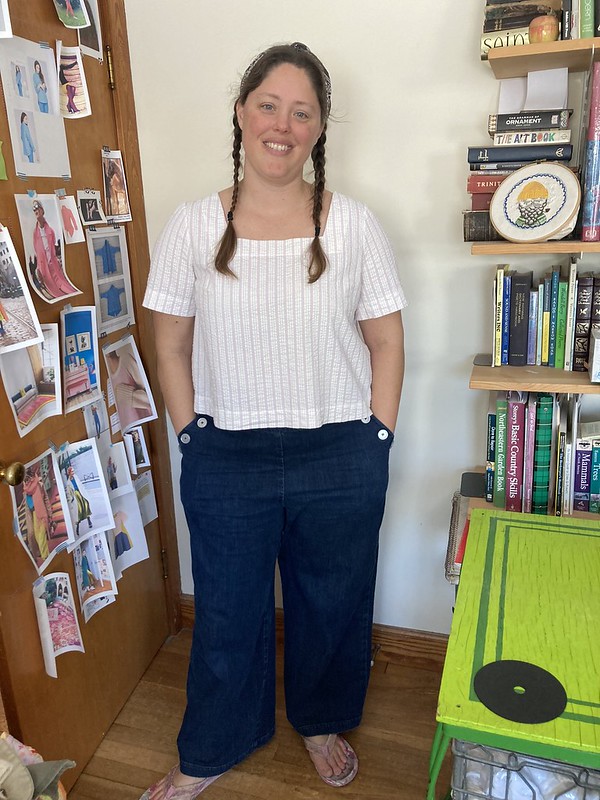
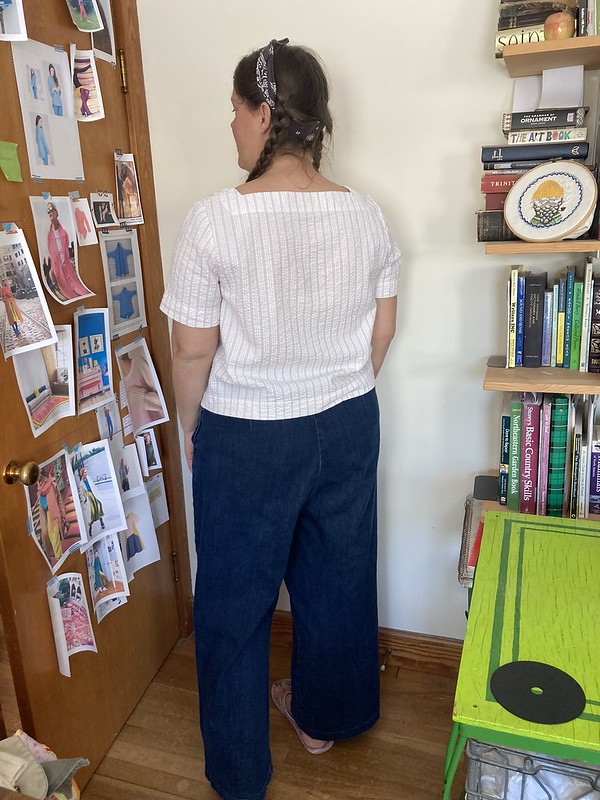
And here are some pictures of me wearing it. I don’t model my suits on the blog, but you can get an idea of the rash guard at least.

Swimwear Sewing:  the Continuing Journey...This Time with the Megan Nielsen Cottesloe and the Closet Core T-Shirt

At this point, you may be coming to the same conclusion that I did. If I am sewing one or more suits a year, and still not getting just the right combination of elements, maybe I need to stop messing around and just use a swimwear pattern from a company that specializes in activewear and has a number of bathing suit patterns. The Cottesloe + Core T-shirt is a really nice suit, I like the fabric, and it stays put, but it’s just not there yet. For that reason, I have told myself that the next suit I sew has to be from Jalie. They specialize in activewear, skating costumes, swimwear, and they have everyday clothes. The patterns have also had a very expansive size range, from toddler to plus, in every or nearly every pattern as long as I have been aware of them. So, to that end, I have already cut out a tankini from Jalie 3023. Hopefully I can get it sewn up this month. The next time I need a rash guard, I should probably look to them, too.

I’ll get there eventually! 🙂

Megan Nielsen Protea Capsule Wardrobe Pattern: My Top and Dress Tester Photos

Standard
Megan Nielsen Protea Capsule Wardrobe Pattern:  My Top and Dress Tester Photos

Hello, friends! And welcome back to the blog. After taking the summer off, I’m ready to get back to writing about sewing, knitting, photography, and other fun creative endeavors. I hope you had a good last few months as well.

My “To Blog” list is pretty long, but I’m actually going to start with a more recent project. I was a tester for Megan Nielsen’s latest pattern, the Protea Capsule Wardrobe. I went through two rounds of testing as the pattern grew from a few views to the many views you see now. In order to be a tester, I signed up to her list and sent in my measurements. They cycle through their list and contact people with a good range of measurements, and then e-mail you when they have a pattern for testing to see if you are interested. You get to see the line drawings and description of the pattern as well as the deadline and what they need from you, and then you can say yes or no. This is a volunteer position, so it’s your responsibility to get your materials together for the project. You don’t have to blog the results or put it out on social media, but since I will really and truly forget the details of my projects if I don’t blog them, I wanted to share my tester versions, and hopefully give you a look at the pattern in its developmental stages.

As the pattern was released, the company offered testers the option of a free Protea Capsule Wardrobe pattern in print or PDF. I chose print, but still had to pay shipping, and I’m currently waiting for it to arrive. I don’t often test patterns since I have so many of my own projects that I want to make, and Megan Nielsen is the only company I have tested for (unless I’m forgetting…but I think that’s right). The process was a little different years ago, but I have always been impressed with the freedom and flexibility this company gives you in testing. So! Let’s get to the actual garments. Just remember…these are versions that came out before the new and shiny final pattern, so some things have changed a bit.

Test #1: Protea Blouse

Megan Nielsen Protea Top and Dress Tester Photos

Here is the first line drawing we were sent back in January. I chose to make the square-neck blouse out of a striped cotton seersucker I bought at Field’s Fabrics in Holland, MI in summer 2021.

Megan Nielsen Protea Top and Dress Tester Photos
front

l

Megan Nielsen Protea Top and Dress Tester Photos
back

I love the general style of this blouse and have worn it all summer long. I love that it is loose and boxy and I didn’t have to make a broad back adjustment.

Megan Nielsen Protea Top and Dress Tester Photos

l

Megan Nielsen Protea Top and Dress Tester Photos

l

Megan Nielsen Protea Top and Dress Tester Photos

It is a little cropped and lifts up when I raise my arms, so if I made it again, I would consider lengthening it just a little and trying out adding a gusset to the underarm with directions I found in Bernadette Banner’s new book: Make, Sew and Mend: Traditional Techniques to Sustainably Maintain and Refashion Your Clothes. I made an 18 at the bust and a 20 at the waist and hip. I think I used the width of the 20 for the sleeve, too.

Test #2: Protea Capsule Wardrobe Tiered Dress

Megan Nielsen Protea Top and Dress Tester Photos

When the option to test the next version of the pattern came along in May, I wasn’t quite sure that I would have the time, but I really liked the look of the tiered dress with a square neck and flutter sleeves. I found some fabric in my stash and decided that I could make it if I applied myself!

I chose to make this dress in a cotton double gauze from Joann, also from the summer of 2021. I didn’t have quite enough fabric. What I did have was a little narrower than the recommended 60″ and I only had four yards instead of the 4 3/8 I should have had, but I decided to do my best to make it work. In the end, I mostly made it. I went back and bought a few fat quarters of quilting cotton in the same pastel purple to cut my pockets out of. That fabric requirement was pretty much spot on.

Megan Nielsen Protea Top and Dress Tester Photos

l

Megan Nielsen Protea Top and Dress Tester Photos

l

Megan Nielsen Protea Top and Dress Tester Photos

I made the dress with a size 18 bust and 20 waist and hip without the drawstring. I didn’t veer too far from the directions except that I hemmed my sleeves with bias tape instead of turning the hem in twice, and gathered my skirt tiers using a zigzag over a string instead of sewing two parallel lines of stitching (a technique I picked up from another Megan Nielsen pattern). I haven’t seen the final version yet to know what choices they made for those parts of the pattern instructions.

I felt a little bit different about this dress when I finished it than I did the top. I love positive ease, and this dress has LOTS of it. It was a bit much even for me.

Megan Nielsen Protea Top and Dress Tester Photos

Unless you are looking for a completely unrestrictive dress, I like it a lot better with something pulling the waist in just a little. I tried pinning the drawstring casing on, but I wasn’t a fan.

Megan Nielsen Protea Top and Dress Tester Photos
waist casing pinned on…nope

The drawstring casing for the dress in this version of the pattern used the same pattern piece as the waistband for the skirt. It’s a clever idea that reduces the number of pattern pieces, but I don’t actually like it on the dress. It’s really wide and I didn’t like how it looked. I also didn’t like the dress without something to pull in the waist a little, so I put the finished dress to the side for a bit to think it over. In the end, what I did was to make two ties out of some single fold bias tape I had that matched my fabric.

Megan Nielsen Protea Top and Dress Tester Photos

I sewed them on to the outside, but if I were planning on adding ties from the start, I would have sewn them into the side seams at the waist.

Megan Nielsen Protea Top and Dress Tester Photos

l

Megan Nielsen Protea Top and Dress Tester Photos

This allows you to gather the waist in as much or as little as you like. There is a bit of fabric that gathers under the ties, but it really isn’t bulky. I tie mine just tight enough to get a little waist definition, but still loose enough not to feel restricted.

Megan Nielsen Protea Top and Dress Tester Photos

l

Megan Nielsen Protea Top and Dress Tester Photos

l

Megan Nielsen Protea Top and Dress Tester Photos

l

Megan Nielsen Protea Top and Dress Tester Photos

For me this takes the dress from something I didn’t like at all to something I love. It’s amazing what a little tweak can do.

Overall Thoughts

Seeing the final pattern, I like it a lot. You don’t often see an indie brand bring out a capsule wardrobe-type pattern. The Big 4 do it (I’ve seen a lot from Butterick), but not always indie brands. Since indie patterns can be so expensive, this is a good value for your money, and it’s simple enough to sew and has such clear instructions that even a beginner could tackle it. You get some good mix and match options with the sleeves and necklines so that you could easily sew a lot of different-looking garments from this one pattern. I like it stylistically, as well, except for the dress drawstring. Personally, I’m really into the square neck, flutter sleeves, and tiered skirts. I don’t often return to patterns I have already made since I love trying new ones, but before summer started to wane, I was contemplating more of the square-necked tops, so I could see revisiting this one and trying out any of the views. I like them all.

Currently making…

Since I finished pattern testing, I have made a few other garments, and I entered both a sewing and a knitting project in the Topsfield Fair in Topsfield, MA for the first time ever, so we’ll see how that goes! I submitted my Patagonia inspired vest and my Arrowhead Cardigan which were both a lot of work and took a lot of brainpower!

On my sewing table, I have a Fibre Mood Norma Blouse cut out of some beautiful linen and I have plans to cut out two cropped Closet Core Kalle Shirts in different colorways of a fun tiger print lawn.

I’m knitting a Weekender Light sweater from Drea Renee Knits in the best Shetland wool from Jamieson & Smith and I’m also knitting a Drea Renee Knits Moonwake Cowl in some soft washable yarn.

Also…I found some sandals with wooden bases at the thrift store that I have started stripping down to try making into sandals I like, but it’s slow going with the other projects, and…you know…actually taking care of my family, ha ha.

I’m pretty inspired and excited about making all the things at the moment. I didn’t sew a ton over the summer, so it feels good to get back to it. And I have a million projects to bring to the blog (some from last winter/spring–yikes!), so I look forward to meeting you back here soon. Happy weekend!

Eucalypt Tank from Megan Nielsen Patterns (Two Versions)

Standard
Eucalypt Tank from Megan Nielsen Patterns (Two Versions)

Hi, sewing friends!  It’s been awhile!  I planned to take all of July off from the blog, but had to stretch it a little longer.  We had family in town and I had no time to take pictures!  I finally rectified that, though, so it’s back to your regularly scheduled sewing posts. 🙂

First up is something I finished back in June.  It’s the Eucalypt Woven Tank Top & Dress Sewing Pattern from Megan Nielsen Patterns.  I have had this pattern for ages and have been wanting to make it, but haven’t until this summer.  I made two different versions of the tank in the same fabric.

Eucalypt Tank from Megan Nielsen Patterns (Two Versions)

l

Eucalypt Tank from Megan Nielsen Patterns (Two Versions)

According to my measurements, I’m a medium at the bust and a large at the waist and hips, so that’s what I made for my first version.  I made it from a polyester crepe de Chine I bought at Hobby Lobby a few years ago that I’ve been saving to use for a wearable muslin.  Since the fabric is pretty shifty, I traced my pattern pieces out as full pieces rather than half pieces as printed.  Whenever I do this, I layer two pieces of tracing paper on top of each other and tape them together.  Then I line up my tracing paper at the cut-on-fold line, and trace the half piece.  I cut that out and then unfold my taped together tracing paper into a full pattern piece!  Since this was a PDF and I cut the pattern out, I just taped a piece of tracing paper to the pattern piece and cut it out to the same shape.  Then I opened it up so I could have a full piece.  Check it out:

Eucalypt Tank from Megan Nielsen Patterns in Two Versions

Version one was a bit tight across the back and the bust and was also a little tight on the front armscye.  I decided to go up a size on the bust and make a straight large for my second version since I was having some tightness all around.

Eucalypt Tank from Megan Nielsen Patterns (Two Versions)

Back

Eucalypt Tank from Megan Nielsen Patterns (Two Versions)

Tightness on the armhole front

Version two turned out a lot better!  I’m much happier with the fit overall.

Eucalypt Tank from Megan Nielsen Patterns (Two Versions)

l

Eucalypt Tank from Megan Nielsen Patterns (Two Versions)

l

Eucalypt Tank from Megan Nielsen Patterns (Two Versions)

l

Eucalypt Tank from Megan Nielsen Patterns (Two Versions)

l

Eucalypt Tank from Megan Nielsen Patterns (Two Versions)

Front view

Eucalypt Tank from Megan Nielsen Patterns (Two Versions)

Back view

So, now, here is my quandary.  There are a few fit issues despite how comfortable it is.  The shoulder seam line looks like it is too far back.

Eucalypt Tank from Megan Nielsen Patterns (Two Versions)

The side seam also curves as it reaches the top in a way that I’m sure it is not supposed to.

Eucalypt Tank from Megan Nielsen Patterns (Two Versions)

And I have some excess fabric in the back, that makes it look like I need a swayback adjustment.

Eucalypt Tank from Megan Nielsen Patterns (Two Versions)

If I wear the top as is, it is comfortable and provides good undergarment coverage.  If I pull the shirt forward so that the shoulder seam sits where it should, the swayback problem disappears, but I have gaping in the armholes that make it look like I need a dart.  So, do I just ignore the weirdness and make any future tanks just like version two?  Do I do a swayback adjustment to get rid of the excess or add a dart?  Do I tinker with it?  Do I care enough to do a bunch of stuff?  I don’t know.  It is really nice to have a quick and easy pattern that you like and can just whip up.  What would you do?

Lastly, ever since I finished my 2017 Make Nine, I’ve sort of been floundering around with my sewing.  I feel like I have a very short attention span, want to sew all the things, and get tempted by new patterns left and right.  I missed that sense of purpose I felt when I made my MakeNine goals, so I decided that since summer is really only half over (we have until the autumnal equinox in September!), I was going to make a summer sewing plan.

2017 Summer Sewing

I posted it on Instagram and even made a hashtag for it:  #2017summersewing.  I only chose six garments, and I’ll feel free to slip other little things in if I want to, but these are things I plan to make.  So, one down and blogged, five to go!  I’ll keep you posted, but feel free to join in with your own projects if you want to!  I already feel more focused and creative in my sewing.  🙂

Recommendations

  • One of my new Instagram discoveries is @plantsonpink .  It is literally pictures of plants in front of pink backgrounds.  Why is this so satisfying?  Well, I do like plants, pink, and pink and green!
  • Speaking of plants, I’m really enjoying going through Six Seasons:  A New Way With Vegetables by Joshua McFadden with Martha Holmberg.  He breaks the year into the normal four seasons, but then divides summer down into three (giving you Spring, Early Summer, Midsummer, and Late Summer, as well as Fall and Winter).  The recipes in each section highlight various vegetables that are in season at that time.  I’ve learned to love vegetables in recent years, so I’m always looking for new and creative ways to use them.
  • I was up in Exeter, NH with family on a recent Thursday and happened upon the Exeter Farmer’s Market.  It’s amazing!  It has a great variety of produce, meat, baked goods, flowers, and so much more.  I was really impressed.  I definitely recommend it if you are in the area on a Thursday.
  • I’ve heard New Zealand is beautiful.  It sounds like a great place to visit.  And here is one more reason to want to go–the safety video from Air New Zealand!

A Quartet of Briar Tops

Standard

And here’s the last of my unselfish sewing…EVER.  Ok, just kidding.  At least for now.  I made myself another Briar top (by Megan Nielsen patterns) as well as two Mini Briars and one mash-up of an adult Briar and a kids’ Briar.

Megan Nielsen Briar and Mini Briar Tees

Megan Nielsen Briar and Mini Briar Tees

This is now my third Briar (number one in a double-layer knit is here and number two in Polartec is here), but it’s my first time making a Mini Briar.  I received all three of Megan’s children’s patterns as a thank you for being a pattern tester for the Mini Tania culottes (which are super-cute, by the way).  The children’s Briar is similar to the adult version, although not identical.  It came together very easily.  One thing I love about Megan Nielsen patterns is their visual clarity.  When I first started sewing garments, I was always intimidated by the busy and complicated look of the standard patterns you find in chain fabric stores.  Megan’s patterns are completely opposite to that.  They have a clean look to them that makes you feel confident you will be able to understand them.  Actually, I think that is the case with a lot of the independent pattern companies, which is a big plus.

Megan Nielsen Briar and Mini Briar Tees

It is a great advantage to have the same pattern in a kids’ version and an adult version when you are sewing for someone who doesn’t quite fit in either range, but is somewhere in the middle.  This was the case with the aqua and pink shirt.  It was great to be able to pull both patterns out, compare sizes and make a custom pattern from the two of them.  It was a bit of a head-scratcher at times, trying to figure it all out and make the best-fitting pattern possible, but all the problem-solving is one of the things I really like about sewing, so I enjoyed the challenge.

Megan Nielsen Briar and Mini Briar Tees

Megan Nielsen Briar and Mini Briar Tees

I ordered all of the deer fabric from Girl Charlee.  It’s a poly/cotton blend, so we’ll see how it wears over the long run.  The fabric for the short-sleeved Mini Briar is left over from a long ago project and is from Jo-Ann’s.

Sewing all these up reminded me that while I really love sewing knits because they are so forgiving, I still have a lot to learn.  I’m getting better at choosing stitches that work well, but I still get wavy collars that don’t sit right.  Part of the problem is that, in most cases, I’m not quite sure what I’m doing wrong.  In the aqua and pink shirt, I raised the neckline, but still used the original pattern piece for the neckband, which I should have shortened.  Lesson learned.  As for the other ones, they are pretty close, but not quite right.  Ironing helped, but I think I still need more practice.  Oh, well!

Overall, these are great shirts and they have been getting lots of wear.  It’s nice to see my t-shirt collection slowly getting more interesting and colorful, and it was fun to try out a kids’ pattern.  I think the recipients of the kids’ shirts were happy, too.  🙂

Megan Nielsen Briar Tee

Megan Nielsen Briar Tee

Megan Nielsen Briar Tee

Megan Nielsen Briar Tee

Recommendations

Here’s some fun stuff to check out over the weekend.

  • You have to see this dirndl on the Draped in Cloudlets blog.  I’m so impressed by the fit, subtle details, and sheer amount of work that must have gone into this!  The results are so beautiful, and really inspiring.  I think I may need a reason to sew a dirndl…
  • I’ve been listening to a lot of the folk/bluegrass music of Sarah Jarosz lately.  I don’t have a broad knowledge of music, but when I find someone I like, I tend to play their music to death.
  • I always figured that the one everyday clothing item I couldn’t make was shoes.  Then I saw these ballet flats that Jodie of Scared Stitchless made.  I’m happy to be proven wrong.  These are amazing.
  • Here’s another cool music video for you this week:  Wintergatan–Marble Machine.  The music is made by marbles being run through a machine by the artist.  Fascinating and lovely.

A Vintage Blanket Becomes a Skirt

Standard

Years ago some amazing sewing ladies who are my mother’s friends, gave me a vintage wool blanket (among other things).  They had a business repairing antique quilts, as well as upcycling quilts that couldn’t be repaired and turning them into handmade goods.  When they moved on to other things, they gave me some of their fabric and thread.  I didn’t sew much at the time, but being a creative person, they thought I might be able to use the things.

One of my favorite items was part of a woolen blanket with two sets of initials on it.  It was a winter white with two blue stripes and navy embroidery, and although I didn’t know its story, it seemed special.  I put it aside until just the right project presented itself.  It finally seemed that I had found the perfect use for it when I saw the Brumby Skirt by Megan Nielsen.  I knew it might not work…but I also knew it might.

Brumby Skirt pattern by Megan Nielsen

Brumby Skirt pattern by Megan Nielsen

That idea, that sort of razor’s edge between working or not working is what makes creative endeavors so exciting.  I love to try projects where I am more sure of the outcome.  I get a lot of satisfaction from them, but it really gets interesting when you ask the question, “Will it work?”  I think this is a question that some of the best art and the best fashion have at their heart.  Sometimes the outcome is terrible.  Sometimes it’s ok.  But sometimes it goes beyond what you imagined.

I don’t think this project reached the level of being beyond all I imagined, but the act of walking that line made the project exciting.  Could I create a skirt from this blanket?  Would it be too thick to sew?  Would it lay right?  I’ll tell you from the outset that I love this skirt.  It’s not perfect.  It doesn’t give me an enviable form or lack mistakes.  But I still say it works because some of my big goals in sewing are to create clothing that is unique and interesting.  (And I get to wear a blanket as a skirt in winter!  Always a worthwhile goal!)

Megan Nielsen Brumby skirt made from a vintage blanket

Megan Nielsen Brumby skirt made from a vintage blanket

Megan Nielsen Brumby skirt made from a vintage blanket

So, let’s get into some details.  The skill that I hoped to learn in this project was how to create a lining, so I bought some Bemberg rayon lining from Joann’s and leaned heavily on the book Easy Guide to Sewing Linings by Connie Long.

Easy Guide to Sewing Linings by Connie Long

Megan Nielsen Brumby skirt made from a vintage blanket

Maggie from Pintuck & Purl helped me think through my process for creating the waistband, which included lining it with some fabric from my stash and omitting the interfacing.

Megan Nielsen Brumby skirt made from a vintage blanket

I found a plain navy fabric in my stash for the inside of the pockets.  Since the edge of the blanket was already finished, I decided to omit the hem.  This also saved me fabric, since I had a limited amount of blanket to work with.  In order to do that, I marked the place I would have turned the fabric up to sew the hem and used that as the new bottom line for my skirt.  You can see it faintly below.

Megan Nielsen Brumby skirt made from a vintage blanket

Like vintage fabric sometimes does, this blanket had some light stains.  I tried using a stain remover to get them out, but it didn’t work, so I did my best to cut around the ones I could.  The rest just had to remain.  I did run into a little bit of trouble while sewing in the zipper.  It wasn’t quite even at the top, but since this is for me, and I get to decide what I will and won’t fix, I just folded the extra over and sewed it down.  Problem solved.

Megan Nielsen Brumby skirt made from a vintage blanket

Megan Nielsen Brumby skirt made from a vintage blanket

Megan Nielsen Brumby skirt made from a vintage blanket

I also decided to do a decorative topstitch above the seam that joins to waistband to the skirt, just to make sure everything was tacked down.

Megan Nielsen Brumby skirt made from a vintage blanket

Megan Nielsen Brumby skirt made from a vintage blanket

I wanted this done before winter was over, so I was pretty motivated to get it finished.  The days after I finished it were cold, so I could wear it right away!

Megan Nielsen Brumby skirt made from a vintage blanket

Megan Nielsen Brumby skirt made from a vintage blanket

Megan Nielsen Brumby skirt made from a vintage blanket

I really like the skirt.  I don’t think it’s going to be the most flattering look, but I just love its interesting uniqueness.  My sister says I need a clever response when asked what the initials stand for.  Any ideas?  (Keep it clean!)

Megan Nielsen Brumby skirt made from a vintage blanket

Megan Nielsen Brumby skirt made from a vintage blanket

It’s really warm and comfortable and love all the different parts I incorporated–lining, colored pockets, and patterned waistband.  I deem it a sewing success.

Megan Nielsen Brumby skirt made from a vintage blanket

Megan Nielsen Brumby skirt made from a vintage blanket

I haven’t yet had a chance to blog a few of my other winter projects, but as far as sewing things goes, this was my last winter make.  I’m on to spring sewing.  I’ll still post the few made-in-winter projects I haven’t shown you yet, but this is the only garment that will probably be worn exclusively in the winter, so I wanted to blog it before spring came.

Recommendations (Yea!)

  • As I come to love hand-sewing more, I find my interest in embroidery being renewed and growing, too.  In that vein, I’ve found some really fun embroidery artists.  An etsy shop I recently discovered is cozyblue handmade.  They have embroidery patterns, etc.  I’m a fan of the Sea Captain.
  • If you listen to podcasts, I’ve just found a new one that I like:  The Seams podcast.  It’s about clothing and the stories connected to it. Jacki Lyden does a great job of interviewing a wide variety of people and looking at clothing from many angles.
  • If you like to garden, but sometimes feel nervous because you don’t really know your plants’ intentions, you should watch “Indoor Gardening Tips from a Man Who’s Very Scared of Plants”.  Problem:  SOLVED!

Take Two: Megan Nielsen Briar T-Shirt

Standard

Today’s project is a second take on a shirt I’ve made once before.  It’s Megan Nielsen’s Briar t-shirt and sweater, this time made from a fleece-backed fabric.  You can see my first version of this pattern here.

I made this one for my trip to Colorado last month.  Since I was planning to wear my other Briar sweater on the plane ride out, this seemed like a good choice for the ride home.  I suppose you could call that dorky, but I call it awesome.  I already had the pattern ready, the fabric waiting to be used, and I really needed a quick project to whip through after all the time I spent on the outfit I wore to the wedding in Colorado.  With all that ready and waiting, it was such a fast project.  Super satisfying!

Here are the details:

As mentioned, I used the pattern below.

My awesome Briar

My imperfect but awesome Briar sweater

These days I trace out my patterns on tracing paper, which gives me a nice, clean pattern to work with, especially if I am grading between sizes, which I usually do.  It was so nice to already have this traced out from the last time.  I chose to make a medium at the bust and grade out to a large for the waist and hips.

Megan Nielsen Briar T-shirt (MN2303)

Megan Nielsen Briar T-shirt (MN2303)

I made Version 4, which is the long-sleeved t-shirt in the longer length.  I really like the high-low hem.

Megan Nielsen Briar T-shirt (MN2303)

Megan Nielsen Briar T-shirt (MN2303)

The fabric for this is pretty cool.  I got it this summer at Field’s Fabrics in Kalamazoo, MI.  Man, that place is great!  This fabric is, I think, made by Polartec.  The quality is really great, and makes me only want to sew with their fleece (However if some other company wants to try to convince me their fleece is better, send over the free fabric!  I’ll try it, but it’s going to take A LOT to convince me.).  It’s got a fleece inside and a stretchy, smooth outside.  It would be perfect for an athletic jacket, but I wanted to try it in another context.  When I thought of pairing it with this pattern, it seemed perfect.

Here are some detail shots.  This time around, I made sure to stabilize the shoulders with ribbon, rather than trying to do that after the fact.  I’ve since stabilized the shoulders and back of the neck on my first version of this pattern, but I don’t think it was a huge help since I did it after the fact.  I wasn’t going to make that mistake this time (See?  Sewing is LEARNING!).

Megan Nielsen Briar T-shirt (MN2303)

Megan Nielsen Briar T-shirt (MN2303)

A nice thing about working with knits is that you don’t have to do a lot of finishing of seams and edges.  The hem and sleeves are just turned up and zigzagged.  I made sure to use a jersey needle and a walking foot to help with the sewing.

Megan Nielsen Briar T-shirt (MN2303)

Megan Nielsen Briar T-shirt (MN2303)

You may notice in the photo above that my sleeve seam isn’t flat.  I sometimes hem the sleeves before sewing the sleeve up.  I’m always afraid it will be hard to hem it afterward, even though my machine has a free arm.  I haven’t decided if I like this better or not.  It’s definitely easier, but I don’t think it looks as nice as sewing the sleeve seam first and doing the sleeve hem after.  It doesn’t bother me when I wear it, though, so I keep doing it.

Megan Nielsen Briar T-shirt (MN2303)

Megan Nielsen Briar T-shirt (MN2303)

Here is the shirt from the inside:

Megan Nielsen Briar T-shirt (MN2303)

Megan Nielsen Briar T-shirt (MN2303)

And that’s about it!  I have one more of these shirts cut out in a jersey knit, so it will be interesting to see if that fits at all differently, since I have noticed some wrinkles that radiate out from the underarms in the versions I’ve already made.  I can’t tell if there is a fit issue there that I don’t know about or if it is the fabric I’ve chosen.  I guess I can compare them all when the t-shirt is finished.

And, last but not least…This is fun now!  Here are my fun things for you to check out.

  • Hillcraft Designs on etsy.  This one belongs to my friend who is an amazing potter, knitter, and all-around fabulous maker of a billion things.  Jo-Alice is a one in a million person and a one in a million maker.  My parents have ordered pottery from her and I bought some for my best friends for Christmas.  It was beautiful, and they loved it.  She has helped me in my knitting, my baking, and in all of life, really.  I highly recommend her work!
  • For your reading pleasure, check out Ask the Past by Elizabeth P. Archibald.  I really love funny things.  The author of this book found advice throughout history and has compiled it, with comments for all of us.  It contains gems like the usefulness of bacon for curing wounds, how to get sympathy after giving birth (hint:  scream really loud!), and a caution to not smell too much basil (you might end up with a scorpion in your brain!).  We checked out a copy from our library, so you can check yours to see if they have it, too.
  • Last, but not least, and continuing on the “funny” theme, this is currently my favorite sketch from The Tonight Show with Jimmy Fallon.  Makes me laugh so hard I cry pretty much every time.

My Imperfectly Awesome Briar Sweater

Standard

This wasn’t the post I had planned to write to accompany these pictures.  This, my first attempt at Megan Nielsen’s Briar pattern, didn’t turn out exactly right.  I was going to fix it and then show you my before and after pictures.  But I didn’t fix it.  I might, but I haven’t yet, and I decided it was better to show you the shirt as it is and update you if I ever do alter it.  Because I actually love it how it is even though it didn’t turn out the way that I planned.

My imperfect but awesome Briar sweater

So here are the details.  I got this super-cool fabric at Pintuck & Purl in Exeter, NH a few months back.  It’s a double layer combination of a wool knit (or it may be a wool-blend; I can’t remember) and a cotton jersey layer.  It was originally smooth on both sides, but I took a small bit and threw it in the washer and dryer to see what would happen.  It shrunk, but the wool layer didn’t completely felt, and the jersey scrunched up in a cool way due to the shrinkage of the wool.

Double layer fabric from Pintuck & Purl in Exeter, NH

You can imagine that this made for a pretty stretchy fabric, and I knew I was taking a risk with it, not only because of the stretch factor, but because the shrinking had really thrown the grain off.  It just seemed like the perfect fabric for a super cozy Briar, though, so it had to happen.

The Briar pattern has been my favorite Megan Nielsen pattern since I discovered that company, and when I heard it was coming out in paper form, I bought a copy as soon as it was available.  That’s pretty rare for me.  I don’t have a ton of “sewing money”, so I tend to window shop for ever and buy very carefully.  I knew I wanted this pattern, though.

My awesome Briar

My imperfect but awesome Briar sweater

 I thought that a Briar in this fabric had a lot of potential for a relaxed, rough look with some exposed seams and unhemmed edges.

My imperfect but awesome Briar sweater

I really love knits and I sew with them pretty frequently, but despite that, I’m not really awesome with them yet.  This is a pretty well-explained, straightforward pattern, but I ran into some problems with the neckline very quickly because of my fabric and what I thought I wanted to do with it.  I didn’t stabilize the shoulders although I see now that I should have.  I also tried to simply sew a strip of fabric cut on the cross-grain around the neckline so it would have a raw-edged look.  The neckline seemed to sort of get wavy, though, and grow.  That’s when the frantic internet-answer-searching began.  I finally left a blog comment for Lauren (of the blog Lladybird) to ask about the wavy neckline, and she gave me some great tips, but it was already a little too late for this shirt.  The waviness was there (because by that time, I had taken off the strip of fabric and just zig-zagged the edge) and I was afraid to mess with it any more.  I do have to thank Lauren, though.  I don’t know her at all.  I just follow her blog, but whenever I have needed an answer (how to use Flickr for my blog photos; how to fix my knit fabric disasters), she has always gotten back to me.  Thanks, Lauren!

My imperfect but awesome Briar sweater

My imperfect but awesome Briar sweater

My imperfect but awesome Briar sweater

At that point, I decided to leave the neckline alone and just finish.  I thought about putting a sparkly zipper (also from Pintuck & Purl) in the back, but once I got to the point of adding it, it didn’t look right, so I skipped it.  This is a really quick and easy pattern, so I just resigned myself to wearing the sweater with a tank top underneath until I could figure out how to fix the neckline.  I bought twill tape to sew into the shoulders and around the back of the neckline after the fact to sort of hold things in place…but I haven’t done it yet……and I just love the sweater.  It’s a little chilly around the neck when it gets cold out, but that’s a great opportunity to wear the cowl my friend knitted for me (thanks, Audrey!).

All in all, even with its “imperfections”, I love this sweater.  I’ve already made a second one (still to be worn, photographed, and blogged), and this time I made sure to stabilize the shoulders.  Gotta learn the lessons, right?  I think more Briars (and mini-Briars) are in my sewing future.

My imperfect but awesome Briar sweater

My imperfect but awesome Briar sweater

My imperfect but awesome Briar sweater

The Brumby Skirt from Megan Nielsen Patterns

Standard

Today I’m happy to share with you one of my latest projects, the Brumby Skirt from Megan Nielsen Patterns!

Brumby Skirt pattern by Megan Nielsen

I really went back and forth on this one before starting and did lots of “research” checking out others’ versions of it around the web.  I’m still not super sure if I like the high-waisted skirt look on me, but I thought I would give it one more try before deciding for certain, especially since I won this pattern in the Refashioners contest and had the perfect fabric for it–some linen from Pintuck & Purl!

Brumby Skirt pattern by Megan Nielsen

Brumby Skirt pattern by Megan Nielsen

 I made Version 1, the shortest version, in a large.  My original thought was to make it longer.  If I’m wearing a closer-fitting skirt, like a pencil skirt, I feel ok with this length because I can feel the skirt on the back of my legs and I know I’m not exposing myself.  In a fuller skirt, though, you can’t always feel the back of the skirt, which worries me at times…

So, I planned to make it closer to knee-length.  I had, however, read Lauren/Lladybird’s post on her Brumby skirt and remembered that she said she had been underwhelmed before hemming, but loved the skirt when it was the specified length.  Well, my experience was exactly the same.

Brumby Skirt pattern by Megan Nielsen

I made it up but didn’t hem it, and it was very blah.  So, I decided to pin it up to the length in the pattern…and that’s when it happened.  I don’t know how she did it, but Megan Nielsen put some magic in this pattern.  When you hem it, it transforms!  I love it!

Brumby Skirt pattern by Megan Nielsen

So, here are some details and design decisions I made.  Initially I was going to put in this gorgeous silver zipper that I bought at Pintuck & Purl, but I would have had to shorten it…and it was a metal zipper.  I know it’s possible, but not having ever tried this, I didn’t think I wanted to try it for the first time on a very fancy zipper.  I also thought about topstitching in silver (I was really getting wooed by that silver thread!), but in the end, I decided on black thread and a metal zipper with black tape (that I wouldn’t have to shorten).  I realized this would make the skirt more every-day in a good way (i.e. it will get worn more).  I’ll save my fancy zipper for a future project.

Brumby Skirt pattern by Megan Nielsen

Back view with exposed zipper

Brumby Skirt pattern by Megan Nielsen

Front view–it’s hard to see the topstitching, but it’s there!

 Things I wondered about before starting this project had to do with ease around the waist and the depth of the pockets.  Having only made the one high-waisted skirt (the apple skirt), I wasn’t sure how things would work out if the finished measurement was the same as my actual waist measurement.  I wondered this with the apple skirt, too, so I actually added a few inches to the waistband to be safe.  With this pattern, I decided to risk it and just made it as it was printed, and it worked out great!  It’s very comfortable and not too tight at all.

Brumby Skirt pattern by Megan Nielsen

I noticed in my travels around the web that the pockets looked deep enough that they weren’t actually supporting anyone’s hands–which is the case.  It’s like your hands are straight down at your sides…but I still love those huge pockets.  I can keep things in them and you can’t even tell!

Brumby Skirt pattern by Megan Nielsen

I did end up doing just a little topstitching at the edges of the pockets (which was an optional suggestion) so that they wouldn’t stand out as much, and that has been great.  I also managed to catch the bottom edge of the pockets in my hem on the inside, which tacks them down nicely.

Brumby Skirt pattern by Megan Nielsen

Brumby Skirt pattern by Megan Nielsen

Brumby Skirt pattern by Megan Nielsen

As far as seam finishing goes, I just zigzagged in the seam allowance and then trimmed the seam with pinking shears.  This does lead to some strings and fraying after washing, but I think that will stop soon.  This fabric is a nice, substantial bottom weight, and French seams didn’t sound like fun on this one.

This was a fun and easy pattern.  I am sort of curious about how it would look in wool–I have a few pieces that were given to me.  With these cozy fleece-lined tights, I wore this skirt four out of seven days.  Yes–I totally do that, especially if I’m not going to see the same people every day, but don’t worry–there were some laundry days in there.  😉  I think this will be a great early fall, late spring, and summer skirt.  The more I see of Megan Nielsen’s company, the more impressed I am.

Brumby Skirt pattern by Megan Nielsen

Brumby Skirt pattern by Megan Nielsen

Brumby Skirt pattern by Megan Nielsen

Before I go, I want to let you know that I updated my last post with a few more pictures of the inside of the shirt I made.  Go on over and check it out if you want to see more.  🙂