Tag Archives: holiday

Simplicity 8391 Wide-Leg Pants in Cotton Velveteen

Standard
Simplicity 8391 Wide-Leg Pants in Cotton Velveteen

Do you ever look in your closet and realize you are missing a certain type of clothing? I suppose that happens to everyone from time to time. Before Christmas, I realized that I had no dress pants except for one pair that was a bit snug. Like many others, my body has changed during COVID, and the dress pants I had previously have been cleared out of my closet since they no longer fit. I often make do with what I have for holidays, but I wanted something nice for our Christmas Eve church service. I don’t like sewing to a deadline, but I had probably a month to go before Christmas, which seemed reasonable, even with all the other pre-holiday demands on my time.

Simplicity 8391 Wide-Leg Pants in Cotton Velveteen

I looked through my fabric collection and found some beautiful cotton velveteen that I had bought a few years ago from Fabric Mart. It was originally slated to become part of a party outfit, but that plan took a turn, leaving this lovely fabric behind.

In order to speed me on my way and avoid fitting questions, I looked at what I had in my closet that already fit. One of the patterns I have made a few times, that still fits and that I love is Simplicity 8391.

Simplicity 8391 Wide-Leg Pants in Cotton Velveteen

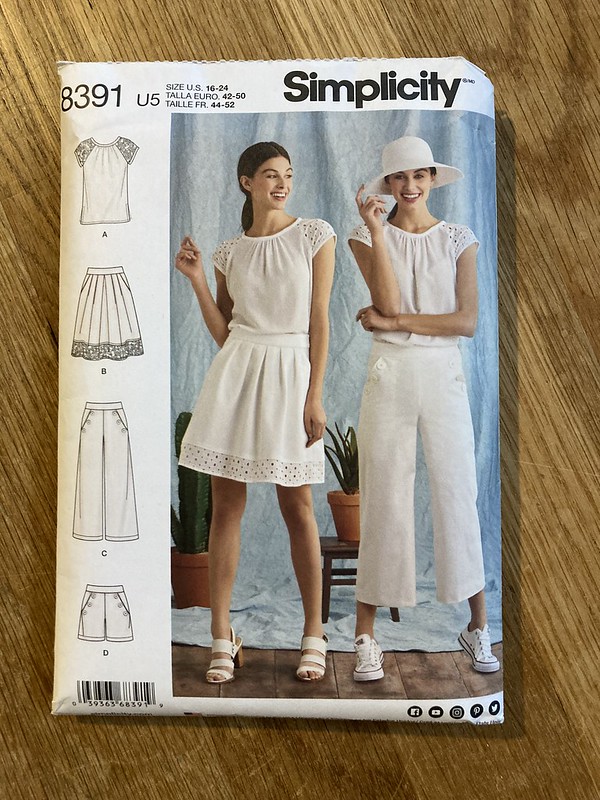
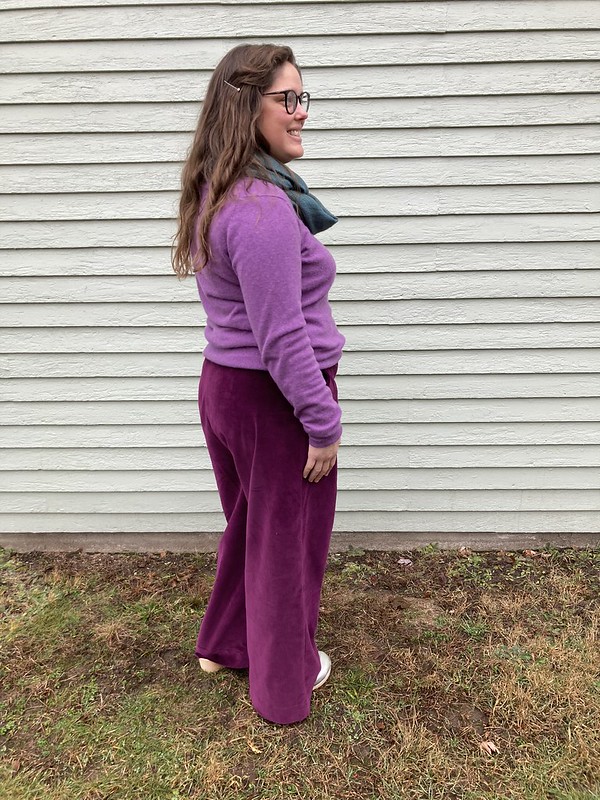
I have made the shorts (View D) in pink denim and the cropped pants (View C) in green canvas. Later, I lengthened the pants to full length and made them in a more traditional blue denim. I love and wear these pants a lot, and with their wide legs, they are great in winter if you need to wear long underwear underneath on cold days. The only thing I wanted to adjust from my long blue denim pair was to add one more inch for a deeper hem.

I laid out my velveteen on the fold to see if I could fit my pattern. It was just barely wide enough, and just barely long enough. I had to keep in mind the nap of the fabric and cut the pants so the nap was running all the same way, but I could manage it with what I had. I cut everything out, and added an inch to the length of the pant legs right at the bottom so that I could finish them with a deeper, 2.5″ hem.

Simplicity 8391 Wide-Leg Pants in Cotton Velveteen
Adding and inch to my pants during cutting (close-up)

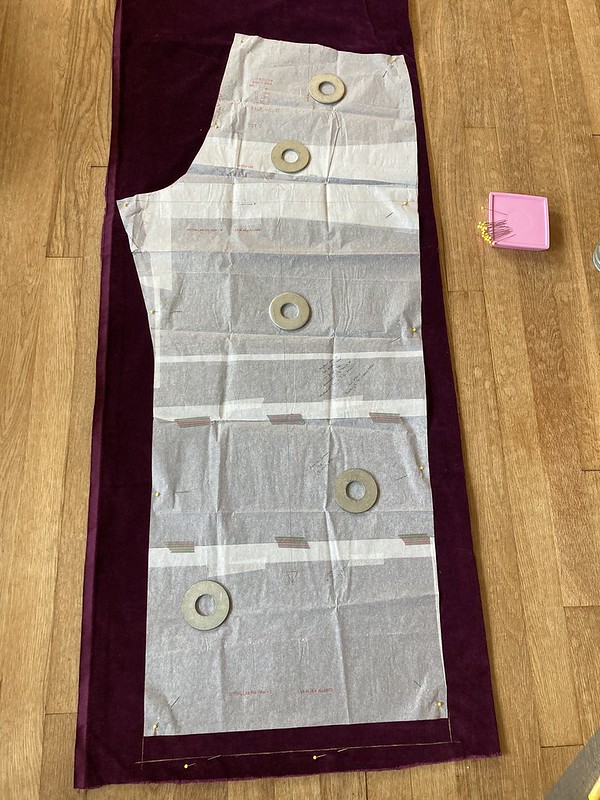
I know that the proper way to add length to pants is in the middle of the legs, and this is what I did when I initially lengthened them, as you can see two pictures up, but because this wasn’t the only project on my plate and there was a deadline, I tried to make things quicker wherever possible.

Making things speedy included using my serger to finish seams. While serging is not my favorite finish as far as looks go, I definitely like it better than the zigzag edge finish I often used inside pants before getting a serger.

Simplicity 8391 Wide-Leg Pants in Cotton Velveteen
Nicely finished, and I even got that deeper hem that I wanted.

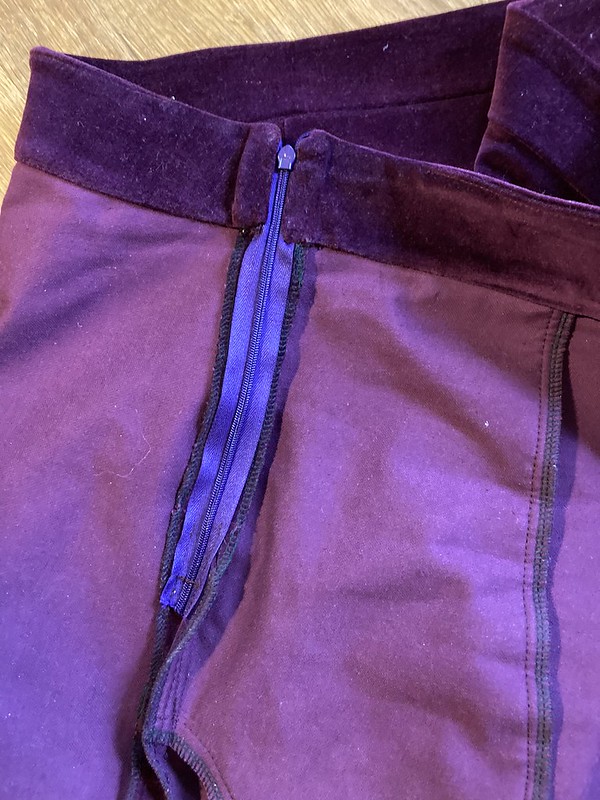
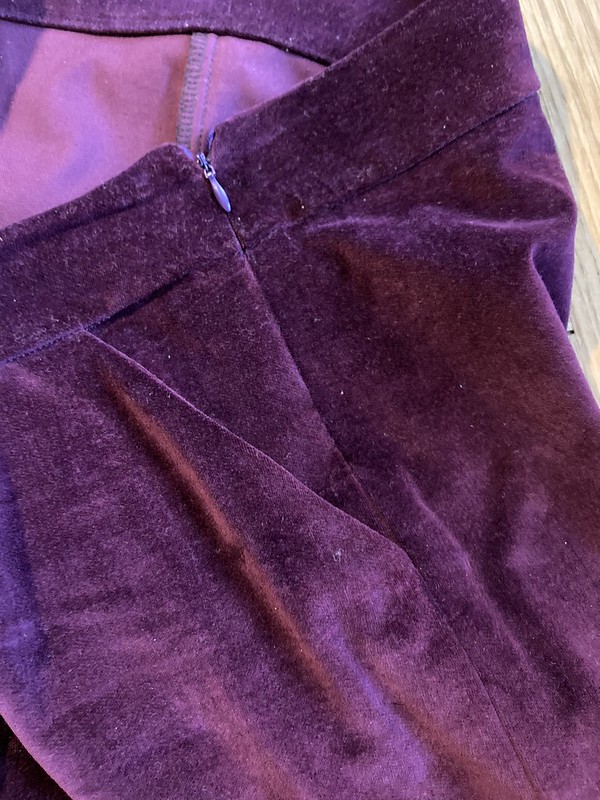
Unlike my last pair of these pants where I used a jean zipper and lapped zipper application, I went back to what the instructions suggested and used an invisible zipper. I couldn’t find an exact color match, but since it’s invisible, only the pull shows, so it doesn’t matter that much. While the zipper technically stops below the pocket, it sticks a bit there because of the bulk of the fabric, so I just unzip it down to the pocket when I need to get in and out.

Simplicity 8391 Wide-Leg Pants in Cotton Velveteen

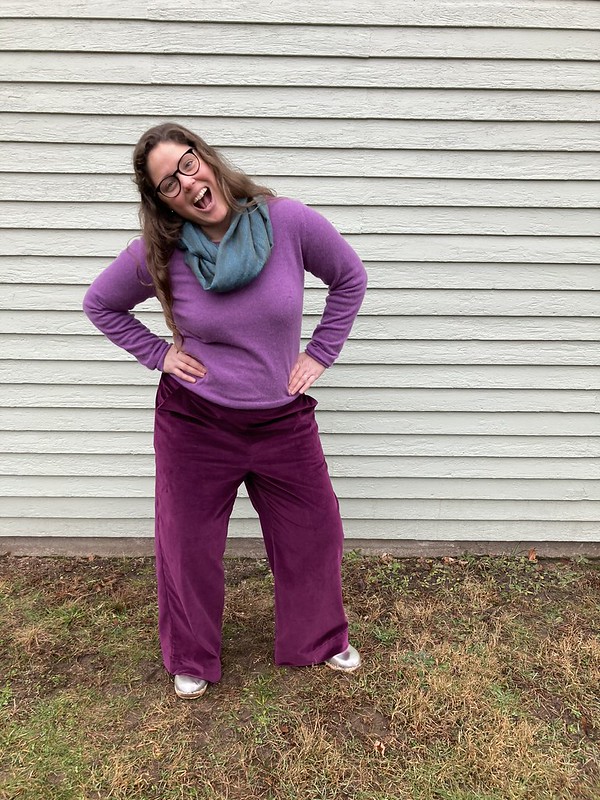
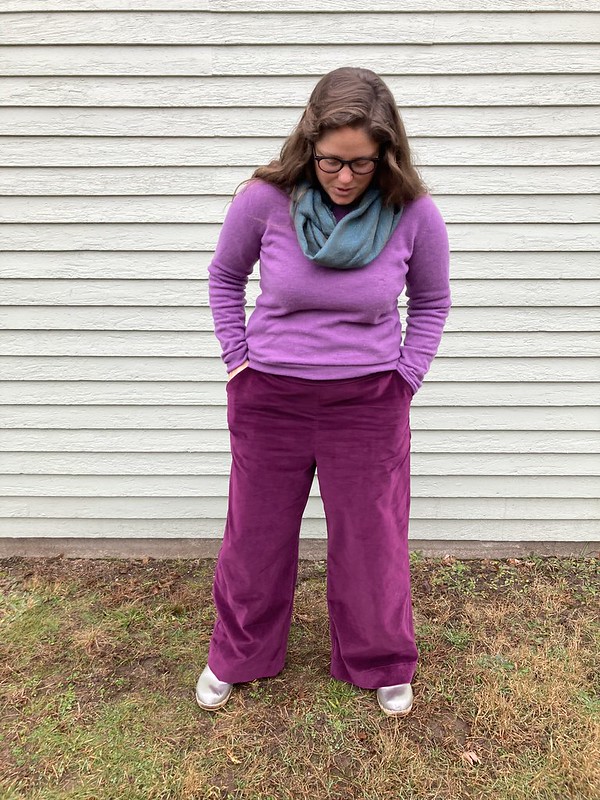
I also left the buttons off the front of the pants this time. They are such a cute sailor-inspired detail, but I wanted these pants to be dress pants, and a little more plain. It’s hard for me to keep things plain and not add extra colors or details, but it helps that I love this purple and its soft and velvety texture.

Simplicity 8391 Wide-Leg Pants in Cotton Velveteen

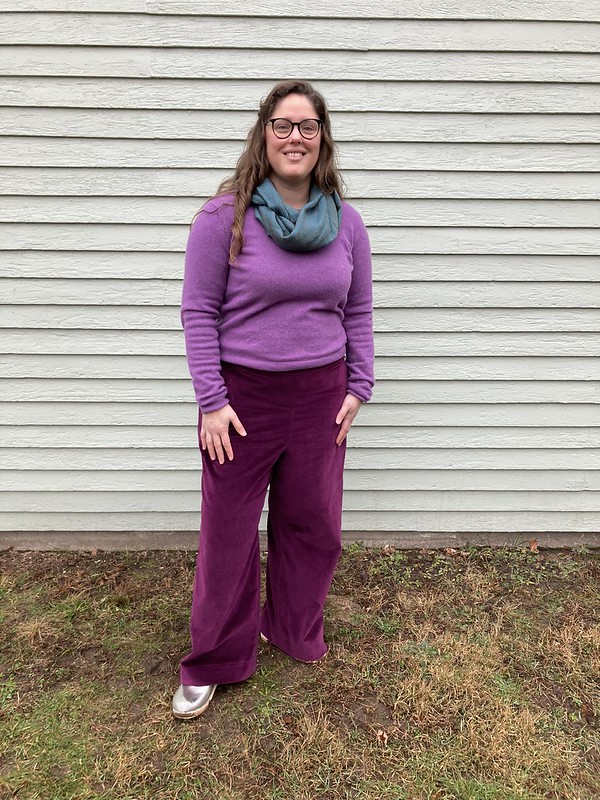
Because these are 100% cotton, they do relax with wear. I find this really comfortable, although it does change where the pants sit on your waist as they relax. This can sometimes result in a rather low crotch, so keep this in mind. I sewed the size that my measurements put me in, a 22, but you may want to size up or down according to what you like. I have worn these a time or two before taking pictures, so this is a more relaxed fabric day.

Simplicity 8391 Wide-Leg Pants in Cotton Velveteen

I was very happy to have these finished with time to spare, especially because I signed up for some ‘panic sewing’ for one of my kids! I wasn’t the only one who wanted something nice for Christmas Eve!

Simplicity 8391 Wide-Leg Pants in Cotton Velveteen
Trying out some different poses; my neighbors were very confused about what we were doing in the yard, and who can blame them? Haha!
Simplicity 8391 Wide-Leg Pants in Cotton Velveteen

So, my mission accomplished, I had something nice to pair with a sweater for Christmas Eve church as well as a pair of dress pants I really like in my wardrobe. And I even got my other sewing projects done on time! More on those later, hopefully. 🙂

Pysanky

Standard

Ever heard of pysanky?  Yes?  No?  Pysanky are Ukrainian Easter eggs.  (You can find more information here and here.)  They are made using a wax resist technique much like batik.  Every year around this time, St. John the Russian, a Russian Orthodox church in Ipswich, offers a few pysanky workshops.  I was able to make it to both of them this year, once with some friends, and once with my eldest daughter.  Check out what we made:

Pysanky

At the beginning of each workshop, Julianna and Xennia Scheider explain some of the history and technique behind making pysanky.  They both have decades of experience, and it’s really amazing to see the eggs they and Julianna’s sister, Seraphima, have created over the years.

To decorate the eggs, you begin with white eggs and a small tool called a kistka that is like a stick about the length a pencil with a very small funnel attached to the end.  You heat the funnel over a flame and then scrape beeswax into it, heat it again until the wax melts, and then use it to draw whatever you would like to remain white onto your egg.  Once you’ve done that, you put the egg into the lightest color of dye you plan to use.  After a few minutes, remove the egg, dry it, and cover whatever areas you want to remain the color you just used  Then submerge it into the next color, and so on, until you finish with the darkest color you want to use.  It involves a bit of planning backwards and a good combination of aiming for a certain design and letting go of creative control.  You never know quite how the colors will come out.

Pysanky

In the picture above, you can see the three eggs I made over two weeks on the left.  The fourth from the left was a Jackson Pollock inspired collaboration between my daughter and myself.  She made the two eggs on the right.  The first egg on the left I had planned to make purple, but in the end it became a deep blue.  The next one over was going to be green, turquoise, and royal blue, but it came out a little different.  If you can approach the process with a little planning and a little letting go, you can really enjoy making the eggs and seeing the surprise of how they turn out in the end.

There is a lot symbolism you can incorporate into your eggs, or you can just experiment.  This year I used some of the example pictures they gave us to cobble together designs I liked.  The collaboration egg was pure experiment.  My daughter’s red egg was her trial egg, and she made the Batman egg for my husband.  Her first version smashed on the floor, but she put aside her disappointment and started again, finishing with plenty of time.

Pysanka

Once you go through the process of drawing with the wax and dying the egg, you put your egg on a rack of some sort in a warm over to soften the wax.  When it has softened enough, you wipe the wax off, revealing your creation!  It’s so exciting to see everyone’s eggs coming out of the oven and being revealed.

Pysanka

Pysanka

Pysanka

Pysanka

Pysanka

You can see a faint “S + L” that my daughter drew on the egg we worked on together.


Pysanka

Pysanka

Pysanka

Pysanka

I have yet to buy a kit and try this at home, but it wouldn’t be hard to do.  You can find kits in many places, including amazon.  Julianna told me that the dyes will usually last about three years if you add a bit of vinegar to top them off each year.  You can also find all kinds of books with examples of amazing eggs at your library or online.  One of the oddest parts for me was that we didn’t blow these eggs out.  Xennia said that over the years, it just feels like the insides turn to dust.  If you aren’t comfortable with this, however, you can blow them out first.  If you choose not to, just make sure you store them where air can circulate around them or they may crack (and stink).  I learned that lesson the hard way last year after storing the ones I had made the year before in a Ziploc bag.  Eggs may make us think of spring, but that smell certainly won’t remind you of a flower-filled day.

Have you ever tried this?  If you never have, I hope you do, but watch out!  It’s pretty addictive.  😉


Merry Christmas and a Happy New Year

Standard

Merry Christmas and Happy New Year from Pattern and Branch

Needlework by Tine Spires


This is to wish you all a Merry Christmas and a Happy New Year!  I’m going to take a vacation from blog writing until the new year (unless I think of something I just have to share with you).

I hope you all have a truly peaceful and hope-filled holiday, not a fleeting peace and hope that comes only imperfectly for a few days or weeks, but the kind that came with the first Christmas.  Now that is a very strange story, but sometimes…well…sometimes truth really is stranger than fiction.  Here’s to the hope of a lasting peace on earth and goodwill toward men.

One Way to Make a Wreath

Standard

One Way to Make a Wreath (Pattern and Branch)

There are about a billion ways to make a wreath.  It’s just a circle, after all, so it really depends on your own imagination.  A few years ago, a lady at my church showed us a method for wreath-making that I’d like to share with you today.

Here are the supplies you will want to have:

One Way to Make a Wreath (Pattern and Branch)

  •  A metal hanger
  • Newspaper
  • Masking tape
  • Pruning shears or tough scissors (for cutting the branches)
  • Pliers
  • Floral wire

Also, you should have some branches that you’ve cut.  If you can’t work on the wreath the day you cut the branches, keep them outside (or in a cool place) in a bucket of water.

One Way to Make a Wreath (Pattern and Branch)

Here’s what you do:

1.  Stretch out your hanger by pulling the bottom down.

One Way to Make a Wreath (Pattern and Branch)

2.  Use your pliers to straighten out the bends and keep pulling and pushing on the wire until you have it more or less circular.

One Way to Make a Wreath (Pattern and Branch)

3.  Tear your newspaper until the double pages are single (leave the single ones as they are) and fold them lengthwise two times to make long strips.

One Way to Make a Wreath (Pattern and Branch)

4.  Wrap the folded strips of newspaper around the hanger, starting at the top and going around.

One Way to Make a Wreath (Pattern and Branch)

5.  Use masking tape to secure the newspaper to the top of the hanger.  It’s hard to see, but I was originally using off-white masking tape.  I used that to secure the newspaper to the top of the hanger.  I had to switch to blue because the off-white wasn’t peeling off the roll easily.  It seems like a happy accident since the blue is so much easier to see.

One Way to Make a Wreath (Pattern and Branch)

6. Keep wrapping until you’ve gone all the way around.  End by taping the last of the newspaper to the top of the circle.

One Way to Make a Wreath (Pattern and Branch)

7.  Take a bunch of short branches and wrap floral wire around them to secure them.  If your branches are too long, use your pruning shears or some tough scissors to trim them to the size you want.  You don’t need to knot the wire in any way, just wrap right over the end.

One Way to Make a Wreath (Pattern and Branch)

8.  Without cutting the wire, lay your group of branches on part of the wreath form you’ve made and continue to wrap the wire around the form and the branches a few times.  I brought the wire from the inside of the wreath out, but however you find it most comfortable is what you should do.

One Way to Make a Wreath (Pattern and Branch)

9.  Continue to make small bundles of branches and lay each new bunch over the ends of the last bunch.  Hold the new bunch in place and wrap wire around it and the form.  (You won’t be wrapping wire around each bunch before putting it on the form at this point–that was only for the first bunch.)  Make sure not to cut the wire, just lay each new little bundle down and wrap.

One Way to Make a Wreath (Pattern and Branch)

10.  Keep going until you are nearly back to your starting point.

One Way to Make a Wreath (Pattern and Branch)

11.  Carefully cover up the place where you started.  This takes a little bit of trial and error.  I laid a bunch of branches over my starting point, but had to lift some of the pine needles up and wrap the wire under them so it would remain hidden.  You can also wrap wire around and, as long as it’s not too tight, you can pull pine needles out of the wrapping to cover your wire.  Cut the wire, leaving a little bit extra (maybe an inch or two).  When I had finished, I tucked the extra wire under some other wire and twisted it around until it seemed secure.

One Way to Make a Wreath (Pattern and Branch)

12.  Now you have a basic wreath.  Time to add a little bit of interest.

One Way to Make a Wreath (Pattern and Branch)

13.  Take a few berries or some pinecones or whatever you like the look of.  Make a little bunch, wire them together like you did in Step 7 and, without cutting the wire, wrap it around the wreath while holding the bunch in place.  Try placing it slightly under some of the pine needles so the wire doesn’t show.  Secure the wire by wrapping it around itself like you did when you finished the wreath (just make it up until it feels secure).  Use the hook from your hanger to hang it up.

One Way to Make a Wreath (Pattern and Branch)

Good job!  You did it!

If you hang this wreath outside in the cold, it should stay nice and green for a long time.  If it’s dry in your area, mist your wreath with water every day or two.

Happy Thanksgiving!

Standard


Happy Thanksgiving from Pattern and Branch

Happy Thanksgiving everyone!

Last Thursday night we had a pre-Thanksgiving dinner at our house called, among other things, “Potato and Pie Thanksgiving”.  This is my husband’s dream menu for Thanksgiving, and I have to admit that it sounded pretty great to me, too.  We had some friends over and each person was charged with bringing a potato-based dish and/or a pie.  We also planned a prize for the most creative and delicious item.  It was so much fun!

The dish that won was a potato dish that took the idea of scalloped potatoes one step further with a creamy sauce, kielbasa, and extra cheese.  So good!  Because this is a group of friends that we get together with to watch MacGyver and other ’80’s TV shows, the prize was a Swiss Army Knife, an important tool that our hero, MacGyver, is never without.

Since we were the hosts, we didn’t compete, but one of our potato dishes was quite popular all the same.  I’d like to share it with you.  It’s a recipe that is common at my husband’s family gatherings and is everything people like in a good holiday dish:  fast, easy, and deliciously unhealthy.  If you need a potato dish for your Thanksgiving feast, you might try out “Hobo Potatoes”.

Hobo Potatoes

Ingredients:

  • 2 pounds of frozen hash browns (the square kind–let them sit out for a little while so they are easier to separate)
  • 1 cup of diced onions (make it easy on yourself and just buy them frozen!)
  • 1 can of cream of chicken soup
  • 16 ounces of sour cream
  • 8 Tablespoons of butter, melted (reserve a little bit to mix with the corn flakes)
  • 8 ounces of grated cheddar cheese
  • corn flakes (enough to cover the top of the dish)

Instructions:

Preheat your oven to 375 degrees Fahrenheit.  Spray a 9″x13″ pan with non-stick cooking spray.  Mix all ingredients except the corn flakes and reserved butter together right in the pan.  Mix corn flakes and the reserved butter together and spread on top of the mixture you just made.  Bake the dish, uncovered, for one hour.  Serve warm.

Hope you have a great Thanksgiving!

Happy Thanksgiving from Pattern and Branch


Field Trip: The Vintage Bazaar Holiday Jubilee (Part 2)

Standard

Yesterday I took you on a tour of my trip to The Vintage Bazaar Holiday Jubilee.  Here is Part 2 of that post, with more makers and vintage sellers to help you with your own Christmas shopping.  Let’s get right to it!

When I was in high school, I came across a set of encyclopedias that were being thrown away and took one to make a hollow book.  Working long and hard with my X-acto knife, I finally finished my project, but it was nowhere near as awesome as the books at Book End Designs. BookEndDesigns.etsy.com

Book End Designs at The Vintage Bazaar Holiday Jubilee

Book End Designs at The Vintage Bazaar Holiday Jubilee


Maybe vintage linens are your thing?  You may like The Linens Lady www.facebook.com/TheLinensLady  She had handkerchiefs, tea towels, table cloths, and aprons, all in wonderful condition.

The Linens Lady at The Vintage Bazaar Holiday Jubilee

Mill 77 www.mill77.com is a multi-dealer antiques and consignment space in Amesbury, MA.  I loved looking at this booth with its array of interesting vintage items.  I think I need to visit the store!

Mill 77 at The Vintage Bazaar Holiday Jubilee IMG_8282 IMG_8284

Across from Mill 77, I met Antoinette Indge of Cinderloop. www.cinderloop.com  As a sewer, I was really impressed with her clothing.  I’m pretty sure the pictures won’t do this one justice, either (If anyone has tips for shooting pictures indoors without natural light, I’d love to hear them.).  Her work was really creative.  Most of the clothing was shaped through artful gathers and beautiful stitches in just the right places.  I’ve never seen clothing quite like it.

Cinderloop at The Vintage Bazaar Holiday Jubilee

Cinderloop at The Vintage Bazaar Holiday Jubilee

One of my favorite things about art is how it can be used to make us look at materials and other things in new ways.  When I saw these clutches made from the same materials used for lobster bait bags, I thought they were so creative.  They’re also easy to wash in your washing machine.  You can’t beat that!

Alaina Marie at The Vintage Bazaar Holiday Jubilee

These bags are made from the same material as lobster bait bags!

One of my favorite booths belonged to Katie Marie, artist, bookmaker, and owner of Lives and Letters.  www.etsy.com/shop/livesandletters  She is a lovely person and we had a nice, long chat about making things and, specifically, her own books.  She upcycles old books and binds them into old/new journals.  They come in various sizes and papers.  She told me that if I was looking for something specific, say a journal with half graph paper and half blank paper, she can accommodate that.  She chooses really interesting books as her covers and gives them new life.

Lives and Letters (Katie Marie) at The Vintage Bazaar Holiday Bazaar

Right next door to Katie was Jessica Kealty. www.kealthydesign.com  She is an interior designer, but also sells goods from her travels.  At this event, she was selling, among other things, Turkish towels.  I’ve seen these in magazines, but never had the chance to feel them myself.  They were lovely.  The lady that I spoke with was telling me that people use them not only as towels, but also as shawls, scarves, and baby blankets.

Kealty Designs at The Vintage Bazaar Holiday Jubilee

All of these shops were located in the large, main tent at the Bazaar.  There were also several greenhouses and a smaller tent with more vendors as well as a shop in a cute truck.

I found my friend Elizabeth Berthoud of sacAmain www.sacamain-shop.com in one of the greenhouses.  (She was the one who generously donated the leather that I used to make the clutches for my friends.)  I’m always impressed with the quality of her handbags and all the special touches she puts into them.

sacAmain at The Vintage Bazaar Holiday Jubilee

Look at this cool purse made from upholstery fabric with a belt for the handle!


sacAmain at The Vintage Bazaar Holiday Jubilee

Last, but not least, I visited Laurel of Retromat Vintage.  www.etsy.com/shop/RetromatVintage and www.RetromatVintage.com  She was just as friendly and knowledgeable in person as I thought she would be.  She had a really great array of vintage goods and clothing.  In case you are wondering, I did try on the fur dress, and it fit…but it was a bit snug in the shoulder area, so I decided not to bring it home with me.  😦

Retromat Vintage at The Vintage Bazaar Holiday Jubilee

Retromat Vintage at The Vintage Bazaar Holiday Jubilee

Retromat Vintage at The Vintage Bazaar Holiday Jubilee

Between this event and the September one, I think I liked September’s better.  There were more vendors since it could be held outdoors, and the entrance price was lower, but this was fun nevertheless.  I found it very inspiring and I came away with new ideas…oh! and even a few Christmas gifts.  🙂

Field Trip: The Vintage Bazaar Holiday Jubilee (Part 1)

Standard

Last weekend, as I had hoped, I attended the Vintage Bazaar Holiday Jubilee.  I’m happy to report that I got pictures and some contact information for you!  Now you can come along via the internet and do a little Christmas shopping of your own (or at least file away some great ideas for later).

It was really fun to be a reporter for my own blog.  I met a lot of great makers.  In fact, I was doing such a good job of remembering to take pictures of  my favorite booths, that I forgot to Christmas shop, and I had to do a second round after my “blog round”.  While this bazaar was not as large as the September event, there were still many more vendors than those I photographed.  I actually got to a point where I was tired of taking pictures and there were a few booths that I really should have captured but, as you’ll see, this post will have plenty of new finds for you even without the ones I missed (I actually broke it into two parts because it got lonngggg!).  Let’s dive in!

First up, we start with the amazing Jess Wrobel www.jwrobel.com and www.broodbaby.com

Jwrobel at the Vintage Bazaar Holiday Jubilee

Check out these sachets made from recycled sweaters. They smelled great and were so soft!

Jwrobel at the Vintage Bazaar Holiday Jubilee

Some luscious yarn to knit up Jess’ patterns with

Jess’ shop was filled with yarn, patterns, and the most wonderful tactile things.  My knitting buddy and I always like to see the Jwrobel shop at craft shows.  Her work is very high quality and has a distinctive beauty to it that makes it stand out.  Plus, she’s nice.  You can’t beat that.

Next up, Luksin. luksindesigns.com  Sadly, my picture won’t do this shop justice, so you should check out her site if you are interested.  The clothing at this booth has a great visual unity, and it’s super cool, and it’s soft.  I’ve been looking online for fabric like her maxi skirt ever since the bazaar.

Luksin at The Vintage Bazaar Holiday Jubilee

The sweatshirt material on that skirt! So squishy, so soft. I guess I could say “lofty” and “silky”, but I love squishing that stuff, so “squishy” it is!


I also visited Selina Vaughan Studios.  www.selinavaughan.etsy.com  This is one of my favorite booths at Brimfield as well.  This shop stocks very well-made bags created from vintage seed sacks as well as really eclectic jewelry.

Selina Vaughan Studios at The Vintage Bazaar Holiday Jubilee

A selection of handbags at Selina Vaughan Studios

After that, I visited Forestbound.  www.forestbound.com  Have you ever had a bunch of cool fabric scraps that you wanted to use, but didn’t know how?  Well, Alice Saunders has the answer.  Every bag was interesting and high-quality.  I’m not a bag maker, but I found her booth inspirational.

Forestbound at The Vintage Bazaar Holiday Jubilee

Forestbound at The Vintage Bazaar Holiday Jubilee

Forestbound at The Vintage Bazaar Holiday JubileeA lot like Luksin, Forestbound had a great, unified look to it.  It sort of gives you a vision of a cool, woodsy life-style.  🙂

Did you every have a spoon ring?  Not So Flatware by Cassandra Mae takes that concept and expands it.  www.NotSoFlatware.Etsy.com  Each piece is unique.  Cassie creates beautiful rings, bracelets, earrings, and necklaces.  She had a great set-up.  Look at some of these displays.  I kind of want the one below as my normal jewelry storage!

Not So Flatware at The Vintage Bazaar Holiday Jubilee

Love the mermaid tails!

Not So Flatware at The Vintage Bazaar Holiday Jubilee

You know I love vintage, and there were plenty of 20th century antiques at this show.  Scrapped and Found (find them on Facebook) had both antiques and fun things they had upcycled.

Scrapped and Found at The Vintage Bazaar Holiday Jubilee

Cool paper flowers at Scrapped and Found

Scrapped and Found at The Vintage Bazaar Holiday Jubilee

Scrapped and Found at The Vintage Bazaar Holiday Jubilee

Need some jewelry for a friend or family member?  Check out the cool offerings from Erin Nelson.  www.freebird-designs.com

Freebird Designs at The Vintage Bazaar Holiday Jubilee

Freebird Designs at The Vintage Bazaar Holiday Jubilee

Freebird Designs at The Vintage Bazaar Holiday Jubilee

Upcycled Wool Mittens was a lovely booth to visit.  Jean Roaf (jeanroaf@gmail.com) makes all her mittens out of recycled sweaters and lines them with fleece.  She also sews the cuffs on by hand to make them more comfortable and give them a flatter seam.  These must be some of the warmest mittens I’ve ever tried on.

Upcycled Wool Mittens at The Vintage Bazaar Holiday Jubilee

Upcycled Wool Mittens at The Vintage Bazaar Holiday Jubilee

Tomorrow I’ll show you the rest of the booths that I photographed.  Have a great weekend!


Happy Independence Day!

Standard

Happy Independence Day to everyone in the U.S!  When I was growing up, my Mom always made us wear red, white, and blue for July 4.  We’re all decked out in red, white, and blue at our house today.  Here’s an up-close shot of my patriotic garb:

Independence Day!

Shorts: J.Crew; Shirt: Diesel–thrifted (yes!)

We’re also getting into the spirit with our food.  We tried this recipe and came up with these chocolate covered pretzels.  I think I would use white chocolate as my main chocolate if I did this again, but nevertheless, they are good and easy to make.

Indpendence Day!

I think we also need some late strawberries.  Aren’t these gorgeous?

Independence Day!

If you plan on relaxing at all this weekend, here’s some reading for you:

  • Have you ever looked at Susan Branch’s cookbooks?  A friend just recommended her work, so I’m looking at The Summer Book, which is filled with recipes, gardening tips, and more all illustrated with colorful watercolor paintings.
  • A walk in the woods is always more fun with a foraging book in hand.  The best I’ve found are by Samuel Thayer, who wrote The Forager’s Harvest and Nature’s Garden.
  • Want a fast-paced and interesting adventure book?  Leepike Ridge by N.D. Wilson may be aimed at a middle reader/young adult audience, but it’s good enough that even older readers will enjoy it.
  • Finally, if you’ve ever dreamed of two of your heroes joining forces, you’ll know how I felt when I heard about Craft South and Fashion by Hand.  Anna Maria Horner + Natalie Chanin of Alabama Chanin teaching a workshop together?  Sounds like creative heaven.  If you go, report back!


Have a great weekend!