Tag Archives: foraging

Hey June Handmade Vero Beach Shorts in Woven Supplex

Standard
Hey June Handmade Vero Beach Shorts in Woven Supplex

Hi, everyone! I hope this finds you well. As you may have noticed, posting to the blog gets a bit patchy in the summer, so after taking July off, I’ll probably post a bit in August, although not as regularly as usual. It matches my sewing though. Even though I LOVE summer sewing, I also love being outside with my family and cooking and baking with summer produce, so the summer sewing never ends up being quite as plentiful as I imagine it will be.

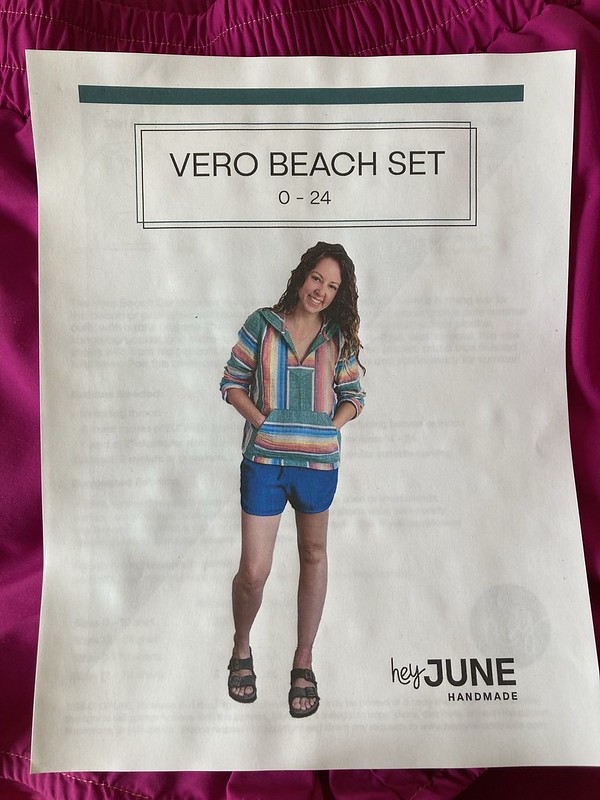
Last summer, my youngest daughter and I spent a lot of time exploring the area around where we live. Sometimes we were in the woods, sometimes we were at the beach or by a river where we might want to swim. I hoped that by making us some shorts in woven Supplex, a texturized nylon fabric that feels a lot like cotton, but is wicking and breathable (etc., etc.), we would have bottoms we could wear on our adventures this summer that could get wet and then dry quickly. It was all about versatility! The shorts from the Vero Beach Set by Hey June Handmade seemed perfect for this.

Hey June Handmade Vero Beach Shorts in Woven Supplex

During the winter, I ordered several cuts of woven Supplex from The Rainshed with the intention of making our adventure shorts, as well as a few other things I had in mind.

Hey June Handmade Vero Beach Shorts in Woven Supplex
Newly washed and dried woven Supplex and Taslan (the generic name for Supplex) ready and waiting to be sewn up!

(You can see the “sweatshirt” I made with the yellow Taslan/Supplex as part of my Spring Outfit here.) Normally when I batch sew, it is groups of different patterns, but this time, I made three of these pairs of shorts at once–two for me, and one for my daughter.

For my shorts, I sized up one size from where my measurements put me. The instructions suggest doing this if you have a fabric with no give to it, and that definitely applies to this Supplex. I also like a good bit of ease, and sizing up made these fit just right. For my daughter, I chose a size based on her waist and hoped the shorts would fit, as she isn’t quite in adult sizes yet. We used the line drawing as a coloring page, since we had gotten two colors for her shorts, and she colored in everything the way she wanted it as a guide for me.

Hey June Handmade Vero Beach Shorts in Woven Supplex

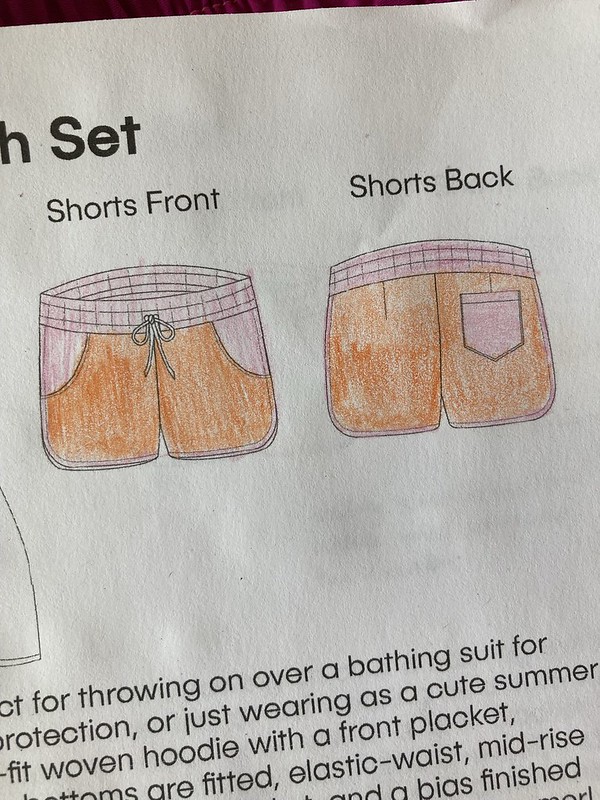
One thing to note, that I didn’t initially realize, is that the binding for the shorts is not visible on the outside if you follow the pattern directions. Of course you could reverse the directions around Step 19 if you want it to show.

Hey June Handmade Vero Beach Shorts in Woven Supplex

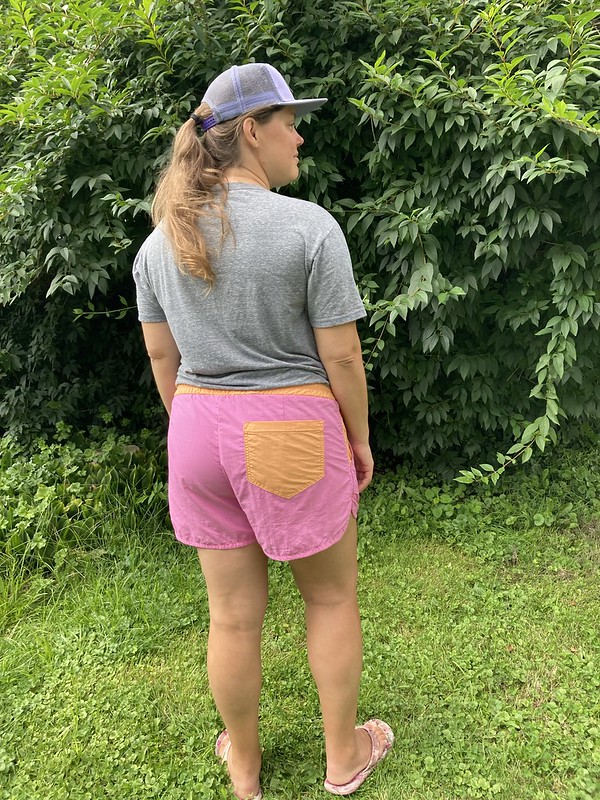
After cutting out her shorts and mine, I realized that I still had enough fabric left from hers to cut out another pair, and since I liked her colors, and she didn’t mind, I cut out some shorts with her fabric, but with the colors in the opposite positions for me.

Hey June Handmade Vero Beach Shorts in Woven Supplex
Front of the Vero Beach Shorts. Mine are top left and bottom. Top right are for my daughter.
Hey June Handmade Vero Beach Shorts in Woven Supplex
Back of the Vero Beach shorts.

When it came time to sew, I started with a Microtex 90/14 needle, but that made my machine sound like it was punching through the fabric, so I switched to a Microtex 70/10 needle, and that was better. I also found that my thinner silk pins were easier to use than the pins I normally use (which are actually quilting pins). I threaded my serger for finishing seam allowances since this fabric doesn’t press well, and frays a fair amount, and was careful to choose thread colors for both my sewing machine and serger that would look good on all three pairs of shorts so I wouldn’t have to switch (plus I love a good contrast thread color). As far as elastic, I bought what Joann’s had in the appropriate width, which turned out to be Underwear and Pajama Elastic.

Hey June Handmade Vero Beach Shorts in Woven Supplex
Inside front of Vero Beach shorts
Hey June Handmade Vero Beach Shorts in Woven Supplex
Inside back of Vero Beach shorts

A slightly higher machine tension (five on my machine, rather than the normal four) gave me more balanced stitches. I rarely change my tension, but it did help on this project. I ran into a little bit of trouble part way through with skipped stitches. Everything had been going fine, and then I started to have problems. After trying a bunch of things, I didn’t know what else to do, so I called the sewing help hotline (i.e. my Mom) and she suggested cleaning my machine and then changing thread brands. So, I cleaned everything out and switched from Coats & Clark to Gütermann, and it worked! I hadn’t thought of that, but after she said it, I remembered that my machine has the same issue, but in the opposite direction with topstitching thread–Coats & Clark works, but Gütermann doesn’t. Funny, huh?

Hey June Handmade Vero Beach Shorts in Woven Supplex
An up-close look at some of the topstitching and fun details on these shorts
Hey June Handmade Vero Beach Shorts in Woven Supplex
I used leftover yellow Taslan from the windbreaker/sweatshirt in my Spring Outfit to add fun pops of color to my magenta shorts.

When it came to interfacing, I attached self fabric with a washable glue stick, since I didn’t want to try fusing interfacing to this fabric. Ironing nylon fabric like this sounds like a recipe for melted fabric!

Hey June Handmade Vero Beach Shorts in Woven Supplex

I also serged the top edge of the back pockets since my serger is set at a 1/4″ wide stitch width (Have I ever actually changed that? No! Haha). At the time, I wondered if I should have serged other areas in the pockets to eliminate fraying, but after having worn the shorts a lot, it hasn’t been an issue, so I guess whatever I did was fine.

Hey June Handmade Vero Beach Shorts in Woven Supplex
I double stitched around the edges of my back pockets to cut down on fraying and add strength.

Here are a few tips for this pattern: make sure when you trim your seam allowances in step 20, that you use a washable marker or chalk to mark the notches on the curved sides/bottoms of your shorts in a way you can still see after trimming–you will need those marks to help you line up the sides.

Hey June Handmade Vero Beach Shorts in Woven Supplex

I also recommend marking the drawstring holes even if you aren’t inserting a drawstring, just so you know where the front of the waistband is for when you are attaching it to the shorts. I had planned to insert drawstrings in mine, but changed my mind. I was still glad I had those markings, though.

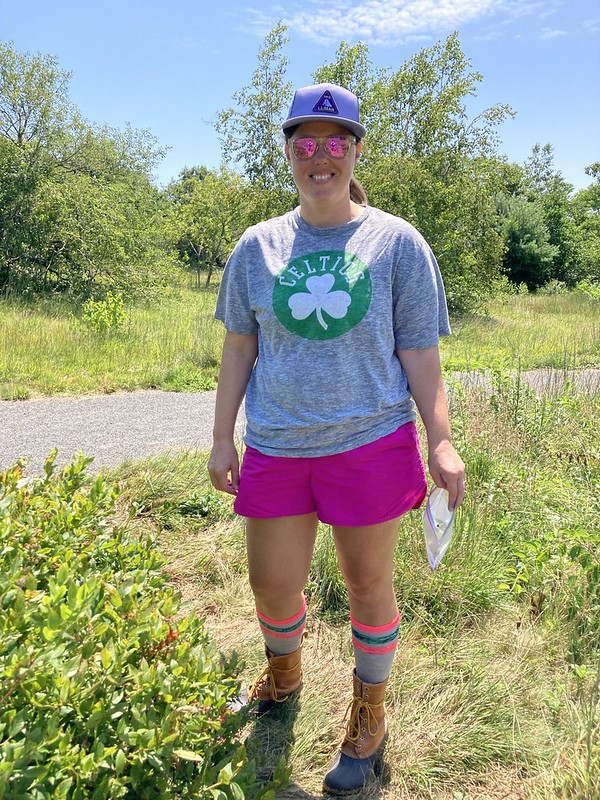
So…how did they turn out? Well, I wish I had about five more pairs, so they are great! And my daughter’s fit well, too. I wasn’t sure how hers would fit since they are a women’s size, but she loves them and they fit great! We have worn them to the beach, wild blueberry picking, for exercise, and as every day wear. I usually wear them as soon as they are out of the wash. I love them. I was afraid the pink and orange ones would be a bit see-through (something I began to worry about after I had cut them out since they seemed fine before that), but unless you are wearing really dark or patterned bottoms underneath it’s not an issue, and if it’s a swimsuit, well, who cares? The magenta ones are completely opaque.

I didn’t take pictures of my daughter since I don’t share pictures of my kids on my blog, but here are some she took of me when we went wild blueberry picking. Try not to be jealous of my outfit–fashion + protection against ticks and mud! What more could you want?! Hahaha

Hey June Handmade Vero Beach Shorts in Woven Supplex
I feel so New England-y! L.L. Bean boots and hat, Celtics t-shirt, anti-tick knee socks, and picking wild blueberries!
Hey June Handmade Vero Beach Shorts in Woven Supplex
These shorts were just right–I never got too hot in them and the big pockets were awesome.
Hey June Handmade Vero Beach Shorts in Woven Supplex
Here’s a picture of some of the wild blueberries–they’re teeny tiny, about the size of a pencil eraser–but delicious! I’ll never reveal our not-very-secret secret spot on the internet, but if you know me in person, feel free to ask. 😉

These shorts are so versatile and comfortable, I would love to sew them up in a bunch of different fabrics–everything from linen to lightweight denim and maybe even athletic knit (worth a try!). They would also make great pajama shorts. The instructions were excellent and the pockets are so nice and large. I really, really recommend these. Knowing my love for nearly always trying new patterns, I can’t say for sure that I will circle back to these, but I hope I do, because they are great.

Hey June Handmade Vero Beach Shorts in Woven Supplex
Picture-taking motivation has been pretty low this summer, so I ran outside when I was already wearing these one day, and had my daughter snap a few pictures of them.
Hey June Handmade Vero Beach Shorts in Woven Supplex

The pullover that’s included in this pattern looks nice, too, so we’ll see if I try that someday. Wouldn’t it be great in double gauze? The more I sew with patterns from Hey June Handmade, the more I love them. The instructions are so good, many of the styles are a great match for me, and I am coming to really trust Adrianna’s expertise and advice in each pattern. She knows what she is talking about!

I’m also really glad that I have tried out woven Supplex. Sometimes I want to sew a garment because the pattern is intriguing and new, and sometimes it’s the fabric I find tempting. I still have some uncut blue-gray yardage that I hope to make into the Itch to Stitch Sequoia Cargos so I will have some woven hiking pants, but we’ll see what happens. Technical fabrics are so interesting, and being able to make your own outdoor gear feels like such a win!

And what’s up next in the queue? I’m working on a rash guard and bathing suit now and am hoping to make the Fibre Mood Lola Top and Elizabeth Suzann Clyde Work Pant pattern in linen after that, but we’ll see! I’ll keep you posted although it may be a bit patchy through the end of summer. 🙂

Try It: Fried Dandelion Blossoms

Standard

Try It:  Fried Dandelion Blossoms (Pattern and Branch)

Guess what we had with dinner last night?  I guess the title is sort of a spoiler, isn’t it?  We tried Fried Dandelion Blossoms!  I have a number of foraging books (my current favorites are by Samuel Thayer), but I’m pretty cautious.  I usually take a few years to learn a plant before I am willing to try it.  Somehow, learning from books feels less sure than learning a plant from a trusted friend–not because the books are faulty, but because I feel more likely to make a mistake.  Despite my extreme caution, however, I do feel confident in knowing dandelion flowers, so I decided it was finally time to take the plunge.

Try It:  Fried Dandelion Blossoms (Pattern and Branch)

Dandelions are a great first foraging food, as any wild food writer will attest, because all parts of the plant are edible.  There are a number of other plants that can look like dandelions if you haven’t trained your eye, and I don’t know about the edibility of those ones, so don’t blindly follow what I tell you–do your own research or find your own foraging buddy.  I’m a beginner–not an expert.  For myself, though, I feel confident that I can tell when a flower is a dandelion flower.

Try It:  Fried Dandelion Blossoms (Pattern and Branch)

I’d long heard about fried dandelions, so it was time to dive in.  I found this recipe on allrecipes.com and decided that if it was good enough for people in the Appalachian Mountains to make, it sounded like good food to me.  I haven’t reprinted the recipe here because I don’t want to run afoul of any copyright laws, so if you’d like to follow along with my explanations below, you may want to print it out so you can refer to it.

First, I went to the spot you see in the first picture above and picked about a hundred dandelions (I picked the open flowers, not the closed buds like the recipe seems to say.).  Then, I left them in my refrigerator too long, and had to go repick them from my yard because I didn’t cook them soon enough (these pictures were too good to waste, though, so you get to see them anyway).  My good discovery through that bit of procrastination was that if I prepped the dandelions by soaking them for 10 minutes in water with some salt (it’s one of the tips at the bottom of the recipe), and then drying them off, I could put them in a partially closed zip top bag in the vegetable drawer and they would keep for a few days.  I was afraid they would close up, but they didn’t.  I don’t know how long they are really good for, but after a few days, they didn’t look quite as wonderful, so I went out to our yard and picked a hundred more for last night’s dinner.

Try It:  Fried Dandelion Blossoms (Pattern and Branch)

Next, I brought the flowers inside and covered them with room temperature water and a Tablespoon of salt for 10 minutes, as the recipe footnotes suggested.  I swished them around a few times to make sure they were getting well rinsed and debugged.

Try It:  Fried Dandelion Blossoms (Pattern and Branch)

Then I drained them and rinsed them a few times with cool water.  After that, I put them in a towel, went out on the deck and, holding the edges of the towel, swung them around in a circle.  This is our friends’ version of  a salad spinner for people who don’t have one.  🙂  It’s great.  That way I don’t have to store a store a salad spinner.

After that, I put the flowers in the egg mixture and stirred them around to coat them.

Try It:  Fried Dandelion Blossoms (Pattern and Branch)

Slightly less appetizing, right?  Hang with me!  They don’t end up looking better, but the final result TASTES awesome!

Once they are all coated, you take half of them and drain them of extra egg, and then put them into your flour+season salt+pepper mixture.  I put mine in a bowl that has a lid, so I could shake it around to coat the flowers.  I bet a zip top bag would work, too.

Try It:  Fried Dandelion Blossoms (Pattern and Branch)

Next, you shake off the excess flour mixture and put the flowers into your warmed and waiting pan.  I used bacon grease as my cooking fat in a cast iron pan on medium heat (we had just made bacon, so it seemed like a good excuse not waste the bacon fat).

Try It:  Fried Dandelion Blossoms (Pattern and Branch)

I did have to add some extra butter because the bacon grease got absorbed part-way through the process.

Try It:  Fried Dandelion Blossoms (Pattern and Branch)

Then, you just cook them until they are golden brown.

Try It:  Fried Dandelion Blossoms (Pattern and Branch)

It was pretty easy and they are so good!!!

My only changes to the recipe if and when I make it again will be to cut back on the salt and pepper a bit.  We are a family that loves salt, but if you eat one after another of these (which you WILL want to do), the salt becomes a bit overpowering.  I’ll probably try 1.5 Tablespoons of seasoned salt and 2 teaspoons of black pepper next time and see how that goes.  The half bacon grease/half butter scenario worked out well, but I would try all butter just as readily.

So, what do you think?  Ready to give these a try?  You know, if you are a homeowner and you hate all the dandelions growing in your yard, you could just cook your way through them…  Think about it!  Free food and fewer dandelion seeds floating around…

If you do try this, I’d love to hear about it!


Outside in October

Standard

As usual in October in New England, the weather is unusual.  We have warm days cozied right up next to cold ones.  One day I’m worried about the first frost coming and the next I’m wearing shorts.  It’s crazy, but I love it.  It’s getting us ready for that fall chill that’s sure to come.  One thing that doesn’t seem to change, though, is that it is beautiful here in the fall.  Here’s a little bit of what I’ve seen outside this month.

Outside in October (Pattern and Branch)

Sunset

Outside in October (Pattern and Branch)

Shagbark Hickory tree

Outside in October (Pattern and Branch)

Shagbark Hickory nuts

I went foraging last week for Shagbark Hickory (Carya ovata) nuts.  This is a new plant for me, but I’ve been researching through many books and websites to double, triple, and quadruple check myself.  Any foragers out there?  Want to comment and let me know if you think I’m right or not?

Outside in October (Pattern and Branch)

Outside in October (Pattern and Branch)

Mountaintop view in Pawtuckaway State Park, New Hampshire

Our family and some friends spent Columbus Day hiking in Pawtuckaway State Park in New Hampshire.  It was lovely.  I took lots of mushroom pictures, so I could try to identify them later.  I’m not ready to forage for mushrooms, but I would like to start learning them.

Outside in October (Pattern and Branch)

Outside in October (Pattern and Branch)

Outside in October (Pattern and Branch)

Outside in October (Pattern and Branch)

I’m also hoping to figure out what this tree is.  Any guesses?

Outside in October (Pattern and Branch)

Clearly not a plant…

Did you ever see The Labyrinth with David Bowie, Jennifer Connelly, and muppets by Jim Henson?  That caterpillar makes me think of the little worm in the wall that helps Sarah.  Actually, a lot of fungi make me think of Jim Henson creations from that movie, too…

Outside in October (Pattern and Branch)


Finally, and completely unrelated…

Here’s a project I didn’t do, but get to benefit from:

Outside in October (Pattern and Branch)A new haircut!  It was inspired by this picture I found on Pinterest.  Now if only I could get it to look that way when I don’t have a talented hairstylist to help me…

Here’s how it looks today:

Outside in October (Pattern and Branch)Changing weather, changing hair…it’s nice to have a change sometimes.

Hunt, Gather, Cook by Hank Shaw (and Other Interesting Stuff)

Standard

I’ve got a fun book to share today.  Hunt, Gather, Cook:  Finding the Forgotten Feast by Hank Shaw has made it to my house from the library twice, if not more.  The very best how-to books, in my opinion, give you the feeling, “It’s possible!”, whatever the “it” is that you are learning about.  This cookbook/foraging guide by Hank Shaw is exactly that kind of book.  I also love a good back story for recipes, and this book often gives you not a brief description, but a true (and interesting) back story.

Hunt, Gather, Cook by Hank Shaw (Pattern and Branch blog)

As you might expect, he talks about foraging for certain plants, but he also gives you pointers on how to get started if you want to clam, fish, or hunt, and then what to do with all that you collect.  While Shaw grew up on the East Coast, he’s lived throughout the USA and now lives on the West Coast, so his experience with wild food covers a broad range of places and environments.  Check out his blog, Honest Food, and you can keep up with him and his adventures.

Here are some images from Hunt, Gather, Cook.

Hunt, Gather, Cook by Hank Shaw (Pattern and Branch blog)

Hunt, Gather, Cook by Hank Shaw (Pattern and Branch blog)

Thanks to Hank, I tried my first rose hips this year, since the very roses that he mentions in the image above grow all over our beach here.  The first try was bland, but the second was better.  Now I’ll have to try more!  If you have a food-lover in your life, you may want to encourage them to check out this book.  It’s a very interesting read, and I can’t recommend it highly enough.

Now for some more fun things to check out!

  • For more foraging information, try out my two current favorite pure foraging books.  (These are not cookbooks, but they do give you some guidance in that area.):  The Forager’s Harvest and Nature’s Garden both by Samuel Thayer.  This guy is smart, experienced, but also adequately cautious when it comes to wild food.
  • What if you love food, but hate the wild (or would rather grow your food instead of search for it)?  Try The Edible Flower Garden by Rosalind Creasy.  This is such a fun book for garden planning.  Most years I use it to try out one or two new edible flowers, just to keep things interesting.
  • You know how some people have “twins” that they aren’t really related to?  In college there was a girl that people always confused me with.  She was actually awesome at sports I did not or no longer played, so it was nice to get compliments meant for her, even though I had to disillusion people afterward and tell them I hadn’t played basketball since high school.  (Also, I was a bench warmer.  I made two points my freshman year of high school.  It was my 15 minutes of fame.)  While the two of us resembled one another, it was NOTHING like the resemblance between actor/comedian Will Ferrell and drummer Chad Smith.  I think these guys were separated at birth.  Want to see it?  Here is their “drumoff” on “The Tonight Show with Jimmy Fallon”.  If you choose to watch this clip, though, you should probably watch Will Ferrell’s famous cowbell sketch first, just to be fully prepared.  http://www.hulu.com/watch/536145 And now here is the drumoff (and the shocking “twinness” of these two men):

Have a good weekend!

Beach Plum Adventure

Standard

As I’ve mentioned before, I’m slowly trying to learn more wild, edible plants.  I like discovering treasures and, like shopping for antiques and visiting thrift stores, foraging for wild food feels like finding treasures.  Last year I learned how to identify beach plums.  We have a lot of bushes that grow right by the boardwalk of one of the local beaches, so they are easy to find and pick.  Also, most beachgoers don’t seem to know about them, so they aren’t all picked over.

This year, I felt confident about finding beach plums (Maybe a little overconfident, as I’ve picked a number of underripe ones, which tend to be extremely sour.  I guess you learn more each year, right?).  Jam still seems like slightly too much work (although I hope to try it again someday–my first attempt was unsuccessful), so I decided to try something else.  To me, beach plums look a lot like cherries.  Check it out.  Here is a picture of ripe beach plums:

Beach Plum Adventure with Pattern and Branch

So, I thought maybe, just once, I would pick a bunch, pit them, and make a pie using a cherry pie recipe.  I reasoned that since cherry pies use sour cherries, and beach plums look like cherries and are somewhat sour, it might be a match.  Now, I have to tell you, that I have never tasted a newly picked sour cherry to my knowledge.  The taste of beach plums, though, is sort of like a cranberry.

What do you think?  Was it a good idea?  I’ll show you what I did in pictures, but first, here is a picture of unripe beach plums, so you’ll know in case you ever find them in your area.

Beach Plum Adventure with Pattern and Branch And lastly, before we get to pie, here’s a size reference:

Beach Plum Adventure with Pattern and BranchNow, to pie!  My little helpers and I picked three small buckets full of beach plums.

Beach Plum Adventure with Pattern and Branch We took them home and rinsed them off, and then I went to work pitting them.  I used this cherry pitting tool made by OXO to get it done.  I definitely recommend it–works for olives, too, supposedly.

Beach Plum Adventure with Pattern and BranchMany episodes of “Duck Dynasty” later, I had six cups of pitted beach plums for my pie.  I used a recipe titled “Our Favorite Cherry Pie” from one of my go-to cookbooks, King Arthur Flour Whole Grain Baking

Beach Plum Pie with Pattern and Branch

Beach Plum Pie with Pattern and Branch

Beach Plum Pie with Pattern and Branch

Beach Plum Pie with Pattern and Branch

Beach Plum Pie with Pattern and Branch

The finished pie had a crumb topping (plus the whipped cream topping that we added).  So what do you think it tasted like?

Well…it was SOUR.  Ha!  Once you got used to the contrast of the sour filling with the sweet crumb topping and the sweet whipped cream, it was pretty good, but initially, it was a shocker.  I fed it to a bunch of hungry college students, and they voted that it was good.  I thought at first that it was a failure, but everyone liked it, so it turned out to be a surprising success.  Hooray!  Maybe next year I’ll try jam.  🙂

Happy Independence Day!

Standard

Happy Independence Day to everyone in the U.S!  When I was growing up, my Mom always made us wear red, white, and blue for July 4.  We’re all decked out in red, white, and blue at our house today.  Here’s an up-close shot of my patriotic garb:

Independence Day!

Shorts: J.Crew; Shirt: Diesel–thrifted (yes!)

We’re also getting into the spirit with our food.  We tried this recipe and came up with these chocolate covered pretzels.  I think I would use white chocolate as my main chocolate if I did this again, but nevertheless, they are good and easy to make.

Indpendence Day!

I think we also need some late strawberries.  Aren’t these gorgeous?

Independence Day!

If you plan on relaxing at all this weekend, here’s some reading for you:

  • Have you ever looked at Susan Branch’s cookbooks?  A friend just recommended her work, so I’m looking at The Summer Book, which is filled with recipes, gardening tips, and more all illustrated with colorful watercolor paintings.
  • A walk in the woods is always more fun with a foraging book in hand.  The best I’ve found are by Samuel Thayer, who wrote The Forager’s Harvest and Nature’s Garden.
  • Want a fast-paced and interesting adventure book?  Leepike Ridge by N.D. Wilson may be aimed at a middle reader/young adult audience, but it’s good enough that even older readers will enjoy it.
  • Finally, if you’ve ever dreamed of two of your heroes joining forces, you’ll know how I felt when I heard about Craft South and Fashion by HandAnna Maria Horner + Natalie Chanin of Alabama Chanin teaching a workshop together?  Sounds like creative heaven.  If you go, report back!


Have a great weekend!