Before January is gone, I want to share the couple of Christmas presents I made. I rarely put pressure on myself to sew or knit Christmas presents, but sometimes the right project presents itself, and it seems like a good idea to go for it.
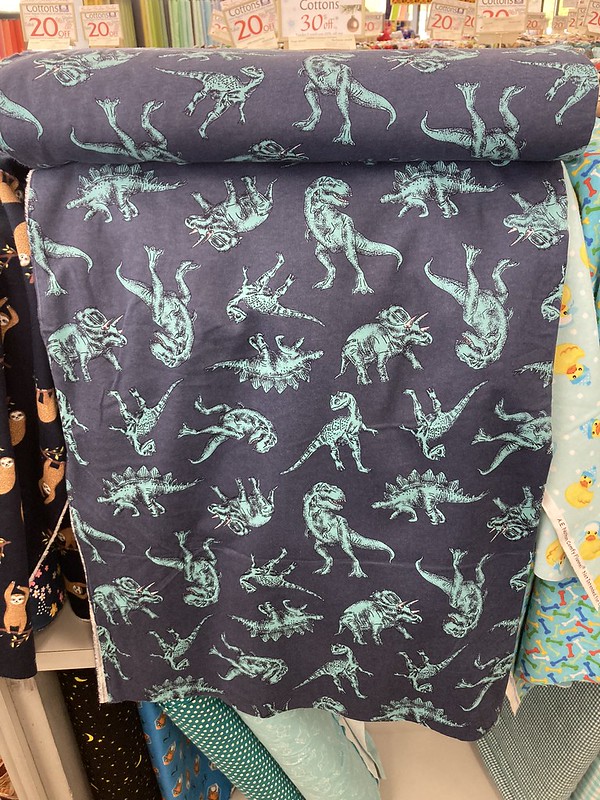
I knew my husband was in need of some new pajama pants way back in the summer, so he picked out a fun dinosaur print cotton flannel at Field’s Fabrics in Kalamazoo when we were in Michigan last summer.
I had hoped to make these for him before Christmas, but creative projects always take longer than you think they will, and there were several things in line before these pants. They were a great palate cleanser once I got my other projects finished.
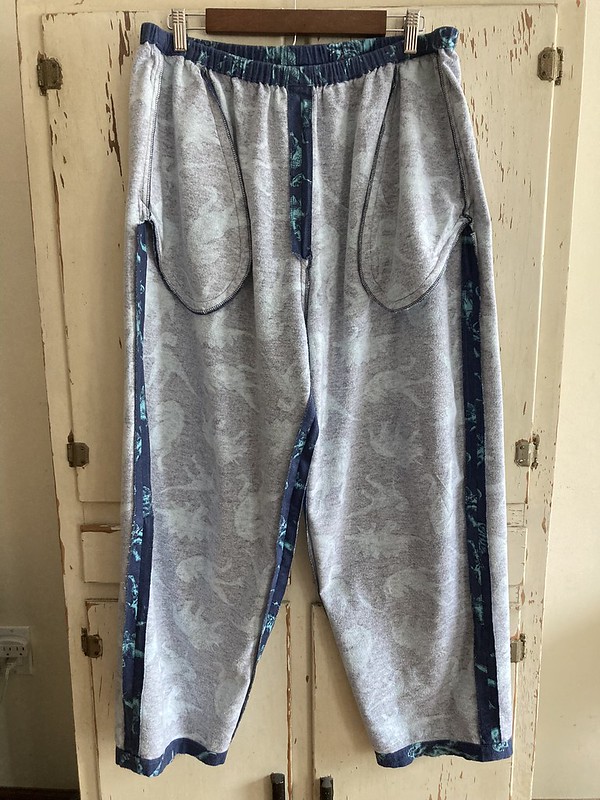
I used our tried and true McCall’s 3019 from the ’90’s, a pattern that my mom used for our family when I was growing up.
She gave it to me after I started sewing, and it’s my husband’s favorite. The pants are loose and easy-fitting with an elastic waist and pockets. The pattern was already traced out in his size from the last time I made pajama pants for him, so when it came time to sew, this was a quicker-than-usual project.
Front view
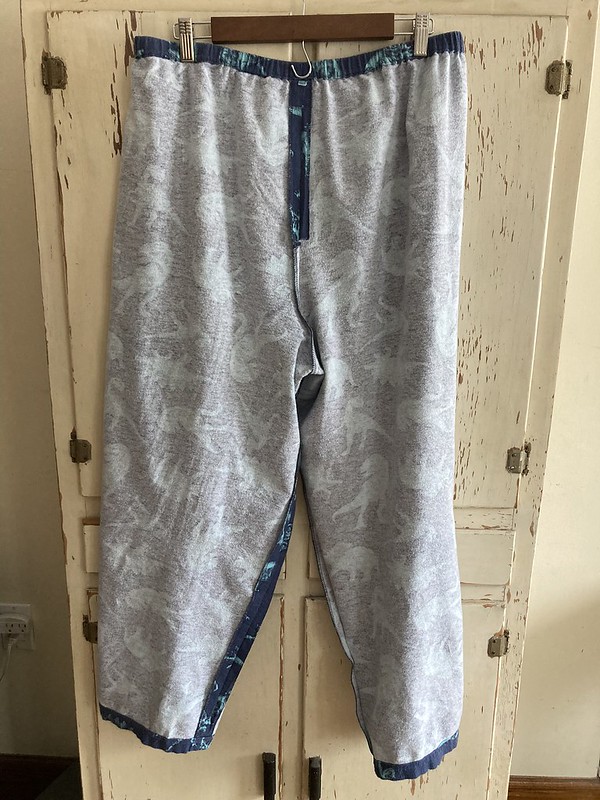
Back view, almost identical to the front view, but I’m sharing it because I’m thorough.🙂
Right before I started sewing, I glanced at my fabric and had a moment where I thought, “Wait. Did I cut these out with the dinosaurs facing the wrong way?” I thought I had been so careful! Luckily, this print isn’t directional. The dinosaurs face in every direction. I had done it right after all. Thank goodness!
I decided to try serging all my cut fabric edges before sewing. I know that serging them together after sewing would be more durable, but I thought this would be nice and quick since nearly all my seams would be finished as soon as I sewed them. I was right–it was great!
Inside front view; the one seam I did serge together was the lower crotch seam
Inside back view
A quick bit of sewing and they were nearly done. I find the waistband casing on the snug side for inserting the recommended elastic, so I skipped the line of topstitching you are directed to do at the top of the casing.
I barely remembered to add a little tag at the back!
My husband was really happy with them. Good thing he was so patient! They made a great Christmas gift.
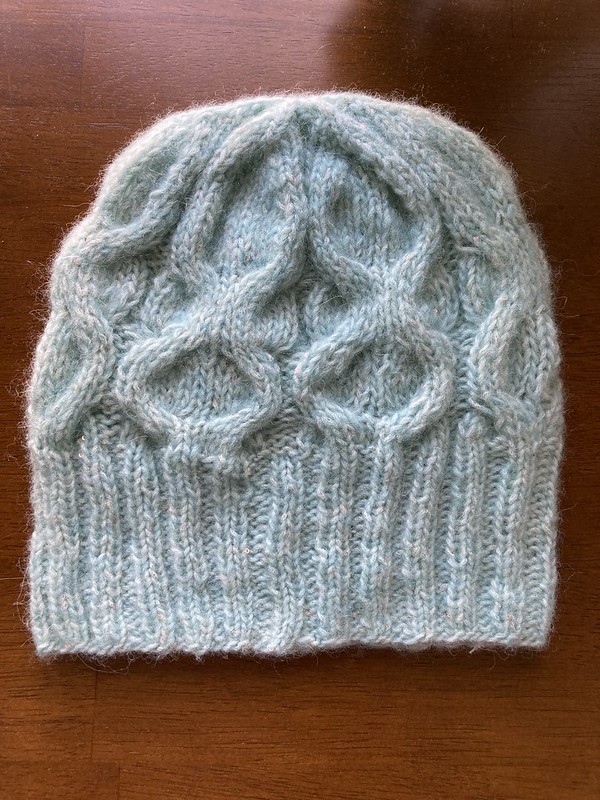
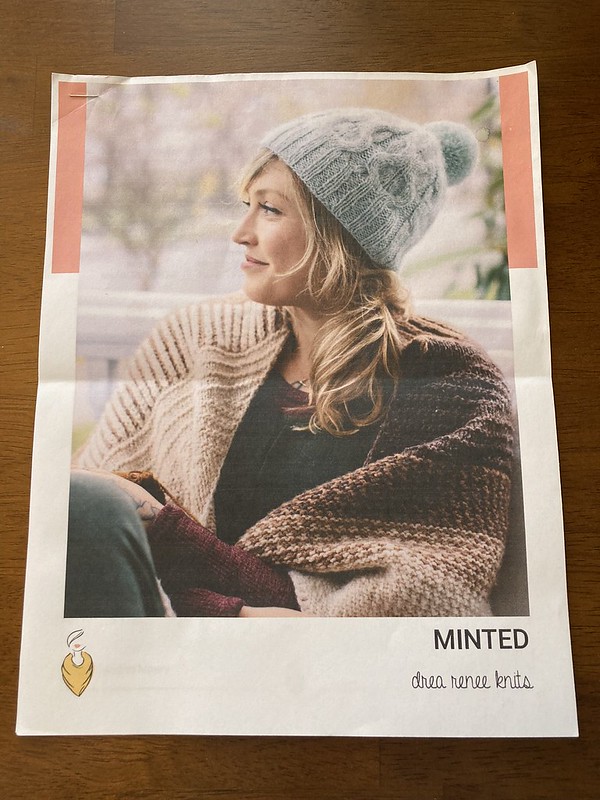
It’s identical to the one I made myself. After making mine, I still had a ball plus a partial ball of my special Katia Concept Sky Paillettes yarn that I got in Webs’ sale area when I visited.
I like this pattern because it’s a quick knit that gives good impact for very little effort/cabling.
Andrea’s patterns are some of my favorites because they are so clear and helpful. She always has YouTube videos available for any skills in the pattern that you may not have learned yet or need a refresher on.
The yarn’s really pretty and I thought my mom would like it. It’s one of those blow yarns that has a sort of net tube structure, with fiber blown in, making it nicely fluffy. This one also has little paillettes attached, which is so pretty, and gives the yarn a subtle sparkle.
Happily, my mom liked it, and it fit her great! She reminded me of how she was always trying to make us all match when I was little, something I was not a fan of growing up, but I guess I don’t really mind any more. ;) Twinsies!
And that’s it! I had the hat done before Thanksgiving and, while I cut it a little close on the pajama pants, I still got them done with a few days to spare. Hooray!
Last week I showed you the pants and shorts I made in my pre-Brimfield sewing spree. This week, I’ll show you the t-shirt I sewed up, and–bonus–it’s a free pattern! It’s the Stellan Tee from French Navy Patterns.
T-shirts are something I initially couldn’t imagine sewing. With all the options at various price points and the free t-shirts people give away, it seemed silly, but now I love sewing the occasional t-shirt. It’s a fast and gratifying project that is the perfect palette cleanser between more complex patterns. I also wear t-shirts all the time, and I love having fun silhouettes in fabric I adore. And I do adore the fabric I used for this Stellan Tee.
I bought this fabric last summer at Field’s Fabrics in Holland, MI in one of their sales.
It’s a 95% cotton, 5% spandex jersey knit, 57″/58″ wide, and is designed by Mimi G Style for Riley Blake. I love the colors and feel. The look simultaneously reminds me of animal print and the Flintstones. I had two yards, but only used about a yard and six inches even though I cut a size XXL, which means I have a nice bit left over.
I have made the Stellan Tee once before in an organic cotton jersey without much stretch or recovery and really liked it. I like this one, too. I don’t know that it’s my ultimate, favorite forever pattern, but it’s a nice boxy shape with an interesting hemline, and I like having it in my wardrobe for a little something different. I also like the colors with both pairs of Elizabeth Suzann Clyde bottoms that I blogged last week.
As far as sewing, it was pretty easy. I serged whatever I could and used a walking foot and 12/80 ballpoint needle in my sewing machine when sewing the rest. There are some nice touches in this pattern, like the optional back neck binding and shoulder topstitching that elevate the quality.
inside back neckline
back neckline from the outside
Personally, I also like to topstitch around the front of the neckline to hold the neck band seam allowance in place (and because I think it looks nice). And I zigzag stitched the hems because I find my double needle stitching comes undone after awhile.
Stellan Tee front view
Stellan Tee back view
a peek inside the front
and a peek inside the back
And that’s about it! This shirt looks good cuffed or uncuffed and was a great pick to wear to Brimfield.
It covered my upper chest, back, and shoulders so I didn’t have to worry about sunburn, and it was comfortable and cheery with its bright colors.
I’m so happy I made it! If this is a style that appeals to you, then I highly recommend the pattern.
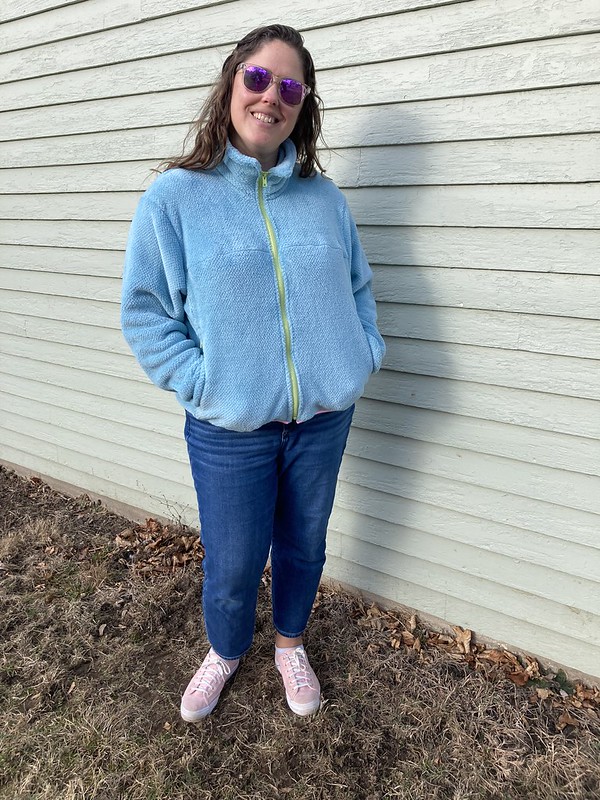
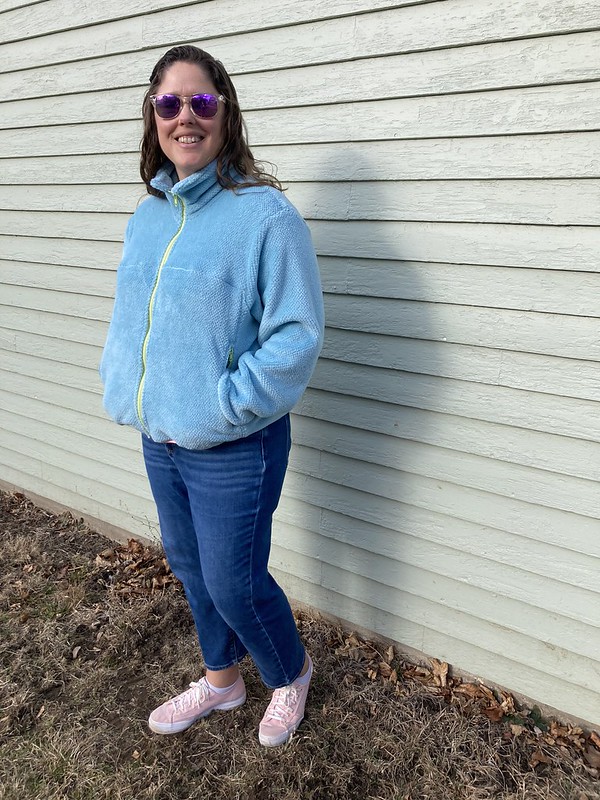
Hi! I’m back with the same pattern I talked about last week, but a different view, in a different fabric. Yep, this is The Green Pepper #507 Plush Polar Jacket in a wonderfully soft Polartec fleece from Field’s Fabrics in Holland, Michigan. Last week was all about the vest view, and this week I’m coming back older and wiser, having had a much more enjoyable sewing experience because I learned from all those pinch points on the vest. Yay!
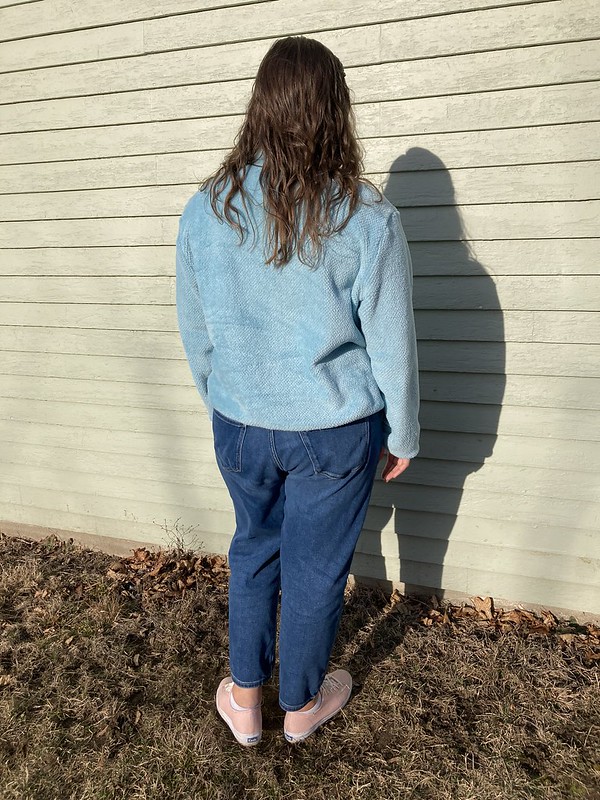
Couldn’t pass up a photo op in front of this fun wall on my first day wearing my jacket out and about!
l
I’ve felt the need for a lightweight fleece zip-up jacket for awhile. I have one from Old Navy that I thrifted, but have you ever thrifted something and then realized you might now understand why it ended up at the thrift store? Yeah, this was one of those situations. It’s a nice jacket, but the fit in the shoulders is not my favorite. Luckily, I had found some Polartec “Micro Plush” fleece at Field’s Fabrics (often labelled as Malden Mills fleece) in Holland, MI this past summer. It was a pretty sky blue, and so very soft.
Technically, I think this is a pile fabric rather than an actual fleece fabric, which is part of what makes it so soft, but either way, it is still produced by Malden Mills/Polartec, which means it has the quality that I love. Polartec produces many, many kinds of really interesting fabrics, and I love trying out different types when I get a chance. While I don’t always care about fabric brands, when it comes to fleece (and related fabrics), I tend to go for Polartec because I know the quality will be high, even in their seconds. And whenever I get a chance to go to Field’s I take a look to see what they have.
I don’t typically do the same pattern back to back, but it was a great experience doing that this time because it really helped me improve my skills and figure a few things out! Along with my notes last week on the pattern and the importance of trusting it, one thing I was surprised by is that you don’t always use a zigzag stitch when making this pattern. Sometimes a straight stitch is what you need, and the directions always tell (and/or show) you when to use each stitch. You also don’t use any interfacing–but it works! I was wondering how that would go in the zipper area in particular, but it was fine. The final product is no more or less wavy than on any store-bought fleece jacket–so trust those directions! Along those lines, I had plans to put my sleeves in flat rather than setting them in, but that really doesn’t work for this pattern, because the armscye is shaped differently than what you find on most patterns, so you’ll have to trust the directions on that, too.
Green Pepper #507 Plush Polar Jacket in Polartec Micro Plush, front
l
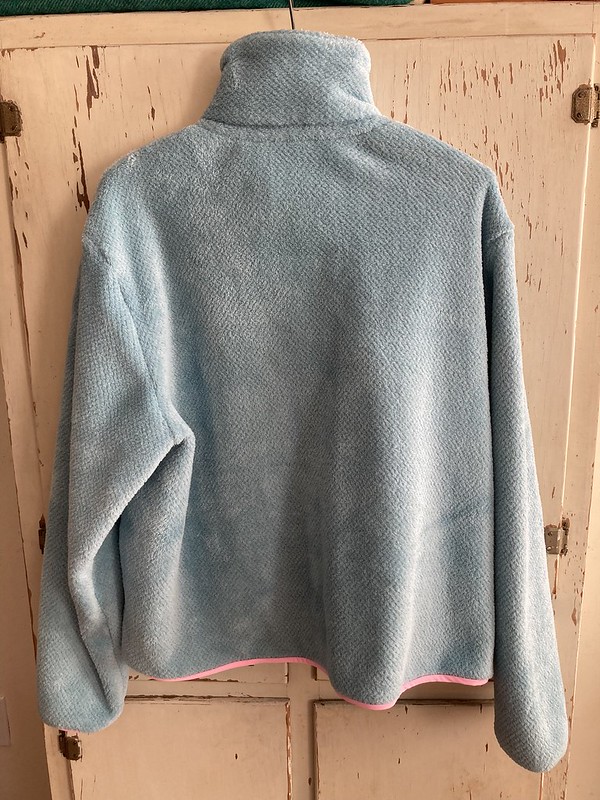
Green Pepper #507 Plush Polar Jacket in Polartec Micro Plush, back
l
One thing I did change was binding the sleeve hems as well as the jacket hem with nylon/Lycra, as I did for the vest hem in last week’s post. I cut 9″ x 2″ strips of nylon/Lycra for each sleeve hem and cut off the sleeve hem allowances. If I did it again, I would bind my sleeve hems flat before sewing the sleeve seam. I used the same nylon/Lycra swimwear fabric as on my vest and also used the same binding technique (“Lycra Wrapped Edges–The Cheater’s Way”) found in Adventures with Polarfleece: A Sewing Expedition by Nancy Cornwell. I had a few spots on the jacket hem where I didn’t catch quite enough of the fleece in my serging, so I just went back with a straight stitch and sewed a bit higher up on the jacket. It’s really important that you secure those bottom layers together because the hem is also the bottom of your pockets, and you don’t want your things falling out! This time, I also left a little nylon/Lycra hanging off the edges by the zipper, which I hand-tacked into place before doing the final sewing step.
Hem detail, view from the inside. There’s room for improvement, but overall my hem binding isn’t bad!
I did all the hand-basting of the zipper and collar/facing area that I did with my vest, and it was definitely worth the time investment to have a smooth experience sewing in my front zipper and sewing on the neckline facing. My results weren’t perfect, but they were good enough that I was happy with them.
Something I wish I had done with the jacket (and maybe the vest) was to round off the corners of my collar as Nancy Cornwell suggests in her book. I think it would have looked nice.
l
Green Pepper #507 Plush Polar Jacket in Polartec Micro Plush,inside front
l
Green Pepper #507 Plush Polar Jacket in Polartec Micro Plush,inside back
Other than a different main fabric, I used all the same materials (with color changes for zippers and serger thread) and references for this that I did for my vest. You can find links for all those sources in last week’s post. It was great to have just made a version of this pattern so I could be smarter about when and where to serge–mainly just in the spots where I wanted an extra internal flash of color–and how to tackle all the parts I found tricky the first time around. Like last week, I wish I had some sort of little tag for the front, but otherwise, I’m really happy with this jacket. Since it’s still winter in these parts, I have worn it a lot around the house, and I really love it. I even had to fight off one of my kids who wants to steal it from me, which is a pretty high compliment in my book. 😉
I definitely recommend this pattern, but if you haven’t sewn it before, it probably wouldn’t hurt to read the two posts I have written plus any other reviews you can find on it to avoid the pitfalls I struggled with. Really, though, the sky is the limit as far as how you customize this. You can knock off your favorite Patagonia, L.L. Bean, or REI jacket, or make something no one has ever seen before! If you do, I would love to hear about it! 🙂
It’s finally time to show you what I have been slowly working on since September! This was a fun project!
My husband and I were invited to a wedding at the end of October, so way back in August, I began to think about what I would make. As someone who sews primarily “every day” clothes and who is extremely casual, weddings are fun opportunities to make something a little bit fancier than what I usually wear. That typically just means a dress that I can add to my wardrobe and wear again after the wedding, but a dress is dressing up for me.
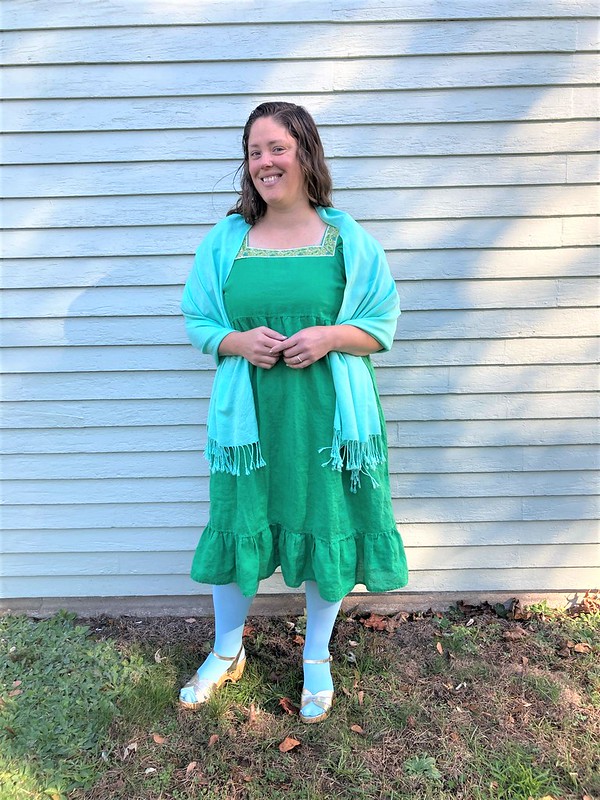
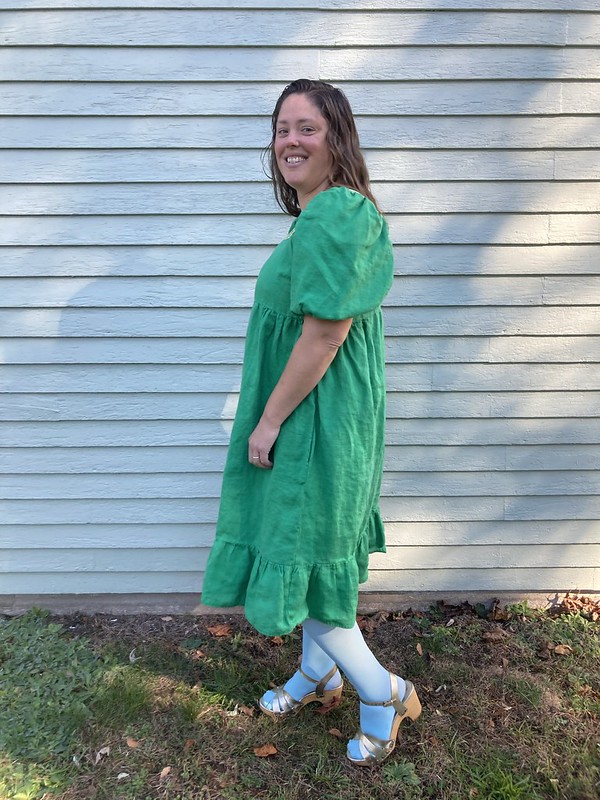
So, after considering my options for quite awhile, I decided to make the Fibre Mood Mindy dress from Fibre Mood magazine, edition number 10, in some beautiful kelly green linen.
The Fibre Mood Mindy has been on my radar to make for over a year, so this was a great opportunity. I love the big sleeves and easy fit. I thought that adding a wide ruffle to the bottom would make it the perfect dress for me.
I bought my fabric this summer at Field’s Fabrics in Holland, MI, and it was love at first sight. The fabric was crisp and lightweight and beautiful.
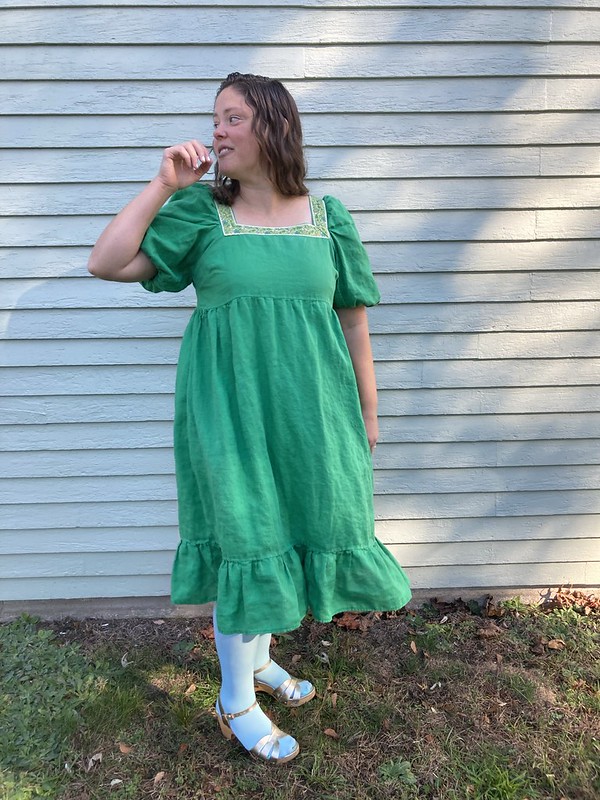
I originally thought I might make another True Bias Roscoe Blouse with it, as it’s definitely a shirt/dress weight linen. While thinking about a Roscoe and testing out some trims with it, I put this vintage trim next to the fabric, and even though the ribbon doesn’t have any kelly green in it, I loved them together. I didn’t have a lot of it, but I thought it would be best at the neckline and maybe the waist of this dress. I think the ribbon is from Brimfield many years ago, back when I first began going to the flea/antique market, and it’s been waiting for its chance to shine ever since.
Once I put these together, this fabric + trim combination was my color muse, and I began to work on all the little details that would make up the outfit. It was such a fun project. The aim wasn’t so much to stand out at the wedding, but just to put together an outfit that I really loved, filled with interesting details and color. And in the end, what I came up with really surprised me in a good way!
I’ll give you all the details on the outfit, with the sewing details*** at the end of the post for anyone else who is making this pattern.
None of the websites or links in this post are affiliate links–I just want to share where I found everything in case you need any of these types of things for projects of your own.
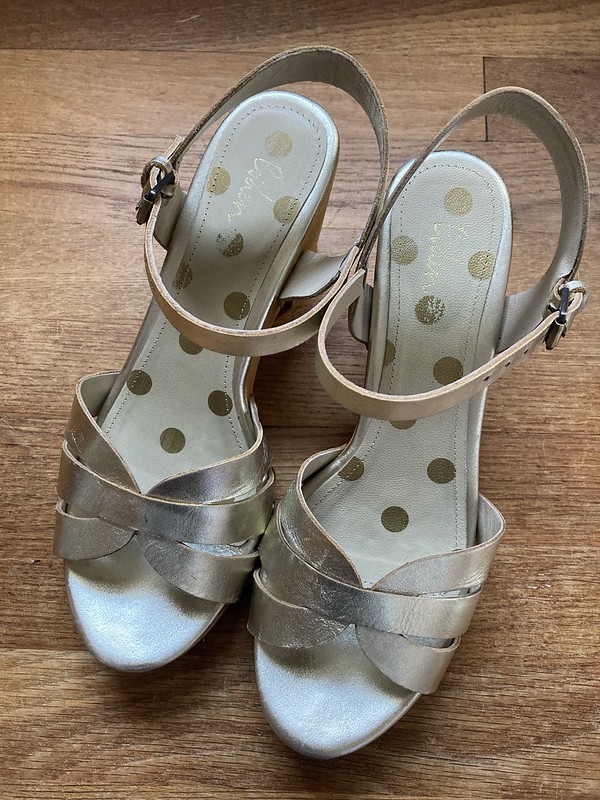
I found some clog-type sandals in gold on eBay for a great price. They are originally from Boden, and they were in good used condition.
Unfortunately, the straps were a bit tight over my toes. I had ordered them early, so I cleaned them up, and shoved some wooden shoe forms down in the the toes to stretch them out. After awhile, I wore them out for coffee with a friend just to see how they were doing. Good news! The stretching seemed to be working! I put the shoe forms back in, and kept stretching them and testing them out until the wedding. Phew! What a relief.
October in coastal Massachusetts can have variable weather. I remember the end of October being in the 40’s F as well as in the 70’s F, so a short-sleeved linen dress was a risk. I decided I needed some sort of shawl, and as I worked on my dress, I sometimes set it next to another bit of fabric that was teetering between light blue and mint green. It was a set of colors I never would have put together, but I loved them! That was the color I wanted my shawl to be! I looked on Amazon and ordered one, but it was too green, so I returned it. The next one was just right, though!
The color is a bit off in this picture, but you get the general idea.
It was thin, but the wedding and reception were inside, so I hoped it would work!
Also in case of cold, I wanted some tights. There aren’t many tights patterns out there, and while I did find a pattern, I didn’t end up making tights for this dress. I found some in the perfect color on the We Love Color website.
I was inspired by Blair Eadie of Atlantic-Pacific, who often pairs colorful tights with her outfits. My “Color” board on Pinterest features a lot of her bright and beautiful outfits on it. Of course, now I want all the colorful tights, so sewing tights may well be in my future. Wouldn’t double brushed polyester tights be cozy?
I added a slip that I had made from Simplicity 8545 for another (secretly colorful) layer and some opacity,
and I also made my other undergarments. I won’t show those, but having made them and having them fit is its own win, so I wanted to at least mention them. If you are looking for some patterns to try, I recommend Megan Nielsen’s free Acacia underwear, available in two size ranges, and Orange Lingerie’s Marlborough Bra. Both are excellent.
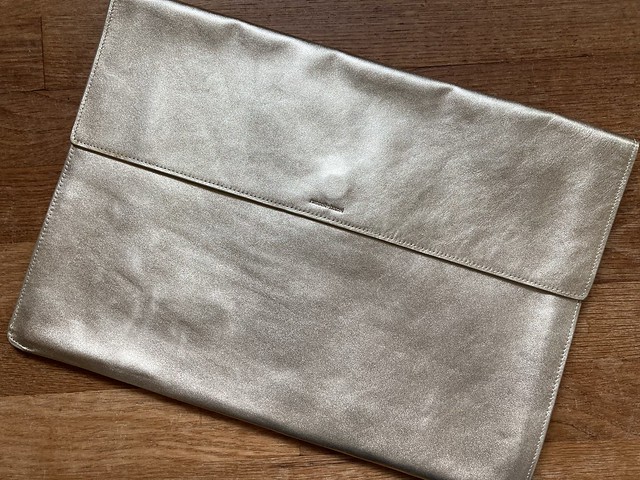
Now for accessories! Thanks to the sister of a friend who was giving away samples from her sales job, I had a gold leather envelope clutch that was perfect. It is from russell + hazel, and the leather is so soft.
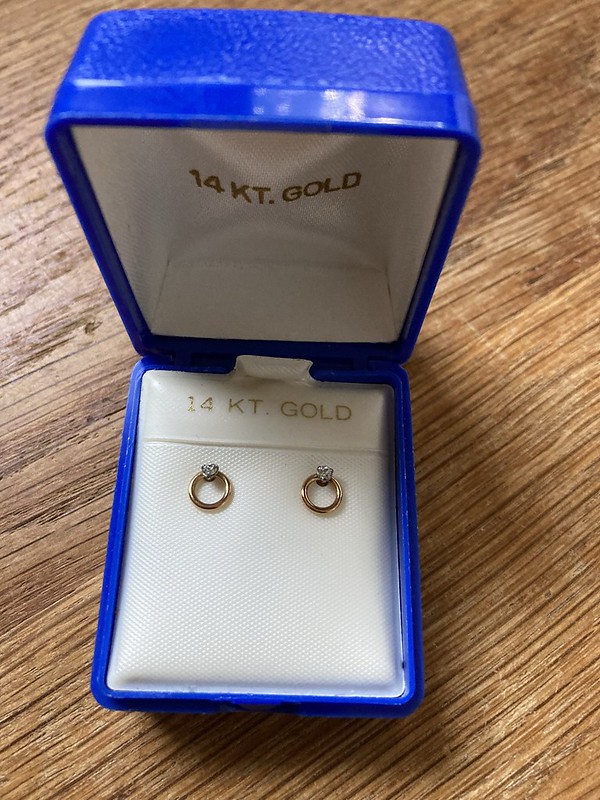
I found little gold and rhinestone earrings in my jewelry box that I have had since I was 14, but have probably never worn, since I don’t usually wear gold. They were perfect for this.
And lastly, I picked up a bottle of essie nail polish at CVS in the color “good as gold“.
I was ready!
The afternoon of the actual wedding was not too warm or too cold, so the whole outfit was perfect. I felt comfortable and colorful. The wedding was beautiful, and it was so much fun to go on a date with my husband to an actual party with friends.
Now I think it may be time for some cold-weather sewing and gift sewing!
***Sewing Details
Here are my notes on sewing the Mindy dress for anyone else who is thinking of making it.
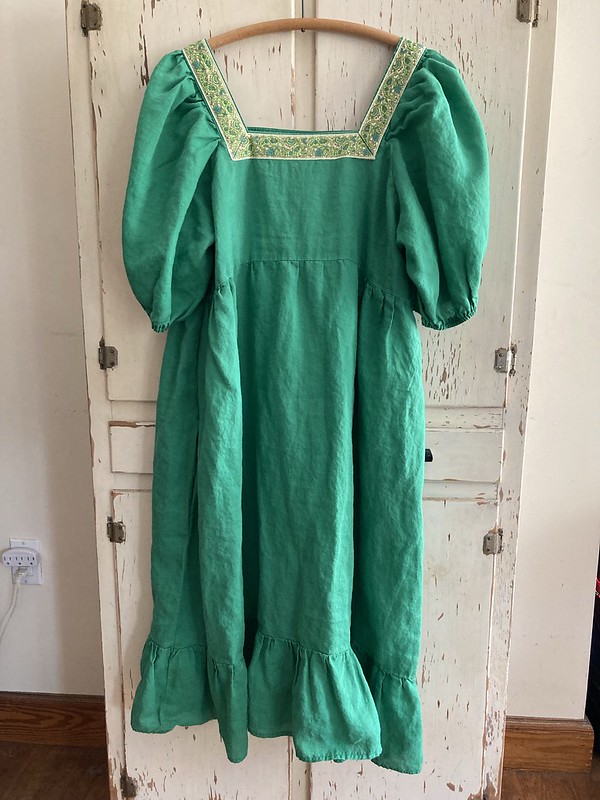
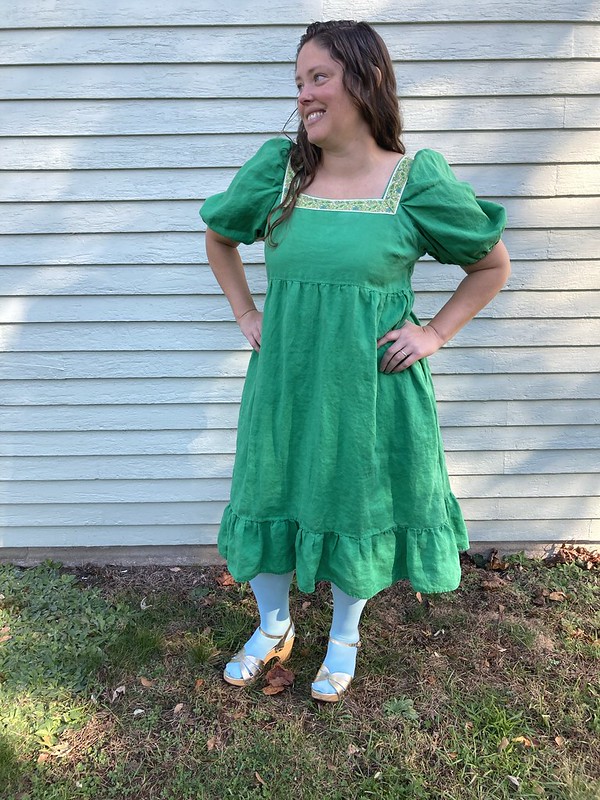
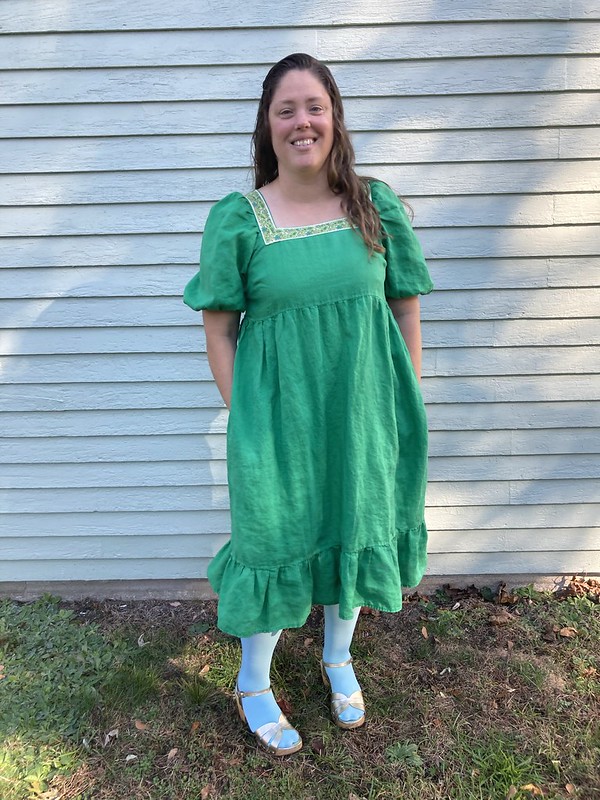
Mindy dress, front
The back of the Mindy dress, which looks almost identical to the front
My bust size put me at a US 16 (UK 20/EU 48) in this dress, but I cut out an 18 for a looser fit, since I could always take it in if it was too loose. I wanted to sew the dress largely as drafted, with the puffy sleeves rather than the butterfly sleeves, but with the addition of pockets and a bottom ruffle. Before cutting out my fabric, I also checked to see if I needed to change the dart height (nope!) or make a broad back adjustment (nope!). Those things noted, I added 5/8″ seam allowances everywhere except the hem, where I added a 1.25″ hem allowance. The pattern called for 2.75 yards of 55″ wide fabric. I had three yards of green linen at approximately that width, so I cut things out hoping I would have enough for my pockets and bottom ruffle. In the end, I did! I just had to cut my back facing on the cross grain. I was left with only a few narrow strips of fabric, but I got everything cut out.
This pattern has you construct the front of the dress and then the back before adding sleeves or joining the front and back together. I made sure to add my bottom ruffles as I was constructing the front and back. I checked my fit before adding the invisible zipper by pin basting the sides together. Everything was looking good, and a bit loose, so I decided that I would use slightly larger seam allowances and take things in a bit when I sewed the sides together. I guess I could have made the 16.
As for the zipper, I put it in, but I have never needed to use it. If I made this again, I think I would omit it. It’s easy to slide this dress on and off over your head. Attaching the straps came next. Everything was fine until you attach the strap + sleeve to the dress and then it got confusing. Is the strap supposed to be at an angle or perpendicular to the front? Mine ended up being more or less perpendicular. Make sure that when you get everything attached in step five and have to finish the raw edges together that you don’t trim any seam allowance off or it will impact the seam allowance when you attach the front facing.
Just before step six, which is sewing the front and back side seams together, I decided to attach my trim to the bodice and sleeve straps. I had figured things incorrectly when I was looking at the width of the sleeve straps and trim. The trim was wider than the sleeve straps, so after asking Maggie at Pintuck & Purl for her advice (she being my most advanced garment-sewing friend), I took the straps off, widened the pattern piece, and recut the sleeve straps out of scraps so I could try again. I wanted them to be just a little bit wider than my ribbon.
The finished width of the strap is actually half the pattern piece minus seam allowances
Then I reattached everything and very carefully, using instructions from The Vogue Sewing Book (revised edition, copyright 1975), I sewed on my trim, even mitering the corners.
Look at those mitered corners!
After that, I only had enough ribbon left for the front of the bodice, so I sewed it on there, but when I tried it on, it looked…maternity-ish.
So, I moved the ribbon down below the underbust seam, and it made the dress look sort of wide and the seam look uneven. That was that. I took it off, and decided to just keep the trim around the neckline and shoulders.
If I sew this again, in addition to omitting the zipper, I will plan to lengthen the bodice by at least one inch. The same thing happened back when I made Simplicity 4111 in 2018. I think I have a larger and possibly lower bust than what these patterns are drafted for, so a lot of these empire waist seams end up on my bust rather than below it, which can lend a bit of a maternity look to a style that easily leans that way already. Since I don’t need a maternity dress, I would rather not look like I am wearing one.
Before sewing up the side seams completely, I added pockets. My pattern piece came from Simplicity 8689, as did the instructions I used for putting them in.
After that, it was just my hem left. I decided not to use the 1.25″ hem allowance, since I had accidentally added that to the skirt instead of the ruffle, but instead to serge my ruffle edge and then press it up twice, so I could preserve as much of the ruffle length as possible. This gave me a quarter inch hem and only took off one half inch, since I folded it up twice.
Although I don’t love the look of insides finished with a serger, generally speaking, I was soooo glad to have a serger for this project since it kept everything nice and neat inside. The only downside was having to weave in a billion serger tails. I think I will start practicing sewing over my tails when possible in the future.
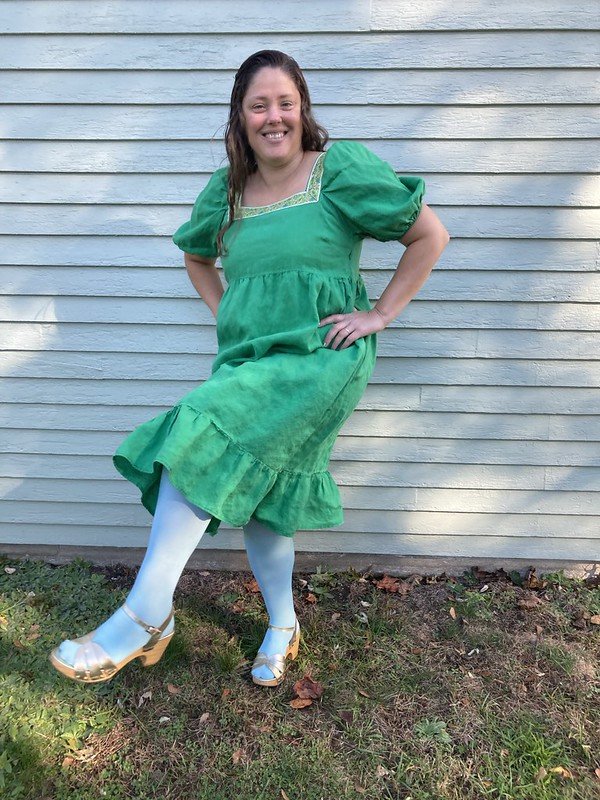
Ready for dancing!
Overall, this was an interesting dress to put together and a good pattern. I would consider making it again with the few changes I mentioned, and I’m really happy that I made it for this wedding. It was so much fun to have an outfit with details and colors that I loved–those are some of the best aspects of my favorite garments, and the longer I sew, the more convinced I am that colors and details are a big part of what makes a project go from good to great for me.
Hi, everyone! It’s been awhile! It felt so good to take a nice, long break this summer. I really needed it. We wait all year for warm weather in New England, and I just wanted to soak it all up. Summer is gorgeous here.
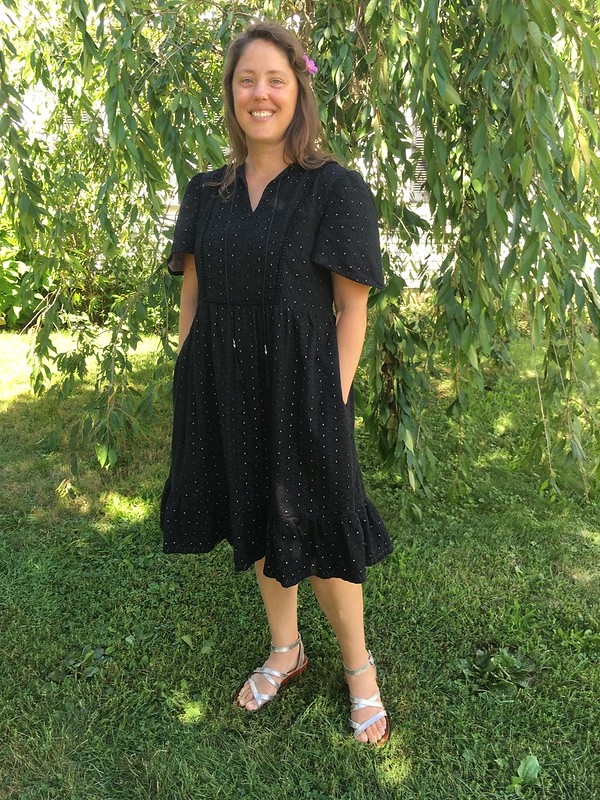
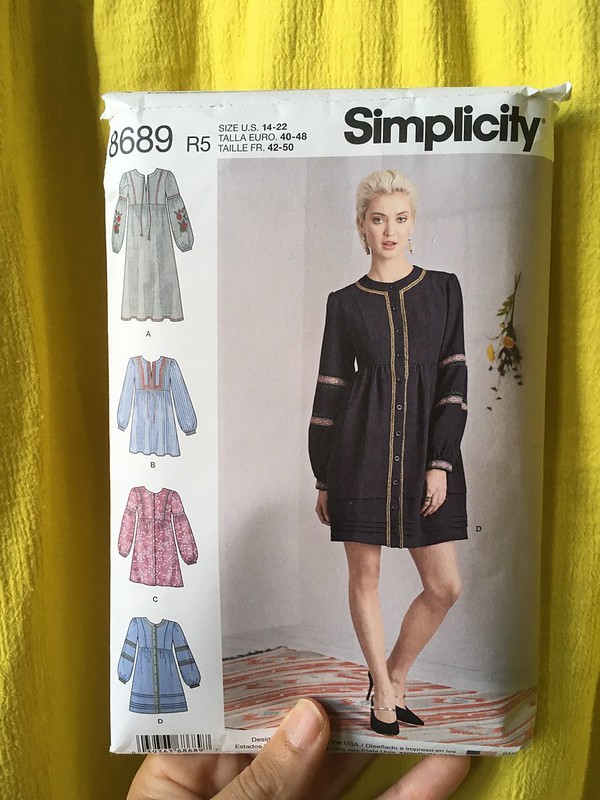
This summer I tried to think about what I really want in my warm-weather clothes. It took me almost until the end of the season to really figure it out, but I did manage to sew a (very) few things that fit my wardrobe ideals. In fact, I found a pattern I liked so much that I made it twice: Simplicity 8689.
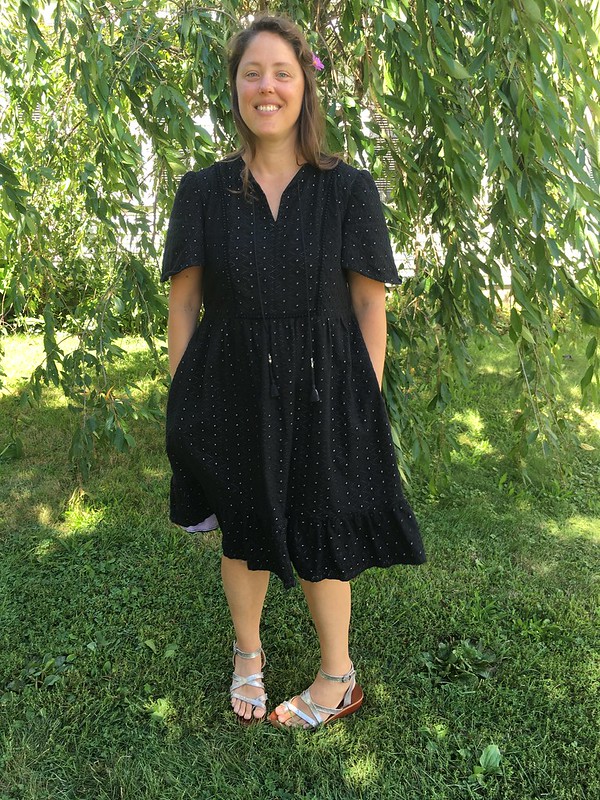
Version 1
Version 2
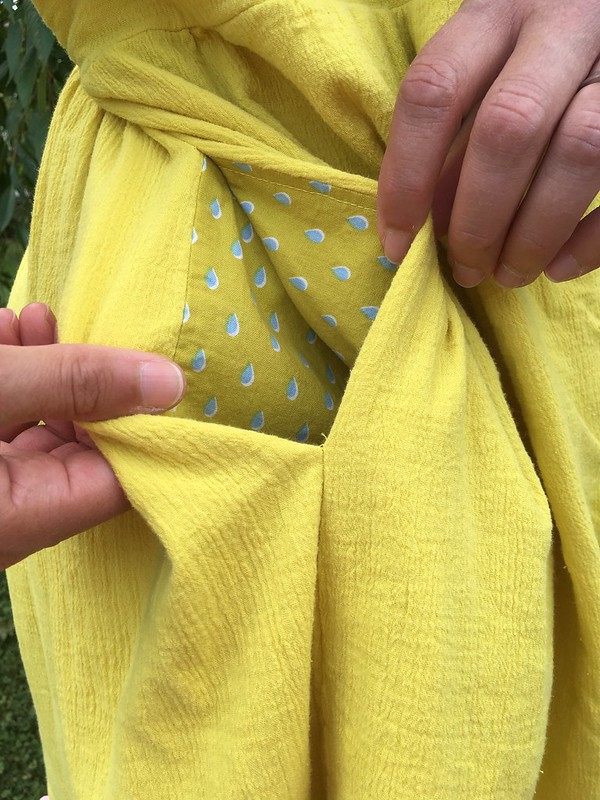
I have made a few somewhat successful dresses in the past, but I think I really found what I was looking for in this pattern: all undergarments are covered, it is loose and doesn’t cling in hot weather, it’s long enough that I don’t have to worry about a gust of wind exposing me, and, of course, it has pockets. I also love that this pattern has so many possibilities for variation (and decoration!). That’s the case with any pattern, but this is one where I can really see those possibilities.
I had fallen in love with a combination of black eyelet and light purple/pink voile at Joann’s in the spring, and when it went on sale, I snapped it up. Originally I had it earmarked for another pattern, but I’m so glad I went with this one. I figured I could underline the eyelet in voile, which would provide modesty and create a cool effect. If you aren’t familiar with it, underlining involves taking two layers of fabric and treating them as one, reducing wrinkling and providing many other benefits. For my purposes, the reduced wrinkling and the modesty underlining provided me with were key.
Pattern Choices
I chose to make View B, the tunic length, with an added 8″ ruffle (before hemming) at the bottom.
l
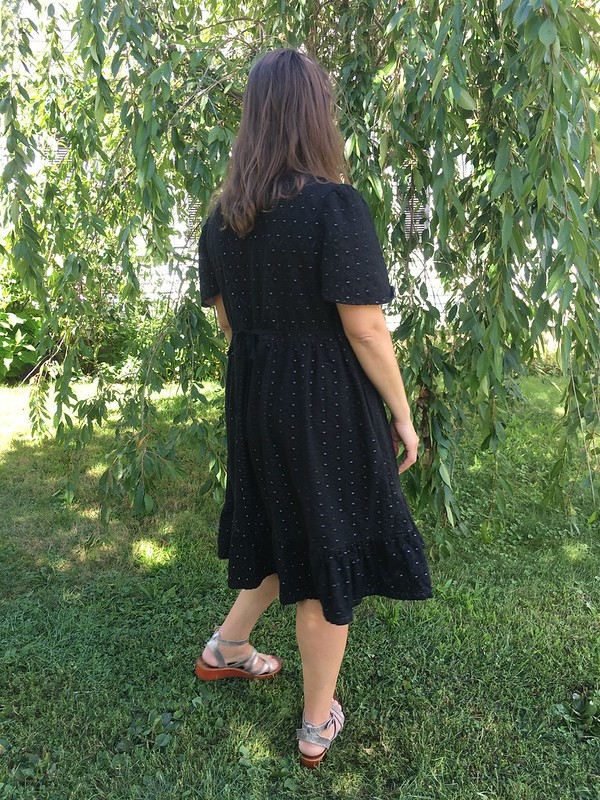
I cut a 16 at the bust and graded to a 20 for the waist and hips. I like a fair amount of ease, but if you don’t, you may want to think twice about grading out. I probably could have made this in a straight 16 and been fine. If you look at the back of the dress, you can see that there is a lot of fabric being gathered in by the waist ties.
l
l
Pattern Adjustments
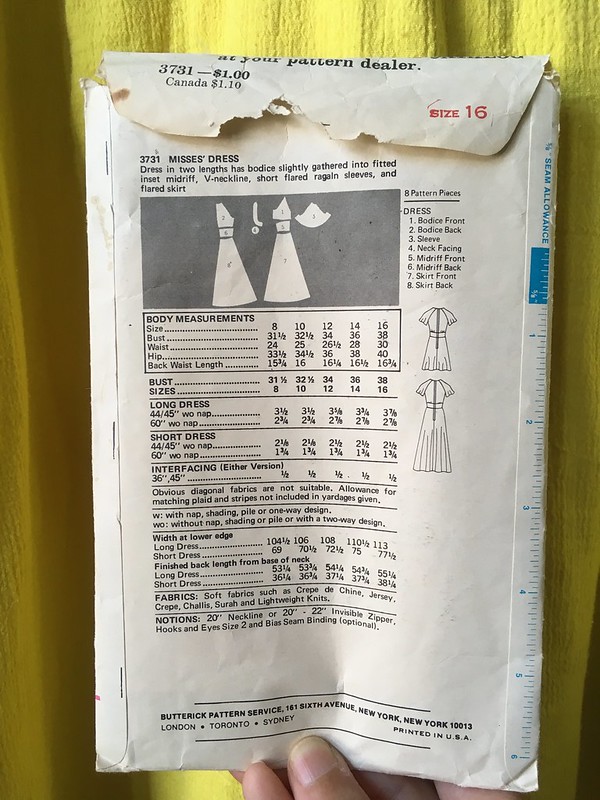
*Borrowed the short flutter sleeve from vintage Butterick 3731. I actually didn’t even notice that I was putting a raglan sleeve on a set-in sleeve pattern until writing this post…hm. I’m glad it worked out! That explains why my sleeves are so long!
l
*Added 2.25″ of length to the bodice, changing it to 2″ on my second dress
*Major broad back adjustment (enough to preserve the ease that was supposed to exist in this pattern, which is 4.5″ above body measurements; you can see how I do a major broad back adjustment here)
*Low bust adjustment, moving the bust point on the princess seams down 7/8″ (and then taking 7/8″ off the bottom edge of the bodice)
*Lowered the placement points for the back ties until they were 1″ above the bottom edge of the bodice
*On my second dress, I raised the pockets 2″ so they would end up where they were before I lowered the waistline
This sounds like a lot of adjustments, but I was committed to getting the result I wanted, and they were worth it. For information on broad back adjustments and lowering bust points, I used The Perfect Fit from The Singer Sewing Reference Library. These books are cheap and easy to pick up used. I have a lot of them, and this is probably the one I turn to the most.
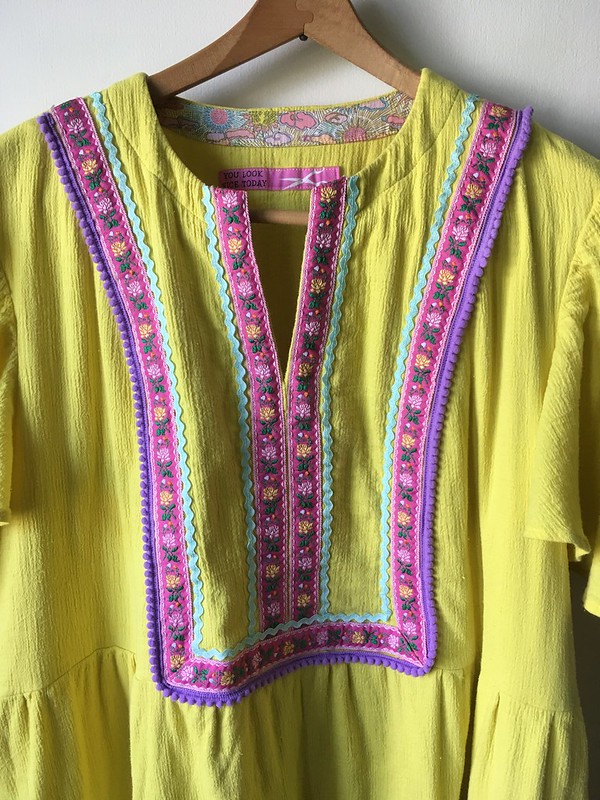
After making my first dress in black eyelet with black mini pom pom trim, and wearing it every Sunday for a month, I was completely smitten. While in Michigan, I managed to hit the fabric sale at Field’s Fabrics in Holland, MI and found some cotton bubble gauze. I bought four yards, thinking I could double layer it for opacity (more underlining!), and make something fun. I settled on making another version of Simplicity 8689 with all the beautiful trims I could find.
Martha Moore’s versions of this pattern influenced me heavily. You can see her black dress on PatternReview here and her brightly-colored embellished dress on PatternReview here. It was through one of Martha’s reviews that I discovered and fell in love with fashion designer Dodo Bar Or’s resort collections (here’s a link to her Resort 2019 collection), and decided I needed something like that in my life.
While at Field’s, I found the floral ribbon, and added rickrack and big pom pom trim from Joann’s plus more baby pom poms from Amazon. These colors make me SO HAPPY. I love them. Getting everything just right took some very careful sewing!
I made the sleeve a single layer of gauze and hemmed the two layers on the bottom ruffle to different lengths for a fun effect. Quarter inch iron-on adhesive was helpful in getting crisp hems in those areas.
Truthfully, I wasn’t sure how the dress would come out in the gauze. It’s a bit crinkly, and after consulting the experts at Pintuck & Purl, I didn’t try to iron it, but sewed it as it came out of the dryer, and this worked well. It probably is a little larger/more relaxed after wearing than the black one, but it’s hard to tell (without actually measuring) if that’s reality or just my perception because of how the light and color interact in each garment.
Garment Details
*I used a plain black fabric for the facings and pockets in the black dress. In the yellow dress, I used part of a fat quarter of Liberty of London Tana Lawn I got in a fabric trade. The colors are great! Quilting cotton was perfect for the pockets, and part of that same selvedge made a great tag for the dress.
l
*If you look closely on the black eyelet dress, you can see that I managed to mostly pattern match the front center seam, and I alternated the direction of the embroidery on the front yoke, side panels, skirt, and bottom ruffle.
*I used shiny nylon cord and tassels plus other odds and ends from the jewelry section of the craft store to add tassels to the black dress. Originally the cords were sewn into the neckline, but they broke in the wash. I tried to sew them on again by hand, but it looks messy and is starting to separate again. If I make this pattern again, I will try to come up with a good way to make them detachable for the wash, maybe with hooks and eyes.
The tassels themselves are removable, thanks to some jewelry clasps.
Anyway…
I finally feel like, after a few years of searching, I have found a summer dress I love. I feel confident, secure, and beautiful when I wear these. I know they are a little different from the norm (especially the yellow dress), but sometimes fashion takes courage.
Hey, friends! I missed you last week. My plans to take some outdoor pictures for my ‘Outside in January’ post were thwarted by family sickness, so that post never happened. Thanks to my ‘Instagram Husband’ photographer and some nice weather on Saturday, though, I’m back with another sewing post for you. Today’s creation is the new Toaster Sweater by Sew House Seven. I was severely tempted to make a sweater for my toaster or pose with a toaster, but I resisted and went for something more basic. 😉
This creation is brought to you by my getting caught up in the wave of cozy versions of this sweater floating around the sewing internet. I often get caught up in these things, but rarely give in. This time, I not only got caught up, I bought the PDF version of this pattern, something I almost never do! I’m not a big fan of PDF’s from a user end. They are a great way for a new company to get their patterns out into the world for a lower start-up cost, but from a sewing perspective, I’d always rather have a paper pattern. Sometimes I will even pass on a pattern I like if it doesn’t come in a paper version. This time, though, I realized that I could buy the PDF of the single view that I wanted (the pattern comes with two views) for less than the price of the paper or full PDF pattern, and I could have it NOW.
I already had my fabric, some Polartec Power Stretch (at least I think it’s Power Stretch) that I bought this past summer at one of my favorite fabric stores in Michigan, Field’s Fabrics. It was just waiting for the right pattern. And this was it.
The Details
This is a great pattern and a fast sew. There aren’t too many pieces, and the instructions are great, which makes the construction feel really simple in a good way. I made this before making the Coppelia Cardi from Papercut Patterns, and I’m glad I did. The helpful advice about double stitching is something I’ve been using in all my recent knit projects.
I had all these plans to alter the pattern before getting started. I wanted to lengthen it and grade the hips out to a larger size, etc., etc., but in the end I made a straight size large for the first version. I had two colors of fleece, so I figured the first could be a wearable muslin, and I could change things up for the second if I wanted to. In the end, all I changed for number two was to add another inch in width to the bottom band so that, hopefully, the sweater/sweatshirt would hang down over my hips, rather than sort of sitting on top of them. I’m not sure that this made a huge difference, but the good news is that both versions are really great.
Here are some knit sewing construction details for anyone who is interested. I used a 90/14 stretch needle (Schmetz brand) and a walking foot with Gutermann polyester thread in the top and wooly/bulky nylon in my bobbin. Normally I just use wooly nylon for swimwear, but I wanted to see if I could get a better stretch stitch, and this turned out to be just the thing. I used a straight stitch with a length of three for my first pass and a three-step zigzag stitch next to that in the seam allowance for my second pass on each set of pattern pieces. For the zigzag, I used a width of 6 and a length of 1. My tension was at 4 and my presser foot tension was at 3. I did not use a serger.
To figure out my stitch length and width, I used the suggestions that came printed on my machine and tested them on fabric scraps. Then I stretched each test to see if any of my stitches popped. The straight stitches will pop if you put enough stress on them, but I think it is worth doing both because the straight stitches give you a clean join in your pieces while the zigzag provides extra strength and stretch.
I used a universal twin needle since I didn’t have a stretch twin needle at the time (I’ve since gotten one, and it’s great, but the universal did work as well). I didn’t press my seams since I was sewing Polartec and I didn’t want to melt it, but I used the twin needle even in spots like the vertical neck, cuff, and bottom band seams to hold my seam allowances to one side. I think I finally have the hang of the double needle now, and I’m so happy about it.
So, in conclusion, I really like this pattern. I don’t think these are the world’s most flattering tops on me personally, but I don’t really care. I love them and I wear them a ton. They are so cozy in fleece and just perfect for winter.
Recommendations
I’ve said it before, but it’s worth saying again: fleece from Malden Mills (Polartec brand fleece) is awesome for cold weather. I love natural fibers year-round, but Polartec fleece is cozy and technically fascinating. Reading their website really gives you an appreciation for all the innovation in these fabrics.
Thanks to this show, I learned that the internet is actually housed on top of Big Ben and if you are really, really lucky, the Elders of the Internet might let you borrow it for big speeches. 😉
It will come as no surprise when I tell you that I’m really excited about my latest creation. For so many sewers, the last thing they’ve made is their favorite and this is pretty much along those lines. It is hard for me to top last week’s pants, so maybe this isn’t my absolute favorite, but it’s a pretty close second.
I am IN LOVE with this shirt (at least as much as you can be with clothing). Like the time I made my husband Thread Theory’s Jutland pants, I feel that the value of this shirt far exceeds what I paid for the fabric. What I think really clinches it for me, though, is the feel of this flannel.
When I felt it initially, I was actually somewhat disappointed. It seemed much thinner than I remembered this line of fabric feeling. Still, I had wanted to sew with it, so I bought my yardage, took it home, and washed and dried it.
And that’s when the magic began.
Once it had been washed and dried, it fluffed up into a beefy, cozy, heavenly bit of fabric. I loved sewing with it, and I love wearing it even more.
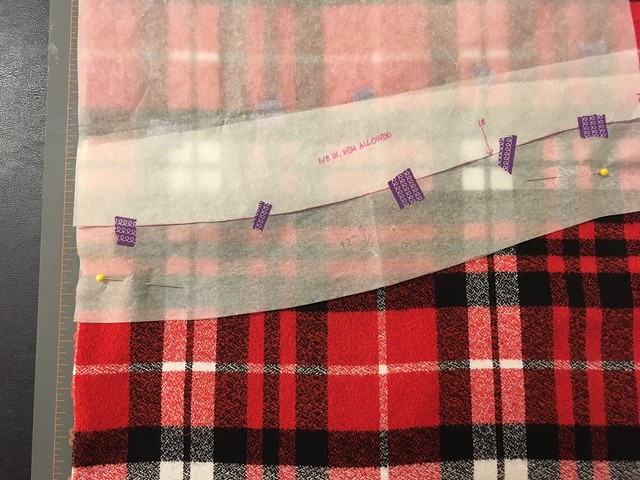
This shirt also marked my first real foray into plaid matching. I had sort of done a bit of it when I made a shirt in Cotton + Steel’s Paper Bandana print, but this time I got serious. I looked around at advice on the internet and in some of my trusty sewing books and tried to pick some reference points I could use to match things up. My goal was to try to do a good job without letting myself slide down the slippery slope of perfectionism. And I think I achieved my goal. Not perfect, but really, really good. And, (dare I say it?) it was kind of fun!
I see now, from experience, why you really want to have some extra yardage when you are matching plaids. I really like setting my cuffs, yoke, and button bands on the bias, but there just wasn’t enough extra fabric to do that anywhere except the yoke; however this gave me the chance to work on some pattern matching across the front.
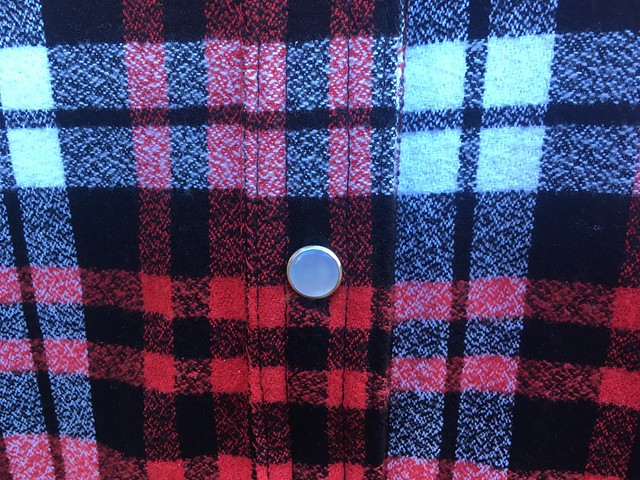
I used my current favorite buttons from Jo-ann’s. They look like pearl snaps. Real pearl snaps are on my list of things to try, and a little birdie told me that Pintuck & Purl just got those in along with some Robert Kaufman flannel (plus a bunch of other great stuff), so I think there’s a pretty good chance that another flannel shirt will make an appearance on this blog in the future. Actually, I love this flannel so much that I want to MAKE ALL THE THINGS IN FLANNEL! But I’m going to try to hold myself back…a little. Once winter hits, I’ll feel the same about fleece so, you know…
The adjustments on this pattern are as follows: major broad back adjustment and lowered darts (as discussed here) and for this version, I also added two inches to the length. I knew I wanted to add 2-4 inches so the shirt tail would cover my backside for wearing with leggings and 2 inches was a good amount. It doesn’t cover completely, but it almost does. I’m happy with it.
Additional Note: I completely forgot to add this when I first published this post until Monique brought it up in the comments–all my seams that aren’t automatically finished/covered (like in the collar) are flat-felled. I wasn’t sure I could manage to get the sleeve seams done on my machine, but after reading a few posts on other blogs, I became convinced I could do it. In order to make it work, I put my sleeves in flat. Rather than sewing up the side seams and then setting the sleeve as my instructions directed, I sewed the sleeve on with my flat-felled seams first and then sewed up the sides and sleeves in one fell swoop, flat-felling those seams as well for a nice clean finish inside. It’s a bit tricky to do, but if you go slowly and have patience, it’s completely possible, and the end result is strong and beautiful.
And that’s it. If you know me in real life and notice me wearing this shirt and last week’s pants every time we see each other for the next month, don’t be surprised. I think I’ve finally found my tried ‘n true button up shirt pattern and a much loved fabric company. I highly recommend both.
Recommendations
First on my list is a long-time favorite of mine: Harney & Sons Bangkok Green Tea. It has a subtle coconut flavor that I really like.
Polartec fleece from Malden Mills. When the temperatures dip, this fabric can’t be beat. It’s great for outdoorsmen and it’s great for the everyday. It also has some pretty amazing science behind it.
Along the lines of the last recommendation, if you live in West Michigan or plan to visit, Field’s Fabrics is a great place to find Polartec in various forms along with all sorts of other great fabrics. I love going to Field’s and always try to visit if we are in Michigan.
You guys know I like to watch surfing, especially in the winter since it reminds me that it won’t be freezing and snowy forever and, as we head into the cold season in this part of the world, I’m keeping an eye open for good surf videos. I can’t vouch for the whole movie (since I haven’t seen it), but the trailer of View from a Blue Moon about surfer John John Florence, is stunningly beautiful.
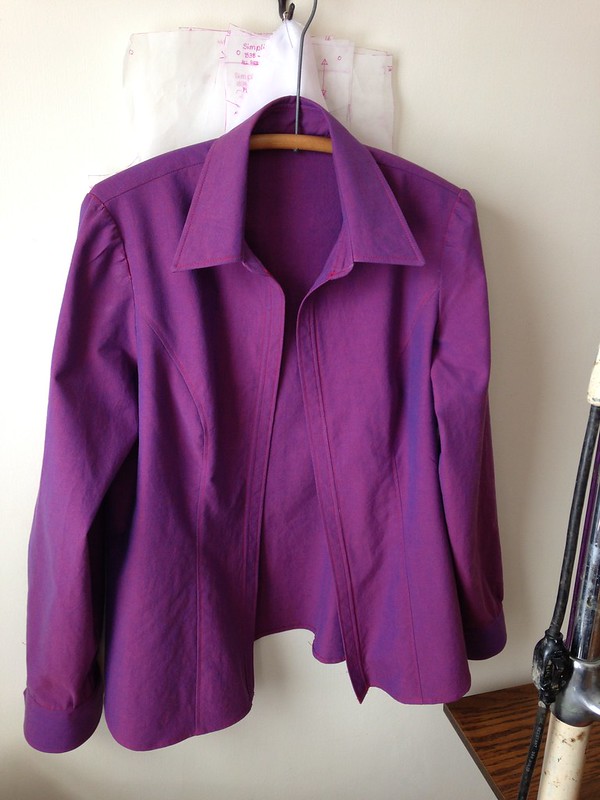
It is a lovely, lovely thing to sew from a pattern you have made before and made positive fitting changes to. I’m just learning how to fit things to my own body, and I used this pattern (Butterick 5526) for one of my first attempts, making a broad-back adjustment to it before trying a first draft. In making this second shirt, I didn’t change anything. Someday, someday, I will try a swayback adjustment, but since I can wear the shirt comfortably without it (and the fabric pools in my back, where I don’t normally see it), it just doesn’t feel as urgent.
The real feature of this edition of the shirt is this cool fabric. I got is last summer at Field’s Fabric in Kalamazoo, MI. If I remember correctly it’s from Robert Kaufman fabrics, and is a cotton. Here’s the cool part: it’s not actually purple. It’s a trick on your eye. The fabric is made of red threads woven perpendicularly to blue threads, and your eye sees it as purple. Color theory in action! (For an interesting read on color, page through Josef Albers’ book entitled Interaction of Color. Mind blowing!) The weave also gives the fabric a fascinating effect (I want to say “iridescent”, but that’s not quite right) in the light.
I chose to topstitch this shirt in red and used plain red buttons. I searched high and low for cool, unique buttons, but in the end, these seemed right.
In future editions of this shirt, I’d like to use French seams inside, but I was sort of afraid they wouldn’t make it around the curves and I would get lumps. However, Lauren of the blog Lladybird is the one who I copied convinced me to try this pattern after I saw her many versions, and she uses French seams, so I should give it a try, too, perhaps. For now, let’s pretend the insides of my shirt, which I finished with a zigzag stitch and which consequently frayed in the wash, are a “design feature”.
And lest you think I’m aiming for the “moody” look in these posts, I’ve been sick all week, and I was still recovering when I took these (and the next few posts’) shots, so it might show. I feel like I have to say this because when I take blog photos now, I always hear my Grandma’s voice in my head telling me to smile. I tried, Grandma!
How about some “in progress” shots?
I’ve had this shirt done for a while and it’s gotten lots of wear. The color is one I wear often, and the weight of the fabric is really, really nice. It’s more substantial than my gingham version (which is not high quality fabric, really), and it feels like it will hold up a lot longer, too. I love Robert Kaufman fabrics. Even if I’m wrong about this being from them, I still love Robert Kaufman fabrics.
I hope you all have a good weekend. I’m already feeling better than I was yesterday when I took these photos, so that’s hopeful. Now how about some fun recommendations?
Thanks to the Thread Theory blog for featuring the Strathcona Henley and Jutland Pants that I made for my husband along with some other amazing things created from their patterns. Check out all the great projects! The coats blew my mind, and I was definitely eyeing the shorts for ideas for the future.
Also on the Thread Theory blog, several cool videos on how various sewing items are made. I really liked that the scissors they showed are still largely made by hand, and seeing how pins and needles are made was fascinating.
This music video by OK Go is CRAZY (crazy awesome). They always have the best music videos. Do you think they did it in one take?
Today’s project is a second take on a shirt I’ve made once before. It’s Megan Nielsen’s Briar t-shirt and sweater, this time made from a fleece-backed fabric. You can see my first version of this pattern here.
I made this one for my trip to Colorado last month. Since I was planning to wear my other Briar sweater on the plane ride out, this seemed like a good choice for the ride home. I suppose you could call that dorky, but I call it awesome. I already had the pattern ready, the fabric waiting to be used, and I really needed a quick project to whip through after all the time I spent on the outfit I wore to the wedding in Colorado. With all that ready and waiting, it was such a fast project. Super satisfying!
Here are the details:
As mentioned, I used the pattern below.
These days I trace out my patterns on tracing paper, which gives me a nice, clean pattern to work with, especially if I am grading between sizes, which I usually do. It was so nice to already have this traced out from the last time. I chose to make a medium at the bust and grade out to a large for the waist and hips.
I made Version 4, which is the long-sleeved t-shirt in the longer length. I really like the high-low hem.
The fabric for this is pretty cool. I got it this summer at Field’s Fabrics in Kalamazoo, MI. Man, that place is great! This fabric is, I think, made by Polartec. The quality is really great, and makes me only want to sew with their fleece (However if some other company wants to try to convince me their fleece is better, send over the free fabric! I’ll try it, but it’s going to take A LOT to convince me.). It’s got a fleece inside and a stretchy, smooth outside. It would be perfect for an athletic jacket, but I wanted to try it in another context. When I thought of pairing it with this pattern, it seemed perfect.
Here are some detail shots. This time around, I made sure to stabilize the shoulders with ribbon, rather than trying to do that after the fact. I’ve since stabilized the shoulders and back of the neck on my first version of this pattern, but I don’t think it was a huge help since I did it after the fact. I wasn’t going to make that mistake this time (See? Sewing is LEARNING!).
A nice thing about working with knits is that you don’t have to do a lot of finishing of seams and edges. The hem and sleeves are just turned up and zigzagged. I made sure to use a jersey needle and a walking foot to help with the sewing.
You may notice in the photo above that my sleeve seam isn’t flat. I sometimes hem the sleeves before sewing the sleeve up. I’m always afraid it will be hard to hem it afterward, even though my machine has a free arm. I haven’t decided if I like this better or not. It’s definitely easier, but I don’t think it looks as nice as sewing the sleeve seam first and doing the sleeve hem after. It doesn’t bother me when I wear it, though, so I keep doing it.
Here is the shirt from the inside:
And that’s about it! I have one more of these shirts cut out in a jersey knit, so it will be interesting to see if that fits at all differently, since I have noticed some wrinkles that radiate out from the underarms in the versions I’ve already made. I can’t tell if there is a fit issue there that I don’t know about or if it is the fabric I’ve chosen. I guess I can compare them all when the t-shirt is finished.
And, last but not least…This is fun now! Here are my fun things for you to check out.
Hillcraft Designs on etsy. This one belongs to my friend who is an amazing potter, knitter, and all-around fabulous maker of a billion things. Jo-Alice is a one in a million person and a one in a million maker. My parents have ordered pottery from her and I bought some for my best friends for Christmas. It was beautiful, and they loved it. She has helped me in my knitting, my baking, and in all of life, really. I highly recommend her work!
For your reading pleasure, check out Ask the Past by Elizabeth P. Archibald. I really love funny things. The author of this book found advice throughout history and has compiled it, with comments for all of us. It contains gems like the usefulness of bacon for curing wounds, how to get sympathy after giving birth (hint: scream really loud!), and a caution to not smell too much basil (you might end up with a scorpion in your brain!). We checked out a copy from our library, so you can check yours to see if they have it, too.
Last, but not least, and continuing on the “funny” theme, this is currently my favorite sketch from The Tonight Show with Jimmy Fallon. Makes me laugh so hard I cry pretty much every time.