Tag Archives: Polartec

The Green Pepper 537 Frenchglen Barn Jacket…with Extra Pockets!

Standard
The Green Pepper 537 Frenchglen Barn Jacket…with Extra Pockets!

Here is a project that I wasn’t planning on making…but I’m so glad I did! Someone I met at the Pattern Review Weekend in Lowell, MA last June invited me to join her and a few others in a coat sew-along. It’s been one of my goals since chucking Instagram to meet more sewing and knitting people in real life, so after thinking it over, I decided to go for it. 

What to sew was the question. Of course, with every new project, there is so much potential. I went down a major Pinterest path. What could I do to make the best coat EVER?! I could transform a wool blanket, I could include many super cool, AMAZING details I had saved as ideas… I really got into the planning! In the end, I came up with a much more pedestrian idea that I could add some nice extra details to: the humble barn jacket. 

The Green Pepper 537 Frenchglen Barn Jacket...with Extra Pockets!
My husband awarded me Best in Show. Aww!!!
The Green Pepper 537 Frenchglen Barn Jacket...with Extra Pockets!

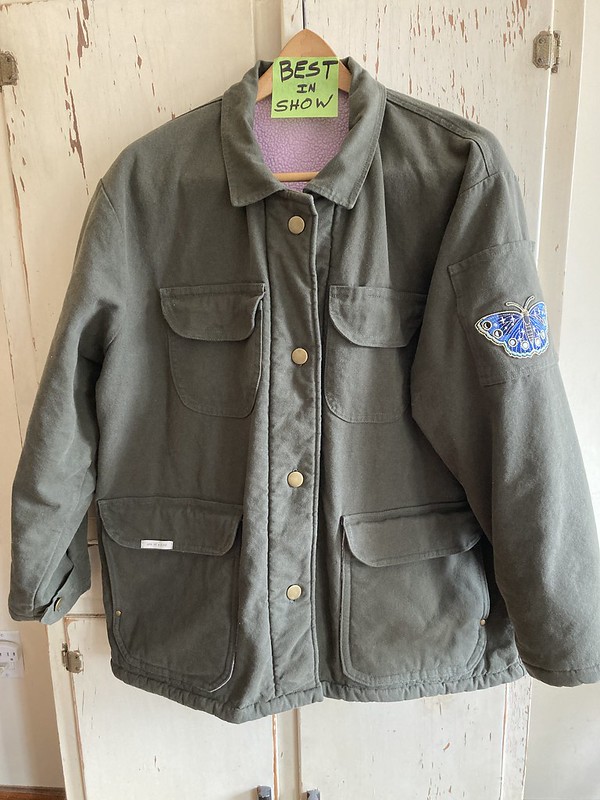
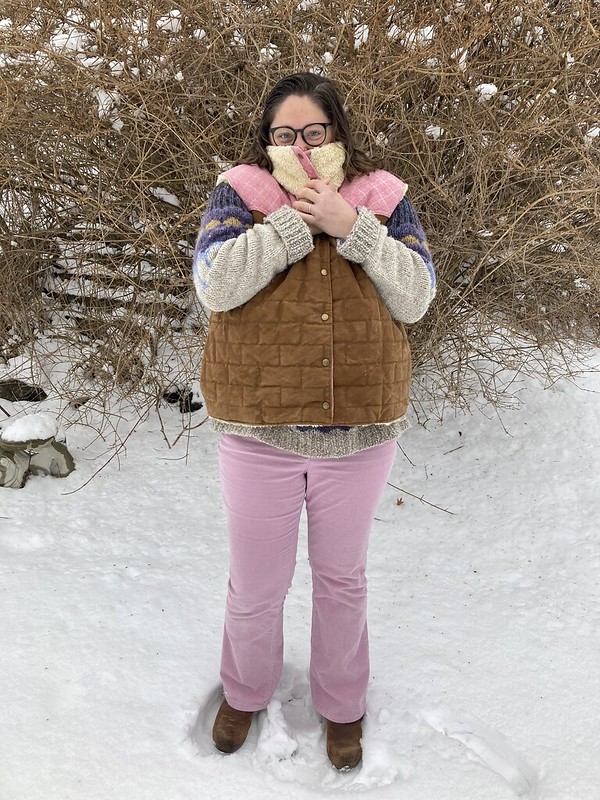
The Green Pepper, a pattern company I have used before and like, has pattern #537, the Frenchglen Barn Jacket, with some great hip pockets and the option to line your jacket, so that seemed like a good base.

The Green Pepper 537 Frenchglen Barn Jacket...with Extra Pockets!

You may not be surprised, considering what you just read, when I tell you that once I decided on a barn jacket after turning my gaze away from wool blanket coats, I decided to make this THE BEST BARN JACKET EVER! Yep, I went nuts on this idea, too. All the pockets! All the details! I compared my pattern to my favorite vintage men’s Woolrich hunting coat that I thrifted and a Dickies work jacket that I also thrifted, and my beloved wool shirt jacket that I thrifted and embellished. Ah…the planning stage is the best! All the possibilities are before you, just waiting to overwhelm you with their glory.

The Green Pepper 537 Frenchglen Barn Jacket...with Extra Pockets!

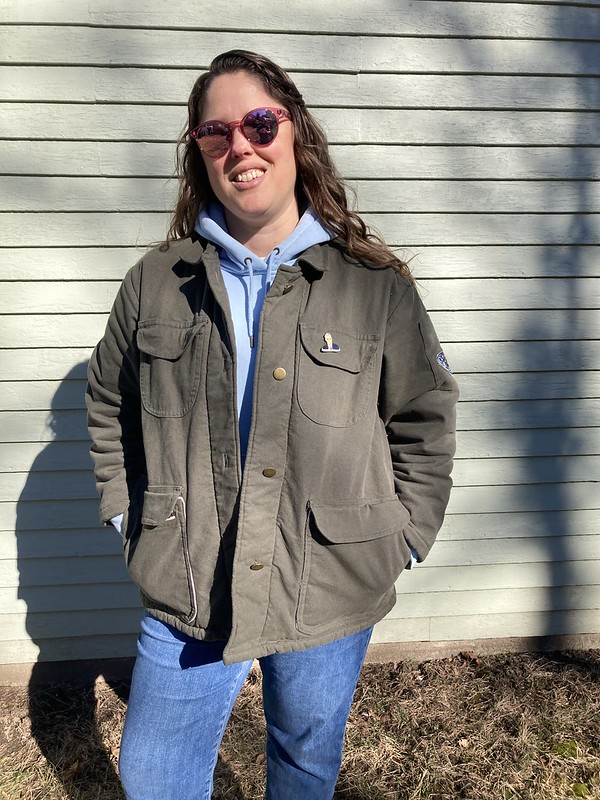
After indulging my planning love, I edited my ideas down. And in the end, I made a fairly normal looking jacket. Haha. So much for taking the fashion world by storm. :) That being said, there are some little details and surprising elements that I am really proud of and that keep the coat from being way too normal to suit me. I can buy normal, but I rarely want to sew it.

The goal for this project was to have it finished by January 31, 2024 so that we could actually wear our coats/jackets during the colder months. In order to accomplish this, I sat down with a cup of coffee and planned out a tentative schedule for myself, week by week, with what I wanted to accomplish. Normally I just let my sewing happen as I have time and energy, but that often means that projects drag on beyond the season they are meant for. I really wanted to try to make this deadline.
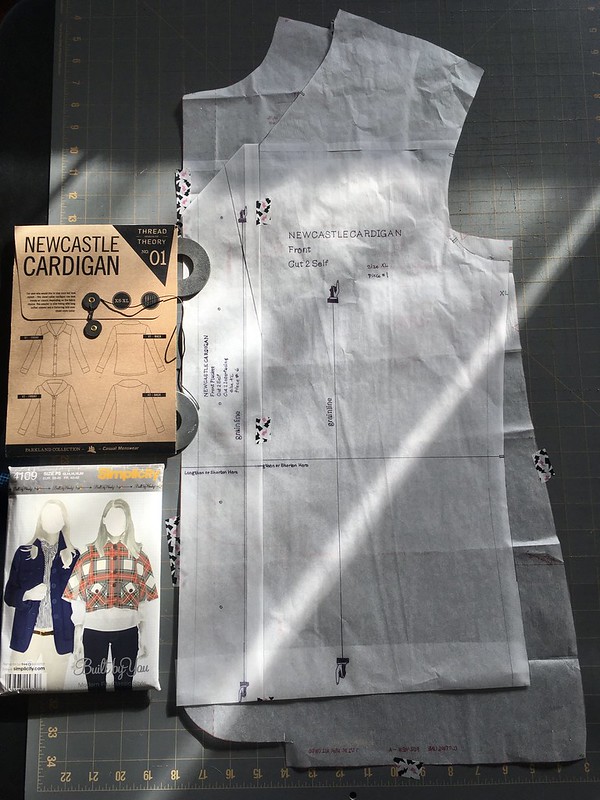
The Pattern

I bought my pattern from Field’s Fabrics on Etsy, which had cheaper shipping than ordering directly from the store. This is a unisex pattern, and my measurements put me in a size large for the bust, large/extra large for the waist, and extra large for the hip. I chose to use the square collar. In an absolutely uncharacteristic move, I made a muslin out of old sheets. I wanted to make sure my jacket would fit over other layers like sweaters, so that is how I tried on my muslin. It was pretty good. I definitely could have made it in that size, but I had a few questions. Should I lengthen the sleeves? Did I need a broad back adjustment? How about a forward shoulder adjustment?

Even more uncharacteristically, I made a second muslin in a straight extra large. I blame the fact that I was in a sewing group–didn’t want to be too much of a slacker! ;) Amazingly, the extra large took care of a lot of my fit issues. It didn’t look as fitted, but I no longer felt I needed a broad back adjustment or that a forward shoulder adjustment would make a huge difference. And the sleeves only needed maybe 1/2″ more length.

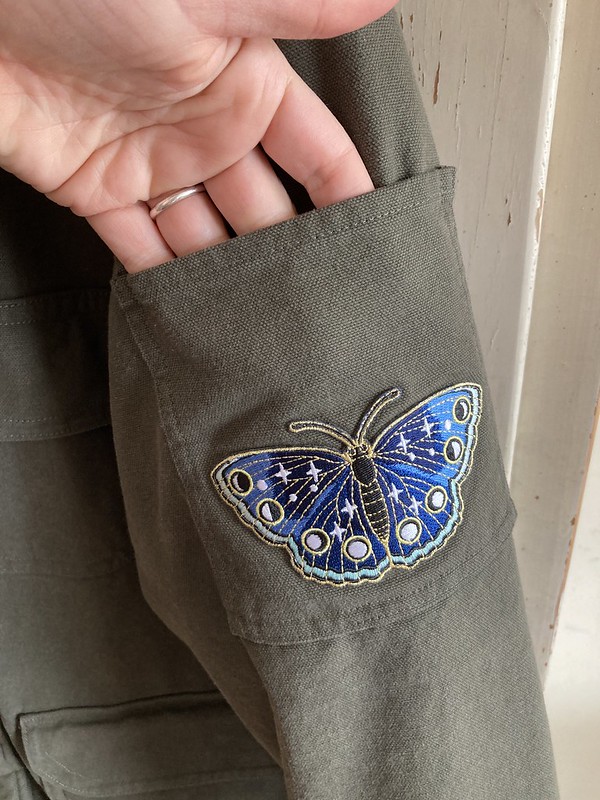
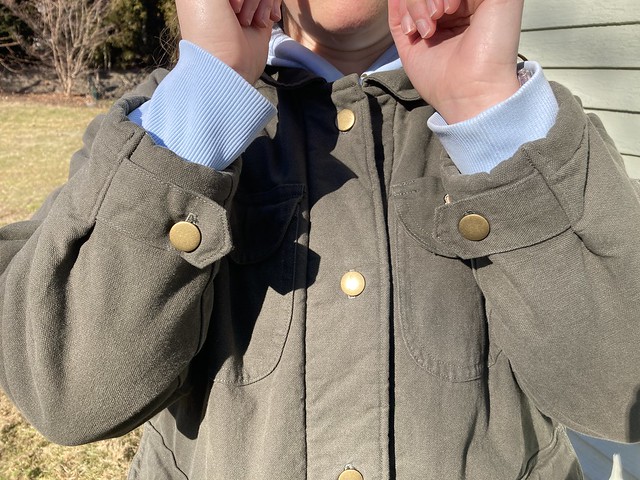
Then it was time to edit my plans for extra details. I soon nixed the idea of an interior chest pocket. The pattern came with great double pockets both inside and out at hip level, so I didn’t feel like I needed another interior pocket, and I didn’t want to weigh my fleece lining down too much. I settled on adding two outer chest pockets with flaps and a sleeve pocket.

The Green Pepper 537 Frenchglen Barn Jacket...with Extra Pockets!
Chest pocket

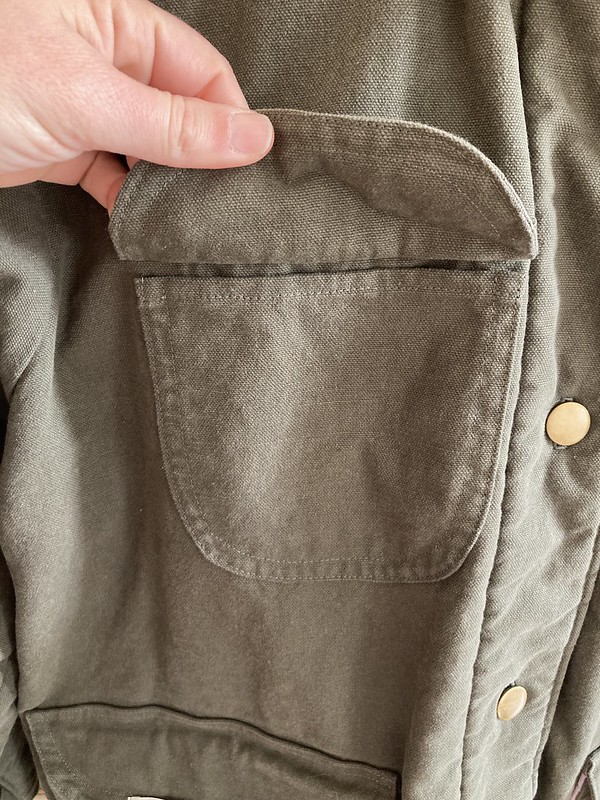
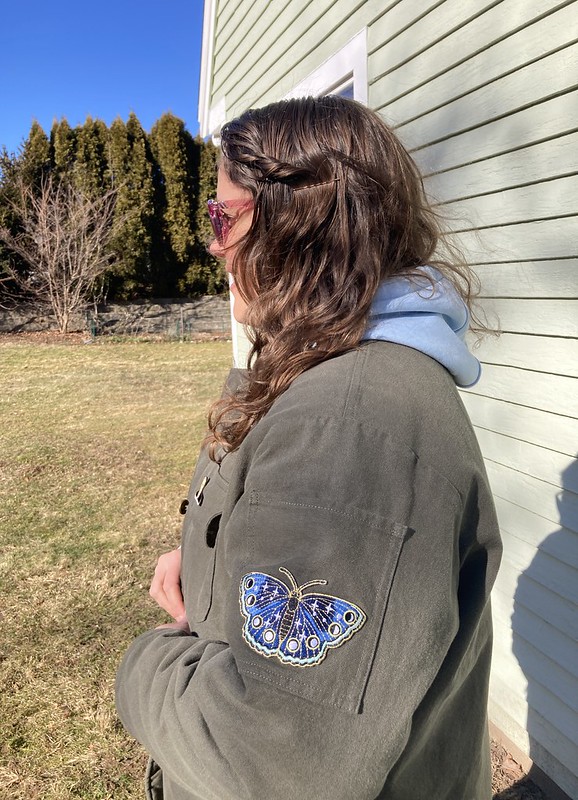
I wanted a little opening in the flap of one of the chest pockets so I could slide in the arm of my glasses or a pen or pencil. 

The Green Pepper 537 Frenchglen Barn Jacket...with Extra Pockets!

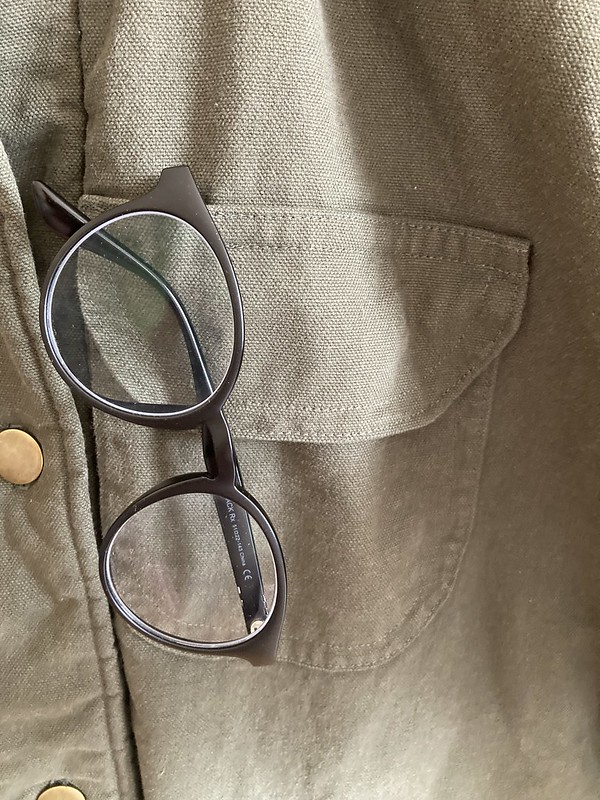
I have this feature on my thrifted wool shirt, and it’s great. I was also hoping to use an embroidered butterfly patch I had been saving for just the right project.

The Fabric

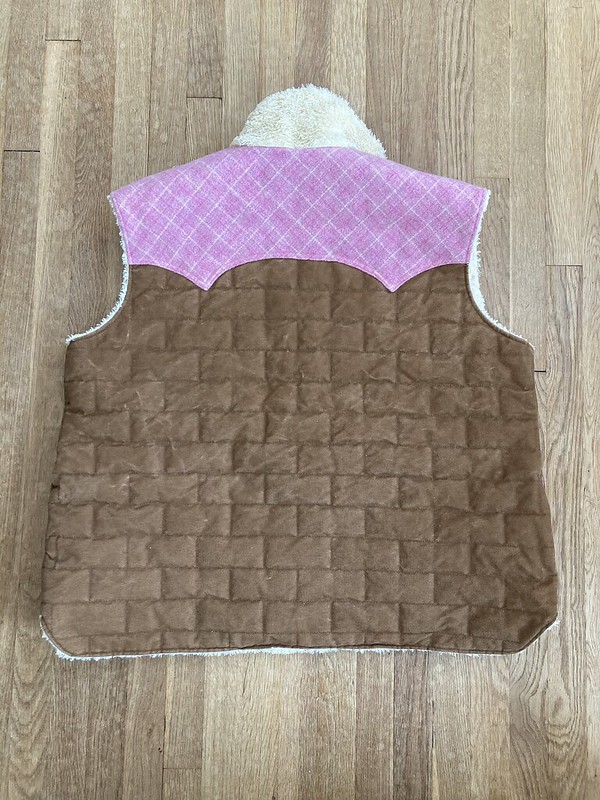
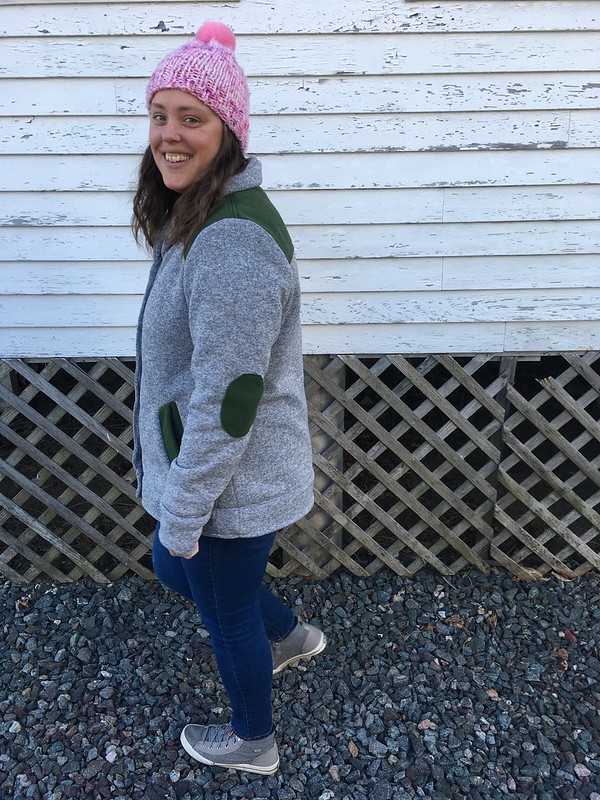
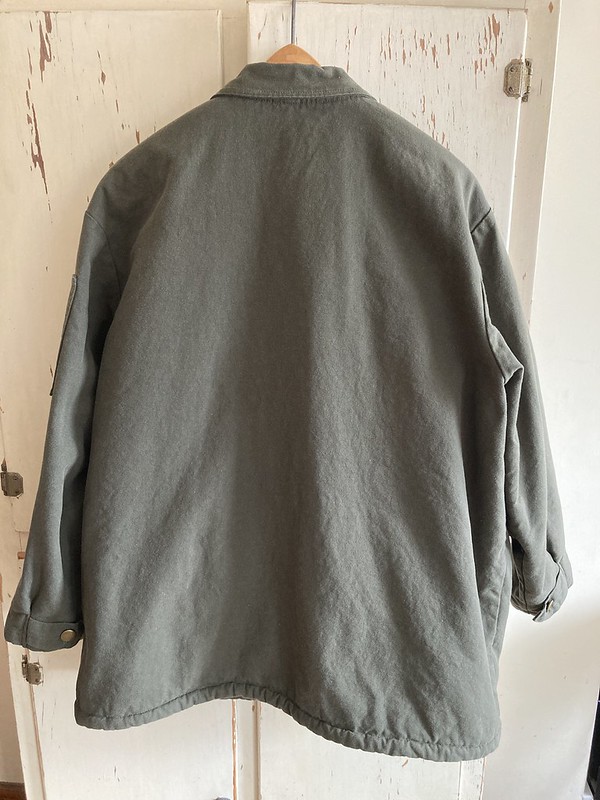
For my outer fabric, I chose some dark olive green cotton duck canvas from Big Duck Canvas, an online store I have ordered from before. I like olive green–it goes with a lot, but isn’t the same color as most denim, so there is good contrast when I am wearing jeans. I think I ordered three yards of this fabric, which was 58″ wide and 10 oz./yard. It washed and dried great, without the color loss that I sometimes see in cotton canvas.

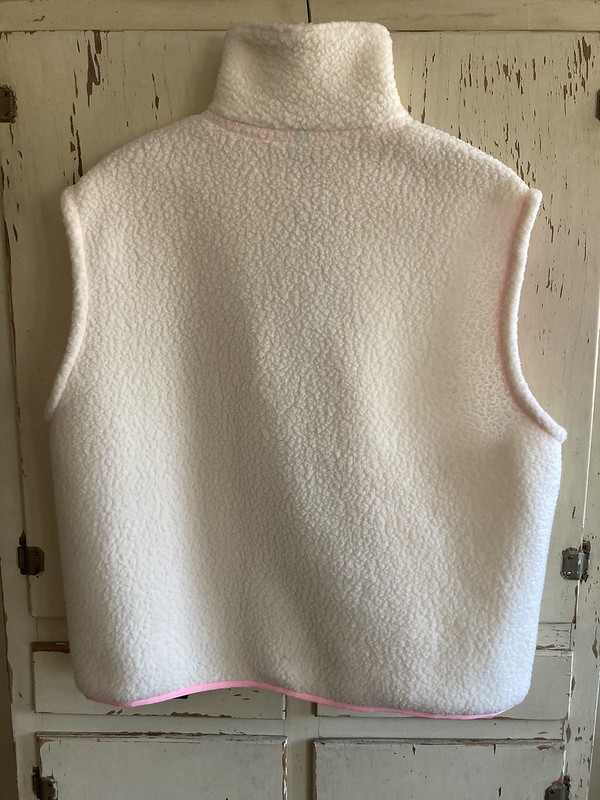
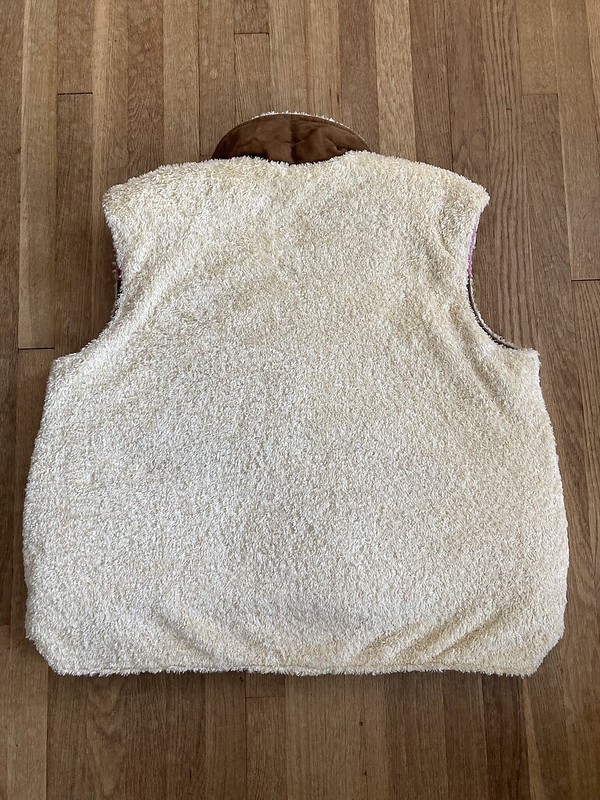
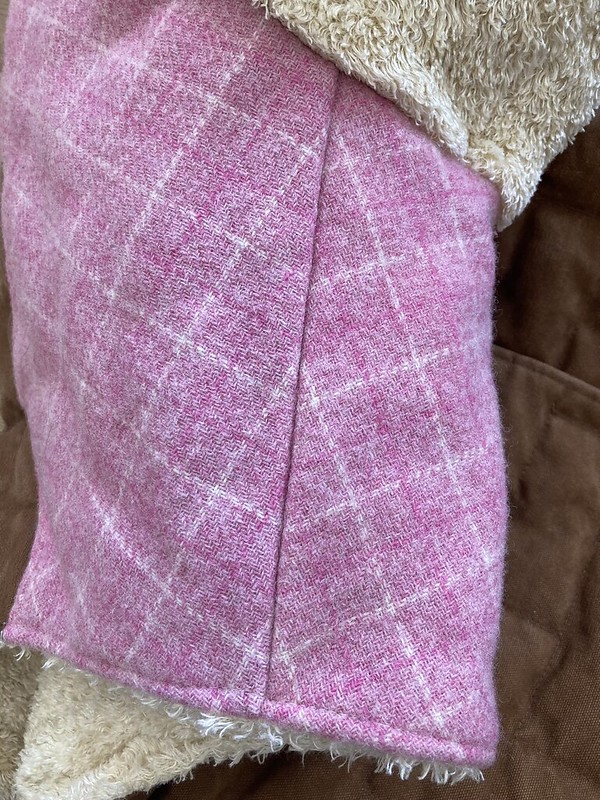
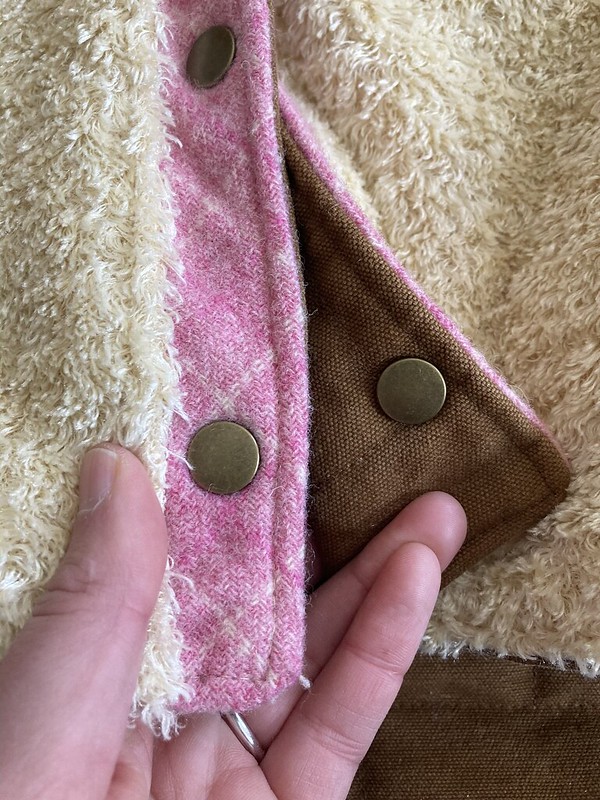
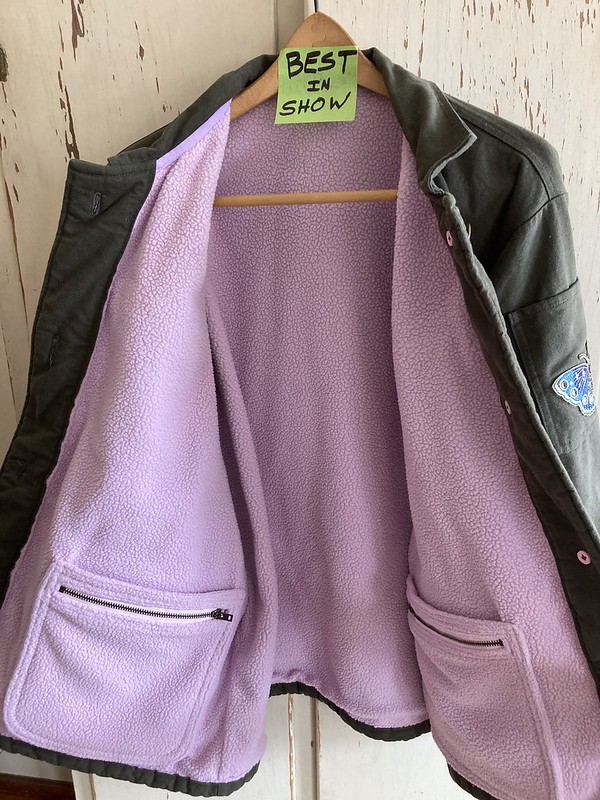
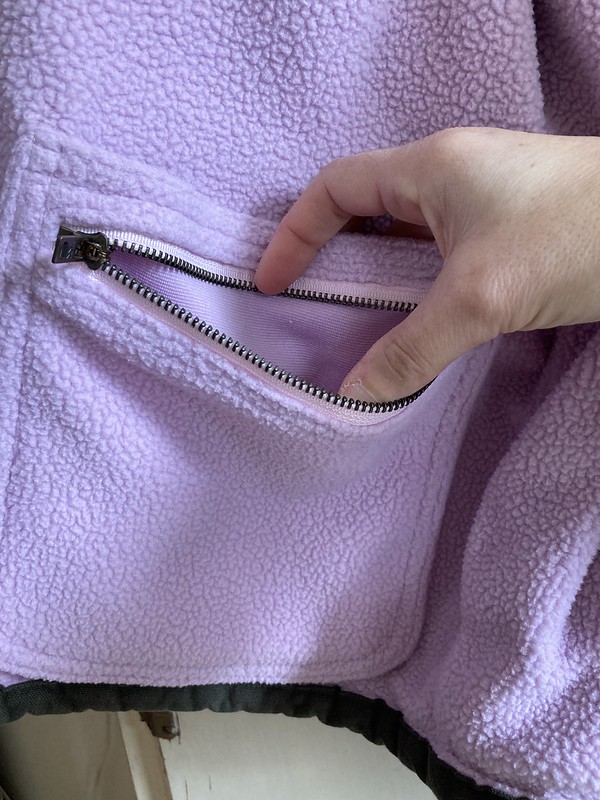
My lining is a Polartec ThermalPro Shearling Jersey lining fabric from Mill Yardage in NH. I really like olive green and pink, and this fabric straddles the line between a pink and light purple. I also like green and purple, so it was a win. The idea of a fun-colored lining in an otherwise utilitarian-looking jacket was so appealing! In fact, seeing this fabric on sale is part of what got me thinking about different coat options from what I had first considered.

Unfortunately, shipping such a bulky fabric has gotten pretty cost prohibitive, but luckily this place was within driving distance from where I live. My husband offered to buy it for me for a Christmas present, and I happily took him up on it and told him I would drive to pick it up. While I ordered my canvas and pattern in November and had started planning before Christmas, I knew I wouldn’t start sewing until after Christmas, so this worked out really well.

While I very briefly thought about using a more slippery fabric in the sleeves of the jacket, I didn’t consider it for long. My Woolrich hunting coat is lined entirely in flannel, and I never have trouble getting it on. Similarly, I sometimes wear fleece zip-up jackets over my sweaters, and I have no problems getting them on, so I was pretty sure I didn’t have to worry.

Notions and Extras

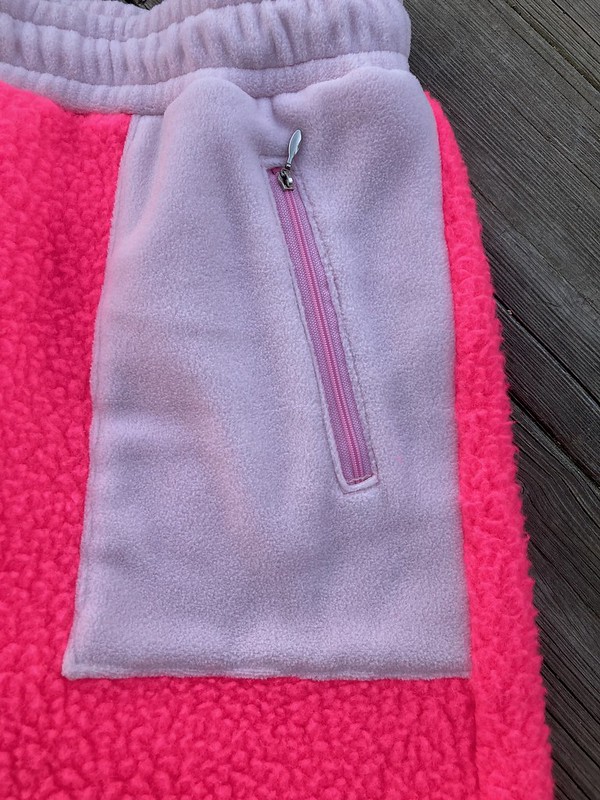
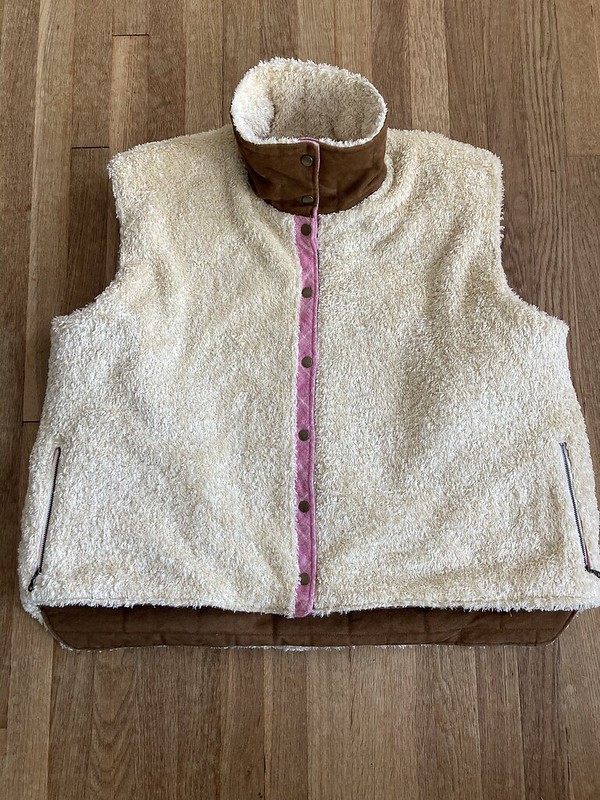
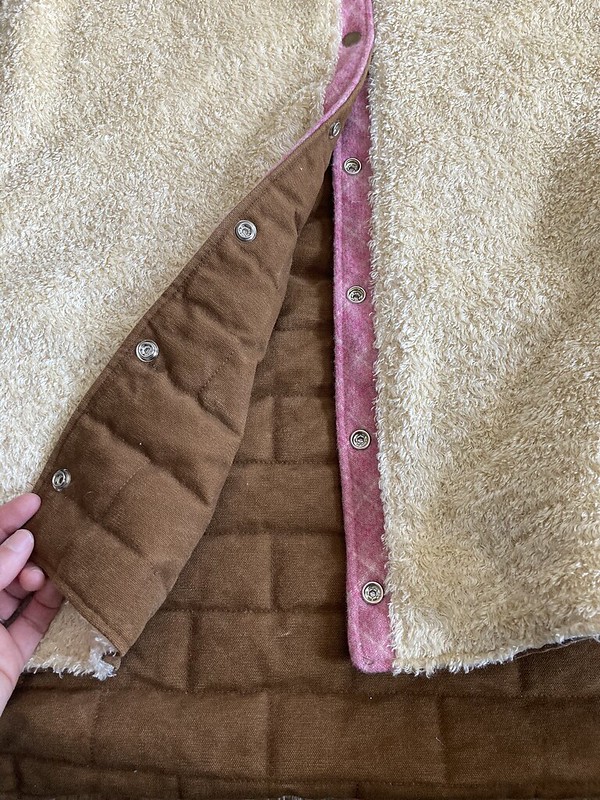
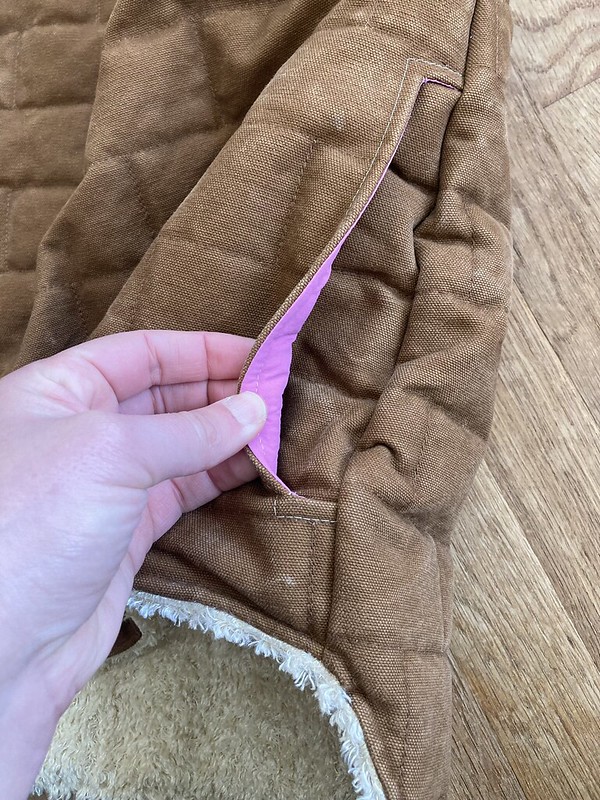
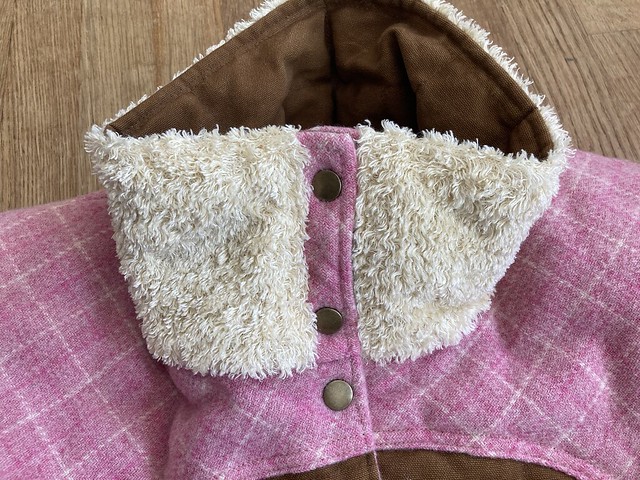
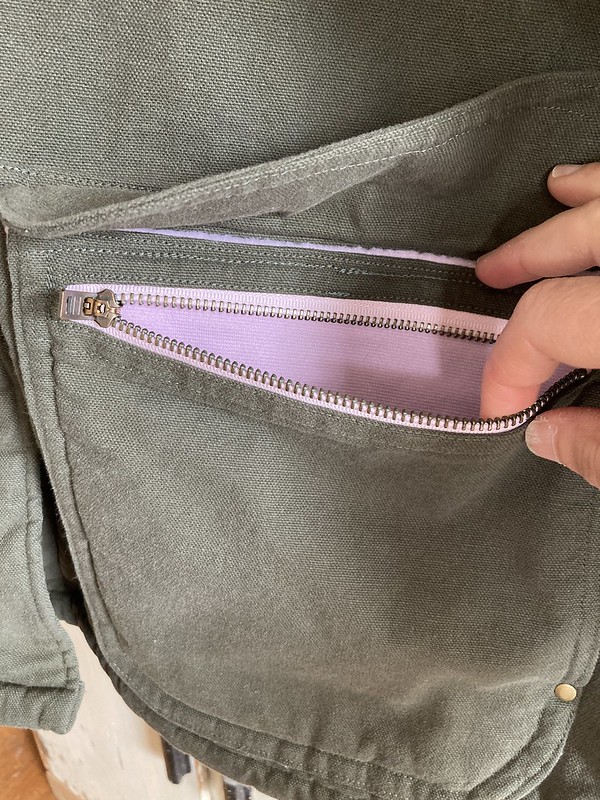
I really wanted all my hardware to match. I have noticed that some of the ready-to-wear clothing and bags that I like and find most striking stand out because of good details and good hardware, which means matching metal parts! I was hoping for zippers with colored zipper tape to coordinate with my lining and a metal color that would work with whatever I found for front closures. Wawak had zippers in the size I needed in a pink that would look good with my lining, and I really liked the antique brass metal option.

The Green Pepper 537 Frenchglen Barn Jacket...with Extra Pockets!

Buttons were my front closure of choice since they would be easy to replace if lost and would be easy to install. I didn’t want to have to worry about messing up when putting in snaps or jeans tacks or having them rip out down the line. It’s not like this is a huge problem that I regularly battle, but I was trying to think not only of problems while installing my front closures, but also being able to keep my coat in repair over the long haul. Luckily, I found some antique brass metal shank buttons from kabooco on Etsy that matched with the antique brass metal of my zippers. I even had some 5/16″ antique brass rivets that I had bought from Wawak when I was making my MidnightSUN bag. Yes!!! Total coordination!

For the ribbon to finish the inside neck edge and create a hanging loop, I found a light purple grosgrain at Joann’s that looked great with the pink/purple lining that I had. 

The Green Pepper 537 Frenchglen Barn Jacket...with Extra Pockets!
Look how nice and clean that finish is! I even switched out my thread to match when I was sewing on the ribbon versus the canvas.

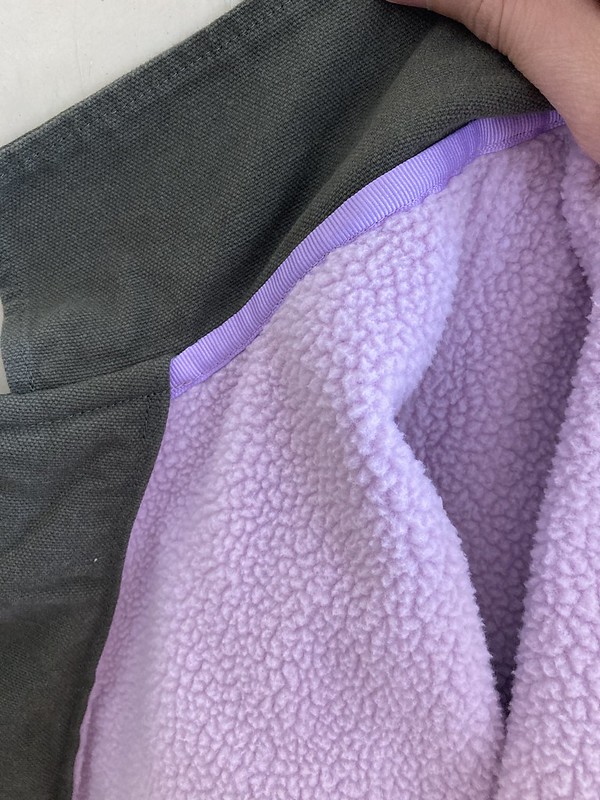
Unfortunately my grosgrain ribbon was 5/8″ instead of the 3/4″ they called for. If you are making this and run into that problem, erring on the side of wider is probably better than narrower. I could easily have used a 1″ ribbon to finish the neck. In order to get my 5/8″ ribbon to work, I offset it by 1/8″ so it would be low enough to cover things and I only barely made it. I suppose you don’t want it too wide for the hanging loop, but that’s an easier problem to solve.

The Green Pepper 537 Frenchglen Barn Jacket...with Extra Pockets!

My hope for the Velcro on the sleeves was that I could replace it with buttons. It seemed like those would look nicer and last longer.

Pattern Manipulation

As I mentioned before, most of my fitting issues ended up not being issues, although I did lengthen my sleeves by 1/2″. This was surprising, because it’s not a normal adjustment for me, but I’m glad I did it. They came out to be the perfect length. You’ll have to take my word for it, though, because I apparently forgot to take a picture of that. Oops!

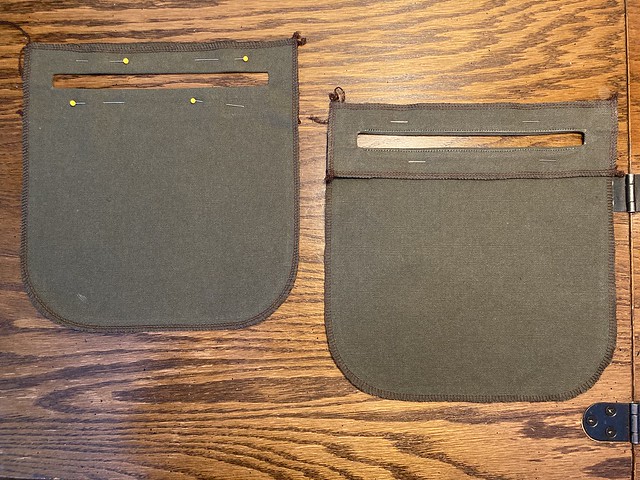
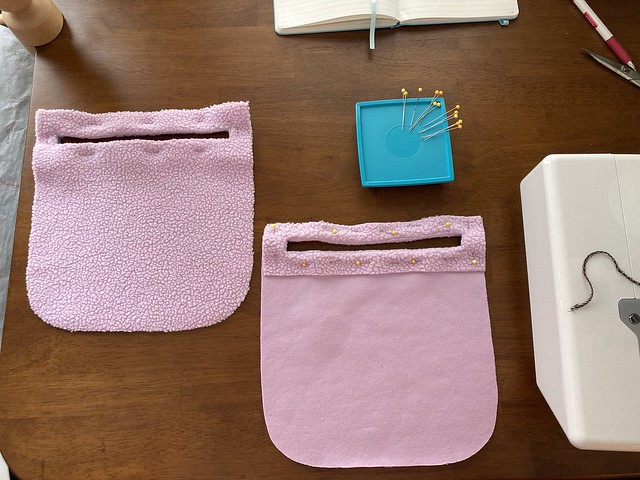
To make my chest pockets, I took the suggestion of one of the members of the group, and made smaller versions of my hip pockets. I traced an extra set of pattern pieces, cut them in half vertically and overlapped them, taped them, and then cut them horizontally and overlapped and taped them. 

The Green Pepper 537 Frenchglen Barn Jacket...with Extra Pockets!

Once I liked how they looked, I traced new pocket pattern pieces from the taped up bits. I did the same sort of thing with the pocket flaps, although they didn’t need to shrink as much. I also drew myself out a little patch pocket for my sleeve.

I had to recut my pocket flaps and my patch pocket once I started sewing because they weren’t quite right. I had made the flaps too short and the patch pocket too narrow to put the butterfly patch on. Once I start sewing, I confess I hate going back and re-cutting anything, but these were small fixes, and I made myself do it because I knew I would be happy with the results.

The Green Pepper 537 Frenchglen Barn Jacket...with Extra Pockets!
I’m not really sure why I didn’t sew that in the middle of the pocket, but oh, well!Too late now!

Cutting and Sewing

I finally cut my outer layer on January 10. From there, I just kept cutting when I had time until it was finished. On the 17th, I marked all my pieces as instructed, and started serging edges the next day. Then it was on to sewing! Finally! When sewing just canvas, I used a universal 80/12 needle and when sewing only fleece, I used a ballpoint 80/12. When it was both fabrics together, I used the universal. 

At that point, I actually did sew pockets for days. There was some very dodgy topstitching during construction. Sometimes it was me–I didn’t do a perfect job, but decided I could live with it. Sometimes it was trying to sew some very tricky fabric layers. And sometimes it was that there just wasn’t enough space for all the topstitching within the given area. The nice thing about sewing for yourself, though, is that you get to decide how much imperfection you can live with, and I would usually rather have some imperfection within a finished garment than a “perfect” garment that never gets finished because you are using your seam ripper more than your sewing machine. I also realized that once I had everything sewn together and wasn’t looking at it all so closely, I wouldn’t think about it any more (and that has proven true!).

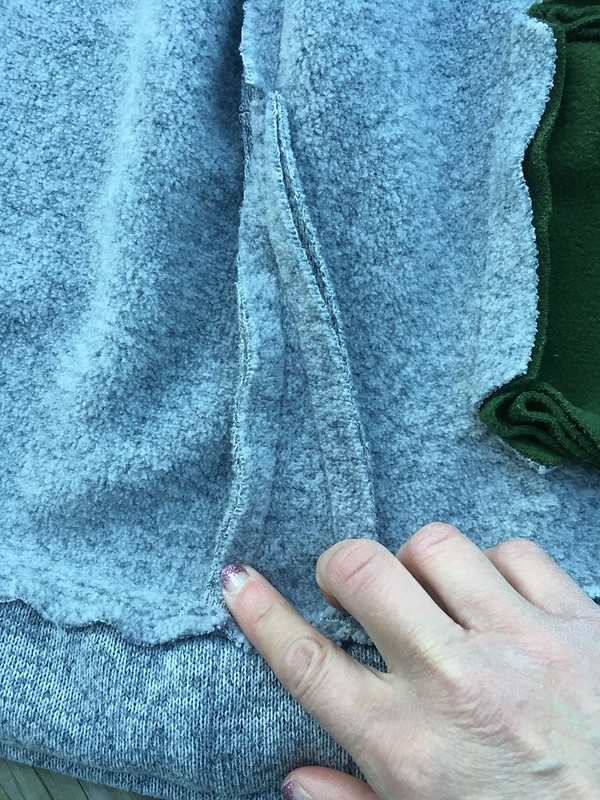
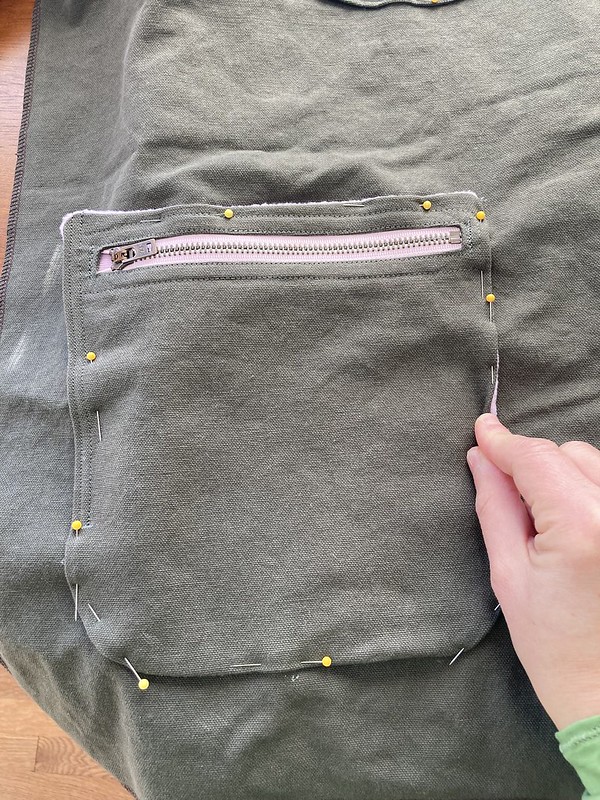
On the zipper pockets, I didn’t love the idea of my zipper facings being all fleece. I wanted to follow the directions as given because The Green Pepper’s instructions have been generally trustworthy, but this seemed like too much bulk, so I used canvas zipper facings for the outer canvas pockets and fleece zipper facings for the inner fleece pockets. 

The Green Pepper 537 Frenchglen Barn Jacket...with Extra Pockets!

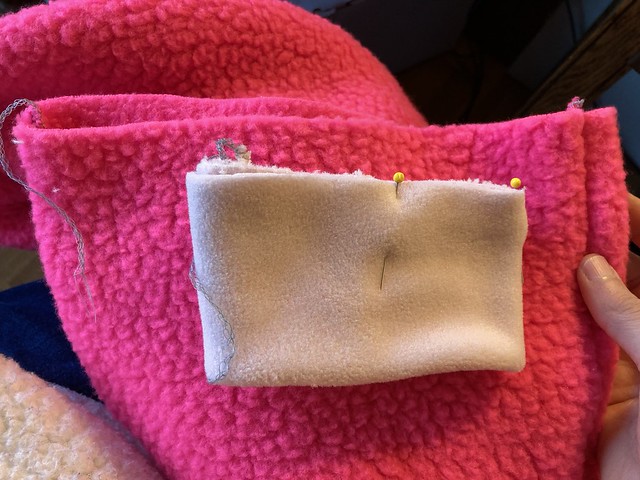
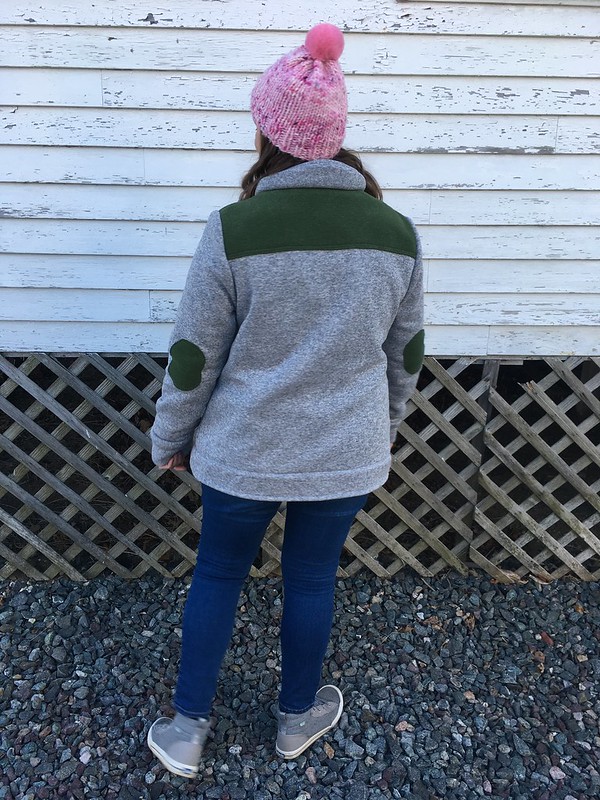
It was very tricky to hide my lining fabric underneath my outer hip pockets when sewing those to the outside of the coat. I actually preferred to have it show and would have made it more obvious except that I was worried about the fleece getting dirty over time. I love fleece, but once the lighter colors get dirty, it’s hard to get those stains out. I sort of ended up somewhere in the middle with the fleece just barely peeking out. 

The Green Pepper 537 Frenchglen Barn Jacket...with Extra Pockets!

One of my favorite tiny details was adding the rivets below the handwarmer pocket openings on the outside instead of sewing bartacks. I know it’s small, but it looks so nice and professional to me. It makes me glad I have a bunch of rivets left from that bag project! It was hard, but I resisted the urge to put rivets all over. Oh, it was so tempting…

The Green Pepper 537 Frenchglen Barn Jacket...with Extra Pockets!

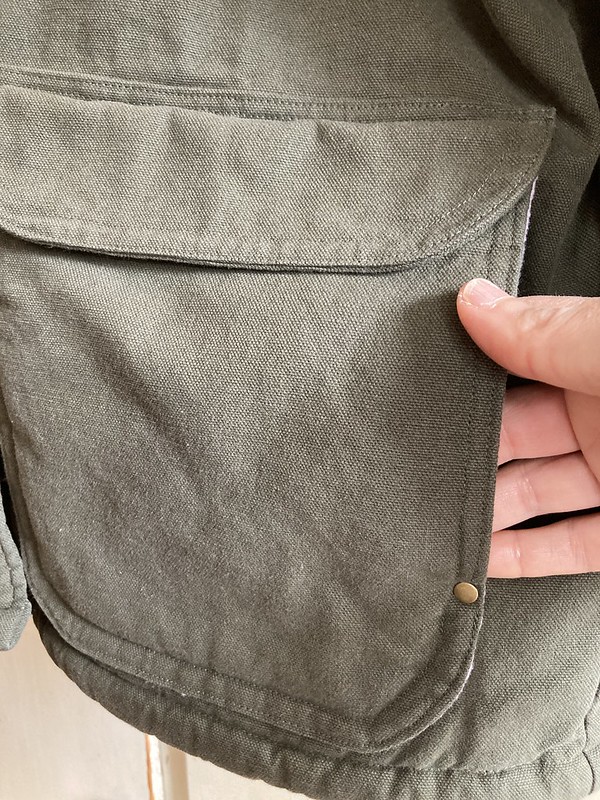
I worked on those dang pockets for nearly a week! I really couldn’t believe it! Now that it’s done, though, it seems worth it. I love all my amazing pockets. The outer and inner hip pockets have zippers, and the outer ones also have side-entry handwarmer pockets behind the zipper pocket. The inner hip pockets have top-opening pockets behind the zipper pockets. Love them!

The Green Pepper 537 Frenchglen Barn Jacket...with Extra Pockets!

With a week left to go, I got busy attaching my lining to my outer fabric. While I was happy not to constantly have to trim my excess seam allowances, using the prescribed 3/8″ and often 1/4″ seam allowances was not always easy or fun. I think, for ease of sewing, wider seam allowances might have been better, if for nothing else than to provide a more level sewing surface when joining bulky layers.

There was also a weird part with the collar. To make the collar, you cut two identical pattern pieces, sew them together, leaving the neck edge open, and then sort of make one layer stick out further at the neck edge in hopes it will help the collar roll the right way, but at that point, you’ve already topstitched the outer edges. I don’t know much about drafting and I just typically follow instructions for collar installation, but that seemed kind of weird to me. Why not make two different pattern pieces, or trim one down slightly before sewing or wait to topstitch until you have extended the undercollar? I also wonder if the collar could be a slightly different shape. It’s a rectangle, and canvas is fairly moldable, but I do feel like I am always smoothing out the fold on the finished collar. It’s fine, but I bet it could be better.

As for my sleeves, I did manage to substitute buttons for the Velcro on the sleeve tabs. 

The Green Pepper 537 Frenchglen Barn Jacket...with Extra Pockets!

My buttonholes had to go perpendicular to the long edge of the sleeve tab because there is a seam hidden in the back of the tabs, and I didn’t want to sew buttonholes in line with that seam. 

The Green Pepper 537 Frenchglen Barn Jacket...with Extra Pockets!

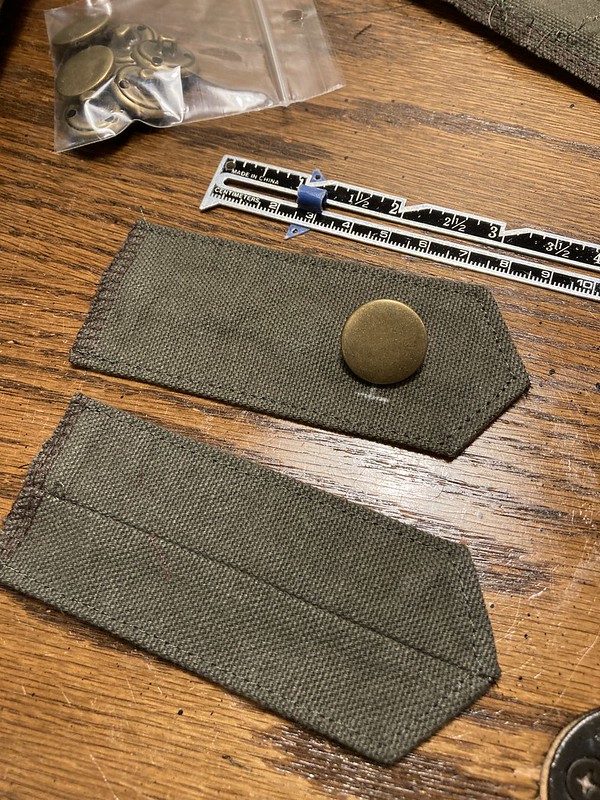
If I were doing this again, I would maybe move my sleeve tabs to a more visible place, since mine are more for show, but they are fine. Honestly, once they were done, I just didn’t feel like going back in and trying to move them.

Also, it is absolutely ridiculous to expect a home sewing machine to easily go through all the layers to sew down the pleat on the sleeve. You don’t want to skip this, because it hides the end of the sleeve tab, but it’s really bulky. I used the handwheel to walk my machine through that. It was not my best sewing, but I got through it without breaking a needle or my machine!

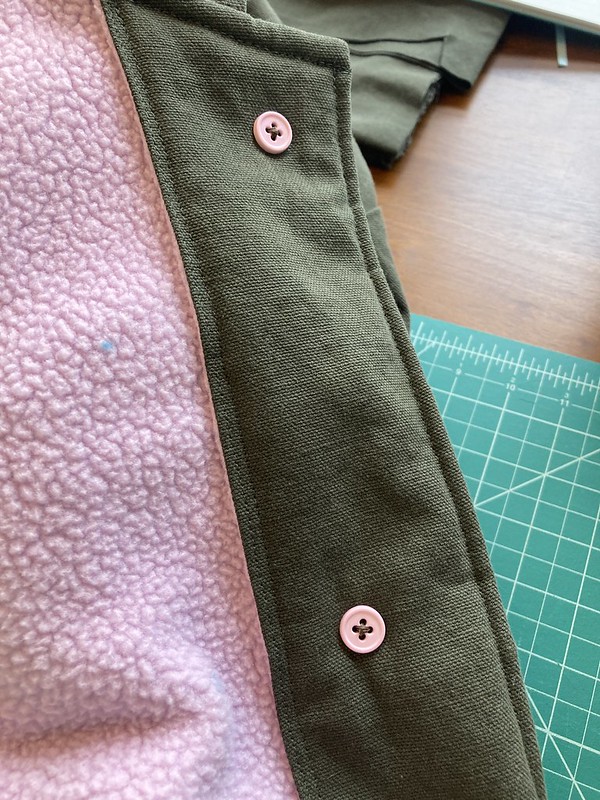
I sewed down the facings in the front because I hate having facings flapping around or partially open. I just imagine lint building up in the edges after years of wearing and washing the garment. I also opted to try using small buttons behind my main ones for added strength. I just happed to have some pink ones in my stash. I don’t think I have ever done it before, but I saw one of the women in the group put them on a cardigan she knitted and it seemed smart, so I wanted to try it out.

The Green Pepper 537 Frenchglen Barn Jacket...with Extra Pockets!

I wonder if it would have been a good idea to trim out some of the lining from the facings and hems. You really just keep them all as one and fold them up, which lends a nice squishiness to those areas, but it also seems kind of like overkill. Maybe you could trim out half of it, so it would just be two layers of canvas and one of fleece. And maybe there is something to be said for taking even generally solid instructions with a grain of salt.

On January 31st, I finished my last bits of sewing. I barely had enough thread to finish!

The Green Pepper 537 Frenchglen Barn Jacket...with Extra Pockets!

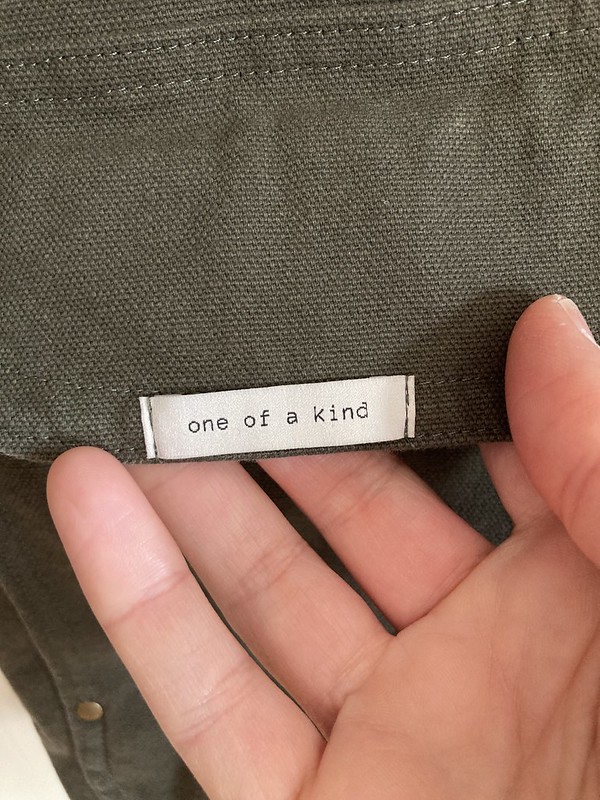
I added a label to an outer pocket hip flap, and then I threw my jacket in the washer and dryer. 

The Green Pepper 537 Frenchglen Barn Jacket...with Extra Pockets!

Just like knitters wash and dry their garments before declaring them finished, I really like to wash off all the sewing marker and chalk in a sewn garment.

Final Thoughts

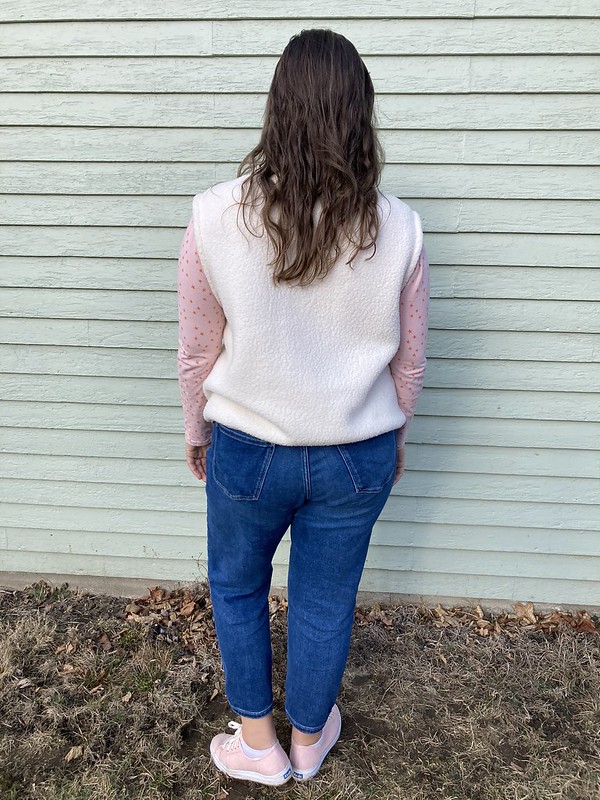
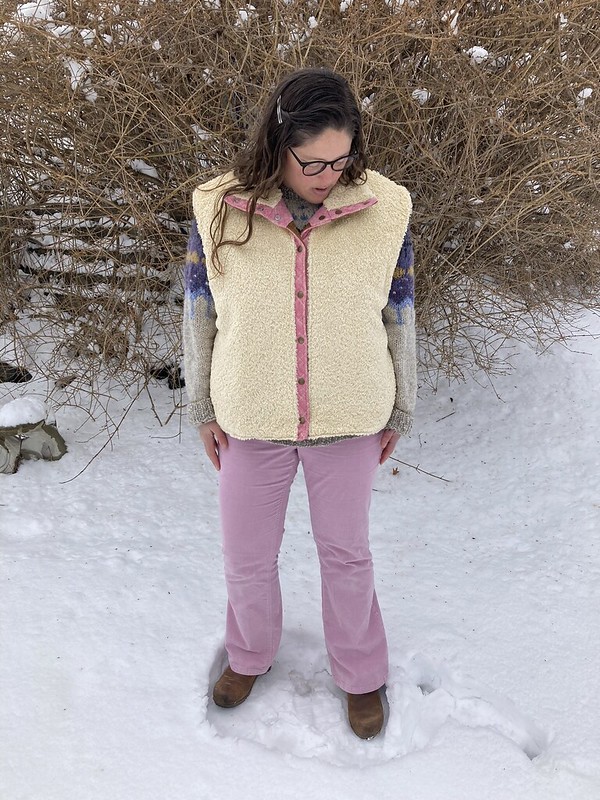
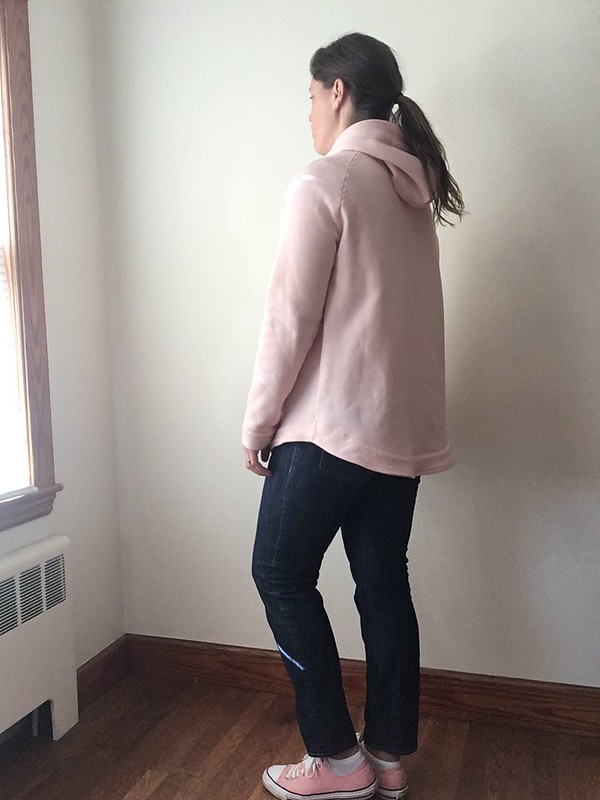
My assessment of this project is: solid construction with some dodgy topstitching. Hahaha. I love it. This has the warmth and feel or a really sturdy insulated shirt jacket. 

The Green Pepper 537 Frenchglen Barn Jacket...with Extra Pockets!

While I wouldn’t expect it to keep me warm with a below zero wind chill, it’s great when the temperatures are around freezing and above. It helps that I can layer sweaters and sweatshirts underneath. I like that it’s fairly lightweight and very cozy, and the pockets are so, so awesome. 

The Green Pepper 537 Frenchglen Barn Jacket...with Extra Pockets!

I never notice the crazy topstitching areas, and I love the butterfly patch, the “one of a kind” label from Kylie and the Machine, and the fact that even though it looks fairly normal on the outside, it has a brightly-colored lining on the inside. 

The Green Pepper 537 Frenchglen Barn Jacket...with Extra Pockets!

It’s just possible that I have been wearing it for the past week, and telling people that I made it, even people that I don’t know that well. I’m so excited to have finished it, and my sewing enthusiasm knows few bounds. I won’t say no bounds. I’m sure there are boundaries somewhere. But not in wearing what I have made. :D

I’m so thankful that I was invited to participate in this group, or I never would have made this jacket. After all my years of thrifting jackets that *almost* fit, it’s really nice to have a slightly longer jacket that does fit.

The Green Pepper 537 Frenchglen Barn Jacket...with Extra Pockets!

Winter Sewing: The Green Pepper #507 Plush Polar Vest in Polartec Shearling Fleece

Standard
Winter Sewing:  The Green Pepper #507 Plush Polar Vest in Polartec Shearling Fleece

Do you have a box of old clothes that maybe don’t fit or you don’t wear much any more? Perhaps they’re old favorites or sentimental pieces or just clothing that has stood the test of time and you still have them. I do. It’s filled with the first jeans I ever made, a dress from ninth grade that fit through multiple size changes, pieces of uniforms my Dad wore, and a fleece vest from high school. That fleece vest is from L.L.Bean, and my parents bought it for me when we first moved to Massachusetts. Everyone was wearing L.L.Bean and they didn’t want me to feel like any more of an outsider than I already did. I loved that vest. I felt good when I wore it.

I still have that vest packed away, even though it doesn’t quite fit any more. I love a good vest, and I have several, but none quite like that. I got one on sale a few years ago from a different store, but the fleece was inferior, and it soon pilled and looked…not great. I wanted a replacement in high-quality Polartec fleece.

My brother got me the Green Pepper #507 Plush Polar Jacket & Vest pattern in 2021, and my husband gave me the fleece this past Christmas. It was time to make a new vest, and I was really looking forward to it.

Winter Sewing:  The Green Pepper #507 Plush Polar Vest in Polartec Shearling Fleece

Sadly, I didn’t really enjoy making this. Surprising, right? I love Green Pepper patterns because they allow me to make all the classic outdoor wear I find in places like L.L. Bean, Patagonia, and REI. I love sewing fleece, and I have done it most winters for the past several years. And yet, sewing this was Not Fun.

Winter Sewing:  The Green Pepper #507 Plush Polar Vest in Polartec Shearling Fleece
The Green Pepper Plush Polar Vest, front

l

Winter Sewing:  The Green Pepper #507 Plush Polar Vest in Polartec Shearling Fleece
The Green Pepper Plush Polar Vest, back

Problem number one was that I second-guessed the directions. The Green Pepper writes really good directions, and I should have just followed them. That doesn’t mean they can never be improved upon or altered and that the patterns can never be hacked. It just means I should have known better and trusted what was there. Problem number two was that it’s not always easy to sew over bulky and sometimes uneven layers of fleece, even when you have all the right tools. Sometimes you have to try and learn, which means struggle.

This pattern is made to be sewn on your sewing machine, no serger necessary. I really wanted some extra secret colors on the inside, so I serged a few seams that would be visible inside.

Winter Sewing:  The Green Pepper #507 Plush Polar Vest in Polartec Shearling Fleece
The Green Pepper Plush Polar Vest, inside front. The neon yellow/green is my serging and secret extra bit of color.

Sometimes my choices to serge were good (extra colors!), and sometimes I thought I could be smarter than the directions and add in serging, which ended up causing problems later because I had cut off seam allowance I should have left on or something like that. I also had a lot of trouble topstitching over multiple layers, even with my walking foot, as things would slide around. While you usually don’t need wide seam allowances on knits, there were times when I wondered if a 5/8″ seam allowance would have been a good idea because you would have (maybe) had more even layers to sew over.

Winter Sewing:  The Green Pepper #507 Plush Polar Vest in Polartec Shearling Fleece

Here are some things that did help me with this project:

*My walking foot was great. This is a foot you can put on your sewing machine that helps your top and bottom fabrics feed through your machine at the same rate so things aren’t sliding around.

*I used a 12/80 ballpoint needle in my sewing machine.

*I hand-basted my zipper, and I hand-basted my collar seamlines and facing in place before sewing down the facing that covers the neck seam. I sewed it down from the inside on both facing edges.

*I checked out the book Adventures with Polarfleece: A Sewing Expedition by Nancy Cornwell from the library (copyright 1997), which helped me change up the bottom of the vest from a hem/casing to a “Lycra Wrapped Edge” (I used “The Cheater’s Way”). I trimmed off one inch at the bottom of the vest where the hem would have been and used the recommendation in the book of a 2″ x 43″ strip of nylon/spandex for my size to finish the bottom edge. I should not have zigzagged the bottom of the vest before applying the nylon/spandex. It would have been better to skip that and just use the book instructions. After fixing that issue, the bottom looked kind of wavy, but once fully finished, it was fine, especially when wearing it. I hand-tacked the corners of the nylon/spandex to keep them perfectly in place. This book has lots of other great tips as well. I hope to pick up a used copy of it at some point. She also wrote two other books on sewing with polarfleece.

Winter Sewing:  The Green Pepper #507 Plush Polar Vest in Polartec Shearling Fleece
The Green Pepper Plush Polar Vest, inside back

*When I got really frustrated, I put this project in time out until I thought things through and had potential solutions to the problems I was having. Taking a break really helped me calm down and figure things out.

Here are a few more details on supplies and sources I used in case you are thinking of making this for yourself:

+fabric (main): Polartec Thermal Pro: Large Clump Shearling/Small Clump Shearling in “Whisper White” from Mill Yardage; 100% polyester, 68″ wide; could this be a Polartec 300 weight?

Winter Sewing:  The Green Pepper #507 Plush Polar Vest in Polartec Shearling Fleece

+fabric (accent): nylon/spandex tricot matte swimwear fabric in “Pink Lite” from my stash, originally from Spandex by Yard; 80% nylon/20% spandex, 200 GSM, 58″-60″ wide

+zippers: YKK #5 molded plastic zippers (jacket and pocket) from Wawak in “lavender”

Winter Sewing:  The Green Pepper #507 Plush Polar Vest in Polartec Shearling Fleece

+thread: 100% polyester thread for sewing machine and serger (I go back and forth between Gutermann and Coats & Clark, depending on who has the best color for what I’m sewing or what I have in my thread stash)

+hanging loop: grosgrain ribbon from my stash, probably made of polyester or nylon

+size: large; I chose based on my measurements; this fits with a fair amount of positive ease

Winter Sewing:  The Green Pepper #507 Plush Polar Vest in Polartec Shearling Fleece

+wish I had: a cute little tag to go on the outside; I’m trying to come up with a design I like and then maybe I’ll have some made.

After wrestling my way through this, here is what I think. This is a great pattern. There are a lot of possibilities for hacks if you want to change things up, copy high end vests or jackets you see in stores, or create things based on your own designs. If I needed 20 vests and jackets, I would have a lot of fun making different iterations of this with cool details and trying out different things. Since I don’t need 20 vests and jackets, I’ll leave the experiments up to you. Your first try may be a little challenging, but maybe not. Either way, it’s definitely a valuable pattern.

All this learning was not only to benefit this project. After this was done, I made the jacket version of this pattern, which I hope to share with you soon. You’ll be happy to know it went much better, thanks to my struggles here.

Mill Yardage + Pattern and Branch = Neon Pink Polartec Seaforth Pants! Think Pink for Spring!

Standard
Mill Yardage + Pattern and Branch = Neon Pink Polartec Seaforth Pants!  Think Pink for Spring!

It’s funny how something can stick in your head for years, and then when the moment is right, you call it up for inspiration. Years ago, I was on the beach, talking to some other moms, and one of them was wearing a pair of shearling fleece sweatpants. They looked so cozy, and I thought what a great idea they were for a beach that is pretty much always either breezy or windy and which is usually significantly cooler than whatever town you are coming from.

Last year, as it got colder and my thoughts turned to winter sewing, I was looking through my main Polartec fabric source, Mill Yardage, and saw some neon pink shearling fleece. I love neon pink, I love shearling, and I love Polartec, so I kept it in mind. I had a few ideas of what I might want to make with it, but the strongest came in the form of that memory of the shearling fleece pants.

Mill Yardage has an inspiration board on their website, and I thought this would be an awesome addition. It said that if you sent in an idea they decided to make for the page, they would send you the same amount of fabric. These pants were a fun idea I wanted to see in the world, and if they also sent me fabric, I could make my own pants. After mulling it over for months, I e-mailed them and shared my idea.

In a short time, I received an e-mail back! They liked the idea, and asked if I would be willing to make the project. I already wanted to make this project, so I said yes! They generously offered any fabric and notions I needed from their site to make the pants, so I sent in my requests, and faster than I could have imagined, had a package of fabric at my door. I was thrilled.

Here was my plan.

I wanted to take the Seaforth Pants from Hey June Handmade, a pattern for elastic-waist, wide-leg pants drafted for woven fabrics, and use View B, which has a narrower leg as my base for this project, since I suspected the pattern could work well for knits as well as the wovens it was drafted for. I wanted to make these in fleece and add a cuff to the bottom for the coziest sweat pants ever. I didn’t want slim joggers. I wanted roomy sweat pants that would feel soft and wonderful when you put them on.

To attempt this, I chose three yards of the long-dreamed-of Polartec Thermal Pro large and small clump shearling in “hot pink” which is nice and wide at 62 inches. I liked the idea of pants with different shades of pink, but I wasn’t sure about the bulkiness of the fabrics I was choosing. I felt confident I could make the shearling work for the pants. Or maybe I just wanted the pants I envisioned so much that I was going to MAKE them work no matter what. You can form your own opinions on that. 😉 But which fabric was the right color for all the extra parts while also not being too thick? I poured over the website time and time again trying to decide. What helped me the most in the end was the box of swatches my husband got me a few years ago. I could feel the fabrics and layer them to see how thick everything would be. So, with a mix of trepidation and confidence, I requested half a yard of Polartec Classic 200 double velour/recycled fleece in “rose petal” because it was the perfect shade of pink for my vision (and 60 inches wide–yay!).

Mill Yardage + Pattern and Branch = Neon Pink Polartec Seaforth Pants!

I have made View B of these pants before, so I already had the pattern pieces cut out. I tried on the pants I had made previously just to get a sense of whether or not I wanted to make any changes to the pattern, and to figure out how long I wanted them. The fit of the pattern seemed good as it was. I wanted the inseam to be about three and a half inches longer that what View B is drafted for with a cuff that was two and a half inches tall. If you were following the directions as written for View B, you would lose one and a half inches to the hem allowance, so if I didn’t fold the hem up, and used a half inch seam allowance as in the rest of the pattern, I would need a cuff that was three inches tall for a finished height of two and a half inches. I measured my ankles, did some sketching, and then made a little pattern piece out of tracing paper. I would have to see if this would work.

Mill Yardage + Pattern and Branch = Neon Pink Polartec Seaforth Pants!
High-tech calculations! Haha. I changed things a bit before the final iteration.
Mill Yardage + Pattern and Branch = Neon Pink Polartec Seaforth Pants!
My cuff pattern piece

Putting the pants together was not hard, although the pockets required a bit of focus. I relied on my sewing machine for the pockets, using a straight stitch since I didn’t need a lot of stretch in those seams. My stitching was a little wobbly, but I knew that once I wasn’t staring at it up close, I wouldn’t notice it. I used sew-in interfacing where interfacing was necessary, because you can’t iron this fleece without melting it, and I basted and pinned things in place until I had sewn them down.

Mill Yardage + Pattern and Branch = Neon Pink Polartec Seaforth Pants!
Front pocket
Mill Yardage + Pattern and Branch = Neon Pink Polartec Seaforth Pants!
Back pocket

Once all the pockets were on and it was time to put the actual pants together, I got illogically nervous about whether or not they would fit. It didn’t matter that I had tried on the pair I had already made. What if I blew it and this idea didn’t work? So, to make myself feel better, I serged the inseams and crotch seam and then basted the outseams together just in case. Guess what? They were fine. The pattern hadn’t mysteriously morphed into something else. What a shock! My fears were unfounded!

It was coming out great.

Mill Yardage + Pattern and Branch = Neon Pink Polartec Seaforth Pants!
My pants before adding a waistband and cuffs
Mill Yardage + Pattern and Branch = Neon Pink Polartec Seaforth Pants!

So, I serged up those outseams, put on my waistband, and then got ready to figure out the cuffs.

Mill Yardage + Pattern and Branch = Neon Pink Polartec Seaforth Pants!

The cuffs were about half as wide as the lower pant legs. Polartec 200 does stretch, but it was asking a lot of it to stretch so much that I could just sew those cuffs on to the bottom of the bulky Thermal Pro.

Mill Yardage + Pattern and Branch = Neon Pink Polartec Seaforth Pants!

I thought about it for a few days, and then mulled over my options with my best problem solving friends. In the end, I machine stitched around the bottom of the pants with a basting stitch and then gathered them. I then hand basted the cuffs to the pants and tried them on.

Mill Yardage + Pattern and Branch = Neon Pink Polartec Seaforth Pants!
I used this box to hold the circumference I needed while hand basting

They seemed good, so I used my sewing machine, which I’m more skillful with than my serger, to sew them together with a zigzag stitch.

Mill Yardage + Pattern and Branch = Neon Pink Polartec Seaforth Pants!
Wonky, but attached…

Then I went around again with my serger to neaten everything up. And it worked! The pants were perfect!

Mill Yardage + Pattern and Branch = Neon Pink Polartec Seaforth Pants!
Cuffs serged on and looking much neater
Mill Yardage + Pattern and Branch = Neon Pink Polartec Seaforth Pants!
Success! Yay!
Mill Yardage + Pattern and Branch = Neon Pink Polartec Seaforth Pants!
Yes, these pants ARE extremely bright in person. I love them.

Mill Yardage + Pattern and Branch = Neon Pink Polartec Seaforth Pants!

That being said, if you decide to try this, you may have more luck making the cuffs from something really stretchy like a thinner Power Stretch or just skipping the cuffs altogether and binding the bottoms of the pants with binding or something. HOWEVER, if you are as stuck on an idea like this as I was, the old adage holds true that where there is a will, there is usually a way.

When I finished these, I was THRILLED. These pants were exactly what I was going for! Spring may be right around the corner, but at least where I live in New England, these pants will get more wear than just in winter (these will come to the beach with me). Here is what I can tell you about wearing these. They are extremely soft, and they are extremely warm. That Thermal Pro is no joke. As soon as I put these on, I felt the warmth.

Mill Yardage + Pattern and Branch = Neon Pink Polartec Seaforth Pants!

In our area, as soon as there is a whiff of spring and a nice-ish day, people kind of lose it and race to the beach. Seriously. People do not waste nice weather here. So, naturally, I had to go too. 😀 The beach was probably twenty degrees (Fahrenheit) cooler than our town and windy, which was perfect for testing the pants. The wind does come through a bit, but less so than, say, this sweatshirt I made.

Mill Yardage + Pattern and Branch = Neon Pink Polartec Seaforth Pants!
These sweat pants are beach approved!

If you were wearing this fabric in winter with a base layer, you would probably feel pretty good. For a cool, but not bitterly cold wind, it was just right. You can easily believe that I saved all my scraps in the hopes of more fun projects when the temperature dips again next fall/winter.

Mill Yardage + Pattern and Branch = Neon Pink Polartec Seaforth Pants!

I think that all the things recommended on the website for this shearling fabric (coats, vests, heavy blankets) would be perfect applications. For instance, wouldn’t this be a fun lining for a winter-worthy jean jacket? Or a shearling vest? And, the Polartec 200 was not too bulky for all my accent pieces. In fact, it was just right. I would say it feels just a little bit thicker than a beefy t-shirt.

After sewing this pattern in fleece, I have a few tips on ways to reduce bulk if you try this yourself.

Increase the seam allowance on the pockets where they are topstitched to the pants just a bit to make them even easier to sew on. When folding those same seam allowances under, cut out a little square where they overlap right at the corner. Just don’t cut too far in. On your back pockets, just fold the tops over once and stitch down since the raw edge won’t fray. I would also probably eliminate the back darts on the pants. If you opt not to remove the darts, you can cut the dart folds open on the inside after sewing them rather than folding them to the side to make things a little less bulky in the back.

Mill Yardage + Pattern and Branch = Neon Pink Polartec Seaforth Pants!

Anyone can have regular sweat pants, but it’s the people who make their own clothes who can have extraordinary sweat pants. 😉

Mill Yardage + Pattern and Branch = Neon Pink Polartec Seaforth Pants!

Thanks again to Mill Yardage for providing this excellent fabric. As of this writing, both fabrics look like they are still available.

I’ll leave you with this song and dance from the Movie “Funny Face”. Think pink!

Patagonia-Inspired Vest in Insulated Carhartt Canvas and Polartec Fleece

Standard
Patagonia-Inspired Vest in Insulated Carhartt Canvas and Polartec Fleece

My vest is finally done!!! I’m so excited to share it with you!

Patagonia-Inspired Vest in Insulated Carhartt Canvas and Polartec Fleece

This vest began several years ago, when I saw a cool Patagonia outerwear vest with a Western-style yoke in a surprising color combination at Nordstrom. (Nordstrom is a great place to “shop” for inspiration!) While I know that Patagonia is a great company that produces clothes of excellent quality, it is not in my price range. So, I filed away the idea for later and moved on. (Sadly, I can’t find a picture of my inspiration vest in my files, but here are the ones that I looked at while planning this project–women’s, men’s.)

This past summer, while visiting family in Michigan, I went to Field’s Fabrics in Holland, MI, and saw this great Carhartt canvas insulated with Thinsulate.

Patagonia-Inspired Vest in Insulated Carhartt Canvas and Polartec Fleece
It’s funny that the name on the roll is spelled “Carhardt”, but if you look on the website at the link above, you’ll see it’s spelled correctly: “Carhartt”. Just a typo, not a knock-off!

I had seen it at the store on a previous trip, and always wished I had bought some, so this time I did. My initial idea? A winter snap-front skirt to wear over leggings. I love those short, insulated skirts for winter! My Mom looked at the fabric, though, and suggested making a vest. At first I ruled it out, but as I thought more and more about the idea, I realized that it was a good one. I would wear a vest more than a skirt and it would fit me longer if I sized it correctly. And I remembered that Patagonia vest from way back. That’s when I got excited.

Deciding on all the specifics of fabric and pattern and any tweaks I wanted to make took a long time. My fabrics were originally not very cozy (other than the insulated canvas) because I was going purely on colors that worked together, but eventually, with input from my family, I decided to use a beloved piece of wool for my yoke that I have had in my stash for I don’t know how long, just waiting for the right project. At that point, I needed to rethink my lining layer to make everything look good together. I found a cream colored Polartec 200 Thermal Pro curly fleece online at The Rain Shed that was on sale, and looked like it just might work. I ordered it with some pocket zippers and bit the bullet on the insane shipping cost (so expensive!) since the fabric itself was such a good price.

Patagonia-Inspired Vest in Insulated Carhartt Canvas and Polartec Fleece

The fabric was perfection with what I already had, but the hardware wasn’t quite there yet. I ditched my first zipper idea and ordered some metal ones with brass pulls from zipit on Etsy.

Patagonia-Inspired Vest in Insulated Carhartt Canvas and Polartec Fleece

I have used their zippers before, and they are pretty cool looking. Brass heavy duty snaps from Joann Fabrics completed my hardware search.

Patagonia-Inspired Vest in Insulated Carhartt Canvas and Polartec Fleece
If you try these, make sure you get a package with a setting tool (not pictured) if you don’t already have one.

For my pattern, I chose the Men’s Santiam Reversible Vest #102 from The Green Pepper Patterns.

Patagonia-Inspired Vest in Insulated Carhartt Canvas and Polartec Fleece

There is a women’s vest, but I was outside the size range, and it didn’t seem like a big deal to curve out the hips on the men’s one if necessary. Time to get started!

The goal? Create an outerwear vest with the Western yoke of the Patagonia example that would be large and roomy enough to fit over my bulkiest sweater and thickest fleece leggings or jeans. And make it cozy! In order to get the fit I wanted, I followed the pattern’s directions to take measurements over the clothes I wanted to wear the vest with. This put me at a chest and waist size XL, and a hip size 2XL.

To keep this post from getting too long, I’ll list out the tweaks I made to the pattern instead of talking through them. Here’s what I changed:

*created a yoke piece to attach to the outer layer of the vest, front and back

Patagonia-Inspired Vest in Insulated Carhartt Canvas and Polartec Fleece

*graded the hips out to a larger size, which meant that the side of the handwarmer pockets needed to be reshaped, and the angle of the pocket zippers needed to change to mirror the angle of the hips

Patagonia-Inspired Vest in Insulated Carhartt Canvas and Polartec Fleece
The original pattern piece is in green marker; my alterations are in pencil

*created a longer back hem that curved down by tracing a vintage Woolrich puffer vest; this is also a feature on the Patagonia vests I linked to

Patagonia-Inspired Vest in Insulated Carhartt Canvas and Polartec Fleece
You can see the longer back extending down in this picture
Patagonia-Inspired Vest in Insulated Carhartt Canvas and Polartec Fleece
The vest from the back, fleece side out

*created a pattern piece for wool strips that would attach to the fleece; I planned to fuse interfacing to the wool strips, hoping that this would be a more stable option for the snaps to attach to rather than the fleece (I previously made a fleece cardigan using sew-in interfacing, and a few of the anorak snaps I used as closures pulled away from my fleece–I was hoping to prevent that here)

Patagonia-Inspired Vest in Insulated Carhartt Canvas and Polartec Fleece

*stay-stitched the yoke so nothing would stretch out

*flipped the directions so that my inner layer would have zipper pockets and my outer layer would have hand warmer pockets

Patagonia-Inspired Vest in Insulated Carhartt Canvas and Polartec Fleece
Zipper pockets; I gave the fleece around the zippers a tiny trim before calling it good
Patagonia-Inspired Vest in Insulated Carhartt Canvas and Polartec Fleece
Handwarmer pockets

*used leftover woven Supplex from this project for my zipper pockets and half of my handwarmer pockets rather than the canvas and fleece to reduce bulk

Patagonia-Inspired Vest in Insulated Carhartt Canvas and Polartec Fleece

By the time I had decided on all these little details, I started to get nervous that I was going to forget something! I had already forgotten that the seam allowance on this pattern was 3/8″, and ended up creating the pattern for my wool strips with one side having a 3/8″ seam allowance and the other one having a 5/8″ seam allowance.

Before beginning anything, though, I had to prewash all my fabric, which included that insulated canvas. The canvas is quilted to a batting layer which has a scrim, but no additional fabric.

Patagonia-Inspired Vest in Insulated Carhartt Canvas and Polartec Fleece
Canvas, batting, and scrim, all quilted together; the scrim is a thin layer over the batting that helps stabilize and hold everything together

I didn’t want it to get messed up in the washer, so I basted an old sheet onto the back side, put a few safety pins in the middle to sort of pin-baste it, and threw it in the washer. Luckily, it worked! I just seam-ripped the sheet off after it was all done and saved it for another purpose.

Once I was ready to cut everything out…I had to stop. Just before cutting I realized (thankfully) that the brick quilting pattern on the canvas needed to be lined up as much as possible so the horizontal lines matched! I got things as close as I could. The quilting wasn’t always possible to line up perfectly, whether because of shrinkage from prewashing or because it wasn’t exact. I got it done, though, and then it was on to the Polartec fleece–but wait! This had a nap, which means it’s a directional fabric–you want the fleece to all lie in the proper direction! Back through the cobwebs of my memory floated the time I had accidentally cut curly fleece upside down for a sweatshirt project and had to recut it. Didn’t want to do that again! Ok. Fleece all cut out, it was on to the yoke. But I wanted that on the bias since it would look nice that way and–oh! The shoulders needed to be pattern matched!

Patagonia-Inspired Vest in Insulated Carhartt Canvas and Polartec Fleece
Decent pattern matching on the shoulder seam!

It was crazy. Every time I thought something would be straightforward, it wasn’t, but nevertheless, I’m so very thankful I realized those things before I cut all the layers out.

I think it’s fair to say I procrastinated a lot on this project. Any time I knew I would have to do something tricky or scary, I paused, but eventually I would forge ahead, hoping it would turn out all right. And luckily, it did. The pattern instructions were very good, and the vest was really interesting to sew. I used my regular sewing machine for construction and my serger for finishing seams, although you don’t need one. The instructions tell you to finish your seams with a zigzag stitch.

I completed this just in time for some really cold weather that came our way. And I love it!

Patagonia-Inspired Vest in Insulated Carhartt Canvas and Polartec Fleece

Now don’t be fooled–this vest is a massive beast of winter. This is no lightweight indoor vest. It’s big and a little bit heavy, though not uncomfortably so.

Patagonia-Inspired Vest in Insulated Carhartt Canvas and Polartec Fleece

It has plenty of extra ease to go over my biggest sweater (just like I hoped!), and it’s so nice and warm. That collar can really keep out the wind, too!

Patagonia-Inspired Vest in Insulated Carhartt Canvas and Polartec Fleece

Happily, it’s just what I wanted, and all the design and hardware choices really combined to make it look professional and rugged. And it’s reversible! Even the snaps!

Patagonia-Inspired Vest in Insulated Carhartt Canvas and Polartec Fleece

Both the pattern and the snap pack mentioned that you can use the decorative snap caps on both sides to make your project reversible, so I tried it and it worked! Success!

Now I have one more unique garment that fits me just right for winter. Yay!

Update:

I entered this vest in the 2022 Topsfield Fair (in Topsfield, MA) and it won both a first place ribbon and Best in Show in the Sewing Division!

Ullvi Slouchy Hats from The Last Stitch in Polartec Fleece

Standard
Ullvi Slouchy Hats from The Last Stitch in Polartec Fleece

Sometimes it takes a little while for a project to make it to the ol’ blog, and this is one of those projects. I tried out the Ullvi Slouchy Hat Sewing Pattern from The Last Stitch in January.

Last Stitch Ullvi Slouchy Hats in Polartec Fleece
Ullvi Slouchy Hat Sewing Pattern from The Last Stitch
Last Stitch Ullvi Slouchy Hats in Polartec Fleece
Line drawing of the Ullvi Slouchy Hat Sewing Pattern from The Last Stitch

If you have read this blog for a long time, you might notice that every winter for the past few years, I make a couple of projects with Polartec fleece. Because of that, I have a lot of scraps and odd pieces left over. I’m not great at using scraps, but I try when I can. This year, I decided to take any of my Power Stretch and Curly Fleece odds and ends that were big enough and make hats out of them.

I bought a bundle of patterns a few years ago from The Last Stitch that included the Tova Mittens, Brisa Beanie, and Ullvi Slouchy Hat and haven’t tried them all yet. After looking at both hat patterns, I went with the Ullvi for this project, even though the fleece I wanted to use wasn’t exactly right. This pattern is designed to have double layers, however my fabrics all had distinct right and wrong sides that wouldn’t quite work with the way the hat is meant to be constructed. There are some great suggestions in the instructions for adapting the pattern, however, and those got me thinking. I knew I could make it work.

Last Stitch Ullvi Slouchy Hats in Polartec Fleece

The best plan seemed to be to cut my hats in a single layer and either cover the bottom edge with foldover elastic or extend the bottom edge by 1/2 inch for a hem allowance. I decided on the hem allowance. The pattern calls for a 5mm or 1/5 inch seam allowance, but I chose to use a 1/4 inch seam allowance, since that’s standard with the tools that I use. It’s a slightly larger seam allowance, but with stretchy fabrics, it’s not a big deal.

For such a relatively simple garment, the designer put a lot of thought into this hat. She provides two different methods of assembly. The first gives you a hat where the seam allowance is visible inside, and the second gives you a hat with no visible seam allowances inside. For my single-layer hats, the first method seemed best. After initially using only my sewing machine and getting wavy seam allowances, I decided I would serge the top and side seams of the hats and use my sewing machine to hem them with a zigzag stitch.

Last Stitch Ullvi Slouchy Hats in Polartec Fleece
Look at those wavy edges! More testing needed!

In fact, I hemmed each hat before doing any of the other seams. For this, I used a walking foot, standard presser foot pressure, a 75/11 stretch needle, polyester thread in my needle, and bulky/wooly nylon in my bobbin. My stitch height was 6 and my stitch length was 1.5. I tested all this on scraps before committing to it. Using a zigzag and wooly nylon in my bobbin are just personal preferences–you could also use a twin needle and polyester thread in the bobbin instead.

Last Stitch Ullvi Slouchy Hats in Polartec Fleece

Because I am still new to using my serger, I had to adjust the settings of the differential feed a few times before I could get smooth, rather than wavy, edges. I ended up setting it at 1.5. This was a great project to practice my serger skills on. Every little bit helps!

The only step of the instructions where I had questions was step 5. I couldn’t tell if the side seam was supposed to be on the side or in the back middle during this step, as the illustration wasn’t clear on that. The notches were also not labeled at this step, so after looking things over, I labeled them for myself. The “A” notches are at the top, the “B” notches are on the side, and the “C” notch/mark is in the middle. All of this means, I think, that the side seam is not pictured because it should be lying at the back in the middle. I know this is really getting into the minute details, but if you have questions at this point, hopefully you can benefit from my experience. Other than that, I didn’t have any problems, and I found the instructions very clear.

While I didn’t try every assembly option, I did try out all the sizes. I made a small for a family member and used up the rest of my scraps trying out the different sizes for a few other people.

Last Stitch Ullvi Slouchy Hats in Polartec Fleece

Everything turned out really well, but I definitely liked the finished product in the Power Stretch best (the gray, ivory, and pink hats) and the Curly Fleece least (the yellow and green), although all of them are wearable.

Last Stitch Ullvi Slouchy Hats in Polartec Fleece
Ullvi Slouchy Hat in Polartec Power Stretch
Last Stitch Ullvi Slouchy Hats in Polartec Fleece
While the Curly Fleece didn’t make my favorite hat, it does match my sweatshirt!

The Power Stretch has much better recovery, so it works better overall. So far, that is my favorite Polartec fleece substrate. I just love it for leggings, sweatshirts, and now hats.

I found this pattern really interesting and would definitely try it again. I hope to try out the Brisa Beanie at some point as well. You can see my first attempt at the Tova mittens here. Hopefully I can give those another try in the future, too. All of these patterns are great for stash busting.

Now I had better go and take pictures of some of my other finished projects so I can share them with you! Have a great weekend!

I Finally Made It: A Newcastle Cardigan for Me

Standard
I Finally Made It:  A Newcastle Cardigan for Me

Do you have some of those patterns that you love, but they hang out in your pattern collection for one reason or another?  I have several of these that linger because I’m waiting for just the right fabric.  The Newcastle Cardigan by Thread Theory Designs is one of those for me.  I bought it at Pintuck & Purl several years ago, because despite the fact that this is a men’s pattern, I could envision a comfy, slouchy women’s version for me.  I like the cozy cardigan look with the rolled collar, and I’m always a fan of a shoulder/back yoke where I can use a contrast fabric or add in some nice topstitching.  I just needed the right fabric and some modifications…

I Finally Made It:  A Newcastle Cardigan for Me

l

I Finally Made It:  A Newcastle Cardigan for Me

I finally found the fabric I was looking for on the Mill Yardage website:  a Polartec Classic 200 Sweater Look Strie fabric that was warm, moderately thick, and had more body than drape.  I could use leftover fabric from my Burda 6471 joggers for the yoke and any other accent areas.

I Finally Made It:  A Newcastle Cardigan for Me

Other Materials and Stitching

After a lot of deliberation, I decided to skip most of the interfacing and only include sew-in interfacing in the button placket areas.  Although I found some ideas on how you could adhere iron-on interfacing to fleece, I didn’t want to risk it, and the fabric was thick enough that it didn’t need much support anyway.  I decided to use some anorak snaps a friend had given me rather than buttons.  For more give in my seams, I used stretchy Eloflex thread as my top thread, and woolly nylon in my bobbin.

Because I modified this pattern to be loose rather than slim-fitting and because of the thread I had chosen, I was able to use a straight stitch (rather than a zigzag, which would have more stretch).  I used a slightly longer length (3.0), a 90/14 stretch needle, a walking foot, my normal tension, and my lightest presser foot pressure.

Pattern Modifications

There were a lot of pattern modifications that I made to get this just how I wanted it!  My measurements put me at a medium chest size.  This pattern says it is slim-fitting, but since I wanted a looser fit, I traced a large.  However, after measuring and tissue fitting, I realized I needed more arm and hip width, so I decided to trace an extra large.  I was really worried about the width, due to the positive ease I was after and the fact that this 100% polyester fabric only has a little bit of mechanical stretch, so I used the side seams of Simplicity 4109 (which I used to make my railroad denim jacket) as a guide.

I Finally Made It:  A Newcastle Cardigan for Me

After this, I planned to add a little sleeve width.  In fact, after measuring my arm and the pattern and consulting The Perfect Fit, I decided I needed a full upper arm adjustment, and I added 1.5 inches to the arm pattern piece, giving me a wider circumference.

I had considered shortening the arms by as much as six inches (the pattern explains that they are drafted quite long), but after sewing the back to the front of the cardigan and holding up my shortened arm pattern piece, I didn’t like it, so I let it out to the original length.  Long and cozy sleeves seemed preferable to too-short sleeves in a garment that was supposed to be warm and snuggly.

I Finally Made It:  A Newcastle Cardigan for Me

I wanted elbow patches, too, so I added the ones from the Plaintain Tee, a free pattern from Deer & Doe.

I made version one of this pattern, and was originally going to use the larger collar from version two, but it almost completely covered the yoke, so I recut it and used the smaller collar that went with version one originally.

I Finally Made It:  A Newcastle Cardigan for Me

I wanted a bottom band on this cardigan, so I made one!  It’s a rectangle and, just before I finished installing it, I added a little gusset at the bottom of the side seams and some extra little rectangles to my bottom band for just a little more hip width.

I Finally Made It:  A Newcastle Cardigan for Me

l

I Finally Made It:  A Newcastle Cardigan for Me

I added in extra topstitching anywhere I wanted to flatten the fabric or add detail or definition.  This was usually a good idea, but where it did not work, was the edge of the collar.  It exacerbated the collar’s tendency to flip up.  I took that topstitching out but kept what I did in other areas. (You can see the collar after I tried topstitching it below.  See how obvious the flip-up is?)

I Finally Made It:  A Newcastle Cardigan for Me

Like I mentioned before, I opted to install anorak snaps instead of making buttonholes and using buttons.  My friend had given me some that had been in her mom’s stash and I used every single one I had left.  Unfortunately, I didn’t hammer two of the top pieces in quite right and they don’t grip the bottom parts of the snap strongly.  It’s a not a big deal for one of them, but the other gapes, so I have to go on a little search to see if these are still available or if they are now considered vintage.

I Finally Made It:  A Newcastle Cardigan for Me

Most nerve-wracking of all, I decided near the end of making this to add self-welt or stand pockets using the instructions in my Reader’s Digest Complete Guide to Sewing.  Yes, this was a little bit crazy, because I really liked the cardigan without them.  I just knew I would like it much more with pockets.

I tested out my idea with scraps to see if it would be too bulky and if I liked using the green for my pocket, and it turned out pretty well.

I Finally Made It:  A Newcastle Cardigan for Me

So, I went for it!  I just took it step by step, deciding at the outset that they didn’t have to be perfect to be good.  And it worked!  They aren’t perfect, but they are good, and I was even able to tack the pockets to the facings, which helped to keep the facings from flipping out.

I Finally Made It:  A Newcastle Cardigan for Me

l

I Finally Made It:  A Newcastle Cardigan for Me

l

I Finally Made It:  A Newcastle Cardigan for Me

I even added a Thread Theory label, which came with the pattern, and one from Kylie and the Machine, that I purchased at Pintuck & Purl.

I Finally Made It:  A Newcastle Cardigan for Me

Final Thoughts

I love this cardigan.  While I can’t say this about every one of my projects, I really feel like I got the fit I wanted on this garment, and I love it in this fabric.  It’s so warm and nice.  If I did it over again in an equally thick fabric, I would consider skipping the facings.  Except for the benefit of tacking them to the pockets, they are kind of annoying.  It would be different in another fabric, I’m sure.  The length of time this took and the adjusting while sewing were frustrating for me, but I’m glad I persevered and finished before spring.  When I wore this to work, one of my coworkers said she thought the cardigan was from L.L. Bean, which was so nice of her!  I often look at their clothes for inspiration.  So, it was a struggle, but I’m happy, and I love the finished product.  And I’m also happy it’s done.  On to the next thing!

I Finally Made It:  A Newcastle Cardigan for Me

l

I Finally Made It:  A Newcastle Cardigan for Me

l

I Finally Made It:  A Newcastle Cardigan for Me

l

I Finally Made It:  A Newcastle Cardigan for Me

Burda Style 6471 Joggers in Recycled Polartec Thermal Pro

Standard
Burda Style 6471 Joggers in Recycled Polartec Thermal Pro

Yayyyy, fleecy pants!  My batch of sewing projects is now at the sewing phase, which makes me very happy.  Today I want to share my version of Burda Style 6471, View A (with a few modifications).  I made these in recycled Polartec Thermal Pro denim look in a color called Aspen (green).  This fabric was a gift from my wonderful husband and came from Mill Yardage.

Burda Style 6471 Joggers in Recycled Polartec Thermal Pro

I got this pattern in my stocking the Christmas before last, but have been waiting for just the right fabric.  My goal was to find a fabric that would look good as everyday wear while feeling like secret pajamas.  I was hoping this fabric would do that, but after making these, they are more of a really nice spin on sweat pants.  It turns out, I’m ok with that.  I’ve still worn them out of the house, but I definitely feel like I’m wearing sweat pants when I do.

Let’s talk details.

Constructing the Pattern

The only pattern alteration I made was to grade up one size from the largest size.  I did this by looking at how much t the largest one or two sizes increased by and doing the same to create a larger size.

Burda Style 6471 Joggers in Recycled Polartec Thermal Pro

l

Burda Style 6471 Joggers in Recycled Polartec Thermal Pro

I chose to make View A of this pattern because I wanted the longer length, but I left off the square side pockets and the drawstring.  This pattern was supposed to have a flat front to the waistband with an elastic back, but I made a few choices based on my fabric that caused me to change the waistband.  You are supposed to interface the front of the waistband.  I felt nervous using a fusible, because I didn’t want to iron this fabric and melt it.  I did find a few discussions in the Pattern Review forums where people mentioned ways to fuse interfacing on fleece.  Many other people said they skipped interfacing altogether.  I did have some sew-in interfacing, but I got nervous that if I used it, the back waistband might not have enough give/length to fit over my hips when taking the pants on and off since they are a pull-on style (the fly is a faux fly and the waistband is continuous with no closure).  Usually I try to trust the pattern, but laziness was also a bit of a factor, so I skipped interfacing the front of the waistband.

When I finished the pants, which were a very quick sew, they fit pretty well.  As I write this, I’m just now realizing what a big deal it is that the crotch curve fit me so well the first time around.  That doesn’t always happen!  Anyway, I wore them around for a bit, and realized that the waistband definitely got looser with wear.  This fabric has a small amount of stretch and no recovery.  I could see that I needed to tighten up the back waistband elastic, so I did.  Then I wore them some more.  Then they got loose.  I could see my options were to go back and redo the waistband with interfacing, maybe even adding the drawstring, or to make the waistband a fully elasticated one.  Since I could tell that these were definitely in the sweat pants camp, and I didn’t have to try to make them everyday pants anymore, I opted to elasticate the whole waistband.

Burda Style 6471 Joggers in Recycled Polartec Thermal Pro

l

Burda Style 6471 Joggers in Recycled Polartec Thermal Pro

l

Burda Style 6471 Joggers in Recycled Polartec Thermal Pro

This is when I realized one other thing.  These are fairly low-rise pants.  They’re not super low, but they’re low enough that when you bend over or crouch down, you should make sure your backside is covered.  The rise is consistent with the picture on the pattern.  If I ever make these again, making the rise a little higher would be a good idea.

Burda Style 6471 Joggers in Recycled Polartec Thermal Pro

l

Burda Style 6471 Joggers in Recycled Polartec Thermal Pro

Lastly, for anyone who is trying to sew fleece like this, here are the specific settings I used on my sewing machine.  I did not use a serger.

  • regular zigzag stitch
  • 2.5 stitch width
  • 1.0 stitch length
  • 1 presser foot pressure (lightest)
  • 4 tension (standard tension; I didn’t change it from my normal setting)
  • 90/14 stretch needle
  • walking foot
  • Gütermann all purpose polyester thread in the needle and wooly/bulky nylon in the bobbin

When sewing knits, I always test out my stitches on a piece of scrap fabric and then stretch it as much as possible to see if the thread breaks.  If it does, I test some more until I get a stitch that doesn’t break when stretched parallel and perpendicular to my stitch line.

Burda Style 6471 Joggers in Recycled Polartec Thermal Pro

l

Burda Style 6471 Joggers in Recycled Polartec Thermal Pro

Final Thoughts

I often expect every sewing project to be THE BEST and most wonderful garment, and I cut them much less slack than I do store-bought/thrifted clothes.  I think that’s not a good way to continue on.  This garment isn’t the best, most wonderful garment I have ever made, but I still really love it.  I think it’s because the fleece is so cozy.  The pattern is good, the sewing is not bad, and the fabric feels great.  The fit is pretty good, if a bit low.  I think that I will get a lot of wear out of these pants, even if they weren’t what I first envisioned.

Burda Style 6471 Joggers in Recycled Polartec Thermal Pro

Winter Sewing Ideas and Plans

Standard
Winter Sewing Ideas and Plans

I have no new projects to share today, so I thought I would give you a look into what I’m thinking about sewing this winter.  I do have a batch of projects underway, and a pretty good idea of some patterns I may want to sew next.  Planning and dreaming up sewing projects is one of my favorite parts of sewing!

Current Plans

Current plans include drafting and sewing my own leggings using this tutorial from Cal Patch.  I’ve made these once before, and they were great.  I want to make them in a midweight Polartec Power Stretch (below),

Winter Sewing Ideas and Plans

but first I have to see if my new pattern fits right by testing it out in some bathing suit fabric (below) that I had in my stash.  I think this (hopefully) wearable muslin will make great exercise leggings.

Winter Sewing Ideas and Plans

I also want to make Burda Style 6471, View A minus the cargo pocket and drawstring in recycled Polartec ThermalPro denim look fabric.  I got this pattern for Christmas 2018, and I have been waiting for just the right fabric to come along.  I’m hoping for some secret pajamas I can wear out and about, but if they read too casual, I can just use them as loungewear.

Winter Sewing Ideas and Plans

New Look 6560, View A without the ruffle, which I just completed in silk is back on the list, this time in hot pink stretch velvet, because it’s FUN!  My friend got this fabric for me for my birthday, and I’m excited to try it out.

Winter Sewing Ideas and Plans

Vogue 8932 has been hanging out in my pattern library for a long time, and I’m finally going to make it (View B).  I’m going to try it out in black ponte de roma from Fabric Mart.  If I like the pattern, I would love to make it in a stretchy boiled wool knit someday.

Winter Sewing Ideas and Plans

I’m also finally trying out the Thread Theory Newcastle Cardigan, Version 1, but in a shape that will fit me (this is originally a men’s pattern).  I’d love a relaxed version of this cardigan, maybe with some elbow patches and a bottom band added, and I want it in a shape that will fit me, so I’ve done a bunch of work and measuring to see if I can get there.  This is another pattern I have had for a long time, waiting to find just the right fabric.  Thanks to my husband getting me several pieces of Polartec fleece that I had my eye on, I plan to make this in a Polartec 200 sweater-look fleece, using scraps of green from the Burda pants I mentioned above for the yoke.

Winter Sewing Ideas and Plans

All of those are at the cutting stage.  I just need to cut out the New Look wrap top and the cardigan, and then I can get sewing.

Future Possibilities

Other thoughts and possibilities for the rest of winter are also brewing.

I had a snap-front skirt (Burda Style 6252, View A, lengthened) on my list to make out of a damaged Hudson’s Bay Point Blanket that I got for FREE (!!!), but it was just too damaged and stained to cut a skirt out of.

Winter Sewing Ideas and Plans

I want a pattern I like to make insulated skirts to wear over leggings, and this may be the one, but it’s going on hold for now.  The blanket could become a pillow and maybe a bag (The Wax + Wool Tote, possibly?).  We’ll see.

One strong possibility is McCall’s 7930, View D.  I think I have some stash fabrics that would work for this–either a shirtweight denim + a Swiss dot or maybe silk double georgette + silk crepe de chine.

Winter Sewing Ideas and Plans

Another likely project is the Persephone Pants from Anna Allen, lengthened for winter, maybe in a green canvas.  I have resisted the ultra-high rise trend, but I once had a pair of very high waisted wool sailor pants that I LOVED, and thinking about them convinced me to give these a try.  To tell the truth, I have been looking at our local Army Navy stores for some ’70’s era sailor jeans to try out before buying this pattern, but couldn’t quite find what I was looking for.  This pattern was a Christmas gift, so I’m going for it!

Winter Sewing Ideas and Plans

I have some cotton velveteen that might get made into Simplicity 1696, a tried-n-true (TNT) pattern for me, although I do worry about the nap rubbing off in places like the inner thigh.

Winter Sewing Ideas and Plans

Burda Style 6265, View A is also a possibility in flannel worn with leggings, but I really wonder how much I would reach for this.  I have never been a dress person, and I am trying to branch out into wearing dresses, but I can’t quite tell if this is something I would reach for or if it would just hang out in my closet.  I actually like the long view, too, maybe for spring or fall.  I’m going to have to think about this pattern for awhile.

Winter Sewing Ideas and Plans

Other tempting patterns are to be found in the Burda Style magazine from November 2019 that I found at one of the larger Barnes & Nobles.

Winter Sewing Ideas and Plans

There are a lot of patterns I like in this issue (which is why I bought it), but my absolute favorite is #121, the “On-Trend pattern”, a really cool cropped jacket.  I love the style lines, and I could see it made up in various wool fabrics.  I wonder if I could recycle some wool pants I have into part of this jacket.  (They’re the checked fabric below.)  I would love that.  And they would be great with this blue wool/cashmere remnant I have.  Overall this issue has a number of great jackets.  I’m just outside their standard range, but I can grade up a size or two.

Winter Sewing Ideas and Plans

l

Winter Sewing Ideas and Plans

The other day I went to my local mall to see how it had changed in the last few years (I don’t get there much) as well as to hunt for inspiration.  I love to look in Nordstrom and J. Crew, among other places, to get ideas for future sewing projects or to check out details on clothing.  I found it really interesting that with the proliferation of pattern companies, plus the fact that Butterick, McCall’s, Simplicity, Vogue, and Burda Style all put out numerous patterns per year, I can find patterns that are close or nearly identical to a lot of the clothes I see in stores.  The sewing world is really on top of what’s current in much of the fashion you find in stores.  It’s pretty cool.  On the flip side, there are also companies that put things together in really creative ways that I haven’t necessarily seen before.  They really inspire me to try to think more creatively.  When I look at Anthropologie, Free People, and even Lucky Brand, I often ask myself why I didn’t think to combine fabrics like that or try some similar detail.  We sort of have the best of both worlds in that way:  fashionable patterns + ready-to-wear inspiration to think even more creatively.  The mall is a different experience when you’re shopping for inspiration.

What about you?  What are your current sewing plans?  Have you tried any of the patterns I mentioned?  Feel free to recommend patterns, too!


My Favorite Fall and Winter Sewing Patterns

Standard
My Favorite Fall and Winter Sewing Patterns

Hi, friends!  My most recent project is all finished, but not yet photographed.  Hopefully I’ll get a chance to take some pictures this week so I can share it with you soon.  In the meantime, let’s talk cool weather sewing!

One thing I have been thinking about as the weather has gotten colder here is which patterns have become favorites in my fall and winter wardrobe.  By now, I’ve sewn through a lot of patterns.  Some projects have been real wins, and others have been given to family, friends, or the thrift store because something about them just didn’t work out.  The most interesting discovery has been that it’s not just the patterns that have to be winners–it’s pairing the right pattern with the right fabric that makes these garments my favorites.

Let’s look at a few of my favorites below.  When possible, I’ve linked to the pattern and original or similar fabrics.  None of these are affiliate links–I just want you to be able to find the same information and products I did if you want to.  (Fabric links, if not listed in this post, are in my original posts.)

Tops

I have two favorite sweatshirts right now.  One is the Style Arc Josie Hoodie.

Style Arc Josie Hoody/Hoodie in Polartec Power Stretch

I made this sweatshirt from Polartec Power Stretch, one of my absolute favorite fall and winter fabrics.  I really think that making this pattern in this fabric is what has me reaching for it over and over again.  This particular Power Stretch is–yes–stretchy, but it’s also thick and squishy with a smooth outside and fleecy inside.  The longer length and curved hem of the pattern are nice touches as well.

One of my other favorite sweatshirts right now is my Brunswick Pullover from Hey June Handmade in Polartec Curly Fleece and Rifle Paper Co. quilting cotton.

Hey June Handmade Brunswick Pullover in Polartec Curly Fleece

I love the colors, the cool details in this pattern (arm pocket, side snaps, cowl neck), and the fluffy fabric.  My family calls this my muppet sweatshirt because of the fabric.  It’s super cozy.

And here is one more sweatshirt that I wear on a regular basis:  my Polar Pullover, pattern F722 from The Green Pepper.

The Green Pepper F722 Polar Pullover

The roomy fit is great, you have three pockets, and you can use this pattern (or the vest view) to create your own version of those pricey fleeces found at stores like Patagonia and L.L. Bean.  I love that I got to pick my own colors, and the Polartec Curly Fleece (just like in the green sweatshirt) is furry and soft.

My current favorite t-shirt pattern is the free Plantain Tee from Deer & Doe patterns.

My New Favorite T-Shirt Pattern:  the Deer & Doe Plantain T-Shirt

I have many versions of this t-shirt (batch one, batch two), a few of which are in wool knits.  Wool and Polartec brand fleece are my two favorite cold-weather fabrics, and having a few Plaintains in wool jersey means that not only are they great for daily wear, they also work for camping and as exercise gear.

This mashup between the Plaintain Tee and the Strathcona Henley from Thread Theory is a real winner.

Strathcona + Plantain=A Strathcona Henley for Me!

This shirt is made from wool ponte and wool jersey, which were gifts.  If you can ever find wool ponte, I highly recommend it.  It’s both drapey and substantial.  This is a nice, long shirt, but with the right curves for my body since I used the shape of the side seams in the Plantain Tee.

Bottoms

For every day, I would have to say my Morgan Jeans from Closet Case Patterns in non-stretch denim are my top pick.

Morgan Jeans!

I love the fit of these jeans, and with some brightly colored topstitching, they feel a little bit special.  I sized up because I don’t like super tight jeans and I want to be able to fit long underwear or leggings underneath in the cold weather.

For looking a little bit nicer, Simplicity 1696 is my go-to.  I have made these pants several times.  My favorite iteration is my most recent, in Cloud9 Tinted Denim.

Spring Pants!  Simplicity 1696 in Cloud9 Tinted Denim

I think it reads as a pleasingly faded chino.  I like this slightly heavier fabric more than the lighter sateen and quilting cotton I have tried in the past.

Another winner for every day or pajamas is self-drafted leggings using an old tutorial by Cal Patch on Etsy’s blog.  My first pair was in a cheap polyester fabric, and I still use these for pajamas.

MMM'15 Day 11

I’m hoping to make a new pattern this winter, since my measurements have changed.  I’d like to make some leggings in a midweight Polartec Power Stretch.  There is nothing like fleecy leggings for coziness.

Speaking of pajamas, I just pulled out my flannel pajama pants made from out-of-print McCall’s 3019 in Cloud9 organic cotton flannel.

Quick and Easy Pajama Pants:  McCall's 3019

I have used a lot of cheap flannel in my time, and probably will again, but there really is a difference when you use something that is high-quality like this organic flannel.

I have to include my Alabama Chanin Long Skirt in Polartec Sweater Knit.

Alabama Chanin Long Skirt, New England Style

This is a really simple pattern that you can sew on your machine if you don’t want to hand-stitch it, making it super fast to create.  The fleece, which looks like a sweater knit on the outside and is fleecy inside, is really warm, and the skirt is long enough that you can wear long underwear or leggings underneath, keeping yourself nice and toasty.  It’s like you’re wearing a blanket, but it looks nice.

I absolutely love sewing wovens, but I find that in fall and winter, I often want to wear knits.  It took me awhile to notice this trend.  My most successful projects are a great pairing of fabric to pattern, even if the fit isn’t absolutely perfect.  Luckily, knits tend to be pretty forgiving in that area, in addition to continuing to fit should your measurements change somewhat.  All that being said, though, I do want to occasionally challenge myself to make and wear different styles, so I have a few knit and a few woven projects tentatively planned for the winter.

If you have any favorite cold-weather patterns or patterns you are excited to sew in the fall or winter, share in the comments!  I love sewing inspiration!

Hey June Handmade Brunswick Pullover in Polartec Curly Fleece

Standard
Hey June Handmade Brunswick Pullover in Polartec Curly Fleece

It’s still cold spring here, but I think this is my last spring sweatshirt…and it’s a good one.  This is the Brunswick Pullover from Hey June Handmade, my first pattern from this company, and probably not my last.  This is a great pattern.

Hey June Handmade Brunswick Pullover in Polartec Curly Fleece

I made View A with the cowl neck of View B in a size 16 bust and 18 hip. I used a green Polartec Curly Fleece from Fashion Fabrics Club (just like last week’s sweatshirt) and a Rifle Paper Co. quilting cotton from Pintuck and Purl.  The zipper on the pocket was from Wawak (I wanted the specific length called for rather than a zipper I would have to shorten, so I had to order it) and the anorak snaps, thread, and interfacing came from my stash.

Hey June Handmade Brunswick Pullover in Polartec Curly Fleece

l

Hey June Handmade Brunswick Pullover in Polartec Curly Fleece

Hey June Handmade is a company whose patterns I’ve had my eye on for awhile.  Last year, I planned to make the free Durango Tank, but never got around to it.  I saw this pattern release, though, and really liked the pattern as well as the various photos of people’s finished pullovers around the internet.  Katie’s Brunswick with the striped hood and other details was really inspiring as was Loni’s Brunswick with the white outside and Rifle Paper Co. button placket.  This last one was the inspiration that stuck with me as I looked for my own fabric.

Hey June Handmade Brunswick Pullover in Polartec Curly Fleece

Although I prefer paper patterns, this is only available in PDF currently, so I decided to put my preference aside and go for it.  Adrianna Appl, the designer, makes this PDF really easy to use with layered sizing (meaning you only have to print the sizes you need) and loads of information about printing and taping PDF’s, cutting your fabric, and sizing before you even start.  I was impressed from the very beginning by the detail and depth of information.  There is a lot of hand-holding in the pattern in the best way.  Adrianna does everything possible to ensure that you have a good and successful experience sewing her pattern.

Hey June Handmade Brunswick Pullover in Polartec Curly Fleece

I think the thing that really drew me to this pattern is all the fun little details you can add that take this from merely a cozy sweatshirt to cozy sweatshirt with a distinctive twist.  Here are some close-ups of my choices:  a contrast zipper pocket on the sleeve,

Hey June Handmade Brunswick Pullover in Polartec Curly Fleece

l

Hey June Handmade Brunswick Pullover in Polartec Curly Fleece

functional snap plackets on the sides lined with contrast fabric,

Hey June Handmade Brunswick Pullover in Polartec Curly Fleece

l

Hey June Handmade Brunswick Pullover in Polartec Curly Fleece

and a big, cozy cowl neck.

Hey June Handmade Brunswick Pullover in Polartec Curly Fleece

l

Hey June Handmade Brunswick Pullover in Polartec Curly Fleece

A few notes from sewing the pattern:

  • I used a walking foot and a jersey/ballpoint needle as well as a lighter presser foot pressure.
  • To mark the pocket on the arm, I used tailor’s tacks since fabric marker or chalk wouldn’t have shown up well on the fleece.
  • Because I was using fleece, I couldn’t press without melting the fabric, and therefore couldn’t use fusible interfacing.  I opted to hand baste some sew-in woven interfacing at the necessary points.  Where the pattern called for pressing, I finger pressed.
  • It can be a little bit hard to tell the front from the back when the pullover is finished if you used the cowl neck option (unless you memorize which arm the outer pocket goes on), so I made a little tag out of a pretty bit of selvage and sewed it inside the back near the neck seam.

Hey June Handmade Brunswick Pullover in Polartec Curly Fleece

This was a really enjoyable pattern to sew.  I love, love, love the finished product, and I’m so impressed with all the attention to detail in this pattern, that I would love to sew another from this company.  Plenty of patterns out there are good, but I think the quality of this one is a step above.  I’m glad I tried it.  It’s been fun to have a bright colored sweatshirt to fight off the spring rain and chill, too.

And with that, I’ll leave you with one of my favorite outtakes/silly shots:

Hey June Handmade Brunswick Pullover in Polartec Curly Fleece

Many thanks to my long-suffering photographer.  😀