Last week I showed you the pants and shorts I made in my pre-Brimfield sewing spree. This week, I’ll show you the t-shirt I sewed up, and–bonus–it’s a free pattern! It’s the Stellan Tee from French Navy Patterns.
T-shirts are something I initially couldn’t imagine sewing. With all the options at various price points and the free t-shirts people give away, it seemed silly, but now I love sewing the occasional t-shirt. It’s a fast and gratifying project that is the perfect palette cleanser between more complex patterns. I also wear t-shirts all the time, and I love having fun silhouettes in fabric I adore. And I do adore the fabric I used for this Stellan Tee.
I bought this fabric last summer at Field’s Fabrics in Holland, MI in one of their sales.
It’s a 95% cotton, 5% spandex jersey knit, 57″/58″ wide, and is designed by Mimi G Style for Riley Blake. I love the colors and feel. The look simultaneously reminds me of animal print and the Flintstones. I had two yards, but only used about a yard and six inches even though I cut a size XXL, which means I have a nice bit left over.
I have made the Stellan Tee once before in an organic cotton jersey without much stretch or recovery and really liked it. I like this one, too. I don’t know that it’s my ultimate, favorite forever pattern, but it’s a nice boxy shape with an interesting hemline, and I like having it in my wardrobe for a little something different. I also like the colors with both pairs of Elizabeth Suzann Clyde bottoms that I blogged last week.
As far as sewing, it was pretty easy. I serged whatever I could and used a walking foot and 12/80 ballpoint needle in my sewing machine when sewing the rest. There are some nice touches in this pattern, like the optional back neck binding and shoulder topstitching that elevate the quality.
inside back neckline
back neckline from the outside
Personally, I also like to topstitch around the front of the neckline to hold the neck band seam allowance in place (and because I think it looks nice). And I zigzag stitched the hems because I find my double needle stitching comes undone after awhile.
Stellan Tee front view
Stellan Tee back view
a peek inside the front
and a peek inside the back
And that’s about it! This shirt looks good cuffed or uncuffed and was a great pick to wear to Brimfield.
It covered my upper chest, back, and shoulders so I didn’t have to worry about sunburn, and it was comfortable and cheery with its bright colors.
I’m so happy I made it! If this is a style that appeals to you, then I highly recommend the pattern.
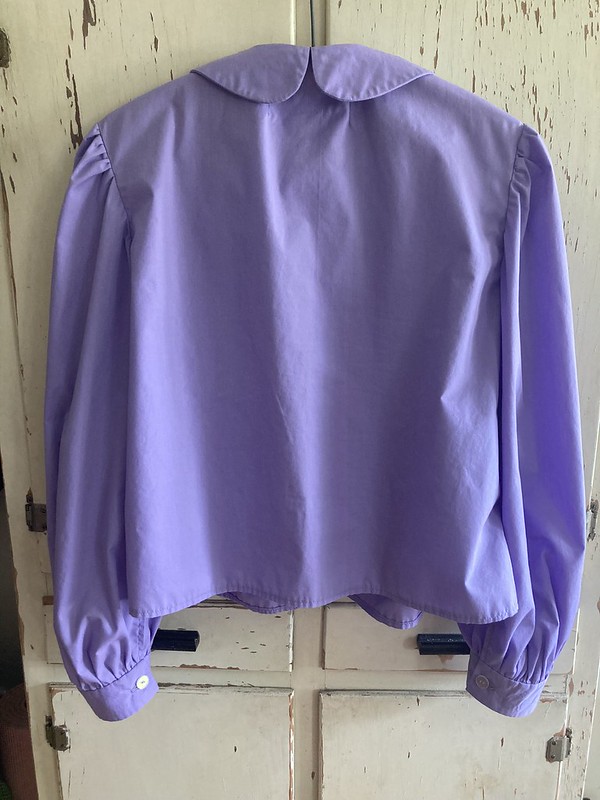
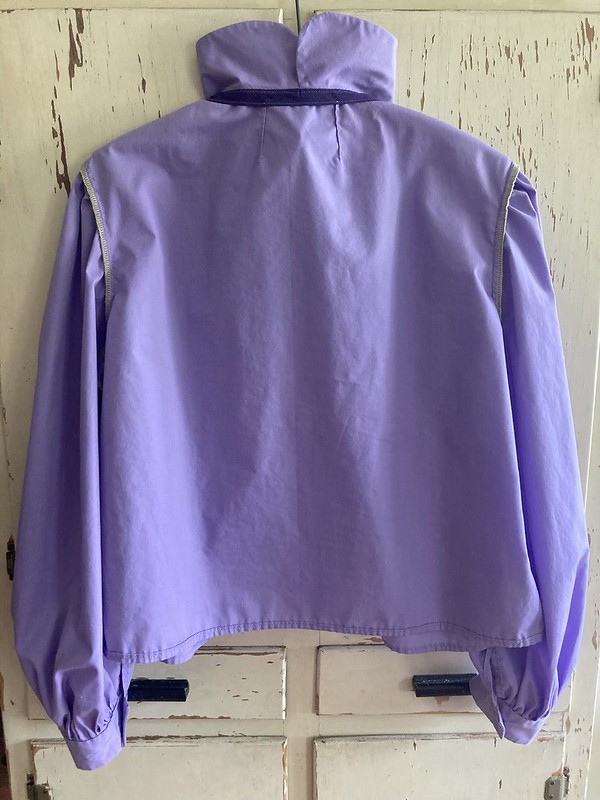
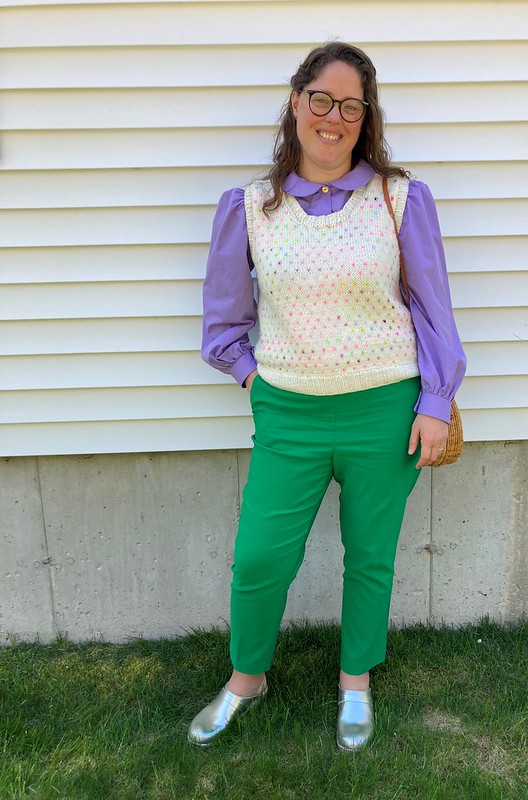
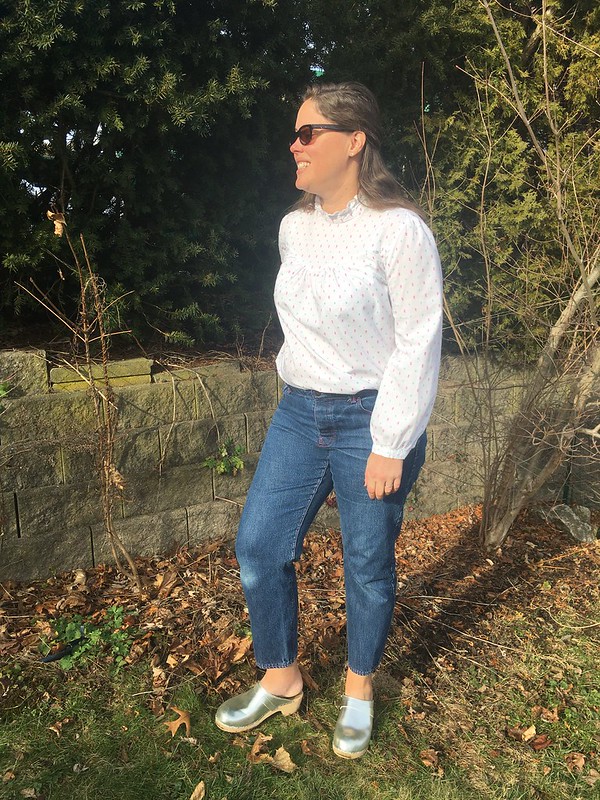
It started with my vest. I had made this really fun knitted vest with so many cool colors, but I didn’t have a lot of button-up shirts to wear with it. And I wanted button-ups in good colors. I tried thrifting, but still didn’t find just what I was looking for.
I wanted to make a cute blouse with a Peter Pan collar. It would be great to make a whole outfit–grass green pants, a lilac purple blouse, and my vest. I ordered samples for pant fabric, but just didn’t feel like I had the time to really dive in. Then I found pants at T.J. Maxx for a great price in the perfect color. The time to make the blouse was now, before it got too warm. I began at the end of April 2023.
I already had Simplicity 8736, a reissued vintage pattern from the 1940’s.
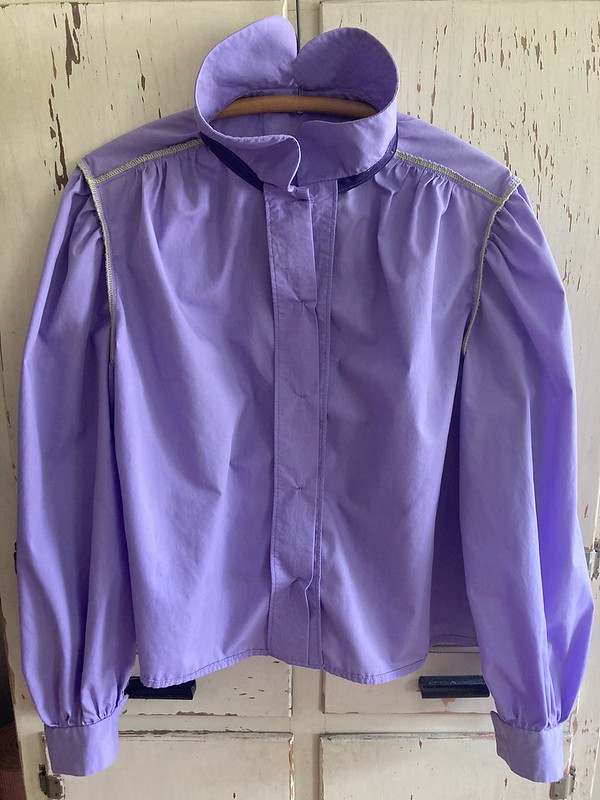
Peter Pan collar option? Check!
I thought maybe I could make this pattern, moving the buttons from the back to the front. It might even look on trend. I just wasn’t finding my perfect blouse fabric, though.
And then one day I was at Joann’s and decided to look in their quilting cotton section. Right nearby, I found “Symphony Broadcloth” a polyester/cotton blend.
They had the perfect color, “Sunlit Allium”, but preferring natural fibers in most cases, I looked in the quilting cotton and found the same color. Comparing the two, I saw that the Symphony Broadcloth looked smoother and the color sat better on the fabric. It was also cheaper (on sale, even). After debating a little bit, I decided to give it a try. I could have my imagined shirt, custom-fitted to me for under $10.
And then I found the ideal buttons. The two packs I needed were NOT under $10.
Again, I debated, but they were just right, so I ordered them from Brooklyn Craft Company. The perfect detail! I was so excited!
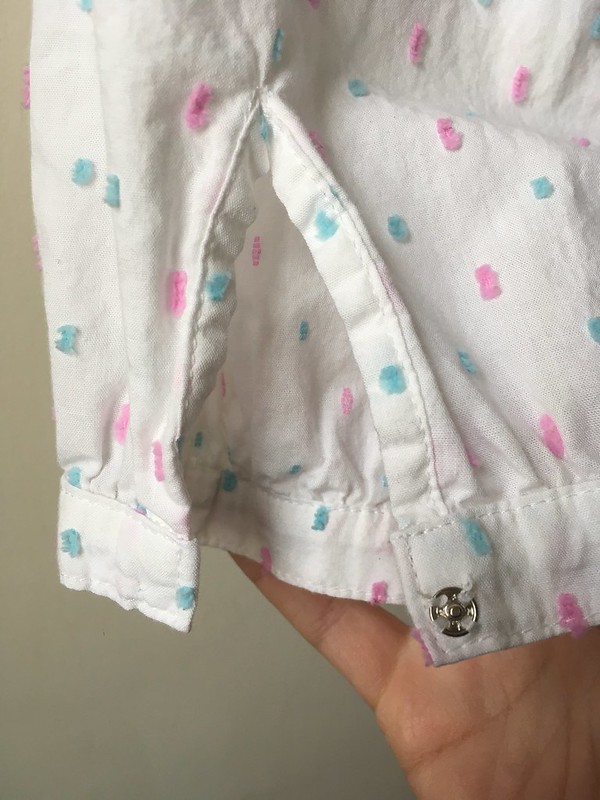
I planned to make View B with the collar from View D in a 20 bust and 22 waist and hip, and I decided to leave out the vertical darts. Amazingly, I didn’t need a broad back adjustment. I skipped the optional shoulder pads and moved the buttons to the front.
In order to move the button placket, I traced the back button placket on its own and cut it out. I folded back that area on my traced back piece at the center back line, making the back piece into one I could cut on the fold. I taped my traced placket to the front, lining up the center back line of the placket and front center fold as well as the lengthen/shorten lines. Next I folded up the placket as it would be folded in the sewn shirt, and traced the top of the neckline so that both sides of the placket area matched. Then I crossed my fingers and hoped for the best!
Modified Simplicity 8736 back
I didn’t alter the neck facing quite right, so I just replaced that pattern piece with some wide, single fold bias tape from my stash to finish the neckline. I tacked it to the shoulder seams and back neck darts to keep it down. I still think it’s probably a little tight, but the casual observer is not going to notice that, and it feels ok, so it’s fine.
I put some neon serging on the inside for an extra bit of secret, colorful detail.
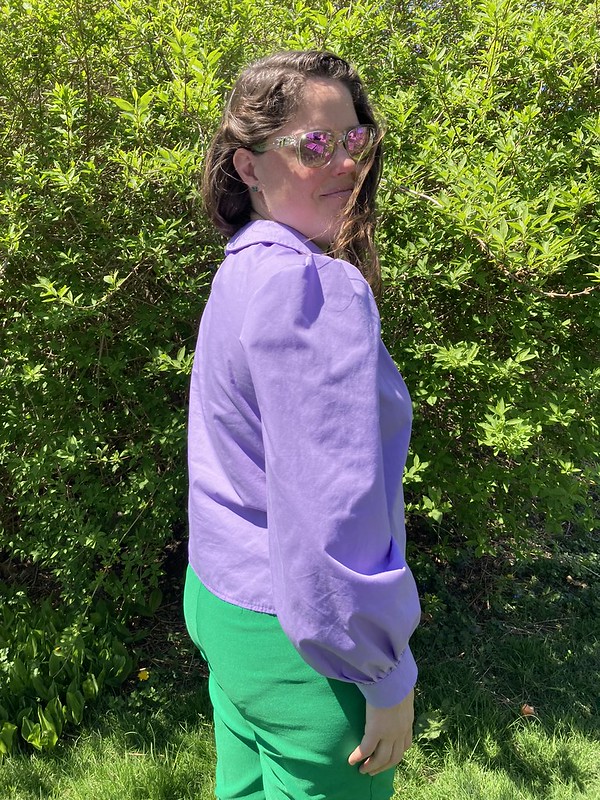
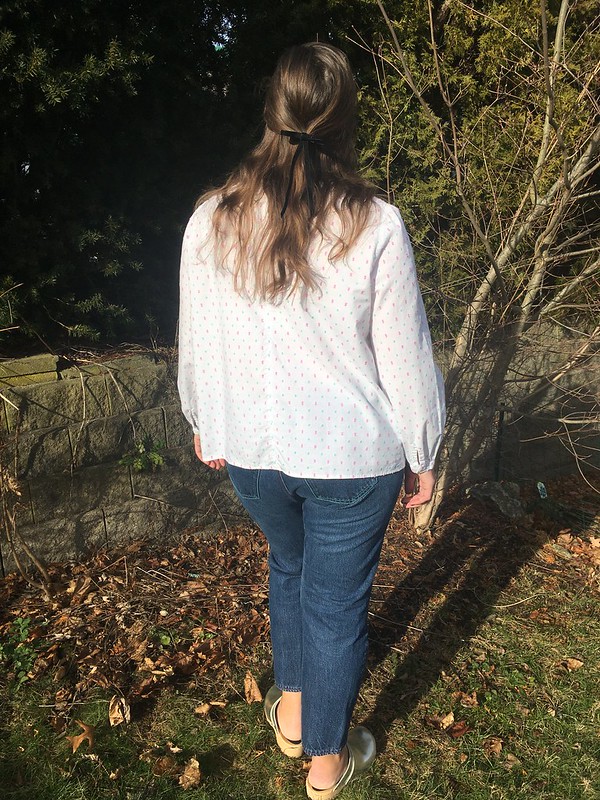
I’m very happy I left off the vertical darts at the bottom back, as the shirt now has the skimming fit with positive ease that I like. I’m also glad I left out the shoulder pads.
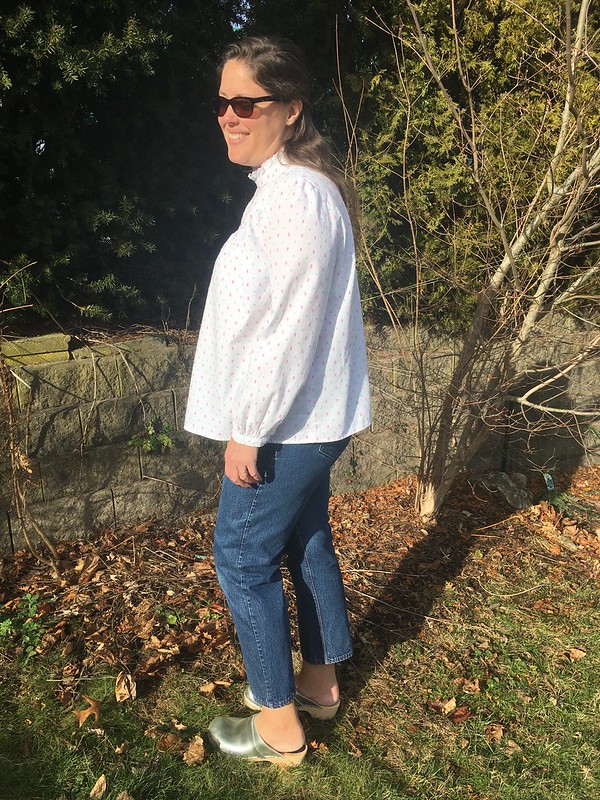
The sleeves are definitely puffy, and this fabric has the body to help them stand up.
Puffy sleeves!
I think this may be one of those blouses that I look back and laugh at, but for now, I LOVE it. It is distinctive enough that I could feel self-conscious in it, but I know if I saw someone else wearing it, I would think it was really fun, so I’m going with it! It’s perfect with the green pants and, more importantly, with the sweater vest.
The outfit I dreamed of is now a reality!
And the buttons were worth the splurge.
I have only bought Tabitha Sewer buttons twice because they are pretty pricey, but each time, they have been the perfect detail and really given my project an extra jolt of fun.
Iridescent buttons! YES!!!
Spring here has been long and cool. We’ve had a few warm days, but not many, and I’m trying to use these last cooler days to get a little more wear out of things like this long-sleeved blouse. It’s also nice to know that when fall comes, I’ll have this all ready to go.
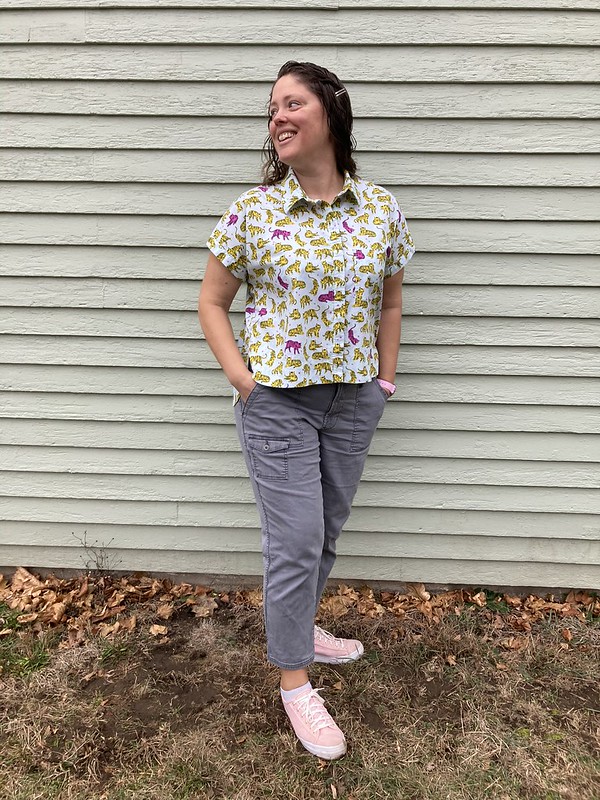
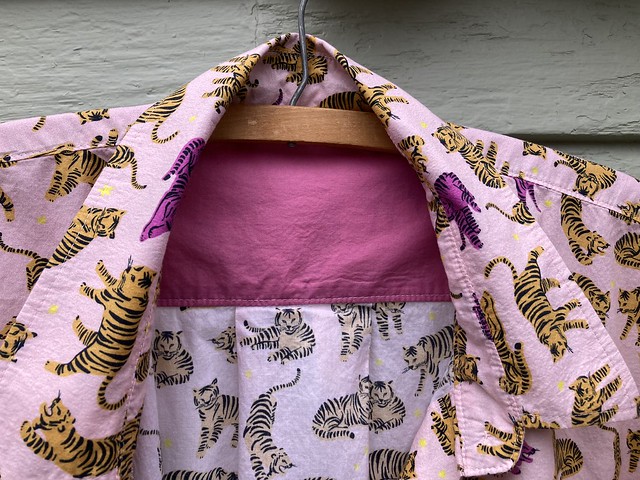
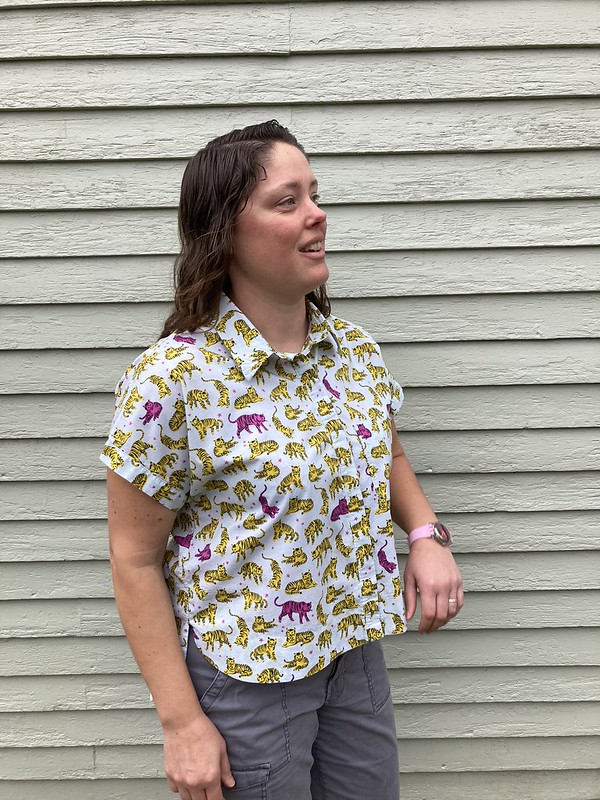
I’m back with two fun shirts–identical, but in different colors–the fraternal twins of the shirt world?
I love a good animal print–not the type of print that looks like animal skin, but a print with pictures of animals, and some of my favorites are tigers and leopards. I have no idea why. There just seems to be a number of cute fabrics out there featuring tigers and leopards.
I’m not sure where I first noticed the fabrics I used for my shirts, but my husband got them for me in my two favorite colorways for Christmas and my birthday in 2020. Not only do I have these prints in lawn, last summer I found the same print in a knit jersey. I’m so excited! Its final destiny is yet to be determined.
But back to the fabric at hand! It was designed by Hello! Lucky as part of a collection called Wild and Free for Robert Kaufman, and it’s 100% cotton lawn, 44″ wide, and came from Fabric.com before it shut down (RIP Fabric.com). The pink is “Tigers Orange” and the blue is “Tigers Sunshine”.
Before beginning this project, I had many ideas floating around in my head. I knew I wanted to make the Closet Core Kalle shirt, but should I made two different versions or versions that were the same, but with contrasting plackets, collars, and cuffs, etc., etc.? In the end, I decided to batch sew two of the same version, each in its own color. I have made the cropped Kalle shirt once before in a speckled/splatter paint print lawn and absolutely love it. I wear it a lot and it has served me well, even as I have changed sizes over the years.
This is an older version of the pattern before the company changed its name.
l
For my tiger shirts, I chose to make View A, lengthened by three inches. I made a size 18. Originally I was going to make the band collar pictured in View A, but part way through the process, I decided to switch to the standard collar so that you could see a bit of the fun fabric even if I wore these shirts under sweaters.
l
I gave some thought to pattern matching, but didn’t let myself get too wrapped up in it. That hidden placket, with its accordion folds, would have been a bit of a mind bender.
I intentionally didn’t pattern match my pockets so that they would be easier to see.
I also forgot to cut out my inner lining for my yokes, but this was fortuitous. If I had cut it out of my tiger fabric, you would have seen some bits of the pattern on the outside. Instead, I cut them out of some scraps of solid pink Cotton + Steel lawn that I had in my stash, which sets off the pattern nicely on the outside.
l
l
This yoke does look a little darker because of the pink of the lining inside, but I still prefer it to seeing bits of the pattern on the yoke lining.
I found just the right buttons at Joann’s in matching colors in their Slimline collection–great basics that cost about a dollar a card. It was tempting to find something really crazy, but with the hidden placket, you’d never see them, and these buttons really were perfect.
l
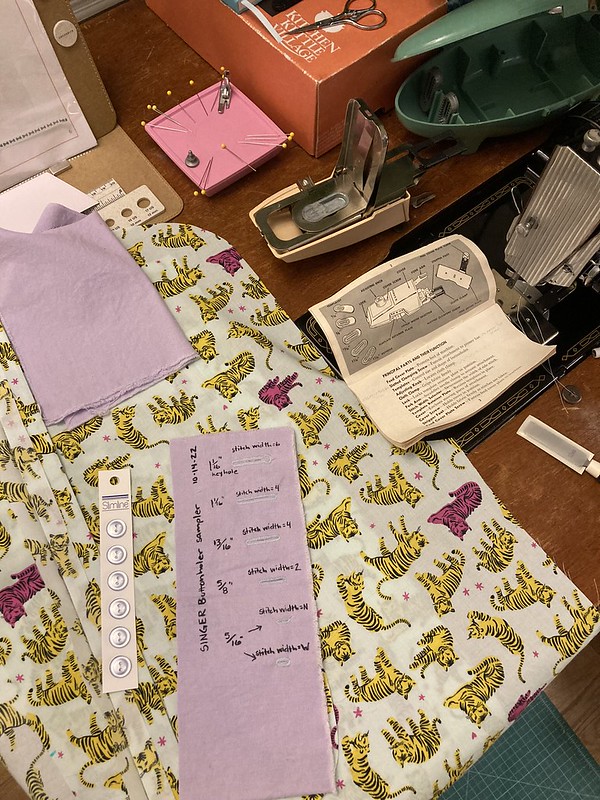
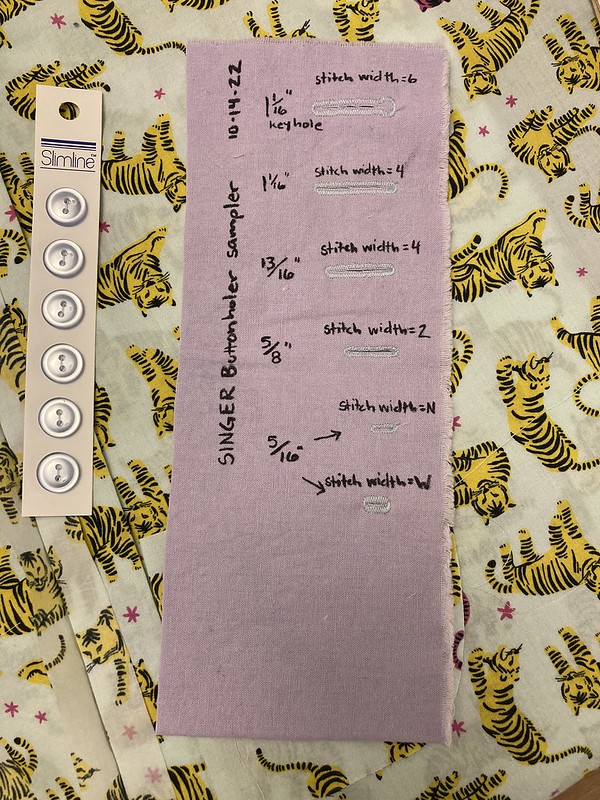
In order to batch sew my shirts, I set up both of my machines with different thread colors. Normally I would always sew my buttonholes on my Elna 3005, which is my newer machine. However, I do actually have a buttonhole attachment for my Singer Featherweight. I told myself that now was the time to learn to use it. As with the Featherweight’s instructions, the instruction booklet for the Buttonholer is excellent.
l
It recommended making a little sample of all the different dies and stitch widths and, uncharacteristically, I actually did it! I knew I would never remember what I had done or might want to do in the future otherwise. On my blue shirt, I used the 5/8″ die at a stitch width of four (I think) and went around each buttonhole twice. It worked out really well, and forced me to learn to use my machine more extensively.
I didn’t have too much trouble with the sewing, except for getting the interfaced collar stand of the two-piece/standard collar to fit. In the end, I measured down and in by 5/8″ to find out where the ends of the collar stand should touch the edges of the button plackets. Then, I stretched the shirt to fit the collar stand. I had repinned so many times! I finally decided I would rather just stretch to fit and clip the neck edge after sewing.
A few other notes I made for myself that may be helpful to you if you are sewing this: at the point that you are sewing your buttonholes on the hidden placket, you should be sewing through two layers of fabric. It’s also a good idea to place your buttonholes slightly to the outside of center since the inner fold is partly taken up when you sew the placket down. And if you are confused on the cuffs, note that the angled part of the cuff should be on the top of the sleeve.
Also, you could check out the sewalong on the Closet Core website. It’s a little bit different than the directions at certain points, so if one doesn’t seem clear to you, the other might. I usually find Closet Core instructions really clear and thorough, but anyone can get confused when you are deep in a project or if the instructions don’t explain things in a way that makes sense to you.
I cut these shirts out in September of 2022, and sewed them up in October, finishing just as it started to cool off here for fall. I didn’t wear them much, so I put them away for my future self, and was so happy to take them out once spring hit.
It’s still pretty cool here, but I have managed to wear each one at least once, and I look forward to wearing them a lot more as the weather gets warmer. Both colors work great with my existing pants and shorts. I’m not a huge pattern repeater, but I’m really glad I came back and made this pattern again. I started with three yards of each fabric, and I have just about half a yard left of each, so while I often struggle to use my off-cuts, I’m pretty happy to have some little scraps of these fabrics left. I love them so much. And I am so very happy with my lovely new tiger shirts.
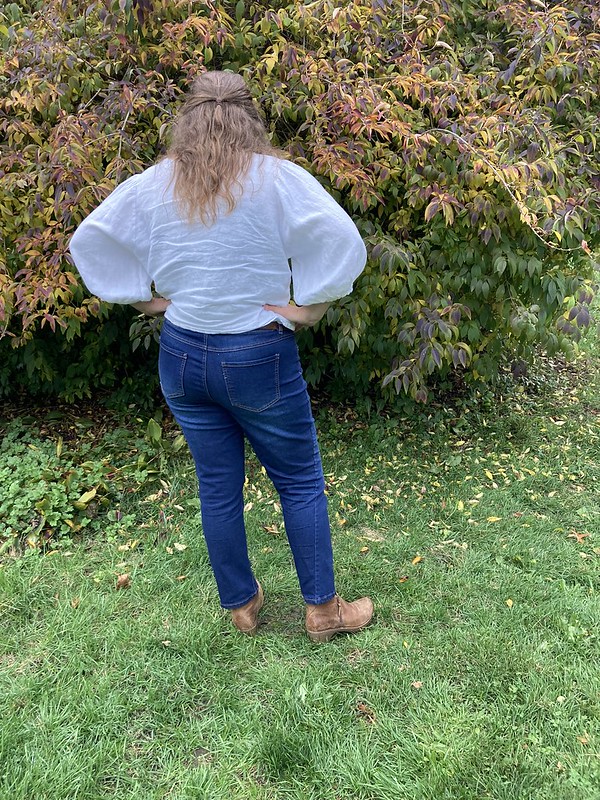
Hi, everyone. Happy week before Thanksgiving! Today I have a lovely linen blouse to share with you. This is the Fibre Mood Norma blouse.
I got this for free when Fibre Mood gave it away as part of a sewing challenge.
It took me awhile to get around to making it, but I got there in the end! Actually, this version was inspired by melt.stitches who made Norma in bone colored linen. I think I saw her version on Pinterest or the Fibre Mood site, and fell in love with this top in a pale linen.
Fabric
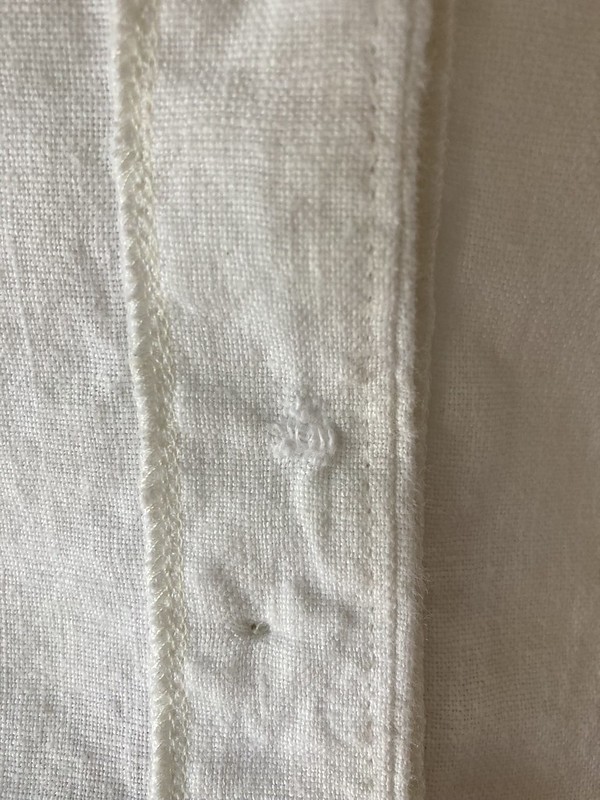
I had read numerous blog posts by people who had gotten linen from fabrics-store.com and been happy, so when white midweight linen went on sale, I snapped some up. It was very nice when I got it, both before and after washing, and made me think of the midweight linen I had bought from Fabric Mart to make my yellow Roscoe Blouse. Cutting and sewing the fabric was great. I did find one flaw in the fabric that I didn’t notice until after I had cut everything out, but luckily it ended up on a facing, so no one but me (and all of you) will see it.
Ack! Fabric flaw!
Pattern
For this pattern, I made a 16 bust, 16 waist, and for the hip, I straddled the line between a 16 and 18 (this is in the US sizing). I made a note to myself to cut wide seam allowances at the hip in case I wanted to let the seams out a bit there for more room, but I think I forgot all about it when I got to cutting and sewing. I did a major broad back adjustment, as I often do on shirts, and that worked out great.
Oops! Didn’t think to iron this before taking pictures. At least you know you’re getting a ‘real life’ view of this shirt!
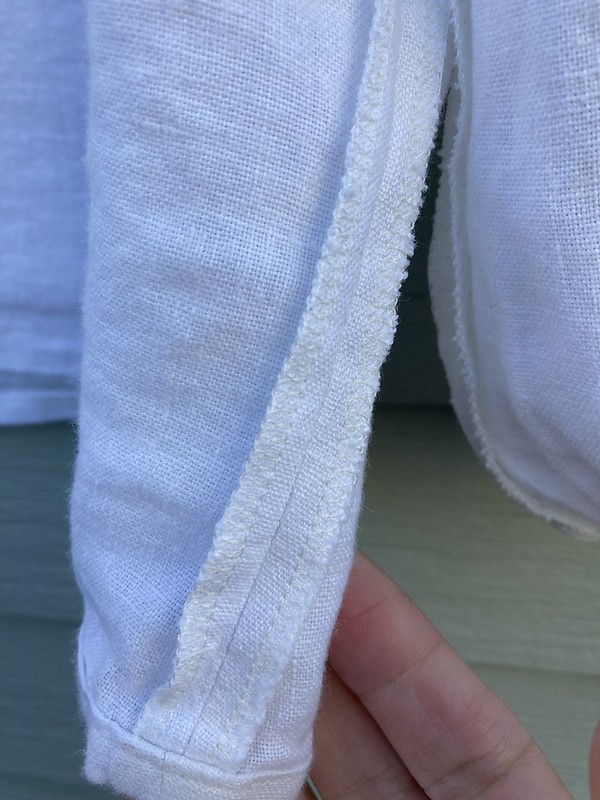
I also lengthened the sleeve cuff since I wanted them loose enough around my lower arms to be comfortable whether the sleeve was hanging down or pulled up over my elbows.
When Fibre Mood first started, you had to add seam allowances to all of their patterns. This often (though not always) seems to be the preference in European patterns. I don’t think this originally had seam allowances, but in my copy of the pattern, it does, which was nice–one less step to do!
The order and steps for sewing this were a little bit different than some patterns I have used, and I really enjoyed the change. This pattern often has you finish seam allowances before sewing pieces together. This works out great if you are going to serge or zigzag your edges.
If you plan to finish your seams together, you will need to change things around a bit, but that wouldn’t be too tricky.
After hemming, I sewed my facings down. I HATE facings that flap around. I know facings are supposed to give you a beautifully finished edge without stitching around it, however I don’t mind the look of a stitched down facing as much as I mind my facings flapping around and getting wrinkled every time they go through the wash.
Fibre Mood Norma, front
Fibre Mood Norma, back
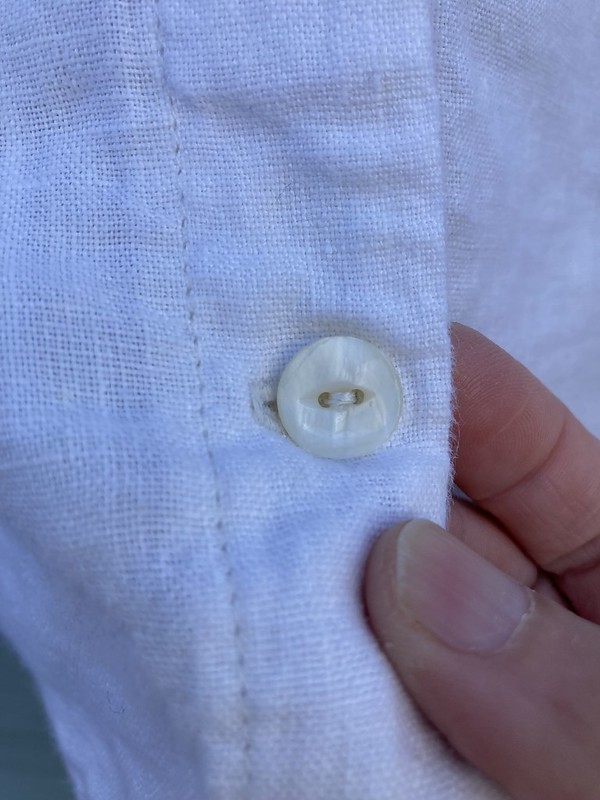
I took a bit of time going back and forth over my button choices, and chose some vintage white (shell?) buttons from the collection my mother-in-law gave me.
I’m really happy with how they look. I had thought about green glass or pink plastic buttons, also from that collection, since I love distinctive details, but because I don’t have a lot of white shirts in my wardrobe, I wanted this one to be versatile and neutral.
There’s a nice tip at the end of the pattern to add some tulle into the shoulder area if you want to keep your sleeve heads extra puffy. I didn’t do that this time, but it’s a great idea.
Changes for next time and overall thoughts
If I were to make this again, I would do a few things. It’s clear to me that I need to do a forward shoulder adjustment as the top ends up shifting back as I wear it.
This doesn’t affect how it feels. It really just affects how it hangs on my body, giving it the look of a shirt with a high-low hem. It works out well for this shirt because the neckline is a little low for me (another thing I would change if I made this again), but because the shirt tends to shift to the back, it effectively raises the neckline to a point I’m comfortable with. Other than that, maybe I would lengthen it an inch or two, but I’m not really sure. That would be a good round three potential change, if I got that far with this pattern.
Otherwise, though, I love this shirt. I have been reaching for it a lot. While I don’t think I need a million of these shirts in my closet, I like this enough that I wouldn’t mind one or two more, and I would definitely consider using a midweight linen again–it’s so nice. It’s turned out to be a great (and pretty!) wardrobe workhorse as we have transitioned into the cooler weather.
Hello, friends! And welcome back to the blog. After taking the summer off, I’m ready to get back to writing about sewing, knitting, photography, and other fun creative endeavors. I hope you had a good last few months as well.
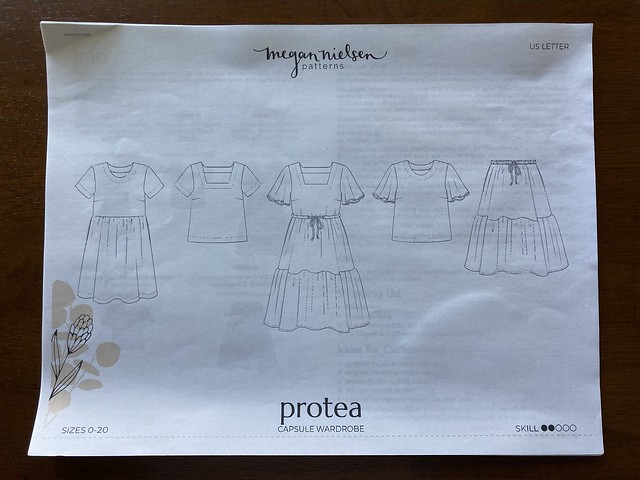
My “To Blog” list is pretty long, but I’m actually going to start with a more recent project. I was a tester for Megan Nielsen’s latest pattern, the Protea Capsule Wardrobe. I went through two rounds of testing as the pattern grew from a few views to the many views you see now. In order to be a tester, I signed up to her list and sent in my measurements. They cycle through their list and contact people with a good range of measurements, and then e-mail you when they have a pattern for testing to see if you are interested. You get to see the line drawings and description of the pattern as well as the deadline and what they need from you, and then you can say yes or no. This is a volunteer position, so it’s your responsibility to get your materials together for the project. You don’t have to blog the results or put it out on social media, but since I will really and truly forget the details of my projects if I don’t blog them, I wanted to share my tester versions, and hopefully give you a look at the pattern in its developmental stages.
As the pattern was released, the company offered testers the option of a free Protea Capsule Wardrobe pattern in print or PDF. I chose print, but still had to pay shipping, and I’m currently waiting for it to arrive. I don’t often test patterns since I have so many of my own projects that I want to make, and Megan Nielsen is the only company I have tested for (unless I’m forgetting…but I think that’s right). The process was a little different years ago, but I have always been impressed with the freedom and flexibility this company gives you in testing. So! Let’s get to the actual garments. Just remember…these are versions that came out before the new and shiny final pattern, so some things have changed a bit.
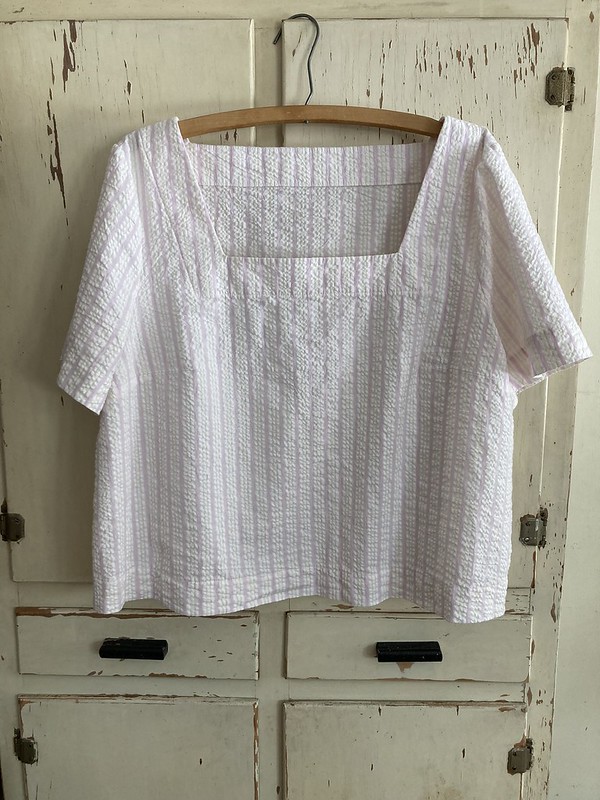
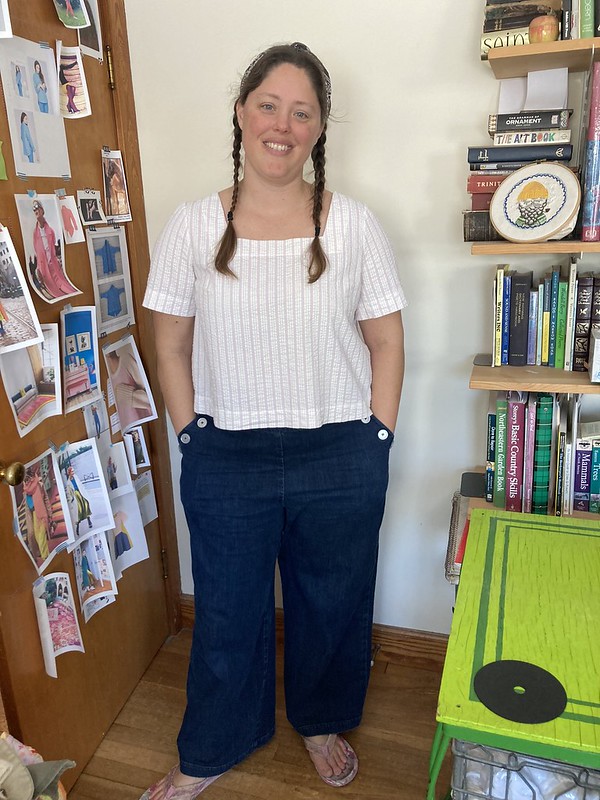
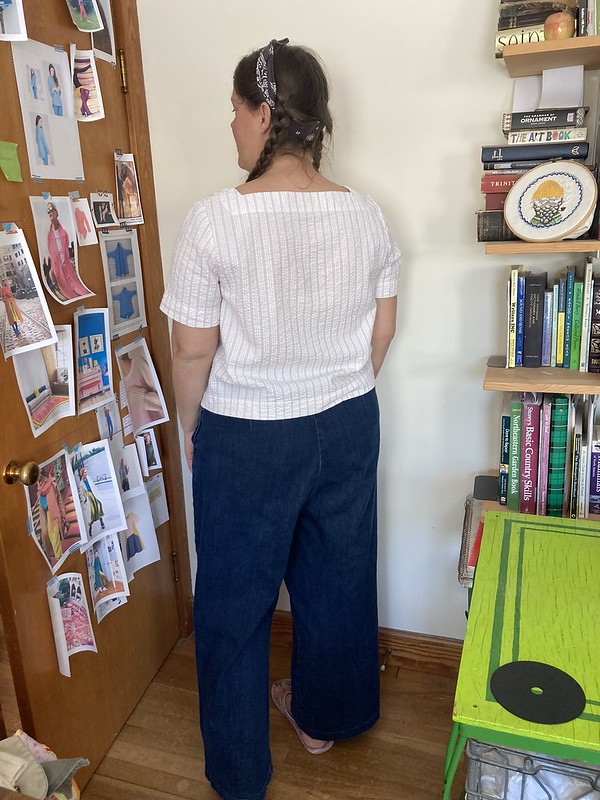
Test #1: Protea Blouse
Here is the first line drawing we were sent back in January. I chose to make the square-neck blouse out of a striped cotton seersucker I bought at Field’s Fabrics in Holland, MI in summer 2021.
front
l
back
I love the general style of this blouse and have worn it all summer long. I love that it is loose and boxy and I didn’t have to make a broad back adjustment.
l
l
It is a little cropped and lifts up when I raise my arms, so if I made it again, I would consider lengthening it just a little and trying out adding a gusset to the underarm with directions I found in Bernadette Banner’s new book: Make, Sew and Mend: Traditional Techniques to Sustainably Maintain and Refashion Your Clothes. I made an 18 at the bust and a 20 at the waist and hip. I think I used the width of the 20 for the sleeve, too.
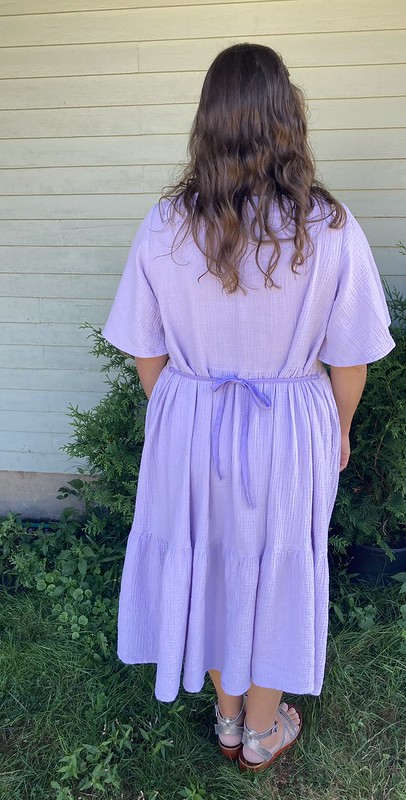
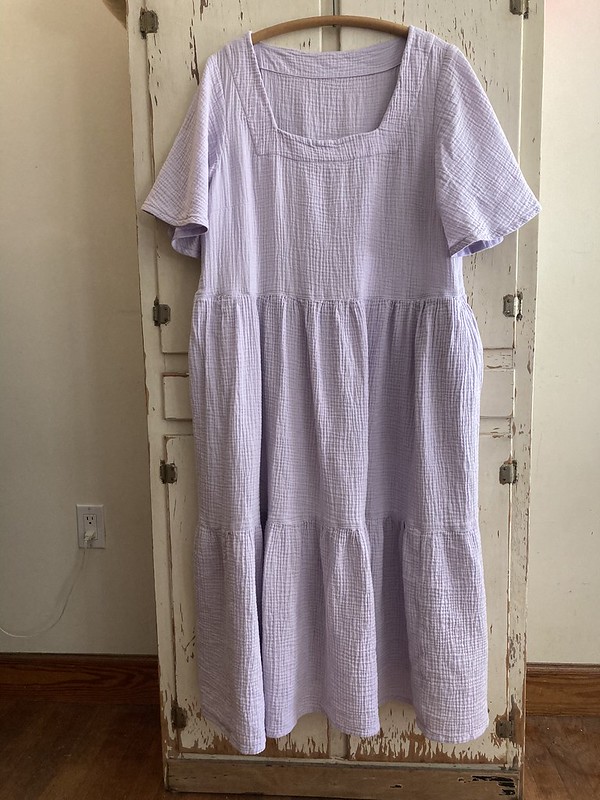
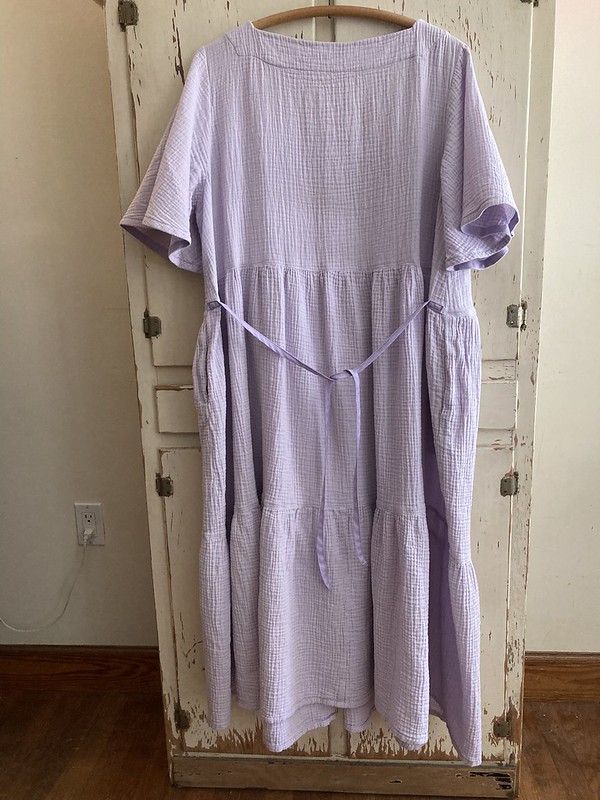
Test #2: Protea Capsule Wardrobe Tiered Dress
When the option to test the next version of the pattern came along in May, I wasn’t quite sure that I would have the time, but I really liked the look of the tiered dress with a square neck and flutter sleeves. I found some fabric in my stash and decided that I could make it if I applied myself!
I chose to make this dress in a cotton double gauze from Joann, also from the summer of 2021. I didn’t have quite enough fabric. What I did have was a little narrower than the recommended 60″ and I only had four yards instead of the 4 3/8 I should have had, but I decided to do my best to make it work. In the end, I mostly made it. I went back and bought a few fat quarters of quilting cotton in the same pastel purple to cut my pockets out of. That fabric requirement was pretty much spot on.
l
l
I made the dress with a size 18 bust and 20 waist and hip without the drawstring. I didn’t veer too far from the directions except that I hemmed my sleeves with bias tape instead of turning the hem in twice, and gathered my skirt tiers using a zigzag over a string instead of sewing two parallel lines of stitching (a technique I picked up from another Megan Nielsen pattern). I haven’t seen the final version yet to know what choices they made for those parts of the pattern instructions.
I felt a little bit different about this dress when I finished it than I did the top. I love positive ease, and this dress has LOTS of it. It was a bit much even for me.
Unless you are looking for a completely unrestrictive dress, I like it a lot better with something pulling the waist in just a little. I tried pinning the drawstring casing on, but I wasn’t a fan.
waist casing pinned on…nope
The drawstring casing for the dress in this version of the pattern used the same pattern piece as the waistband for the skirt. It’s a clever idea that reduces the number of pattern pieces, but I don’t actually like it on the dress. It’s really wide and I didn’t like how it looked. I also didn’t like the dress without something to pull in the waist a little, so I put the finished dress to the side for a bit to think it over. In the end, what I did was to make two ties out of some single fold bias tape I had that matched my fabric.
I sewed them on to the outside, but if I were planning on adding ties from the start, I would have sewn them into the side seams at the waist.
l
This allows you to gather the waist in as much or as little as you like. There is a bit of fabric that gathers under the ties, but it really isn’t bulky. I tie mine just tight enough to get a little waist definition, but still loose enough not to feel restricted.
l
l
l
For me this takes the dress from something I didn’t like at all to something I love. It’s amazing what a little tweak can do.
Overall Thoughts
Seeing the final pattern, I like it a lot. You don’t often see an indie brand bring out a capsule wardrobe-type pattern. The Big 4 do it (I’ve seen a lot from Butterick), but not always indie brands. Since indie patterns can be so expensive, this is a good value for your money, and it’s simple enough to sew and has such clear instructions that even a beginner could tackle it. You get some good mix and match options with the sleeves and necklines so that you could easily sew a lot of different-looking garments from this one pattern. I like it stylistically, as well, except for the dress drawstring. Personally, I’m really into the square neck, flutter sleeves, and tiered skirts. I don’t often return to patterns I have already made since I love trying new ones, but before summer started to wane, I was contemplating more of the square-necked tops, so I could see revisiting this one and trying out any of the views. I like them all.
Currently making…
Since I finished pattern testing, I have made a few other garments, and I entered both a sewing and a knitting project in the Topsfield Fair in Topsfield, MA for the first time ever, so we’ll see how that goes! I submitted my Patagonia inspired vest and my Arrowhead Cardigan which were both a lot of work and took a lot of brainpower!
On my sewing table, I have a Fibre Mood Norma Blouse cut out of some beautiful linen and I have plans to cut out two cropped Closet Core Kalle Shirts in different colorways of a fun tiger print lawn.
Also…I found some sandals with wooden bases at the thrift store that I have started stripping down to try making into sandals I like, but it’s slow going with the other projects, and…you know…actually taking care of my family, ha ha.
I’m pretty inspired and excited about making all the things at the moment. I didn’t sew a ton over the summer, so it feels good to get back to it. And I have a million projects to bring to the blog (some from last winter/spring–yikes!), so I look forward to meeting you back here soon. Happy weekend!
Today’s project is my last one of the summer. There is one other I have to share from the warm season, but it’s a bit more transitional, so this one is up first! This is the Lola Top from the tenth issue of Fibre Mood magazine, a sewing magazine out of Belgium.
This issue came out in 2020 with so many good summer patterns, that I had to order it. It took what felt like ages to get here, but it was worth it! It’s only this year, at the end of summer 2021 that I have gotten around to making any of these patterns.
I approached the sewing of this top with a certain level of arrogance. I don’t like arrogance in others, and I try to stamp it out in myself, but something set me off, and I admit that I started sewing this project with a little bit of arrogance. Maybe it was having to add seam allowances, some of which were one size and some another, sometimes not even a size used in American sewing (1/6″??!!). That annoyed me, so I added 5/8″ to all my seams and 1.25″ to my hems and moved on. And the sizing between the magazine and the online directions was confusing, too–EU/US/UK–you had to figure out what size you were in inches (for me, at least), and find your US size, but make sure you traced your EU size from the magazine. At that point, I made the mistake of thinking I knew better than the pattern.
In general, I like to trust the pattern. I know the designer has worked hard on their directions, and I like to go on autopilot and sew through those directions after having done the work of tracing, adjusting the flat pattern, and cutting out my fabric. Follow the steps in the pattern, and you almost always get a great garment. But that request for a 1/6″ seam allowance really threw me.
Then there were a few confusing parts in step 3, which made me doubt the directions even more. Arrogance and frustration surged ahead, until I started to question all the directions!
But then…I started to figure things out…and then I saw that the directions were good…I just wasn’t used to them yet. I did need to trust the pattern. It was, in fact, trustworthy, but I hadn’t given it a real chance. Feels like there might be a life lesson or two buried in all of this. 😉
Luckily, I managed to get rid of my pride and arrogance once I settled into sewing this pattern, and in the end, it came out great.
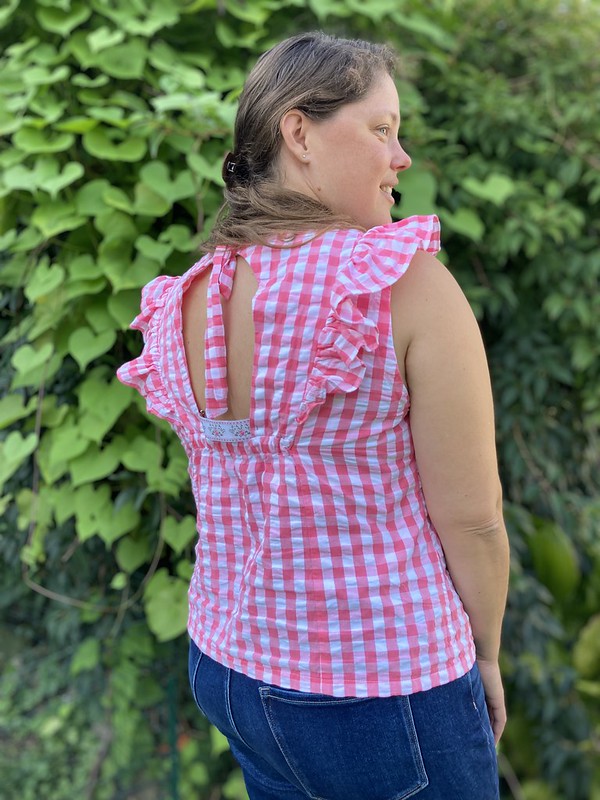
That’s not to say there wasn’t an issue or two. Piece number 9, the bias strip for finishing the armhole, should be an inch or two longer for my size (US 16/UK 20/EU 48 bust and US 18/UK 22/EU 50 hip). Luckily I used some silk bias tape I had made for another project, and I had extra, since I originally cut my strips to the size of piece 9, and they were too short.
Piece number 5, the center back piece, should also be 1.5″ taller to cover your bra band. I added in some decorative ribbon to bridge the gap, but if I made this again, I would lengthen that piece.
I found this ribbon in my stash, and it was a perfect match!
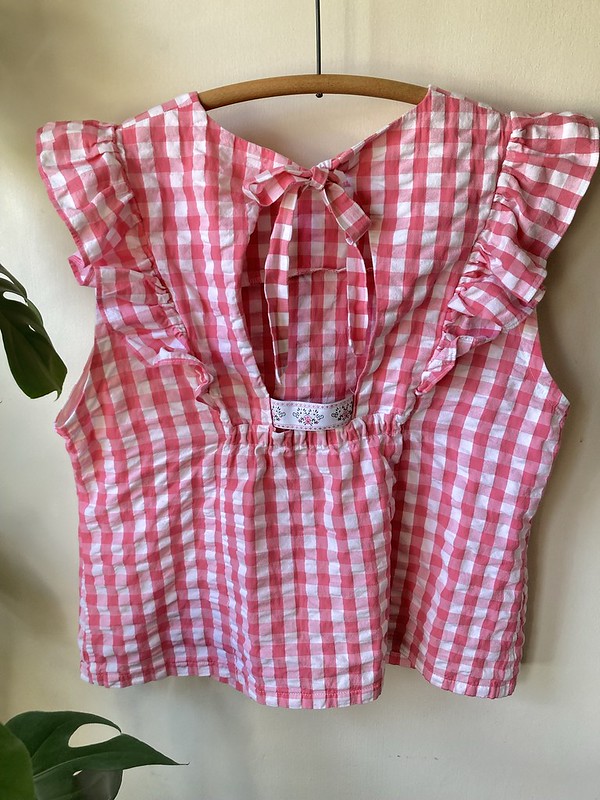
Once I got going, though, I really enjoyed making this. I was able to make most of it on a day that I unexpectedly had several hours to sew. I can’t remember the last time that happened! I put on some music and got to it! I was also really excited about this fabric. I’m sorry to say that I have often thought of Joann Fabrics as “the place fabric goes to die”. In the past, they have sometimes had great prints on poor quality cloth, but in recent years, they have started bringing in some better options. This 100% cotton seersucker gingham was from their POP! line for kids. I have found a couple of exciting fabrics (for me) in this line. I love the color and quality of this seersucker, and looking at it while sewing just made me more excited to wear it.
The pattern is a really interesting, unique design. I managed to finish this project a few days before fall officially started, when the weather was beautiful and warm without being hot. I immediately threw it in the washer to get the sewing marker out, and then ironed it and wore it as soon as I could! I love it! It feels really unique and fun, which is generally how I want my clothes to feel.
So, at the end of this pattern, I can say I did learn a sewing lesson. Trust the pattern until you find out you can’t, and approach your sewing practice with humility. I guess there is a life lesson there, because I think you should also approach life with humility. So there you go–sewing really is more than just a pleasant way to pass the time–it’s also occasionally a font of wisdom. 😉
P.S. Here are a few outtakes for you. My Mom sent us this blonde wig for fun and we clipped on some rainbow hair–it’s a makeover! Haha.
What seems like a story about a pattern, is actually a story about fabric. The wool/polyester waffle knit I chose to sew into a Visby Henley surprised me and caused the project to take an unexpected turn.
I love henley shirts for fall and winter. These long-sleeved knits with a short placket at the neck, epitomize rugged yet comfortable cool-weather style in my mind. Although I have hacked the Thread Theory men’s Strathcona Henley in the past to create such a top for myself, I was excited to try the Itch to Stitch Visby Henley & Top when it came out. Not only is it drafted for women, it has a raglan sleeve and a number of other options that could be fun to explore in the future.
After searching and considering different fabric options, I decided to try a wool/polyester waffle knit I found on e-bay. It was 80% New Zealand wool blended with 20% polyester at an affordable price, and the seller promised that although they didn’t cut straight, they cut long yards. And they weren’t kidding! When I got my fabric, I measured and found that they had given me an extra 2/3-3/4 of a yard!
The fabric felt like your typical, fairly thin waffle knit. It had just enough stretch for the pattern (barely!).
I like to wash my wool and, if it seems warranted, shrink it down as much as possible before sewing it up so that I can machine wash and dry the finished garment. Believe it or not, this usually works for me. I wasn’t sure what would happen with this fabric, so I cut a little test swatch and threw it in the washer. It showed some shrinkage, and it did change the hand slightly, but in a really nice way, making the fabric a bit fluffier and beefier.
After two test swatches, I threw in my yardage. I washed it a few times so it would shrink as much as it was going to. That’s when I started to feel some surprise. That extra yardage? It shrunk right out. What I mean is that the fabric shrunk down to the amount I had originally ordered, which was three yards. Maybe I had gone too far, but I LOVED the feel of the fulled (felted), shrunken fabric. It was so soft and nice!
Now it was too thick to make the henley, however, so I changed course and opted to try the basic top option. The pattern was easy and clear–no problems with the small exception of a slightly wavy neckline, which I figured would be fine after washing. I had sized up so the finished garment would be on the looser side.
The neckline has mostly settled and straightened since washing.
When I was finished, the fit was great. So was the feel! Rather than a shirt, this felt like a light, cozy sweater! I wore it once to test it out, and threw it in the wash, figuring I would just plan to wash it on cold and air dry it from here on out.
When I wore it next, it seemed…well…a little smaller. Was it still shrinking?! Even with a cold wash and no dryer? Yikes!
The next time I wore it, it fit perfectly–no longer oversized, but just right. However…if it shrinks any more, I’ll have to give it to one of my kids. I love my kids, but I want this shirt-sweater for me! Now the shirt has been relegated to the hand-wash pile (I don’t hand wash anything if I can help it, so it’s the only thing in the pile.).
The future of the shirt is unknown! I’ve just hand washed it, and it looks good, but now that it’s warming up, I’m going to put it away until cooler weather. Fingers crossed that it doesn’t shrink any further!
Takeaways? The Itch to Stitch Visby Henley & Top is a great pattern that I would happily make again. This fabric is wonderful, but if you try it, proceed with caution and don’t be as tough on it as I was. Happy sewing!
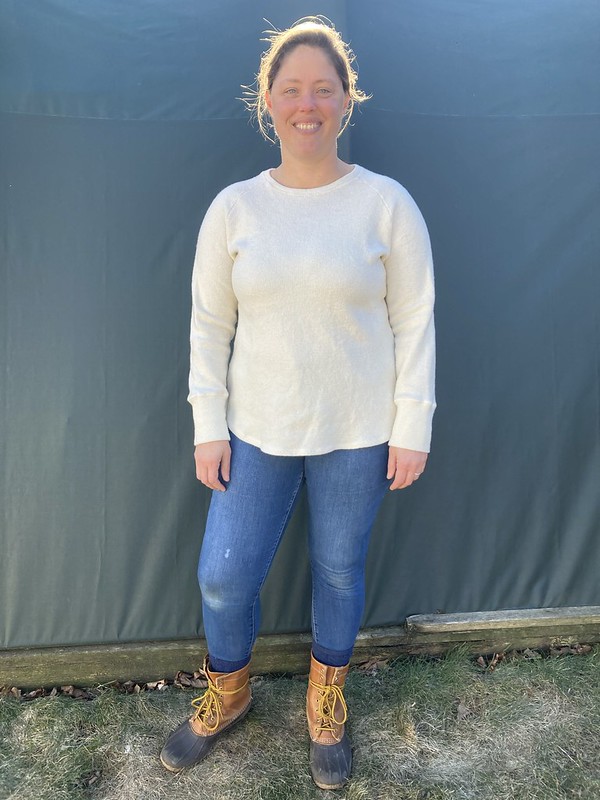
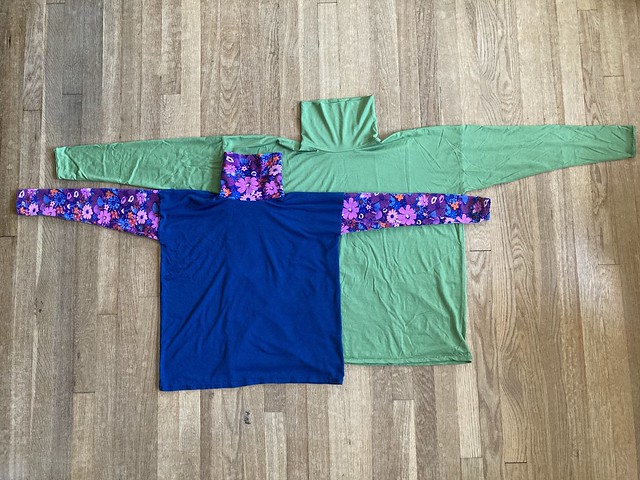
This is a free pattern for women and girls that comes with 28 sizes–pretty impressive! That is typical of Jalie’s patterns, making them a great value for money. I haven’t worn turtlenecks/roll-neck shirts in a few years, so I thought I would use this pattern to do a little scrap-busting and try the style out.
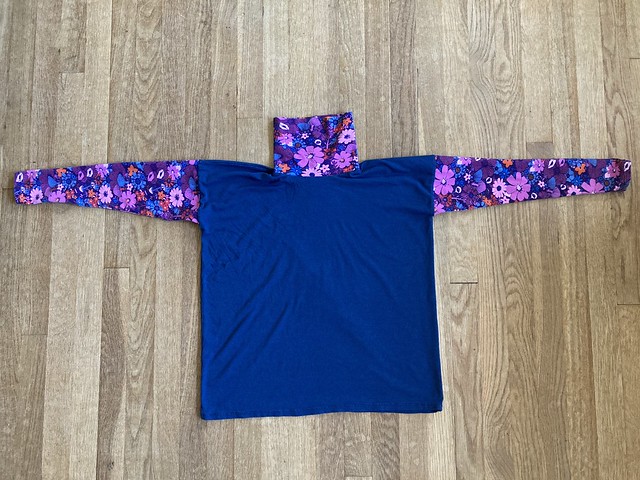
Like my last two sweaters (Engle and Wool & Honey), this pattern has a boxy/square body and fitted sleeves. Unlike those sweaters, however, this pattern has a drop-sleeve. I guess this is the year of that fun but odd silhouette for me! It’s not my favorite silhouette, but it’s interesting and comfortable. I used a green wool/Lycra jersey that I got from Fabric Mart Fabrics a number of years ago for my top and some navy and flower print cotton/Lycra jersey for a kid-sized top. I can’t remember where I got the navy, but the flower knit is an old Cotton + Steel fabric that I got from Pintuck & Purl some time ago.
For my top, my measurements put me in size Z for the bust and BB for the waist and hip. Because this is a boxy style, I opted to make a straight size Z. For the kid shirt, I made a straight size N. I used my serger for the main seams and my sewing machine for the hems.
The tops were pretty easy to sew. There weren’t any points where the instructions were unclear or where things got tricky, making this a nice, quick project.
Jalie’s instructions come in French and English and are not extensive, but are clear. This free and simple pattern would be a great way to get a feel for the company if you are interested in trying their patterns. While I haven’t tried many of their patterns, I know I can turn to them when I want a reasonable cost for a LOT of sizes and professional results, especially if I want to make activewear.
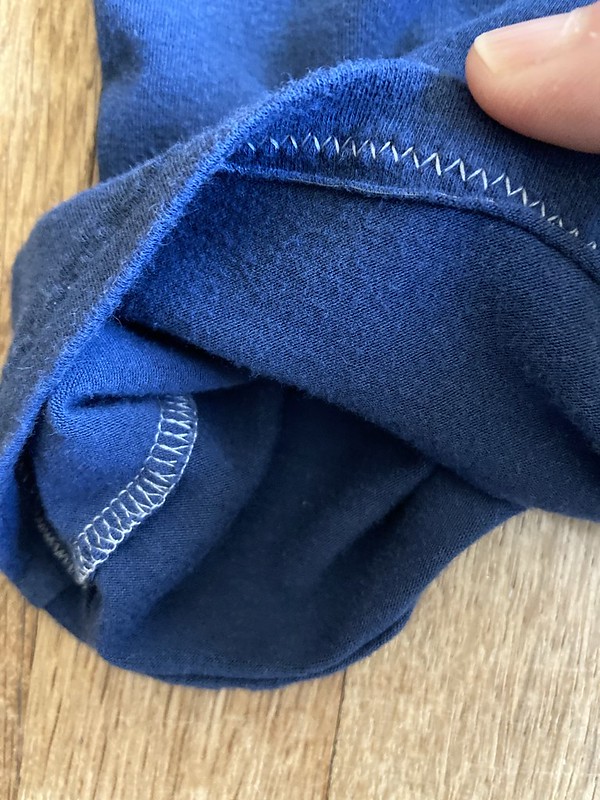
Let’s get back to the tops! The hems came out much better in the cotton/Lycra than in my thin wool/Lycra jersey where I ended up with some tunneling and scrunching.
Still, you only really see that up close, and it doesn’t affect the fit at all. The neck is a double layer of fabric, which both looks and feels good.
These tops turned out to be nice and comfy, and while I’m sort of over the whole extreme dropped sleeve look, I’m happy I made them and tried this pattern out.
I like how they look in the cotton better than in the wool, as this thin jersey, while comfortable, attracts lots of fuzzies, and is slightly on the pukey side of spring green. Still, it’s a great layering piece that will work in any sort of cool weather, and I do love having a few wool jersey tops in my wardrobe. I’ve made one other shirt in this fabric, which you can see here.
Look! It’s blue sky! (The photo shoots get silly more often than not.)
If I were to make this again, I would consider cotton/Lycra or a slightly heavier weight wool/Lycra . That’s not a “rule” of any sort, just my feelings after making this in these two different substrates.
Interestingly enough, Tessuti has a very similar free pattern, the Monroe Turtleneck, which you could also try if you are thinking of making a top like this, although it doesn’t have the extensive size range Jalie does. It would be fun to make both and compare them. If this is a style you are into, this is a great pattern. I like it, but don’t absolutely love it, although I do really like Jalie as a pattern company, and hope to make many more of their patterns in the future.
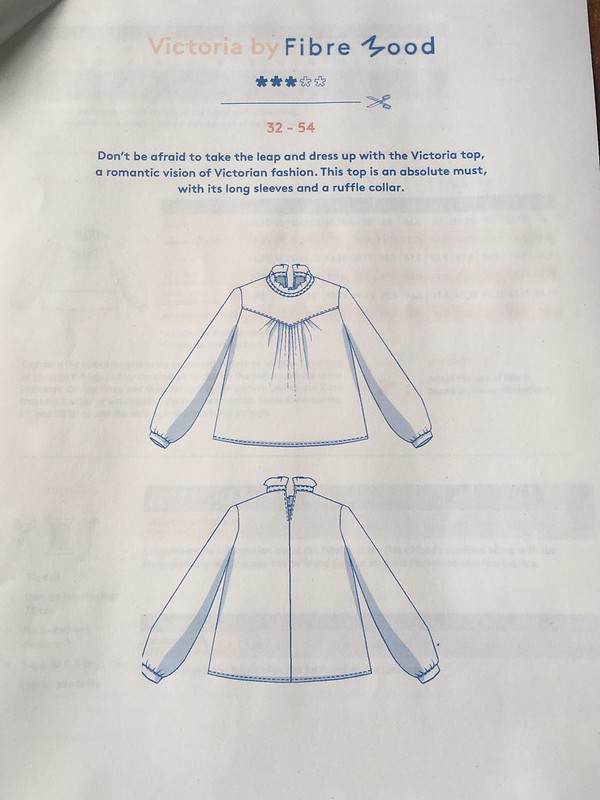
These days, I wear a lot of stretchy pants and t-shirts, which, honestly, I love, but I still like to make the occasional non-stretchy garment, too. 😉 The latest project I have to share with you is in that non-stretchy category and is a new style for me, which is fun! It’s the Victoria Blouse from Fibre Mood.
This pattern has a ruffled collar, triangular front yoke with gathers falling from it, and slightly puffed sleeves.
This isn’t a style that I have really worn before, but I love the romantic blouses we have been seeing in fashion and, consequently, in sewing patterns. They are so much fun to wear. When I finished this and put it on for the first time, it took me right back to the ’80’s, which was the last time styles like this were a thing. While I never would have worn this in the ’80’s, I really like it now!
Fibre Mood has offered various PDF patterns for free throughout the pandemic (so generous!) to help people keep sewing, as it’s a positive, stress-relieving activity for so many. I downloaded this several months ago when it was free and made it in the fall. After looking through my stash, I decided that the Victoria Blouse would be perfect in this cotton “Swiss Dot Voile” fabric from Fabric Mart (long since sold out). The fabric itself is really cool and can be used with either side as the right side. One side has little oblong embroidered shapes, and the other has fuzzy dots, typical of a swiss or clip dot fabric. I love this kind of fabric.
After printing and assembling this pattern, I had to add seam allowance, which is not my favorite thing. I think you have the option to print with or without seam allowance on Fibre Mood patterns at this point, although I could be wrong. The seam allowances they recommended on this pattern were different at different points. This is both good and bad–good because it eliminates waste from large seam allowances that you have to trim, and bad because you have to keep track of which piece has what seam allowance. To keep track, I wrote myself notes along the way. I figured it was good for me to try something different, even if I wasn’t sure that I would like it, because maybe I would come to like it or discover something new by trying it.
The directions instruct you to finish a lot of the seams with a serger. I have a serger now, but I don’t love how the finish looks, and while I want to use it when appropriate, I don’t want to serge all my seam allowances when there are often better quality choices out there. However, for this pattern, I decided to stick to my plan of following the directions, at least the first time through.
Before beginning, I did a major broad back adjustment (which is typical for me). I cut a 48 bust and graded out to a 50 hip. Overall, I liked sewing this pattern. The instructions were well laid out. I followed them pretty faithfully, except that I put my sleeves in flat rather than setting them in. One thing I liked is how they put the collar and cuffs on, which involves topstitching from the outside rather than trying to stitch in the ditch so that there is no visible stitching on the outside. I find it hard to do that well while catching the fabric underneath, so I like the method that Fibre Mood chose. I think it’s easier and looks nice.
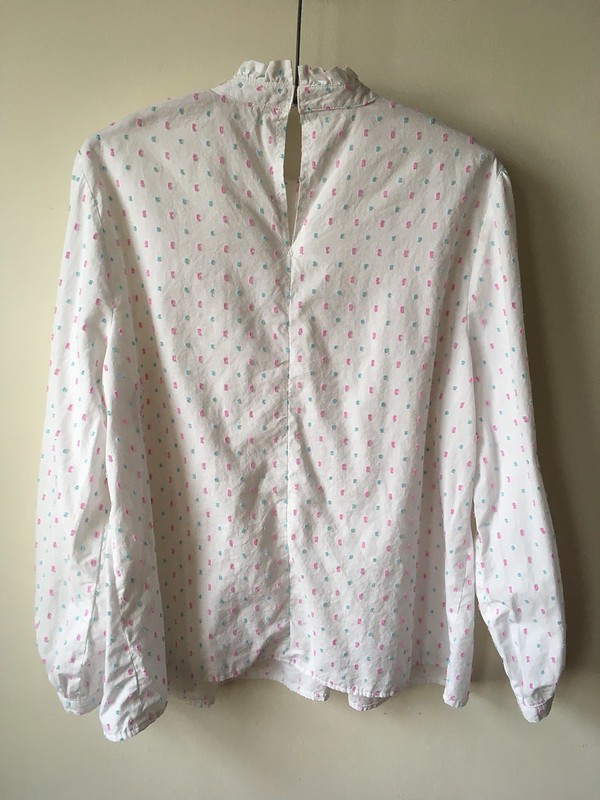
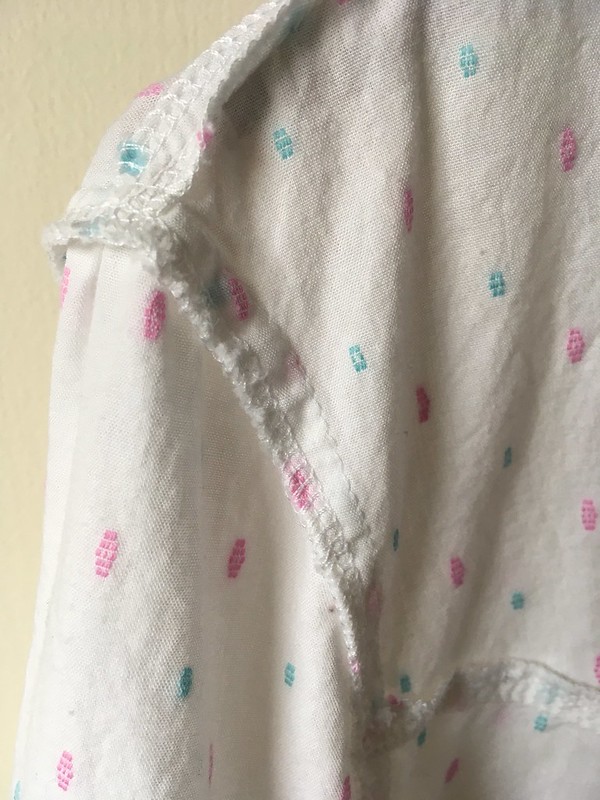
The back neck slit is only turned once and stitched, so I added another line of stitching to (hopefully) keep it from fraying too far, but there could definitely be a better finish there.
Overall, I am really happy with the finished blouse. In fact, I love it, especially tucked in. I found it to be comfortable overall with enough neck and wrist room. The sleeves are puffy, but not so large that they get in the way.
Some possible changes I would consider making next time:
*raise the armhole to allow for better/more arm movement
*take a small horizontal wedge out of the back just below the collar to get the back neck slit to sit more smoothly against the body
*consider if a different neck closure would work better–maybe buttons with elastic loops? I find that the hooks and eyes sometimes unhook as I wear the shirt.
*consider lengthening the shirt if I know I will always wear it tucked in. It is the perfect length for me to wear without tucking it in, but it tends to come untucked in the back when I try to wear it tucked in.
“Look! The sun is out!” Sometimes we try to get creative when taking pictures…with mixed results. Haha!
These are all small and optional suggestions because, overall, I love this shirt. I feel good when I wear it, and I would make another. For now, I think I will put it away in order to have a nice surprise for spring.
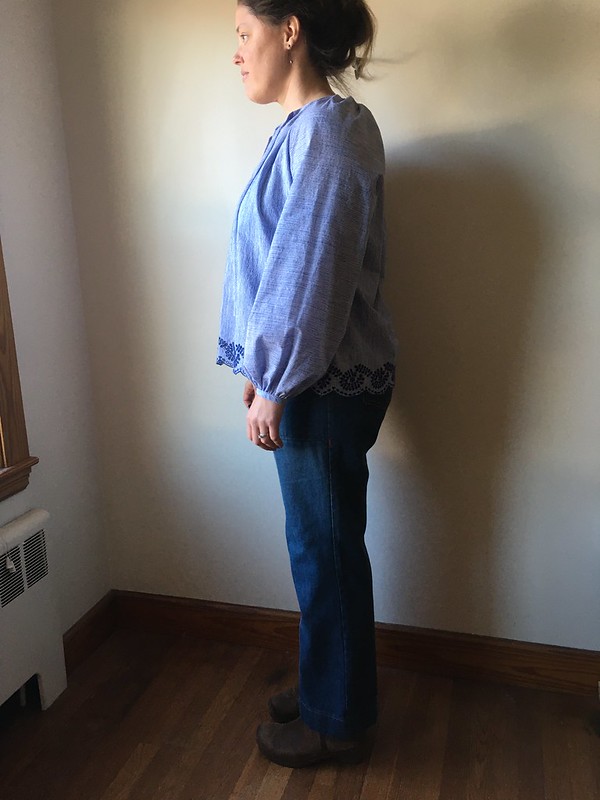
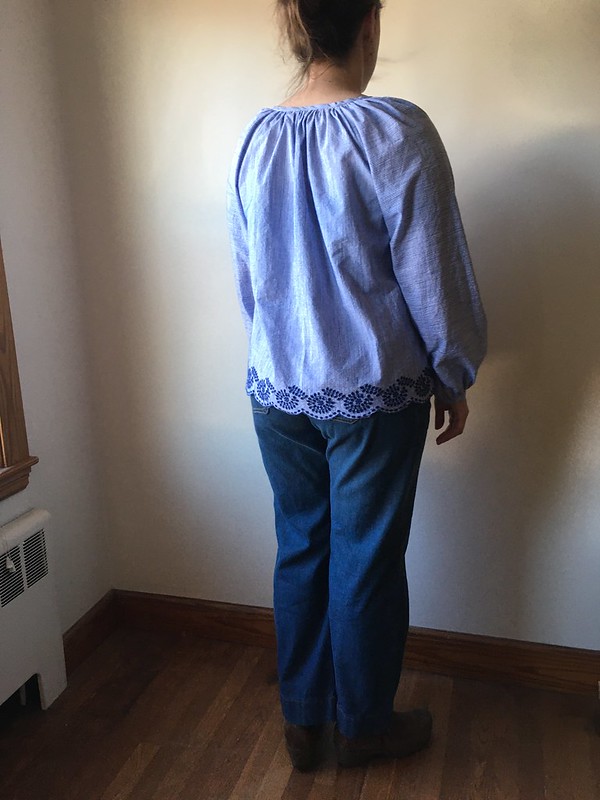
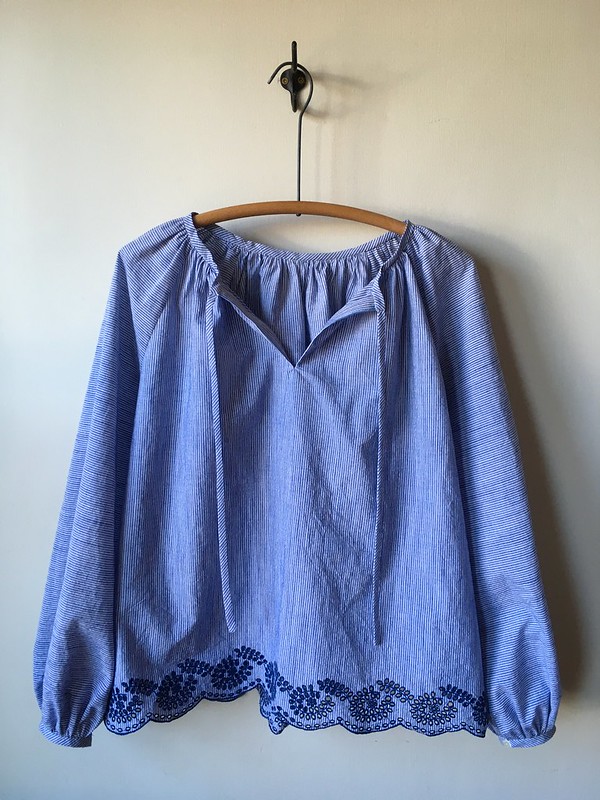
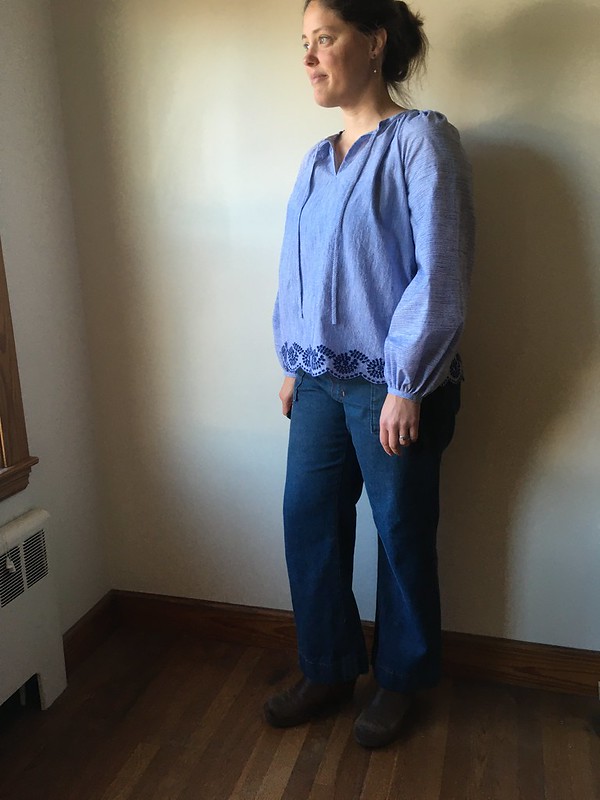
Today’s project is New Look 6472, a peasant-style blouse in a lightweight striped cotton with an embroidered edge. I love the boho, ’70’s-inspired style that’s been going around, and this pattern is perfect for that.
I found this fabric in the clearance section of Hobby Lobby in Indiana this summer. I had planned to make a skirt with it, but changed my mind when considering what fabric to use for a first try of this pattern. I decided to make View A with the sleeves of View C in a size 18 bust and 20 waist and hip.
l
In order to use the fabric well, I made a few adjustments to the pattern. There are two lengths included. However, the embroidered edge seemed perfect for the bottom, and I wanted it to fall at midhip, so I shorted it 1.5″ from the shorter view. I also took a risk and lined up the finished embroidered edge straight to the bottom of the front and back pattern pieces, even though it threw the grainline off a bit and added a wedge of fabric into the center front and back. I figured I could probably gather that into the neckline.
Luckily it didn’t seem like a broadback adjustment was necessary on this pattern, and the little bit of fabric those wedges added seemed like extra insurance.
l
l
The pattern wasn’t too difficult, which was nice after all the changes I attempted on my last project. There were a few little things I would change. I think they forgot a step between steps 11 and 12. It should direct you to press the unsewn long raw edge of the binding to the wrong side at 3/8″.
Also, there was no direction to trim the seam allowance around the neckline, but I thought it seemed like a good idea. If you leave it untrimmed, it can create some structure to wrap the neckline binding around, but that seemed like it might be a little too stiff for this shirt.
Additionally, when making the neck ties, I think it would be easier to fold the tie right sides together the long way, sew one short end, pivot, and sew the long edge, leaving the thread tails from the beginning of your sewing long. You can then thread them through a needle, push that needle to the inside and push it through the tube and out the open end, turning the tie right side out.
l
I finished the inside with French seams, which I love. I also like the little buttons on the sleeves, but I didn’t plan ahead to find some nice looking elastic for my button loops, so I used the 1/8″ white elastic I had on hand. The buttons are vintage ones from my in-laws (thanks, Mom and Dad!).
I’m happy with how this shirt turned out. I suspect that the armholes might need some fitting tweaks that I don’t yet know how to do, but I have to say that other than trying it out under a warm sweater the day I finished it, I haven’t had a chance to wear it. It’s been pretty cold here. My plan was to wear it once or twice and then put it away for the spring, but it may go to a family member who fell in love with it. I love it too, but I actually have a fair number of shirts, and I can always make another one…or borrow it back. 😉
I’m really happy to have found a pattern in this style that I like, and I hope to make more of these–maybe in a drapey fabric next time!