Tag Archives: denim

Simplicity 8841 Tapered Pants in Pink Denim…and Exciting Topsfield Fair News!

Standard
Simplicity 8841 Tapered Pants in Pink Denim…and Exciting Topsfield Fair News!

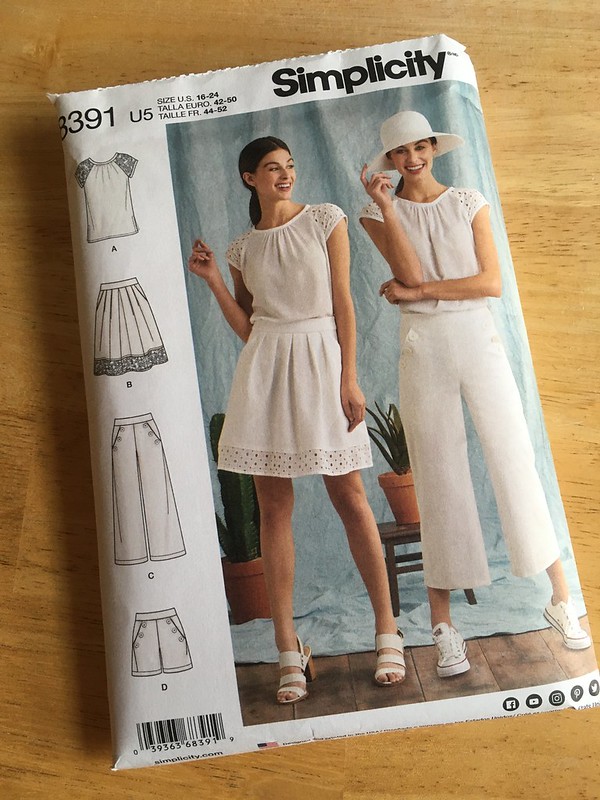
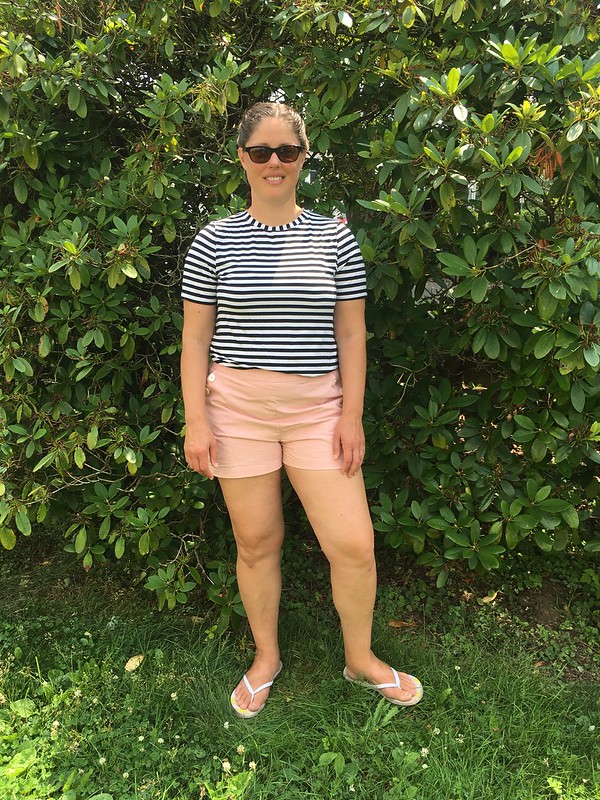
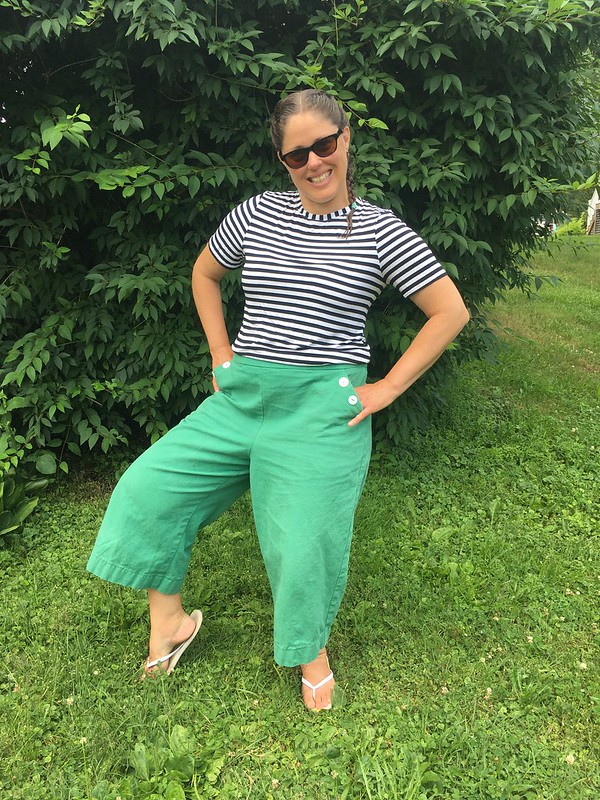
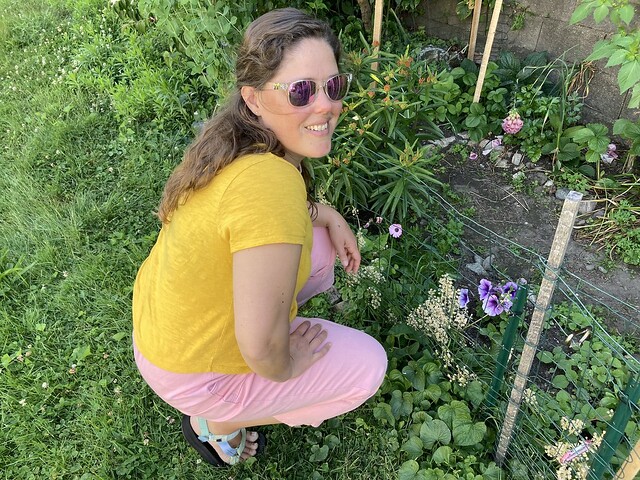
Let’s start with the pants! These pants, made using Simplicity 8841, are a repeat pattern for me–not something I always do. Each sewist/craftsman/artist has a way they like to dive into projects, and for me, it usually involves trying something new, often a new pattern, so I rarely circle back to previous patterns unless I really liked them and want more versions in my closet or they are just right for the fabric I want to use. I really liked the style of these pants, and I wear my first version a lot. However, I kind of overfit that version, and I thought I could do better…plus I really did want more of these in my closet!

Simplicity 8841 Tapered Pants in Pink Denim
My husband took these pictures for me when it was still summer, but these pants will work in multiple seasons.

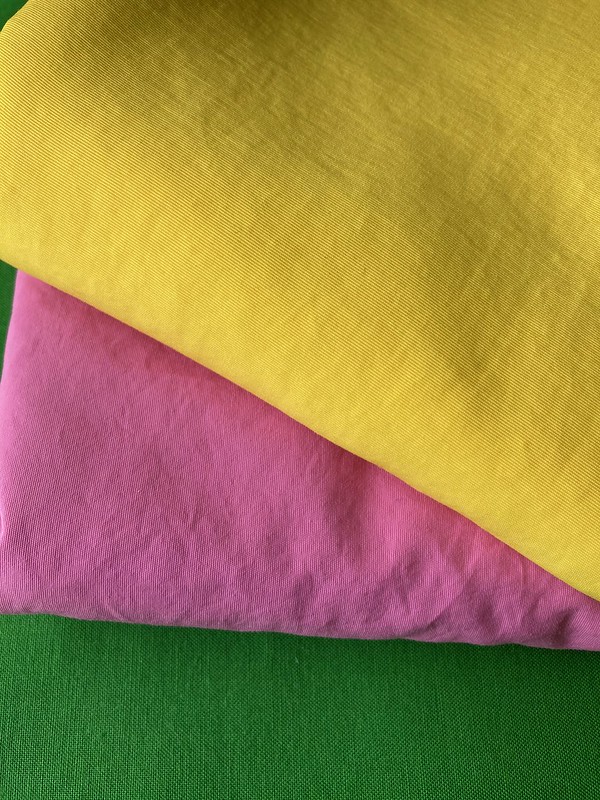
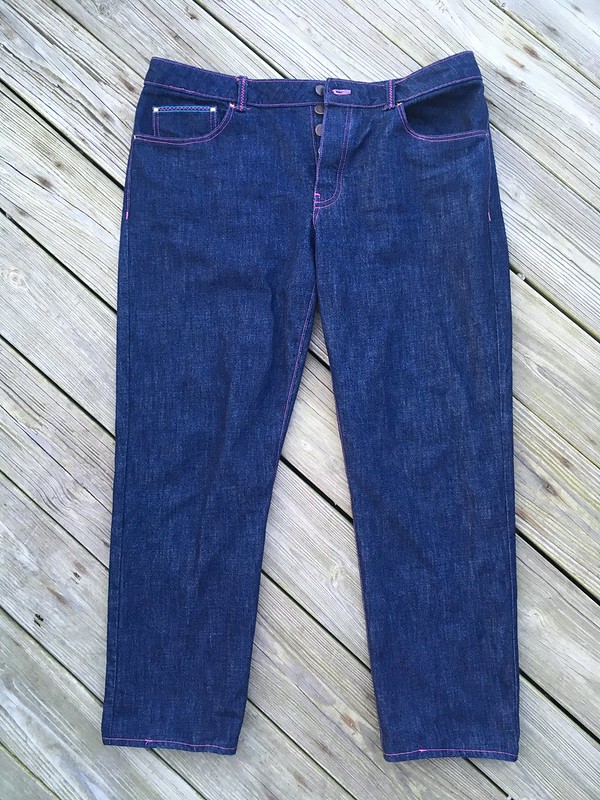
The other thing that drove this repeat performance was some great denim I found at Joann’s. It was 100% cotton, and pink from being vegetable-dyed. The vegetable dye made me curious about how the color would hold…and I really like this shade of pink. Simplicity 8841 seemed like a good match for the denim. I got what I needed when it was on sale. Yay!

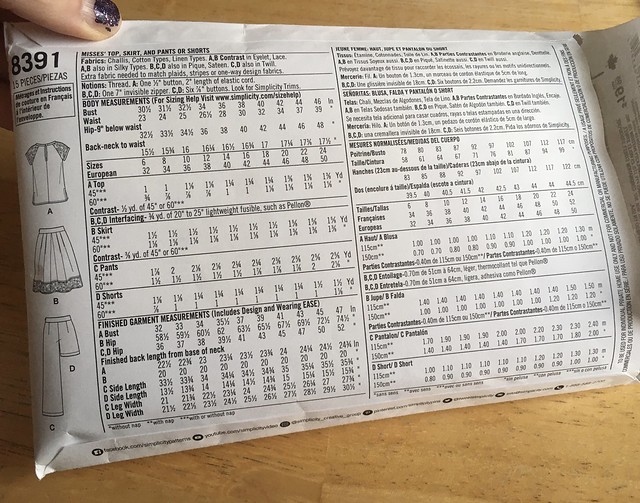
According to my measurements, I was a size 24 in this pattern. It only went up to a 22, so I did some very inexpert, cheater-style grading. I looked at the distance between the last few pattern sizes, and sized up the largest size by that amount, by just tracing around it, and trying to make things look like they would have if there had been one more size. I wanted to make View D, but with the longer length of View C. This was pretty easy to do.

Simplicity 8841 Tapered Pants in Pink Denim

l

Simplicity 8841 Tapered Pants in Pink Denim

Using the book, Sewing Pants that Fit from The Singer Sewing Reference Library, I added 1.5″ to the back crotch length by making a wedge adjustment for a protruding seat. This entailed cutting into my back pattern piece from the crotch seam to the hip, without cutting all the way through. I then tipped the top of the pattern up 1.5″ making the back crotch seam of the pattern longer. After doing that, you have to smooth out the hip/outseam because making that wedge creates a little divot at the side seam.

Then I lengthened the back crotch point by 1.5″ and lowered it 0.25″ to true the pattern. This can help with full thighs or a protruding seat. I have found that it works for me, whatever the reason may be. I tend to need more length in the back with Big 4 patterns. Somehow it always feels a little bit like trial and error, but I usually end up making the maximum crotch seam length adjustments on the back pattern piece and find those really comfortable.

Simplicity 8841 Tapered Pants in Pink Denim
This may not be the most helpful picture, but here is the top of the back pattern piece. The crotch seam I have mentions is that curved left edge, and the hip/outseam is the right edge. You can kind of see the wedge shape running horizontally through the pattern piece.

These pants are pretty straightforward to put together with good directions.

Simplicity 8841 Tapered Pants in Pink Denim
Simplicity 8841, front

l

Simplicity 8841 Tapered Pants in Pink Denim
Simplicity 8841, back

l

Simplicity 8841 Tapered Pants in Pink Denim
Simplicity 8841, patch pocket detail; I have traced this patch pocket onto tag board and use it whenever I want to add patch pockets with this shape to clothes.

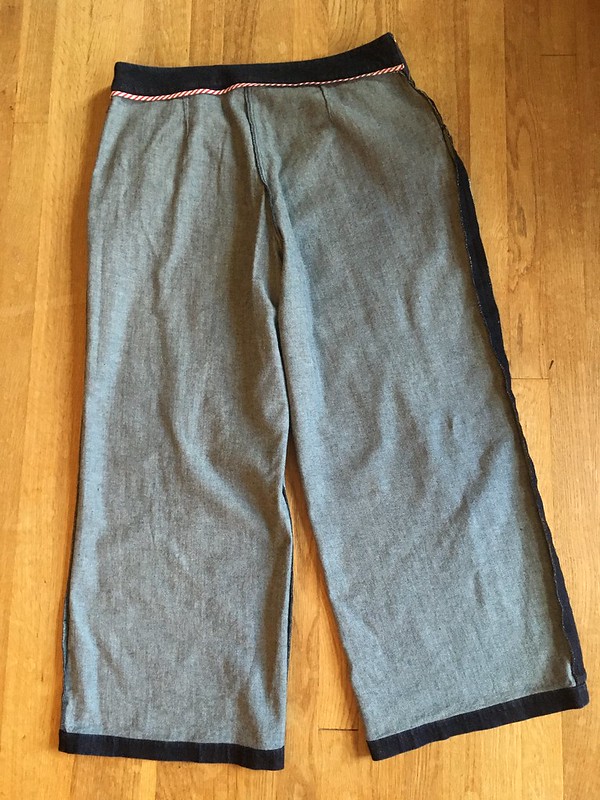
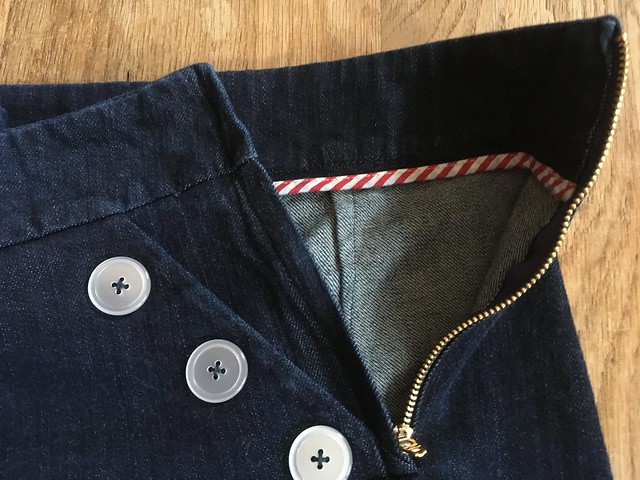
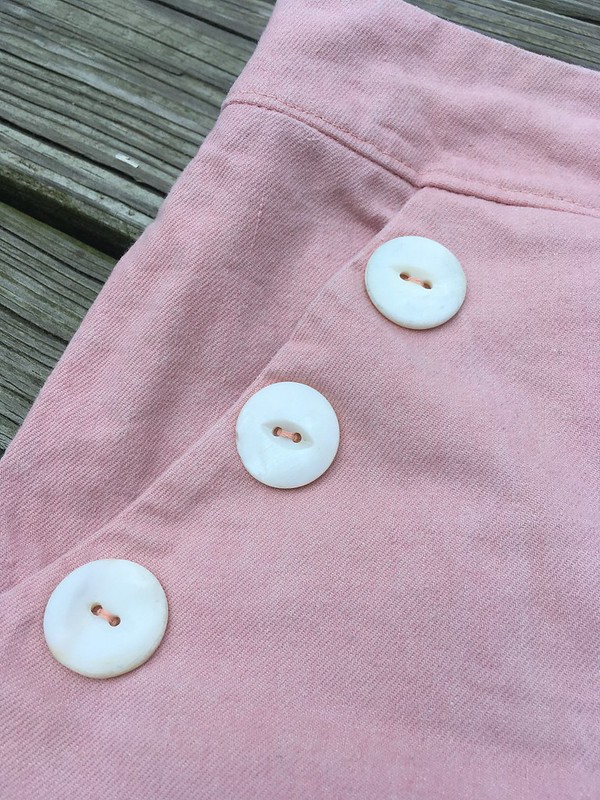
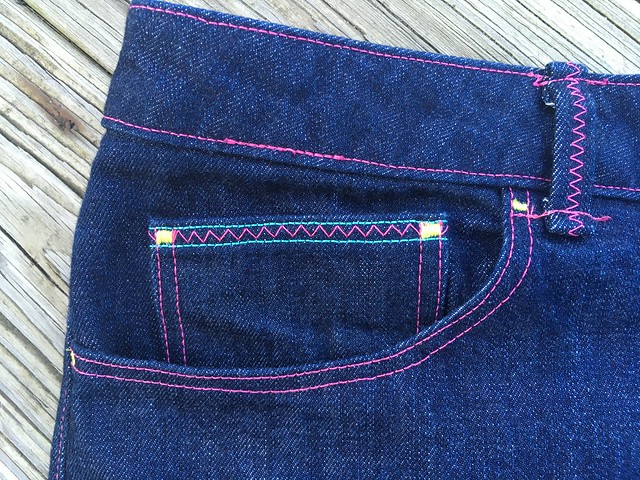
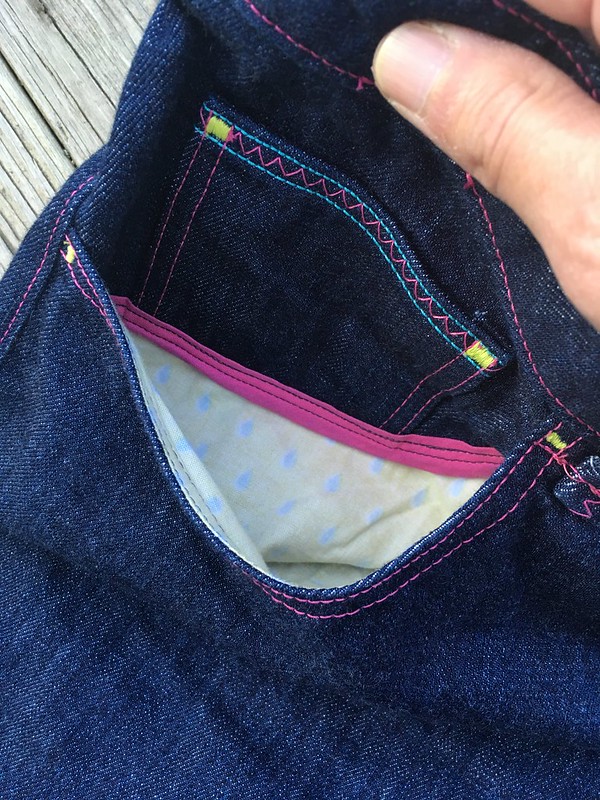
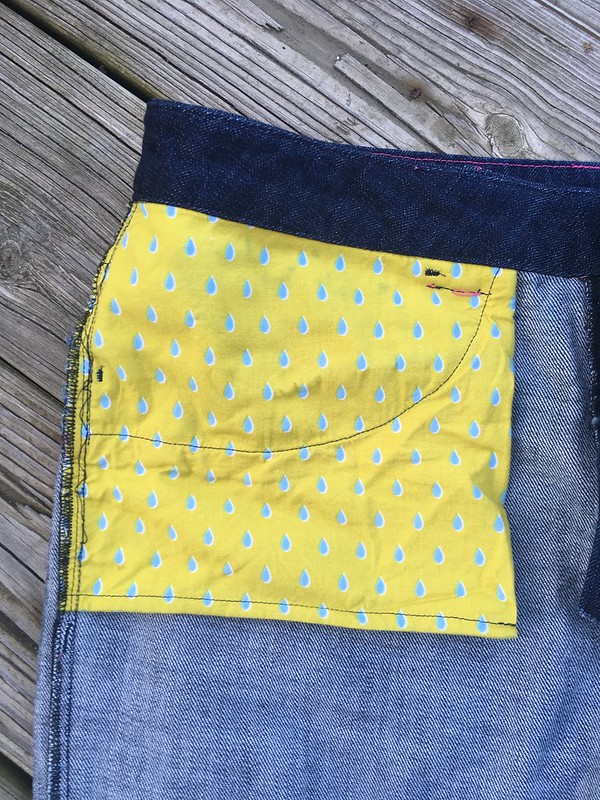
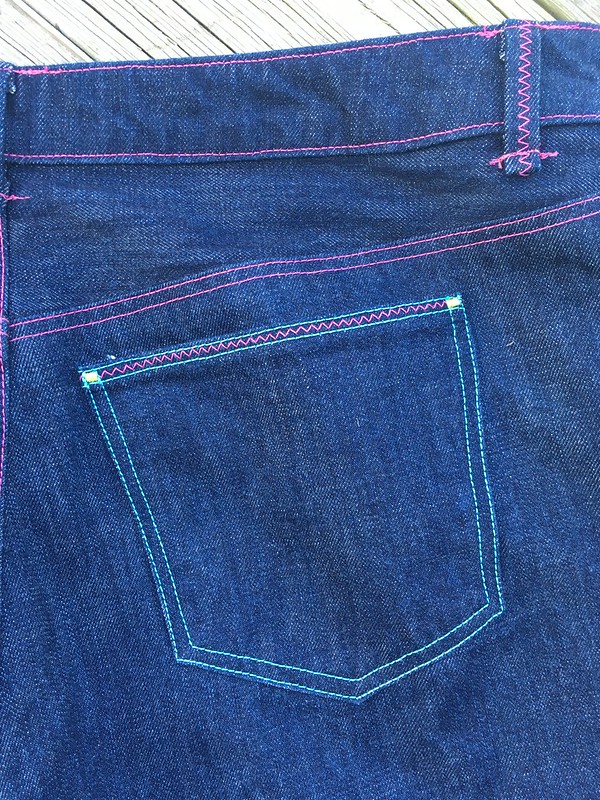
I changed up how I inserted the elastic into the waistband a little bit, but otherwise followed the directions as written. Since these pants have no fly, and only front patch pockets, I pushed myself to finish them before meeting up with a friend who was visiting. It’s always really fun to have something new to wear for something like that, and it’s good for me to occasionally give myself artificial deadlines to speed a project on.

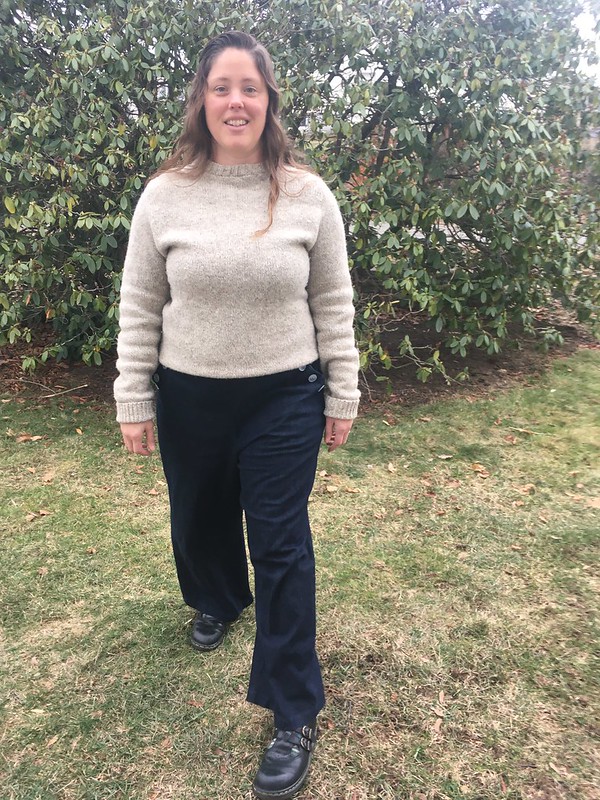
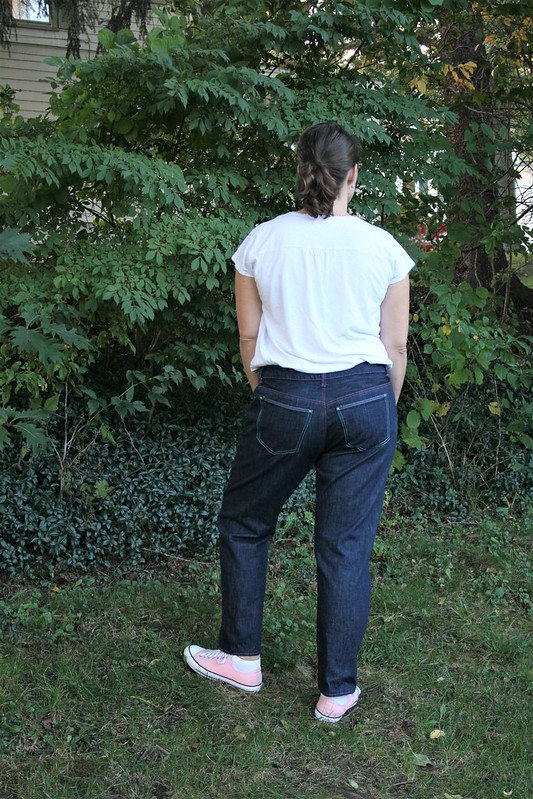
Once I started wearing the pants, I had a few thoughts about them. They are definitely a style I like, and they’re very comfortable. The dye in the fabric seems to be holding well, too.

Simplicity 8841 Tapered Pants in Pink Denim

l

Simplicity 8841 Tapered Pants in Pink Denim

I’m not sure I love how they look, even though I love how they feel. They look a little too big to me. I’m all about preserving design ease and not making the smallest size you can squeeze your body into, but maybe I could have made these a little smaller, especially since the size 22 pants that I made do still fit. The other iffy part is that the waistband doesn’t feel as strong as I want it to. The pants stay up just fine, but it feels like if I load up my pockets, things could get saggy. Yikes.

Simplicity 8841 Tapered Pants in Pink Denim

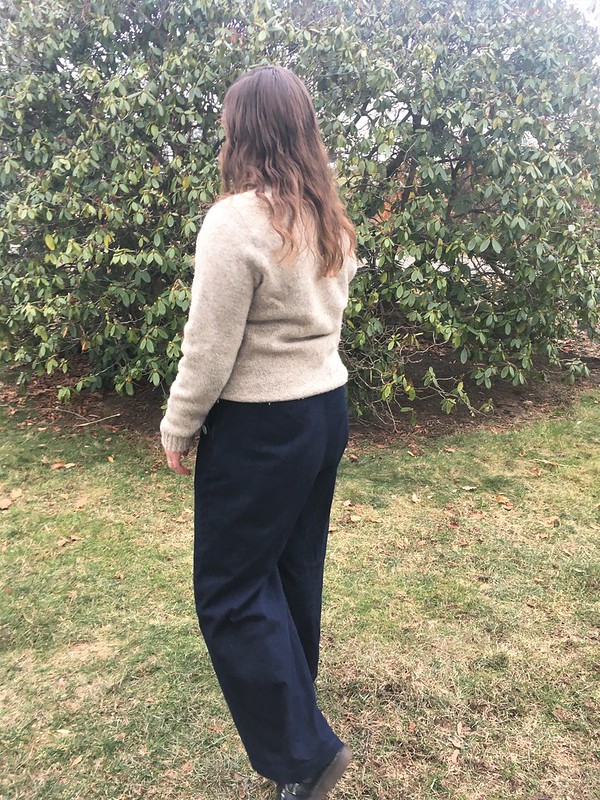
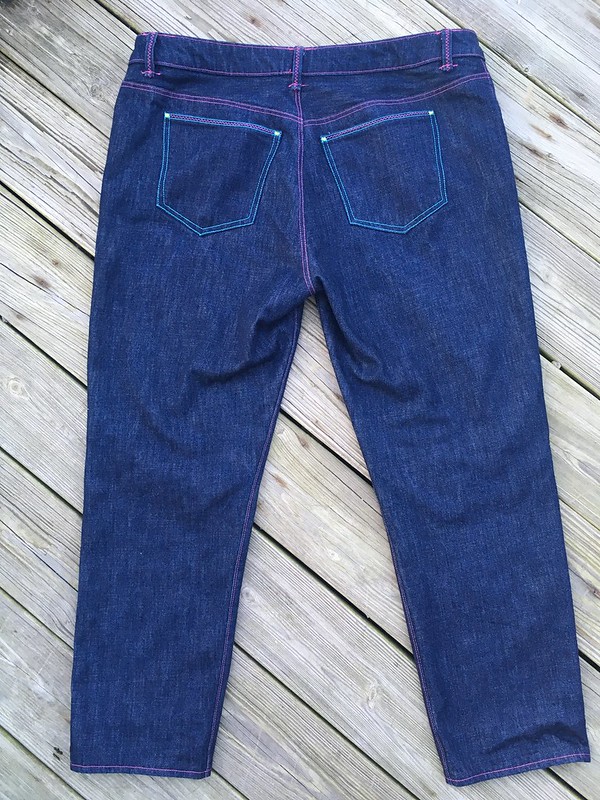
I have toyed with the idea of taking off the waistband and cutting a new one that would allow for 2″ wide elastic, like the Elizabeth Suzann Clyde Pants pattern, but I cannot tell you how much I really don’t like going back into patterns once I have finished them. I know they would be more wearable if I altered them, but the joy of alterations is not the reason I sew. The fact that they do fit and are comfortable will probably be enough for me to wear them and not bother to alter them. The good news is that the paper pattern adjustments I made were good. I don’t feel like the back of the pants are too short or tight (i.e. no wedgies or “plumber’s butt”–yay!). They feel just right.

Simplicity 8841 Tapered Pants in Pink Denim

The real kicker, though, is that while writing this, I looked back at the blog post I wrote for the first pair of pants I made, and those had the same problems! Yes, if I had carefully read my own post before starting on these, I wouldn’t have graded up, and I probably would have tapered the legs of the pants. I still would have made the flat pattern adjustments I made this time–I did remember the need for those–but I could have made an even better pair of pants if I had listened to my past self and reminded myself of all the changes that would have been helpful. Oops.

So, I guess this project is a little bit of a mixed bag, but overall good. I do recommend the pattern if you are looking for a simple pair of elastic-waist pants. These could definitely work, construction-wise, for a beginner, and they are loose enough that you wouldn’t have to think about fitting to the level you would with a pair of skinny jeans or something like that. I would potentially make these again, with some slight tweaks (after actually reading this post and my last one; haha).
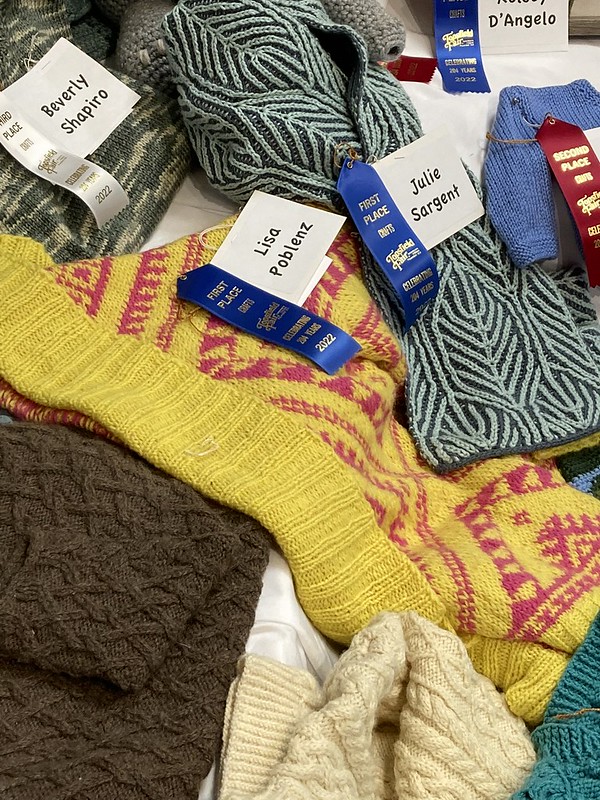
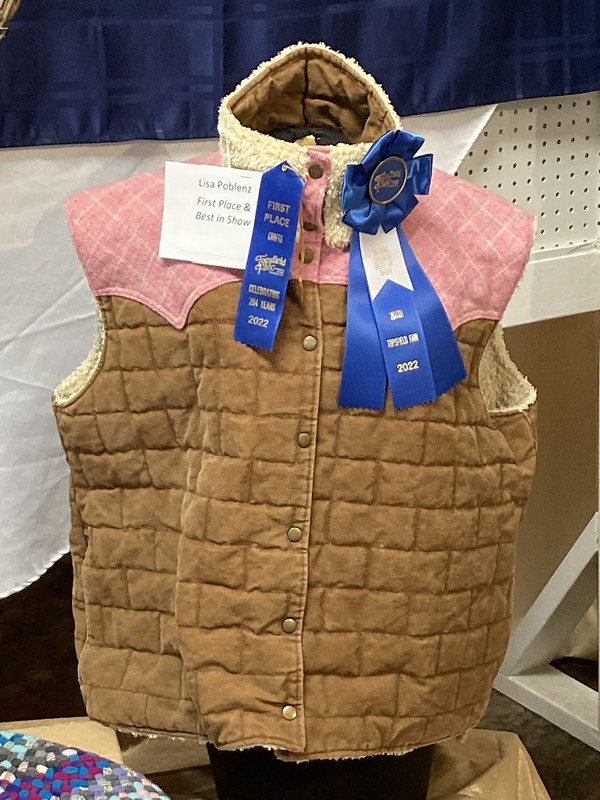
News from the Fair!

And now for something unrelated, but awesome! If you read this blog regularly, you may remember that I submitted some garments to the Topsfield (Massachusetts) Fair for the first time. Well, the cardigan I knitted got a first place ribbon, and the reversible vest I sewed got both a first place ribbon and Best in Show! I was so excited!!! I knew that I had worked up to my skill level at the time and pushed myself beyond on those projects, but it’s really, really nice to occasionally have some outside validation for your work, from people who also make things.

Topsfield Fair 2022
My Arrowhead Cardigan at the Topsfield Fair

l

Topsfield Fair 2022
Me at the knitting exhibit. You can sort of see my cardigan by my left hand. There were so many great projects!

l

Topsfield Fair 2022
My vest and both its ribbons at the Topsfield Fair!!!

l

Topsfield Fair 2022
This exhibit had multiple types of crafts. You can see my vest by my right hand.

Making clothes is my art practice. My work will probably never be in a gallery, and I don’t want to turn it into a business, so I don’t get that kind of positive professional critique on a normal basis, so it means a lot. That being said, I do very much appreciate all the cheerleading and support I get from my family and friends. That is what has really kept me going all these years.

My parents and kids were with me when I went to see all the entries, and they can tell you that I had a pretty big smile on my face. What a great experience!!!

Spring Sewing Plans: My Personal Spring Outfit Challenge

Standard
Spring Sewing Plans:  My Personal Spring Outfit Challenge

*I’m reposting this because the pictures were only showing as links when viewed on a phone. I’m sorry for any confusion! Hopefully you can see all my pictures now, no matter what type of device you are reading on.*

Hi, everyone! I have something a little different for you today. Normally, I do a photography post the last Friday of every month, but I never made the time to get out and take those photos in March. So instead, I want to share a little challenge I have set myself for the spring.

My Personal Spring Outfit Challenge

Now, I love planning sewing projects–and knitting projects, actually, but especially sewing projects. I wanted to try something new for the spring–a personal challenge of some kind. I know there are a million sewing challenges floating around the internet, but I usually have so many ideas of my own that I find it hard to take time away from my never-ending list of fun possibilities to follow the guidelines of a challenge. So, I decided to create my own! I want to try to make myself a spring outfit that all goes together. My plan is to make as many of the pieces as I can. While this isn’t an especially novel idea in and of itself, it’s distinctly different from how I usually work, which makes it fun and refreshing for me.

Here’s a broad outline of what I want to make: a long-sleeved t-shirt, some pants, and a windbreaker for my main pieces. In addition, I plan to make undergarments (which won’t show up here, as I don’t feel comfortable blogging those, but which I will still make), socks, and a hat. I haven’t learned to make shoes, so I’ll exclude those.

My Personal Spring Outfit Challenge

All right! That seems like a pretty good list. Now let’s break it down.

Where I live, spring starts off quite cool and takes awhile to warm up. Every year, I wish I had some Breton-striped long-sleeved shirts in bright colors for spring time, so that or something similar is what I want to make for my shirt. (Never heard of Breton stripes? Check out this article on the history of Breton Stripes.)I decided that I would pick my pattern based on what fabric I found. I could use the Union St. Tee from Hey June Handmade if my fabric was pretty stretchy or Vogue 8950 if I found two coordinating stretchy fabrics. If the fabric was low-stretch, I could make the Coco Top from Tilly and the Buttons.

My Personal Spring Outfit Challenge

After lots of deliberation, I ordered this coral pink and white striped sweater knit from Fashion Fabrics Club. It’s low stretch, so I’ll make the Coco top with long sleeves and boat neckline.

My Personal Spring Outfit Challenge

Since a Breton-striped shirt has nautical roots, I thought it would be fun to make the Sailor Pants, Pattern 229, from Folkwear, which I got for Christmas.

My Personal Spring Outfit Challenge

I found some non-stretch, medium/heavy weight denim also at Fashion Fabrics Club. I’ll admit, I’m a little nervous about this, but I plan to compare the pattern to jeans patterns that fit me as well as some genuine sailor pants that I own. The pants I have are the same 13-button style, but are made in a wool gabardine (I think). They are truly high-rise and don’t have quite the bell-bottom shape of the Folkwear pattern. I plan to use them as a guide. I may even make a muslin. All the extra steps and double checking are, admittedly, the kinds of things that usually lead me to procrastinate, so fingers crossed on these.

For my windbreaker, I want to use the sweatshirt pattern in vintage McCall’s 5303.

My Personal Spring Outfit Challenge

I have had this pattern for a long time. It’s one I got from my Mom’s pattern stash, although she gave me the medium instead of the large. After looking at the finished measurements, I decided to hunt down a large online, even though anything from the medium through the extra large would fit. I think the windbreaker/sweatshirt will be great to throw on when the wind whips up on the beach, and in a Supplex/Taslan, which is water resistant, it will even keep sprinkles off. It doesn’t hurt that Supplex/Taslan also blocks a good amount of UV rays. Woven Supplex is something I have wanted to try more of for awhile now. Previously I used a tiny bit for the neckline placket and pocket of my Patagonia-inspired sweatshirt, but that wasn’t enough to get a real feel for the fabric. I ordered a bunch from the Rainshed so I can make this and hopefully some hiking pants and board shorts later this year. My original plan was to make the main part in yellow with magenta facings on the hood.

My Personal Spring Outfit Challenge

After looking at the various colors I ordered, however, I think I would rather make the main part in yellow with this “Candy” pink for the hood facings. I do need the Candy pink for another project as well, but I’m hoping that with some careful cutting, I’ll be able to make it work for both.

My Personal Spring Outfit Challenge

For the socks, I found the free Sew It Forward Socks from Ellie & Mac, a sewing company that is new to me.

My Personal Spring Outfit Challenge

Free patterns are such a great way to try out a new company, and a sock pattern I could sew was right up my alley. I’m not quite sure what fabric I want to use for these, but I’m hoping to use up some of my t-shirt scraps.

My Personal Spring Outfit Challenge

Because it is often cool here during a lot of the spring, I thought a hat might be a good idea as well. I plan to make The Oslo Hat–Mohair Edition from Petite Knit. It will be nice to throw a little knitting into the mix.

My Personal Spring Outfit Challenge

Maggie at Pintuck & Purl gave me some mystery yarn on a cone and after doing some tests, I’d guess it’s a wool fingering weight yarn. I plan to pair it with some silk mohair from The Farmer’s Daughter Fibers to make this hat. I picked out the color “Stagecoach Mary” from their Mighty Mo line over on the Wool & Co. website.

My Personal Spring Outfit Challenge

If the season gets ahead of me and warms up before I finish with this, I still plan to make it, but I’ll consider substituting a bag pattern or just taking this off my spring outfit list without substituting something else for it.

And that’s it! I’m really excited about this! Even when I work in larger batches of several projects at once, I don’t usually try to coordinate my projects, so it’s fun to do something a little different. We’ll see how I get on as the season progresses. I have a few things to finish up, and then I plan to get started tracing all my patterns. As I get going, I’ll post some projects that I finished recently, and by the time I’m done showing you those, I bet I’ll have some of this challenge finished! If this sounds fun, feel free to join me and make your own spring outfit using whatever parameters sound good to you, then leave me a link in my comments so I can check out what you’re up to!

Sailor-Inspired Pants! Simplicity 8391 in Denim

Standard
Sailor-Inspired Pants!  Simplicity 8391 in Denim

I’ve met some serious secret pajama goals with this pair of pants. In making these wide-legged, comfortable, sailor-inspired jeans, I’m revisiting a pattern I tried for the first time last summer: Simplicity 8391, view C.

Sailor-Inspired Pants!  Simplicity 8391 in Denim
Simplicity 8391
Sailor-Inspired Pants!  Simplicity 8391 in Denim

Only this time I added seven inches to the length of the cropped pants in the pattern to make full-length pants/trousers, and I made them in denim because after several years of skinny jeans, I’m ready to let my legs out of prison, at least some of the time. Plus, these feel about as great as a nice pair of pajama pants.

Sailor-Inspired Pants!  Simplicity 8391 in Denim
Family help with pictures means things get silly.

I made these from a lighter midweight denim from Fabric Place Basement in Natick, MA. Fabric Place Basement is turning out to be a good source of denim for me. This denim was nicely drapey rather than stiff, perfect for wide leg pants.

Sailor-Inspired Pants!  Simplicity 8391 in Denim

I cut a 22. Really, I just altered the pattern I used this summer by adding length. My hem is 1.25 inches, but next time, I think I would make it an inch deeper, so I’d add one more inch to the length, allowing me 2.25 inches for my hem.

Sailor-Inspired Pants!  Simplicity 8391 in Denim
Pants, inside front
Sailor-Inspired Pants!  Simplicity 8391 in Denim
Pants, inside back

I changed the invisible zipper the pattern calls for to a lapped zipper with the help of Gertie’s New Book for Better Sewing by Gretchen Hirsch (the machine-sewn lapped zipper directions). I wanted to use a larger, more heavy duty jeans zipper.

Sailor-Inspired Pants!  Simplicity 8391 in Denim

That went pretty well, but I didn’t think about the best way to attach everything, so I sewed the zip to the pants and waistband, and then had some trouble figuring out how to secure the waistband facing without it interfering with the zipper. I got it in the end, but there’s probably a better way to do it. I also had some trouble closing the rest of the seam below the zip, so I used a combination of hand and machine sewing.

I covered the bottom edge of the waistband facing with a cute, striped vintage bias tape. I should have used double fold bias tape rather than single, or just done a Hong Kong seam finish rather than binding the edge, but I really wanted those stripes.

Sailor-Inspired Pants!  Simplicity 8391 in Denim

Normally, with jeans, I use a zigzag stitch to finish the seams, but now that I have a serger, I serged all my seam allowances, which looks a lot neater. I’m really happy with that.

I love the large pockets and the comfortable straight leg in this pattern. The denim I used also seems to have a good amount of mechanical stretch, which adds to the comfort, and the jeans zipper feels much more secure than the invisible zipper in my last pair.

Sailor-Inspired Pants!  Simplicity 8391 in Denim

I really love looser pants in the winter so I can fit a pair of long underwear underneath whenever necessary, but I think these will actually work year-round.

Sailor-Inspired Pants!  Simplicity 8391 in Denim

While I’m starting to think that, overall, I like a straight leg pant better than a wide leg style, as a straight leg is slightly narrower, this pattern is so cute and comfy that I would definitely make it again.

Sailor-Inspired Pants!  Simplicity 8391 in Denim

It’s also really nice to have more than one style of jean in your closet, you know? So, I’ll keep a pair or two of skinny jeans around while adding all the other fun cuts and styles I feel like making, too. 🙂

Sailor-Inspired Pants!  Simplicity 8391 in Denim

Simplicity 8391 Sailor-Inspired Shorts and Pants

Standard
Simplicity 8391 Sailor-Inspired Shorts and Pants

Summer sewing is in full (albeit slow) swing, and these pants are one of the most recent projects I finished.  I really like the look of sailor pants.  I actually have a pair of wool 13-button sailor pants that I love from an Army Navy store, but sadly they don’t fit right now.  I have noticed that I’m drawn to that style, though, so I decided to make some of my own.  First, I tried the Persephone Shorts by Anna Allen.  The pattern and instructions are excellent, but I really, really didn’t like the look of the shorts on me, even though I think they look great on other people.  Rather than fiddling with the fit to try to get something I might like, I moved on to Simplicity 8391.  The Persephone Pants are actually based on sailor pants from the 1920’s-1940’s, whereas Simplicity 8391 is more of a cute take on the idea of sailor pants.  I have to say, though, that I really, really like these.

Simplicity 8391 Sailor-Inspired Shorts and Pants

l

Simplicity 8391 Sailor-Inspired Shorts and Pants

First I made the shorts version (View D) to get an idea of the fit.  I made them up quickly without worrying much about interior perfection or getting things just right.  These were my wearable muslin.

Simplicity 8391 Sailor-Inspired Shorts and Pants

l

Simplicity 8391 Sailor-Inspired Shorts and Pants

Cute, right?

My measurements put me in between two sizes, so I traced that out and sewed them up in some leftover Tinted Denim by Cloud9 Fabrics that I got long ago at Pintuck & Purl.

Simplicity 8391 Sailor-Inspired Shorts and Pants

I am finding that in most, if not all, Big 4 pants, I need to do a full seat adjustment and possibly even lengthen the back crotch point.  I didn’t do any of that for the shorts, and while they came out cute, they aren’t super comfortable on me, and I have already given them away.

Simplicity 8391 Sailor-Inspired Shorts and Pants

l

Simplicity 8391 Sailor-Inspired Shorts and Pants

Aside from giving me wedgies, sitting was really uncomfortable and I wanted a lot more ease, so I decided to try again and just sort of guess at the amount of adjustment to make and hope for the best.

For version two, I made the pants (View C) from Delaware Grass Green 10 oz. cotton canvas from Big Duck Canvas that I had originally bought to make into Persephone Pants.  This was my first time ordering from Big Duck Canvas.  The price was good and so was the quality of the fabric.  Interestingly, when I washed these, they faded a fair amount.  They also softened a lot as I’m sure they had some sizing on them while on the bolt.  They remind me of one of my favorite pairs of pants from years ago, so I loved how the fabric came out of the wash, but keep the fading in mind if you give this fabric a try at some point.  I have also noticed this sort of fading when I bought duck canvas from Joann’s, so maybe it’s just something that happens with this fabric?

Simplicity 8391 Sailor-Inspired Shorts and Pants

As far as adjustments, I really wanted some comfy pants, so I decided to go big or go home with the fitting.  I retraced the pattern half a size larger, and then did a 1.5″ full seat adjustment, as well as adding 1.5″ of length to the back crotch point.  I used The Perfect Fit from the Singer Sewing Reference Library series to figure out how to do this.  I’m always a little confused about which adjustments to do and how in the world to know what I need in each case.  It helps that I sew a lot of Big 4 patterns and can use a lot of similar adjustments on those, but what about when I sew a pattern from another company?  Isn’t there some way to measure the flat pattern and know if I will need to adjust things?  I still need to finish reading Pants Fitting:  The Crotch and Pants Fitting:  The Crotch Part 2 from the Winmichele blog and do the exercises she mentions because I think that will answer those questions for me.  I understand how to measure the back of a shirt pattern to see if I need a broad back adjustment, but I still don’t fully have pants figured out, even after making a number of different types.

Simplicity 8391 Sailor-Inspired Shorts and Pants

Back to these pants.  When hemming, I took 2″ off the length of the pants.  I think if I had left the size the same as the shorts, the pants would have fit closer and been higher on my waist, and then maybe that 2″ would have been too much, but with the adjustments I made, they sit just below my navel and taking 2″ off looked better to me than just hemming them at the normal hem allowance (for reference, I’m 5′ 8.5″ tall and I don’t usually make length adjustments).  I had to stretch the fabric as I hemmed so that everything was nice and flat.

Simplicity 8391 Sailor-Inspired Shorts and Pants

l

Simplicity 8391 Sailor-Inspired Shorts and Pants

I got to use a few vintage buttons on both the pants and the shorts.

Simplicity 8391 Sailor-Inspired Shorts and Pants

l

Simplicity 8391 Sailor-Inspired Shorts and Pants

I used whatever invisible zippers I had around.  The zipper on these is on the left side.

Simplicity 8391 Sailor-Inspired Shorts and Pants

One other thing I changed was on the inside of the waistband.  I covered the inside edge of the waistband with bias tape, which made catching the waistband SO MUCH EASIER when stitching in the ditch from the outside.  I do have to be careful when zipping and unzipping because the bias-covered edge likes to get in the way a little bit, but it’s not too bad.

Simplicity 8391 Sailor-Inspired Shorts and Pants

The adjustments I made to this pattern made the finished product feel WONDERFUL.

Simplicity 8391 Sailor-Inspired Shorts and Pants

l

Simplicity 8391 Sailor-Inspired Shorts and Pants

I’m really thinking hard to analyze how I want to feel in my clothes during each season, and so far what I have come up with for summer is loose and breezy, which means no tight clothes (except things like bathing suits), lots of breathable cotton and linen wovens, and plenty of elastic waists.  Even without an elastic waist, I love these pants for summer.  They’re nice and loose, and I would definitely consider trying to lengthen them to full length and make them in linen or some other great fabric.  I think I have worn them almost every day this week (don’t worry–they’re going in the wash after today).

Simplicity 8391 Sailor-Inspired Shorts and Pants

I know that’s the picture you were all waiting for.  😉 Have a great weekend.

Morgan Jeans!

Standard
Morgan Jeans!

I’m working through a batch of transitional garments as we go from warm to cool weather, and first up is a pair of Morgan Jeans from Closet Case Patterns.

Morgan Jeans!

I made a short pair this summer, and wanted to try a full-length pair, hoping for some pants that would be good for daily wear and that I could layer over long underwear in the cold weather.

Morgan Jeans!

l

Morgan Jeans!

My measurements put me in a 14 waist and 16 hip, but as I discovered this summer, that 14 waist is just too small.  I ended up adding extra fabric at the top of those pants, so I wrote myself a note to make a straight 16 next time.  Well…as I read the description, I noticed that these are drafted to fit closely, assuming that the non-stretch denim will relax over time.  I don’t love tight jeans and I wanted these to fit over long underwear in winter when layering is an act of survival, so I chickened out on the sizing and decided to trace an 18 to be safe.

Morgan Jeans!

I was lucky enough to be visiting Fabric Place Basement in Natick, MA when they were having a denim sale and, after vacillating between some non-stretch selvedge denim that was 30″ wide and a 60″ wide non-stretch denim, I went with the wider fabric, not least because I could make two pairs of jeans for the price of one in selvedge denim.  The more thrifty I can be, the more projects I can make!  That’s a huge consideration for me.  Happily, I managed to get enough denim to make a pair of jeans for about $15.

Morgan Jeans!

l

Morgan Jeans!

l

Morgan Jeans!

l

Morgan Jeans!

The pattern and topstitching thread came from Pintuck & Purl, as did the Cotton + Steel fabric I used for my pockets.  It was left over from this shirt.

Morgan Jeans!

My jeans buttons are from Wawak.

Morgan Jeans!

As far as the pattern goes, here are my notes:

  • I bound the edges of the pocket facings with bias tape, because I think it looks really nice.Morgan Jeans!

    l

    Morgan Jeans!

  • I also like the look of French seams at the bottom of the pockets (this is a suggestion in the pattern).Morgan Jeans!
  • I recommend sewing your buttonholes, slicing them open, and using Fray Check on them before you sew the fly placket into your pants, just in case you have issues.  It’s not such a big deal to recut the piece and redo it before sewing it in.  I accidentally sewed my bright thread on the bottom of my fly placket, so next time if I want contrast stitching, I’ll put it for my top thread and in the bobbin.Morgan Jeans!
  • One thing to note, my button fly placket extended above the top of my pants.  I think I should have matched the top of my fly shield to the top of my button fly placket, because I matched the top of it to my pants and it was weirdly low.  I had to trim it and finish it with my serger.  Incidentally, I have a new-to-me vintage serger that is working!!!  I was able to use it to finish my seams. A billion thanks to Pintuck & Purl for servicing it!Morgan Jeans!

More tips:

  • When putting the back together, wait to trim the seam joining the yoke and back legs until after you have topstitched it–then you don’t have to worry about missing the seam as you topstitch.
  • As Heather, the designer, suggests in her Ginger Jeans sewalong (in this post), it makes sense to finalize your back pocket placement at the end so you can put them in the optimal spot for your unique back side.  In the end, I moved the pockets a little bit, but not too much. Morgan Jeans!

    l

    Morgan Jeans!

  • One other new thing I tried was installing the waistband using Lladybird’s tutorial (skip to the end of the linked post).  It was really helpful and makes so much sense.  The gist of it is that you sew your inside waistband seam first so that when you are turning under the seam allowance and finishing the waistband, you are topstitching from the outside, and you never have to worry about catching an inner facing–it’s already attached.  It makes more sense in the post, but it’s a very logical order of steps.  I like it.
  • I interfaced my waistband this time to make it less stretchy, but I really should have graded my seams better around where my buttonhole was going to go.  I had to sew through so many layers to make my buttonhole that I ended up fudging things to make it longer and it still takes a good amount of effort to get that top button buttoned and unbuttoned.  You don’t want to have a bathroom emergency in these pants!Morgan Jeans!

Last tip:

  • Use Fray Check on the edge of your belt loops to keep them from fraying every time you wash them.  It doesn’t take care of the fraying entirely, but it helps.

All right, now after all of that, what’s the final consensus?  Well…my jeans are really comfy…they will fit over long underwear…but they do look a little big.

Morgan Jeans!

They’re perfect when they come out of the dryer…for about 5 minutes, and then they are comfortably loose.  Also, it may be the style with boyfriend jeans, but I’m not sure that I like them cuffed.

Morgan Jeans!

So I guess I’ll have a better take on them after wearing them during cold weather, but my gut feeling is that, especially if I were to make these in a thinner denim, I should go down to a 16.  Or maybe I should just look for a pair of pants with a straighter, wider leg.  I think I convinced myself that these were like that, but they really are a closer fitting, non-stretch jean, which is actually obvious from the cover art and the sample photos.  Well, live and learn!  That one’s on me!  😉

Morgan Jeans!

The good news is that whether or not these are the perfect jeans for me, the pattern itself is high quality and well done, which is consistently true with Closet Case Patterns.

Knee-Length Morgan Boyfriend Jeans, or: Making Jeans Without Enough Denim

Standard
Knee-Length Morgan Boyfriend Jeans, or: Making Jeans Without Enough Denim

Today’s project was a struggle!  Thankfully, I can report that it ended happily, but it was a long process getting there.

The challenge:  could I make jeans I liked using the denim I had, which was less than what the pattern called for?  Armed with my Denim Pinterest board and ideas from the Refashioners 2016 jeans challenge, I was ready to take this one on!

I decided to use the Morgan Boyfriend Jeans Pattern from Closet Case Patterns since I had non-stretch denim.

Knee-Length Morgan Boyfriend Jeans, or: Making Jeans Without Enough Denim

l

Knee-Length Morgan Boyfriend Jeans, or: Making Jeans Without Enough Denim

Idea one was all about a casual, patchy look.  I love clothes that are casual, lived in, and durable.  I decided to cut as much of the top of the jeans as I could from the denim I had left over from my Jutland cutoffs from last year and my Lander Pants.  I would use the worn out jeans we had around the house (kept for patch jobs) to construct the bottoms of the pants.

Knee-Length Morgan Boyfriend Jeans, or: Making Jeans Without Enough Denim

This seemed like a great idea, and looked really cool on my sewing table.

Knee-Length Morgan Boyfriend Jeans, or: Making Jeans Without Enough Denim

Unfortunately, when I put them on, my cool, patched legs became something akin to denim leg warmers attached to jeans made of thin and much more flexible denim.

Fail.

On the advice of some very wise friends who, although not sewists themselves, often help me troubleshoot my projects, I took the pants bottoms off, and moved them up higher so the pants would end around my ankles.

Everything looked good on the work table again, but when I put them on, the denim leg warmer look was back, and it wasn’t a good thing.  It was time to abandon that idea.

Option two was cropped pants with a raw edge, back slightly longer than the front.  One look told me this wasn’t a good option on these particular jeans.

Fail.

Time to come up with a third option.  At this point, my eldest daughter had a great idea. I could use some of the anchor fabric I was using for my pocket bags on the inside bottom of my pant legs so that I would have cropped pants that could be rolled up to reveal the cute print on the fabric.

I loved this idea!  It wasn’t too hard to execute, and it looked great.  The fabric, with its cute anchors and hearts is directional, so I had to think about that as I planned it out.  Thankfully, I got it right the first try.  The pants are shorter than most cropped pants you see today, but I like them.  They are great for spring and cooler summer days.

Knee-Length Morgan Boyfriend Jeans, or: Making Jeans Without Enough Denim

Things were finally on track.  I just had to put on my waistband and back pockets.  I put the waistband on and…they didn’t fit.  And I had trimmed my side seams.  Oh no!

I tried letting the side seams out the little bit that I could, but it just wasn’t enough.  I couldn’t understand it.  I thought they had fit, but when I really examined what I had done, I realized that I must have been close to a 14 waist or between sizes, so I traced a 14 waist and 16 hip when I should have just done a straight size 16.

I wanted to give up, but I was so close to being done.  I decided to try one more thing, and if that didn’t work, I would give the pants away.  I added little triangle wedges at the top of each side seam using the same striped fabric I had used in my pocket facings, but turning the stripes perpendicular.

Knee-Length Morgan Boyfriend Jeans, or: Making Jeans Without Enough Denim

l

Knee-Length Morgan Boyfriend Jeans, or: Making Jeans Without Enough Denim

l

Knee-Length Morgan Boyfriend Jeans, or: Making Jeans Without Enough Denim

I lengthened my waistband at the end so that I wouldn’t change the curve (I had also added a dart at the center back to prevent gaping, and I didn’t want to change that either).  Then I finished everything up, tried them on, and…THEY FIT!  They fit well!  And they were pretty cute!  I was so happy.

Knee-Length Morgan Boyfriend Jeans, or: Making Jeans Without Enough Denim

l

Knee-Length Morgan Boyfriend Jeans, or: Making Jeans Without Enough Denim

l

Knee-Length Morgan Boyfriend Jeans, or: Making Jeans Without Enough Denim

l

Knee-Length Morgan Boyfriend Jeans, or: Making Jeans Without Enough Denim

l

Knee-Length Morgan Boyfriend Jeans, or: Making Jeans Without Enough Denim

l

Knee-Length Morgan Boyfriend Jeans, or: Making Jeans Without Enough Denim

I think I seam-ripped everything on those pants at least once–more in a lot of places.  I am so, so glad they are done, but also really happy to have a pair of fun jeans that I like, AND to have used up so many scraps.  Not only was my denim left over from other projects, so was the anchor fabric (I used it to make this shirt) and the striped fabric (I used the other side as my right side when I made the striped shorts in this post).  I even used a leather scrap to make a little patch.  Yay!

Knee-Length Morgan Boyfriend Jeans, or: Making Jeans Without Enough Denim

l

Knee-Length Morgan Boyfriend Jeans, or: Making Jeans Without Enough Denim

l

Knee-Length Morgan Boyfriend Jeans, or: Making Jeans Without Enough Denim

l

Knee-Length Morgan Boyfriend Jeans, or: Making Jeans Without Enough Denim

As for the pattern itself, I liked it, and would make it again.  I like the button fly, which is different from other jeans that I have, and the comfortable fit (once I got the sizing right).

Knee-Length Morgan Boyfriend Jeans, or: Making Jeans Without Enough Denim

l

Knee-Length Morgan Boyfriend Jeans, or: Making Jeans Without Enough Denim

I have a few more detail-oriented projects in my queue, but after that, I might need a palate-cleanser of easy projects!  With family sickness (now better), projects that weren’t straightforward, and several muslins (still unsewn), spring sewing has been a bit of a slog.  Even with that, though, I still love sewing.  I’m excited to finish up these last few things and get down to easy and/or summer sewing!  Bring it on!  (If only I can narrow down my ideas!)

Lander Pant, Take One

Standard
Lander Pant, Take One

After making three pairs of Ginger Jeans (1, 2, 3) as well as a few other pairs of pants, I’m finally getting in my pants-sewing groove.  I still don’t feel like I have pants-fitting down, but I’m not afraid to try any more.  When the Lander Pant & Short pattern from True Bias came out, I was excited (ok, really excited).  I had already given away all my thrifted skinny jeans, and was feeling the need for some looser pants, or at least nothing tighter than the stovepipe leg view of the Ginger Jeans.  These looked like just what I was after, so I did something I’ve never done before–I preordered the paper pattern.

Lander Pant from True Bias in Denim

l

Lander Pant from True Bias in Denim

l

Lander Pant from True Bias in Denim

I already had some inexpensive non-stretch denim in my stash from Fabric Place Basement in Natick, MA, and plenty of thread, interfacing, and jeans buttons, so I was ready to go.  When I got the pattern, I decided on View C, the boot length pant and traced a size 12 waist and size 16 hip.  I also decided to lengthen the pattern by 4″ since I’m 5′ 8.5″ and this pattern was drafted for someone who is 5′ 5″ tall (I ended up only needing 2.5″ of extra length, however).  I told myself this was a wearable muslin, in the hopes that it would work out and I could wear it.

Lander Pant from True Bias in Denim

l

Lander Pant from True Bias in Denim

The instructions are very clear and helpful, although I did a few things differently.  Like with the Ginger Jeans, I opted to put my back pockets on last, so I could place them while wearing the pants.  I also changed the method for making belt loops, which I felt was just too tricky.  Using a loop turner on denim is not for me!  It’s much easier to cut your fabric strip for your belt loops, turn your seam allowances in and press them, and then topstitch everything closed and cut the long strip apart into belt loops.  These things are minor personal preferences.

The part I really had trouble with was the waistband and crotch seam.  The pants fit great until the point where I added the waistband.  Despite using my measurements to determine my size in that area (and I double checked to make sure I had them right), the waistband was uncomfortably tight.  It was also very high, sitting above my belly button, at my natural waist.  This is what the pattern promises as far as the waist height.  After trying it on, though, and feeling how uncomfortable the waistband was, I decided to go off-book and lower the rise and recut the waistband.  This is not the correct way to lower the rise of pants, but with the jeans near complete, it was the only option.

Lander Pant from True Bias in Denim

I decided I wanted to lower them about 1.75″ (or the finished width of my  original waistband), so I marked new stitching and cutting lines and cut a new waistband 7″ longer, and sewed that on.  I decided to cut the pants down after sewing so I could make sure I was on the right track before crossing the point of no return.

Lander Pant from True Bias in Denim

l

Lander Pant from True Bias in Denim

l

Lander Pant from True Bias in Denim

This was more comfortable, but it also meant I needed to curve the waistband a bit.  I added some darts (which added a few drag lines, but what are you gonna do?), and this seemed workable.

Lander Pant from True Bias in Denim

l

Lander Pant from True Bias in Denim

I tried the pants on and was pretty happy with them.  They are SUPER wide-legged as drafted, but I decided to keep the width and try them out for a while.  Mine also have more ease in the hips than many other versions I’ve seen online, but I chose my hip size according to my measurements, and find the fit in the hips really comfortable.

Lander Pant from True Bias in Denim

l

Lander Pant from True Bias in Denim

I liked the back view, and was happy with them when standing, but after wearing them for a few days, I realized I COULD NOT wear them any longer.  Something is up with the crotch seam such that it cuts into me in the front when sitting, and I cannot wear them any more until I figure that out.  I really hate going back into a project once it’s done, but I put them in my mending pile, and I’m going to compare the crotch seam of this pattern with the crotch seam of the Ginger Jeans, which are very comfortable, and see what the difference is.  I’m hoping I can add in a (hopefully invisible) patch to lengthen the front seam or something so that these can at least be wearable.  I think my Jutland pants actually need this adjustment too, although they are not nearly as uncomfortable (in fact, this is something I have only noticed recently).  It looks like I have a little sleuthing to do, which means I get to learn more about pants fitting.  Right?

Lander Pant from True Bias in Denim

l

Lander Pant from True Bias in Denim

l

Lander Pant from True Bias in Denim

l

Lander Pant from True Bias in Denim

l

Lander Pant from True Bias in Denim

My overall analysis is that this is a good pattern, the instructions are well done, and Kelly of True Bias has actually put out a design that is different from what everyone else is doing (in a really good way).  As more and more pattern companies come on the scene, it seems to be harder and harder to find unique patterns, so I like that these aren’t available in 1,000 iterations from every company.  If you are thinking about this pattern, I would say: go for it.  Every pattern will have to be fitted to your unique body, and as hard as that can be at times, it also helps us learn and become better at this craft that we love.

Lander Pant from True Bias in Denim

Recommendations

  • Have you seen the Google Arts & Culture app?  I haven’t explored it fully, but my family and I did have some fun with the selfie feature that pairs your picture with a piece of art the app thinks looks like you.  I managed to get two pairings to different selfies:Matching people to art:  Google Arts & Culture

    and

Matching people to art:  Google Arts & Culture

You can read all about this in this article on Google’s blog.

  • I’ve really been enjoying listening through some of the fiction works of writer Wendell Berry (most recently Hannah Coulter and That Distant Land).  He creates a community that isn’t perfect, but still manages to make me want to be my best self.
  • I think I could make a coat like this men’s wool shirt jacket from L.L. Bean by using Simplicity 4109.  One day, I WILL realize my shirt jacket dreams! 😉
  • Funny stuff from Jimmy Fallon and Will Ferrell:

The Perfect Summer Cutoffs: Thread Theory Jutland Pants as Boyfriend Jeans

Standard
The Perfect Summer Cutoffs:  Thread Theory Jutland Pants as Boyfriend Jeans

It’s late summer here, and I think it’s time I introduced you to my most-worn shorts of the season.  This year I finally realized that the shorts I’ve been making myself are kind of…well, short.  This may have been obvious to everyone around me, but it really wasn’t obvious to me until I realized that I wanted some longer shorts and only had one pair that I had thrifted.  But I know how to sew, so that’s a problem I can fix!  😀

Thread Theory Jutland Pants as Boyfriend Jeans

Enter what is quickly becoming a favorite pattern not only for my husband (see versions one and two of his cargo pants from this pattern), but also for me (my pants version is here):  Thread Theory’s Jutland Pants pattern.

Thread Theory Jutland Pants as Boyfriend Jeans

l

Thread Theory Jutland Pants as Boyfriend Jeans

My husband loves this pattern because he loves cargo pants, but I love this pattern because, for some reason, it fits me!  It doesn’t fit me to the sewing world standard of “perfect fit”.  It fits me in the way women would want a pair of men’s jeans to fit for that authentic “boyfriend jeans” look or in the way that you want a pair of work pants to fit.

Thread Theory Jutland Pants as Boyfriend Jeans

This summer, I dreamed of a pair of long cutoffs that weren’t tight, but were loose and comfortable.  More and more, I realize that I want my summer clothes to be loose and breezy, and my winter clothes to feel like a warm hug.  😉

Thread Theory Jutland Pants as Boyfriend Jeans

l

Thread Theory Jutland Pants as Boyfriend Jeans

l

Thread Theory Jutland Pants as Boyfriend Jeans

Before our trip out to visit family earlier in the summer, I cut these jeans out of a non-stretch denim that I bought at Fabric Place Basement, and flew through the sewing!  I wanted these done FAST, so I didn’t do much extra top-stitching or any seam finishes beyond zigzagging my seam allowances.  I didn’t even hem them, because I wanted them to look like cutoffs.  I figured that I was making them secure enough to last, but if they showed some fraying and wear and tear, they would have even more of that authentic look.  And let me just say, I LOVE these shorts.  In fact, I have to hold myself back from wearing them every day.

The only thing I did differently from my pants version (besides the length) was to use the actual Jutland Pants back pockets rather than the back pockets from the Ginger Jeans.  I knew that the Jutland Pants back pockets were bigger and more square, but I just wanted to try them to see if I would like them.  And I do!

Thread Theory Jutland Pants as Boyfriend Jeans

l

Thread Theory Jutland Pants as Boyfriend Jeans

Another thing I like about these shorts is that you can wear them long or roll them up one or two times, giving you some different options.  I probably wear them rolled up twice most often, but I really like all the different lengths I can achieve.  Now I’m beginning to wonder if they would look good in canvas and if I have enough left over from other Jutland pants I’ve made…

Thread Theory Jutland Pants as Boyfriend Jeans

l

Thread Theory Jutland Pants as Boyfriend Jeans

l

Thread Theory Jutland Pants as Boyfriend Jeans

That might be a job for next summer, though.

Recommendations

    • After going to New Hampshire’s White Mountains, I would definitely recommend them!  Now I want to go back and go camping!  (You can see my last post for some pictures of our trip.)
    • I just finished listening to the audio version of Willpower:  Rediscovering the Greatest Human Strength by Roy Baumeister and John  Tierney.  It was a really fascinating psychological look at what willpower is and how you can cultivate it in your life.  I think I need to go back and listen through it again.
    • Devon Iott (@missmake on Instagram) does it again!  I’ve got her version of Style Arc’s Josie Hoodie in my head, and now I want to make my own!
    • This video is a little longer than what I usually post, but it was interesting to learn about the “Pros & Cons of Common Fabrics” both for everyday and as far as environmental impact.  I definitely learned some things!

Finally Just Right: McCall’s 6848 Shorts

Standard

It may be September, but summer isn’t over until the first day of fall on September 22, so it’s been shorts-land over here lately.  Yes, Shorts-Land is a place, and that place has been my house, where I’ve been sewing up a ton of basic and not-so-basic shorts this summer.  Like many aspects of sewing, I’ve been putting shorts and pants off because I didn’t know how to fit them, but I also know that I really need to try if I’m ever going to learn.

IMG_9938

McCall’s 6848 is a pattern I’ve been tweaking little by little, and I think I finally have it right.  This is actually a pajama pattern, but after making my first pair of shorts from it (View D), I realized this it was going to be more of a summer staple than pajamas.

McCall's 6848

McCall's 6848

One thing I’ve found in the little bit of pants/shorts sewing I have done is that bottoms sometimes feel as though they are too high in the front and too low in the back for me.  This was definitely the case with my first pair of these shorts.  So, I got out the good ol’ Singer Sewing Reference Library books and looked up fitting, until I came up with some ideas.  For my second pair of shorts, I took a wedge out of the front and added a wedge into the back.  This got my shorts really close to what I wanted, but the front legs felt just a little…well, not tight, but not quite right–a little like they were pressing against me too much in the front of the legs.  So, for this last pair, I lengthened the back crotch point just a bit and…finally just right!!!

McCall's 6848


IMG_9981

They feel exactly like I want them to.  For this pair, due to my need for basics, I decided to try out the new Art Gallery Fabrics Denim.  I got it at Pintuck & Purl in Exeter, NH (who, by the way, I’ve started doing some social media for, which is super cool).  I was kind of skeptical about this thin fabric.  I didn’t really believe it was denim, because the weight is closer to a quilting cotton, although it’s much drapier.  When you look at the weave, though, it really is a denim weave.  All that to say, I was pleasantly surprised when I tried it.  I managed to make these up before the road trip we went on in July, and they were perfect in the car.  I guess it’s always a good day when you can wear something designed as pajamas in your everyday life.

IMG_8764-001


IMG_8774

IMG_8776

I even put a little lace flower in there as my back tag.

The one extra thing I did (besides that flower) was add some long bartacks at the sides.  I know from experience that these shorts can catch on things…and rip.  It’s no fun ripping a hole in the side of your new shorts.

IMG_8777

The only other thing I would change if I made these again would be to add pockets.  It’s pretty annoying not to have any, but I think, at this point, I want to focus more on fit than modifying patterns with extra features.  So, I’ll save it as a future idea.

Recommendations

  • I’ve got to recommend it again–BRIMFIELD!  It’s going on now, and if you are an antique-lover anywhere near western Massachusetts, I highly recommend you go.  Brimfield is the largest outdoor antique market in the US and it’s going on this week until Sunday.  You can find all the details at the above link.
  • I tried one of the best recipes EVER on Monday.  It was Bostocks from the Seven Spoons cookbook.  It’s an amazing combination of day old brioche (like challah bread), orange simple syrup, and almond cream.  It’s totally worth the work, and you can make the various elements ahead of time.  Check your library…I bet they have it!
  • How about more learning about fabric?  Here’s a link to another of the Cotton + Steel substrate series.  This time it’s all about their cotton/linen canvas fabric!  Interesting!
  • And finally, I’ve got one more video from Cotton + Steel about how their fabric is manufactured and printed over in Japan.  It’s pretty cool to see how it’s all made:


Pleasant Pathways Shorts, or I Need Some Basics

Standard

Hi, guys!  I hope you’ve been having a good week.

Today’s project is brought to you by the need for basics.  I’m like a lot of sewing people.  I get drawn in by the pretty, happy, shiny prints and end up with a closet full of crazy, crazy fun…that doesn’t all go together.  I also tend to make a lot of tops, because I’m still trying to get over my fear of sewing pants due to my lack of fitting knowledge.

Well, you can’t learn if you don’t try, right?  So, along with the tops, I’ve been working on shorts this summer.

Pleasant Pathways Shorts

This pair, however, was more of a known quantity, so I made them up earlier this summer when I went nuts sewing easier, known stuff after all the complex things I’d been doing.  I’ve made this shorts pattern before, back when I started sewing seriously, and the fit has always been great.  I never needed to alter them.  Besides the fit, the other great thing about this pattern is that it is free, free, FREE!  You can find it here.  It’s one that Anna Maria Horner made for Janome.

Pleasant Pathways Shorts

I still wear my first pair of shorts from this pattern (the green ones in this post).  In looking at my measurements now, I should probably grade out at the hip, but I used some stretch denim that was left over from my Ginger Jeans extravaganza, so the fit turned out great, and they’re very comfortable.

Pleasant Pathways Shorts

I didn’t have a navy zipper, so I used what I had, which happened to be red, but thanks to my fairly new invisible zipper foot, you can’t see the red much.  Plus…I don’t actually mind.  I like little surprising details and contrasting colors.

Pleasant Pathways Shorts

Someday I’d love to add pockets and maybe a waistband to this, but for now, this pattern was just what I needed as far as sewing a known pattern and something basic that fit well and matched with most things.  I highly recommend it.

So that’s it!  I hope you give these a try if you are looking for some simple shorts.

I’ve still got some summer sewing to fit in, so you’ll likely be seeing more of that here for a bit.  Summer isn’t officially over until September 22!

Pleasant Pathways Shorts

Recommendations

  • As an art lover and a surfing…spectator, I love seeing the boards at Album Surf.  Check them out for some serious eye candy.
  • I thought Hila’s Nautical Outfit turned out great!  Striking colors and patterns!
  • Cotton + Steel Fabrics teamed up with Colette Patterns awhile back to explain some of the different fabric substrates they use.  If you’ve ever wanted to learn about double gauze, check it out on Cotton + Steel’s site here.
  • Here’s a video about Cotton + Steel’s double gauze collection, Bespoke.  It was interesting to hear about their thought process and to learn more about double gauze itself.