Tag Archives: Simplicity

Simplicity 4109 Jacket in Railroad Denim

Standard
Simplicity 4109 Jacket in Railroad Denim

Hi, everyone.  I’m excited to share this jacket with you today now that I have pictures!

Simplicity 4109 Jacket in Railroad Denim

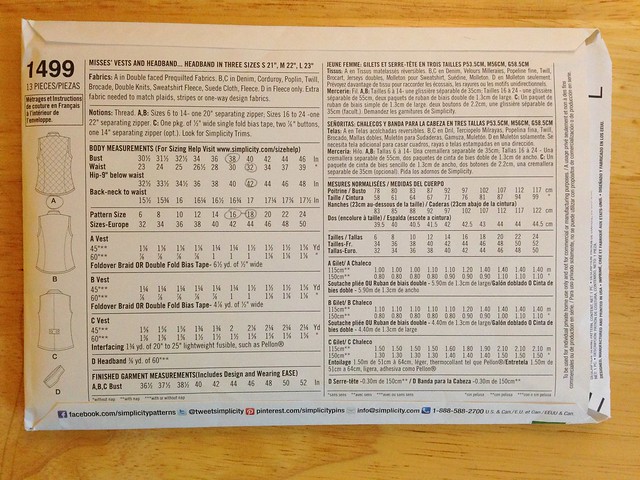
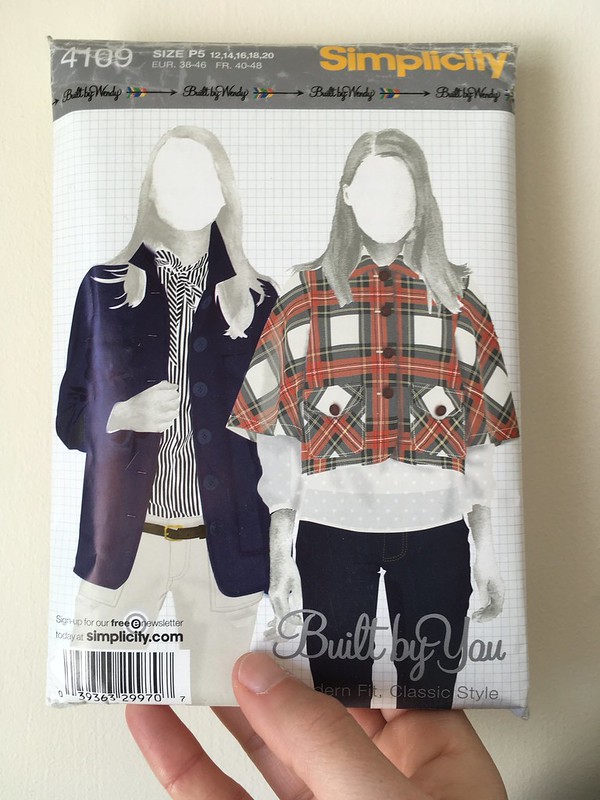
Today’s project is Simplicity 4109, an out-of-print Built by Wendy/Built by You sewing pattern from 2006.

Simplicity 4109 Jacket in Railroad Denim

l

Simplicity 4109 Jacket in Railroad Denim

l

Simplicity 4109 Jacket in Railroad Denim

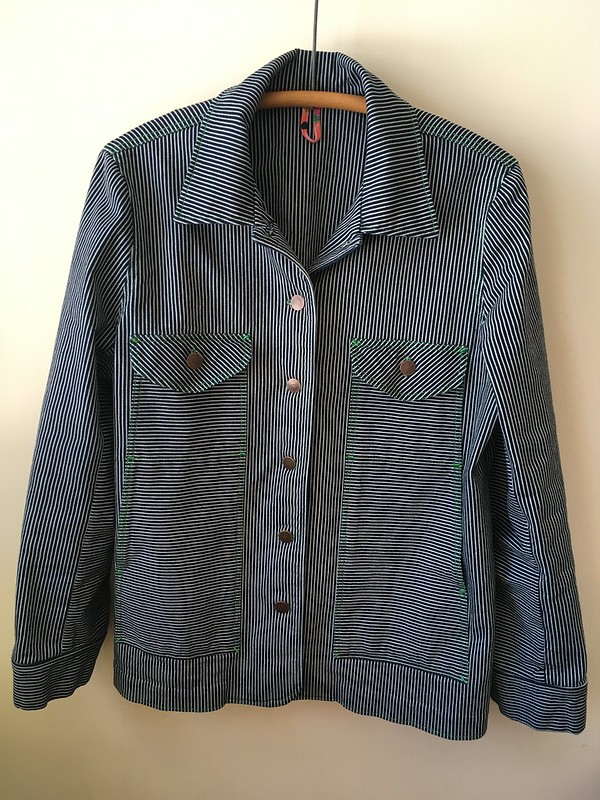
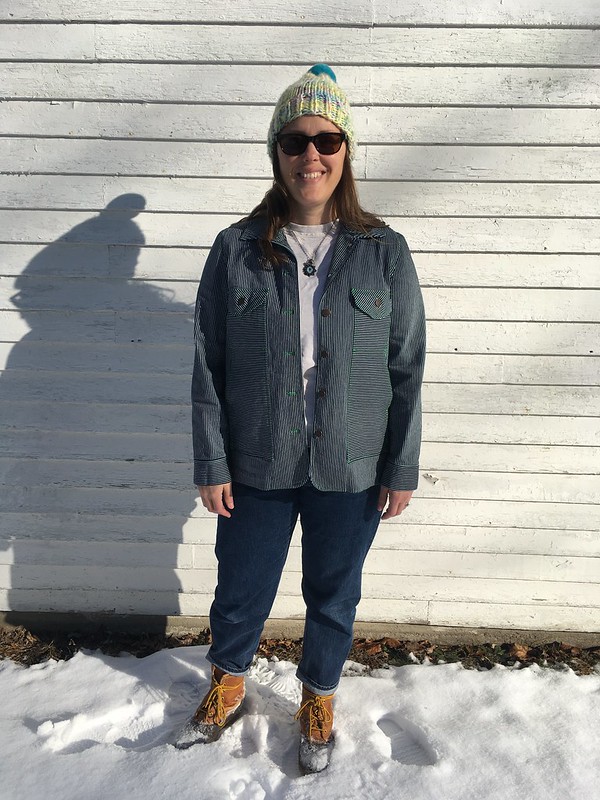
I found my copy on Etsy.  What drew me in were the cool front pockets on View A and the potential to create different looks based on your fabric and hardware choices.  It looked like a pattern that would make a great chore jacket or jean jacket.  Originally I had planned to make this last year, maybe in an olive green cotton twill, but that fabric became my recent pants overfitting drama.  Instead, I finally made this pattern from some railroad denim I got this past summer at Field’s Fabrics in Holland, Michigan.

Simplicity 4109 Jacket in Railroad Denim

l

Simplicity 4109 Jacket in Railroad Denim

l

Simplicity 4109 Jacket in Railroad Denim

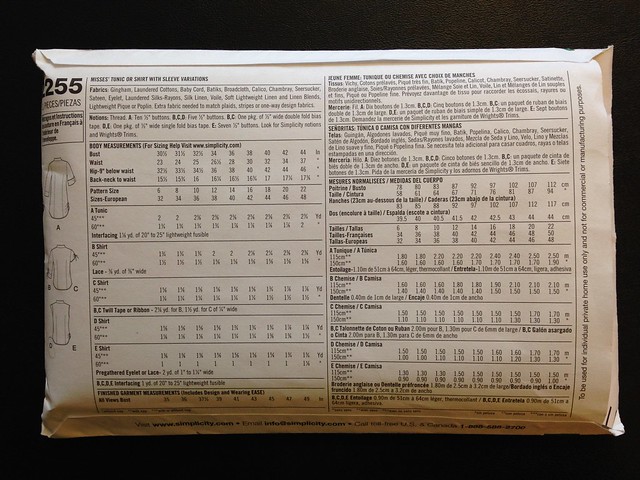
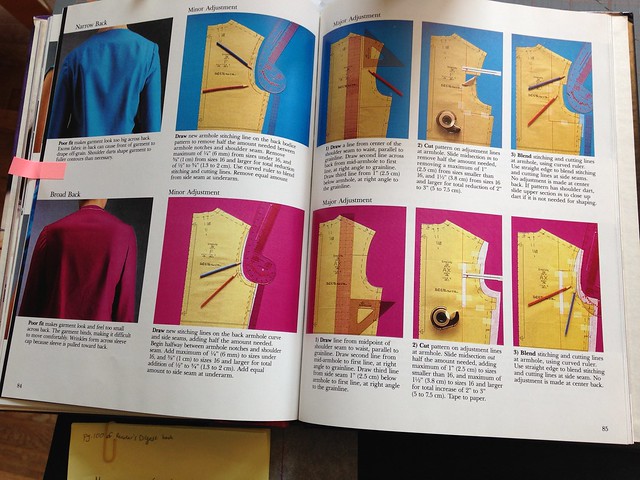
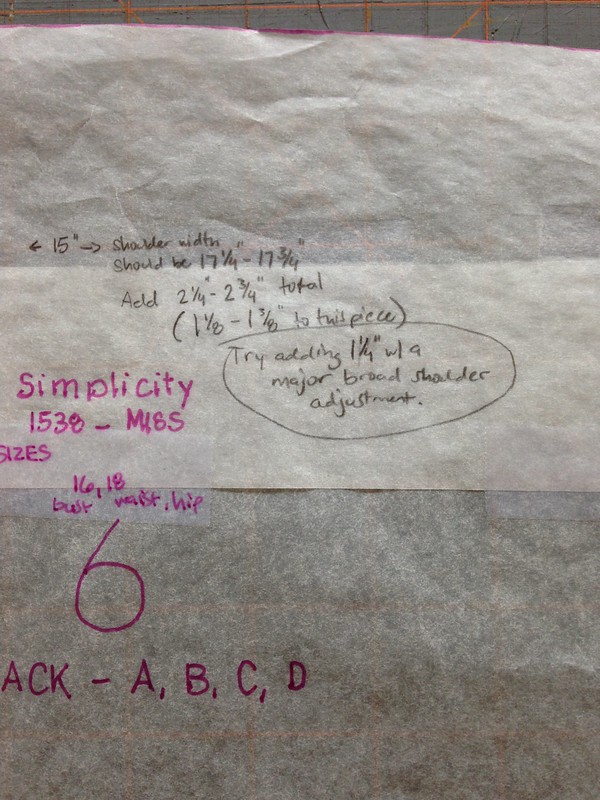
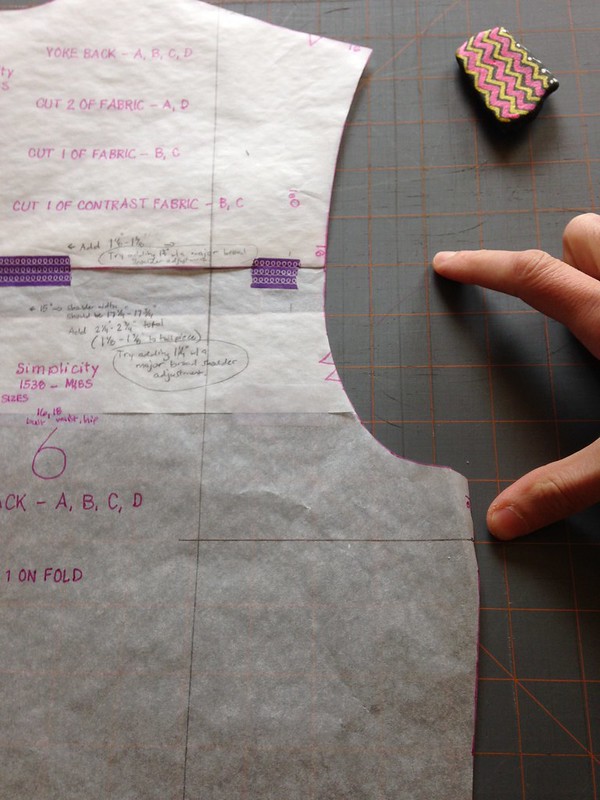
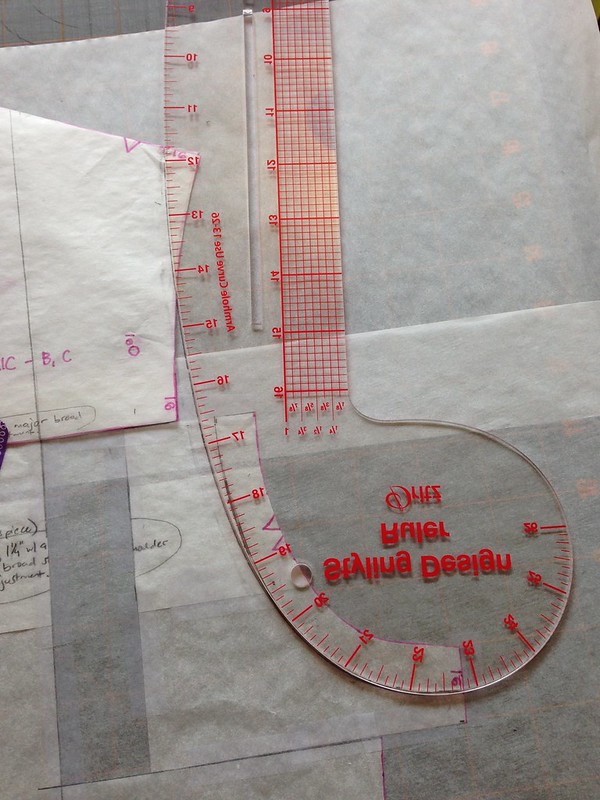
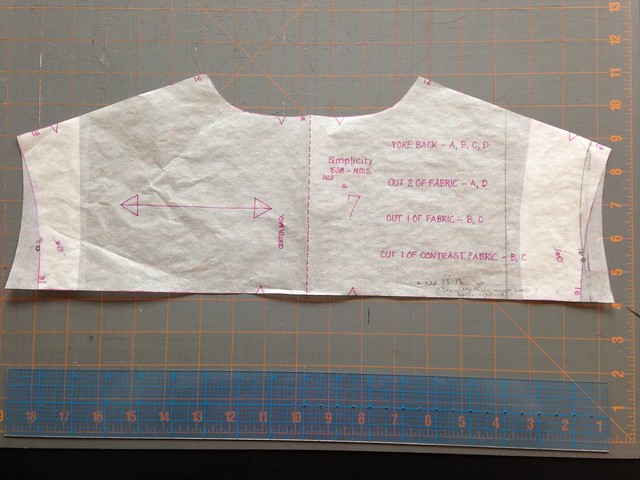
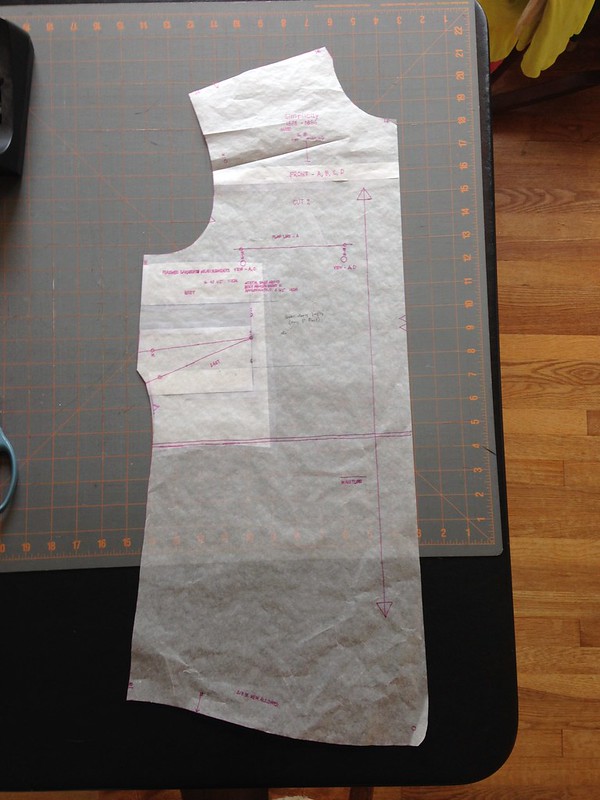
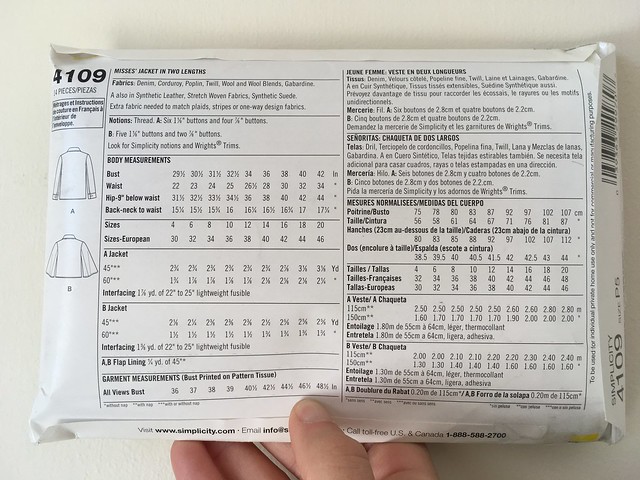
The label said it was 100% cotton as far as I can remember, but there is definitely some stretch, even if only good mechanical stretch.  I would say this is probably a midweight.  I traced View A with a 16/18 bust, 18/20 waist, and 20 hip.  I also did a major broad back adjustment.

Simplicity 4109 Jacket in Railroad Denim

l

https://flic.kr/p/2hY9jxJ

The pattern instructions were really good, and this was an enjoyable project to make.  I didn’t have topstitching thread, so I chose to use a triple stitch with a normal weight thread.  If I had planned ahead a bit more I could have ordered topstitching thread in green from Wawak, but my local fabric stores didn’t have any (and I didn’t plan ahead), so regular weight was what it had to be!

Simplicity 4109 Jacket in Railroad Denim

Let’s talk pattern details.  The most intriguing part of this pattern was the front pockets.  I really like them, but I did change a few minor things.  For some reason, the top pocket wasn’t supposed to have a real buttonhole–you were just supposed to sew a button to the flap, which seems silly.  I wanted the real deal, so I made a buttonhole in the flap and installed a jeans tack instead of a button.

Simplicity 4109 Jacket in Railroad Denim

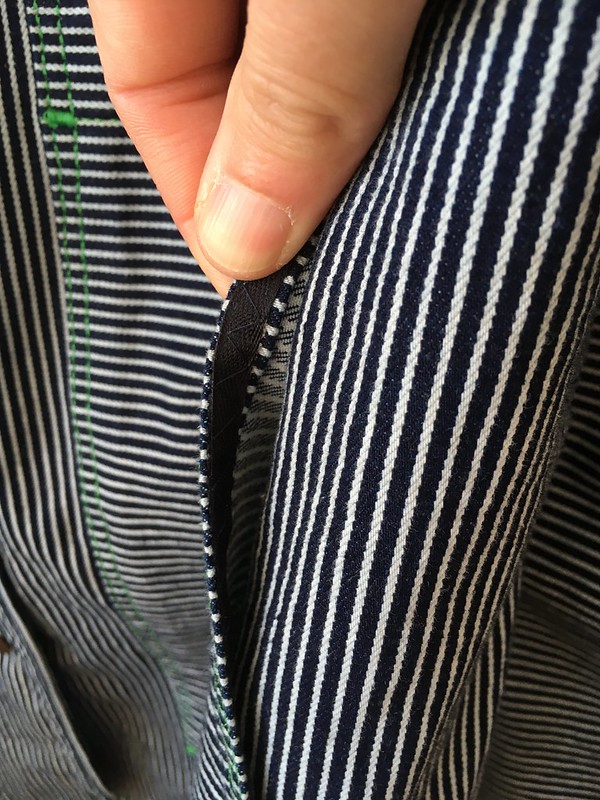
Because my fabric was kind of stretchy, I also sewed twill tape to the inside of the lower pocket opening, doing a decorative zigzag on the outside to hold it in place.  I was hoping this would keep the pocket openings from stretching out.

Simplicity 4109 Jacket in Railroad Denim

l

https://flic.kr/p/2hY9chb

I also added bartacks at the corners of the pockets and the lower pocket opening because I like that look.

Simplicity 4109 Jacket in Railroad Denim

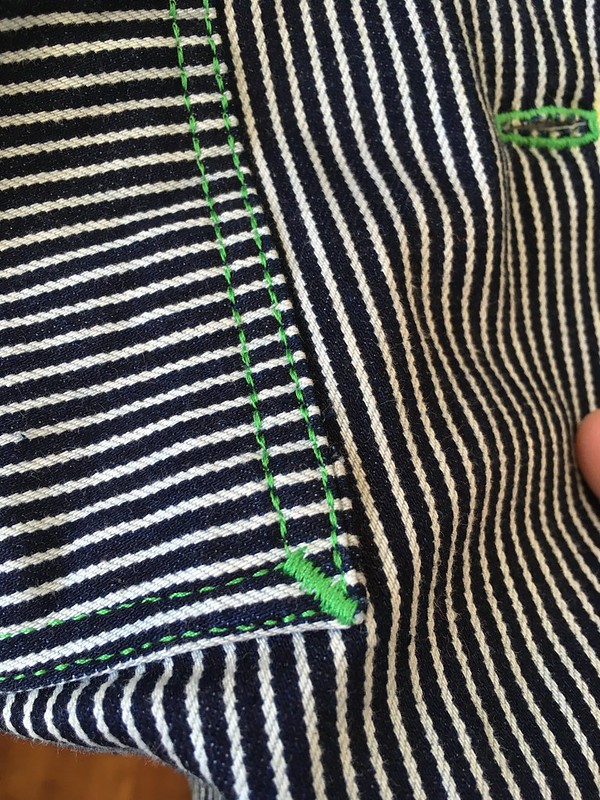
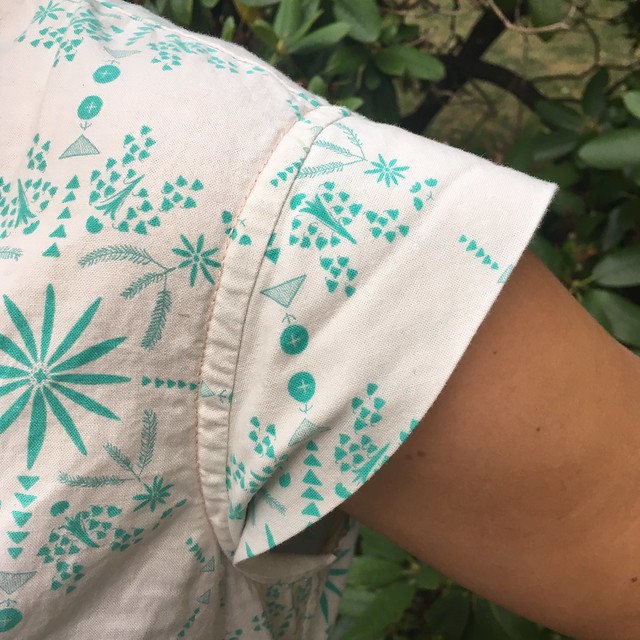
I did a double line of topstitching on the top of the flap, even though the directions only say to do one.  If you do a double line, you need to be very careful not to sew the top of the pocket underneath the flap shut.  I also did a little extra topstitching on the sleeve vents because I thought it would look nice.

For some secret fun, I added Rifle Paper Co. rayon scraps to the insides of the pocket flaps as well as using bias tape from the same fabric to make a hanging loop and to finish some of my inner seams.  I did an ugly but effective version of bias bound seams; however I think Hong Kong seams would have been better.

https://flic.kr/p/2hYahS3

l

Simplicity 4109 Jacket in Railroad Denim

l

Simplicity 4109 Jacket in Railroad Denim

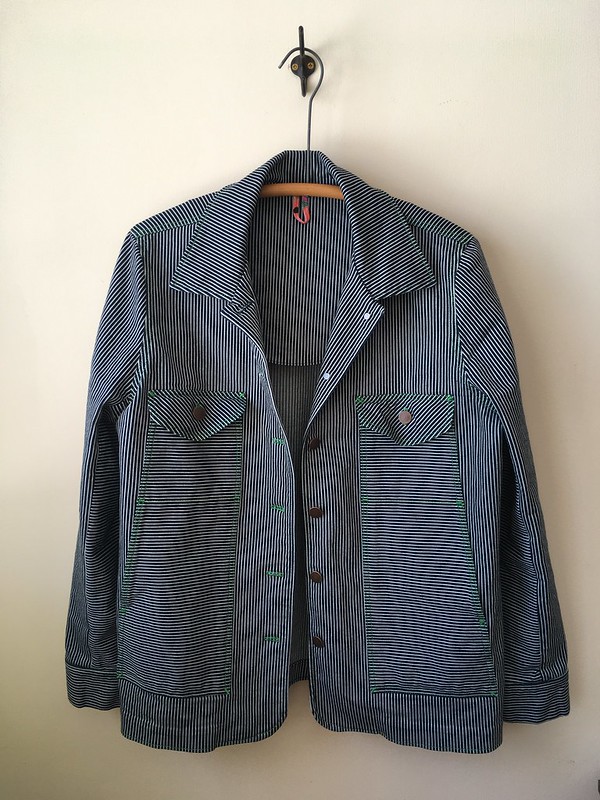
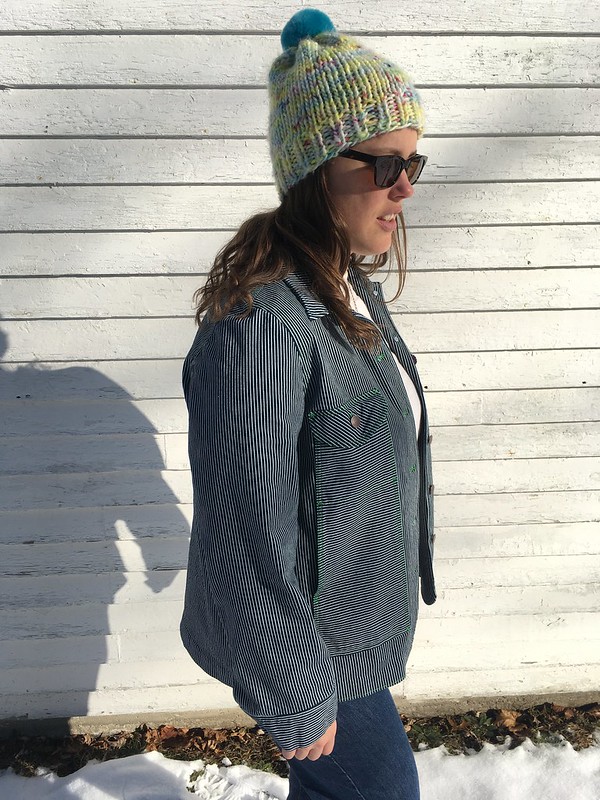
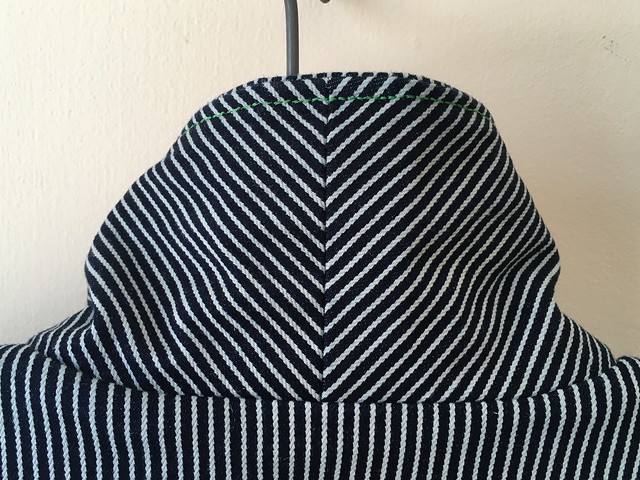
I had a lot of fun playing with the stripes on this jacket.  I tried to take every opportunity to flip things around, and I’m really happy with how it turned out.

Simplicity 4109 Jacket in Railroad Denim

l

Simplicity 4109 Jacket in Railroad Denim

I thought I would like it, but I REALLY like it.  It’s got a good amount of ease, so you can easily wear a sweater underneath (nice since I finished this just as the weather got even colder).  I also think this pattern could be a good candidate for a lining as it would be easy to hide the edges under the facings.

https://flic.kr/p/2hY9d9B

You should know that I have very little experience with lining things, so that’s a guess based on near total inexperience.  🙂  What got me thinking about it is these very inspiring denim jackets made by Ginew that are lined with an exclusive Pendleton wool.  They’re beautiful!

I find denim very inspiring and I also really like workwear.  There are so many details that are both interesting and functional in work clothes, not to mention you can do actual work in them.  I may not be a farmer or a construction worker, but I like having clothes that I don’t have to worry about messing up and that wear beautifully as they age.

Simplicity 4109 Jacket in Railroad Denim

All that to say, I’m happy with this jacket.  I definitely recommend this pattern, and could see making it again if I found a fabric that was inspiring.


The Last Summer Project: Simplicity 1887 Shorts (in Sparkly Linen!)

Standard
The Last Summer Project:  Simplicity 1887 Shorts (in Sparkly Linen!)

Today is the last full day of summer in the Northern Hemisphere.  Tomorrow, September 22 is the Autumnal Equinox, the official beginning of fall.  But until then, it’s still summer!!!  So let’s talk about this last summer project, a pair of elastic-waisted, deep-pocketed, SPARKLY linen/cotton shorts:  Simplicity 1887.

The Last Summer Project:  Simplicity 1887 Shorts (in Sparkly Linen!)

This pattern is a good one.  I would make it again, and I recommend it to you. 🙂

At some point this summer, I realized (or re-realized) that I really want easy-wearing, elastic-waisted shorts and skirts for summer.  I had other projects already planned, but these shorts managed to get squeezed in right at the end.  I had hoped to make them last year and didn’t, so I was determined to sew them this summer.

The Last Summer Project:  Simplicity 1887 Shorts (in Sparkly Linen!)

I made View C, the shorts, in a size 20 with no changes.  I didn’t even really come up with my own fabric idea.  I loved the sparkly fabric Simplicity used on the sample on the envelope, so I bought a Sand-colored linen/cotton/Lurex blend (Essex Yarn Dyed Metallic) by Robert Kaufman Fabrics from Pintuck & Purl.  The sparkle is hard to photograph, but I gave it a try.  ↓

The Last Summer Project:  Simplicity 1887 Shorts (in Sparkly Linen!)

l

The Last Summer Project:  Simplicity 1887 Shorts (in Sparkly Linen!)

l

The Last Summer Project:  Simplicity 1887 Shorts (in Sparkly Linen!)

This pattern ticked all the boxes I wanted:  something that looked a little bit nicer so I could wear it to work, shorts that were a little longer than what I had been making previously, an elastic back waist, deep pockets, and a loose fit for those hot days.

The Last Summer Project:  Simplicity 1887 Shorts (in Sparkly Linen!)

l

The Last Summer Project:  Simplicity 1887 Shorts (in Sparkly Linen!)

l

The Last Summer Project:  Simplicity 1887 Shorts (in Sparkly Linen!)

I decided I would try out the tie on the front, knowing it would be easy to remove if I didn’t like it.  It’s only stitched onto the front (not inserted into the waistband), so if I didn’t love it, I could take it off quickly and easily with my seam ripper.  The good news is that so far, I like it.

The Last Summer Project:  Simplicity 1887 Shorts (in Sparkly Linen!)

l

The Last Summer Project:  Simplicity 1887 Shorts (in Sparkly Linen!)

I also wondered if I would like the front pleats, and I do!

The Last Summer Project:  Simplicity 1887 Shorts (in Sparkly Linen!)

The fabric was very easy to work with and while it is slightly less soft than a lot of linen/cotton is, (I think that’s because of the Lurex), it’s still very comfortable.  Once I finished these, I felt the temptation to make more in other sparkly colors (there are many color options), but I’m going to wear these for the rest of the warm days to get a gauge on how they fit into my wardrobe and if I want to make further pairs next summer.

The Last Summer Project:  Simplicity 1887 Shorts (in Sparkly Linen!)

l

The Last Summer Project:  Simplicity 1887 Shorts (in Sparkly Linen!)

l

The Last Summer Project:  Simplicity 1887 Shorts (in Sparkly Linen!)

I was happy to note that the crotch curve was a good fit, further cementing my suspicion that Simplicity’s crotch curve is one that works for me.  After making this view of the pattern, I would consider making the longer pants as well as the longer skirt.  We’ll see what next summer holds, but I’m glad I finally tried this pattern, and I recommend it for a relatively quick and satisfying sew.

The Last Summer Project:  Simplicity 1887 Shorts (in Sparkly Linen!)

Thanks to my husband for the pictures.  And if you want to read up on the shirt that I’m wearing, you can find that project here.

And now?  On to projects that will transition into fall!  I already have several cut out.  I’ll report back soon!  What are you working on for fall?  What is inspiring you?


Simplicity 8172 Jacket in Polyester Crepe de Chine

Standard
Simplicity 8172 Jacket in Polyester Crepe de Chine

I’ve been thinking about adding some jackets and cardigans to my wardrobe, and Simplicity 8172 is a great summer version of that idea.  Layers can add a lot of fun to an outfit as well as giving you numerous mix and match options.  Living in New England, where summer evenings can get cool, this pattern made sense.

Simplicity 8172 Kimono Jacket

I started out with View A, the shortest and boxiest view.  I wanted to see if I liked it or if I would want a longer version.  I had leftover polyester crepe de chine from the Megan Nielsen Eucalypt Tank I made last year, and I hoped I could squeeze this jacket out of it.  The fabric came from Hobby Lobby’s clearance section a few years ago, so it was inexpensive and perfect for testing out this pattern.

Simplicity 8172 Kimono Jacket

l

Simplicity 8172 Kimono Jacket

It was pretty tricky, but I managed to get the pieces cut out of what was left, although there was no chance of any sort of pattern matching.  The sewing itself was pretty easy.  It’s only two pattern pieces and three seams (shoulders and back).

Simplicity 8172 Kimono Jacket

l

Simplicity 8172 Kimono Jacket

I used French seams to keep things neat inside.  Then you use bias tape around the front/neck opening and hem the sleeves and bottom.

Simplicity 8172 Kimono Jacket

l

Simplicity 8172 Kimono Jacket

I took the opportunity to practice using my narrow hem foot with the instructions in my machine’s manual rather than the pattern instructions.  After that, you sew on the trim, and you’re done!  I thought about skipping the trim, but I’ve had this pom-pom trim in my stash for ages (maybe it’s from Joann’s?), and thought that adding it kicked the project up a notch.  Even if I gave it away, it would be fabulous for someone else.

Simplicity 8172 Kimono Jacket

After finishing, I tried the jacket on, and…it was ok, but not awesome (although the pom-poms helped).

Simplicity 8172 Kimono Jacket

l

Simplicity 8172 Kimono Jacket

l

Simplicity 8172 Kimono Jacket

I don’t love where the bottom sits, but I still think it has potential, so I’d like to try View C.  I was talking it over with one of the librarians at our library when it came to me–if I find a coordinating fabric, I can trace out and cut the lower pieces and cuff and attach it to what I’ve already made, turning my View A into a shiny, new View C.  If you decide to try this pattern and view, I found that it did look better on my friend who was shorter than me (I’m 5′ 8.5″), so if you are shorter, it might be just right for you.

If a future version ends up being a winner, I think it could be great in a handkerchief linen.  Or what would it be like in ankara/wax print, crocheted lace, or a knit?  It definitely has potential.

Recommendations

  • Are you watching “Making It” on NBC?  It’s hosted by Amy Poehler and Nick Offerman and is a friendly competition show that features makers who work in all different media.  They complete two challenges per show and one is eliminated at the end.  It’s funny and people are kind to one another, which is a welcome change from some of the cutthroat reality competition shows.  We don’t have cable, but I’ve found that I can watch it for free (older episodes) through my Apple TV.  You can find it on NBC’s website as well.
  • I’ve never been into fitness videos, but lately my family and I have been trying out some of the free workout videos on Fitness Blender, and I have to say–I like it!  They have a really encouraging, positive approach.  My regular exercise routine died sometime in February, so I’m thinking of ways to get back to it and improve my strength, fitness, and flexibility.  I think this might be part of the answer.
  • I have a favorite jacket that I thrifted that doesn’t fit me as well as I would like it to.  I’ve been toying with the idea of recreating it, and I wonder if Simplicity 8700 from Simplicity’s new Pattern Hacking line would make a good base.  The jacket has lots of seam lines, but at its core, it’s very similar to this pattern.

Summer’s Last Garment: Simplicity 1020 Pants

Standard

Fall has officially started (the autumnal equinox was Thursday, September 22), but I still have one more summer garment to share with you.  I also have a few other projects I did during the summer, but those are great for any season, so we’ll save them for another time.  Today I want to talk about these pants!

Simpicity 1020 linen/cotton pants

I really wanted some wide-leg linen pants for summer, and I also wanted to try sewing with linen, something I hadn’t done until I made this Datura blouse (also pictured).  When trying to find a pattern for the pants I had in mind, I remembered some scrub pants I owned in college.  They had a wide, straight leg and were the ultimate in comfort.  Since I hadn’t been able to find a pattern I really liked among the “regular” clothing patterns, I turned to the scrub patterns, and found Simplicity 1020.

Simpicity 1020 linen/cotton pants


Simpicity 1020 linen/cotton pants

I figured I could use that and just leave off a few of the extra pockets, keeping the front and back ones.  I found my fabric at Fabric.com–a Kaufman Essex Yarn Dyed Linen blend (55% linen, 45% cotton) in blue and a cotton/rayon (50% cotton, 45% rayon, 5% Lycra) knit in Indigo for the top of the pants.  Other than that, I just needed elastic and thread, which I had in my stash.

I made a quick muslin out of a sheet since I’ve had to do so many fit adjustments on recent bottoms, but while these could maybe have been tweaked slightly, they were good overall, and I decided to make them without adjustments.  This makes me wonder if the Simplicity pants/shorts patterns will fit me better (i.e. with fewer adjustments) than McCall’s and Butterick.  I’ll have to explore that as I make more pants.  The pants themselves were not too difficult to sew up, although I did prolong the process by finishing all my seams.  Finishing seams used to feel like such a chore and while it still does sometimes, I didn’t want thready insides once these pants were finished and went through the wash.  I used a turned-and-stitched finish (a.k.a. clean-finish) per the instructions in the Reader’s Digest Complete Guide to Sewing.

Turned-and-stitched/clean-finished seam allowances

The linen seemed too thick for French seams, although I’m open to hearing about other finishes people have used.  I also basically did a double turned hem for all the pockets and then topstitched them on so that I wouldn’t get threads in the pockets, either.  Last, but not least, I covered the seam where the main pants fabric joined the knit waist fabric with bias tape.

Simpicity 1020 linen/cotton pants

All of that added quite a bit of time, but I was really happy with these when they were finished.  I don’t know what has happened to me, but it makes me really happy to see those beautiful insides in a project.  I guess I’m “growing up” as a sewist.  😉

Simpicity 1020 linen/cotton pants

I think my only question on the whole thing is the hem length.  If I had hemmed these at the suggested spot, they would have been long, but probably good with heels.  I turned them up one more time so I could wear them with flatter shoes, and I think that is the right length for lower shoes, but sometimes, at some angles, they look a little bit like floods. (Wow.  I just used Google Images to look up “flood pants”.  It was a little different than I expected, but I think my statement still stands.)  I didn’t actually cut my excess off the hems, so if I change my mind later, I can rehem them to be longer.  I’m done with them for this year, though.

Simpicity 1020 linen/cotton pants

Simpicity 1020 linen/cotton pants

These pants are super comfortable (secret pajamas for the win!) and they wrinkle much, much less than I thought they would–maybe because of the cotton blended in?  I think of cotton as pretty wrinkly, but who knows?  Maybe because of the midweight?  I don’t know.  Whatever it is, I’m happy with them.  Now it’s on to fall sewing!

Simpicity 1020 linen/cotton pants


Simpicity 1020 linen/cotton pants


Simpicity 1020 linen/cotton pants

Recommendations

  • Here’s one more post from Cotton + Steel about the fabric called cotton lawn.  Sounds like lawn is a winner for your button up shirt needs.
  • I’m really impressed and intrigued by the embroidery of Tessa Perlow.  This article about her has some great pictures so you can get a feel for what she does.  I think I’d like to try adding embroidery to some of my garments someday…
  • If you are a garment sewist in fairly close proximity to Exeter, NH, you might enjoy the Pattern Review Meetup happening at Pintuck & Purl this Saturday, September 24 from 2-4pm.
  • Jellyfish or jelly fish?  Be careful how you say it!

A New (Awesome) Shirt! Simplicity 2255 in Cotton + Steel Paper Bandana

Standard

Hi, sewing friends!  It feels like forever since we’ve had a good old basic sewing post.  So that’s what we have today.  I love doing special projects and field trips and, honestly, taking a break from blogging has allowed me to build up a nice backlog of projects to share with you, but it’s also nice to get back to the normal, everyday type of sewing stuff.  A little break makes it feel more special, and it makes me excited to share things with you.

So, all that to say, I made a shirt!  And I love it!

Simplicity 2255

Simplicity 2255

The pattern I used was Simplicity 2255, which first came to life in my closet in an orange iteration last year.

Simplicity 2255

Simplicity 2255

This time I made the same view (View D) in the same size (16 at the bust, 18 at the waist and hips), but I left off the pocket, and I didn’t mess up the bias binding on the armholes!  Progress!

Simplicity 2255

Simplicity 2255

I will say that the shirt feels different in the quilting cotton I chose this time around than the voile-like mystery fabric I used last time.  I think I would like the armhole to be slightly larger, so I looked in some fitting books and, if I make this again, I’m going to try scooping out the bottom curve of the armhole just a bit, although I’m open to other suggestions if you have them.  It’s not uncomfortable exactly, but it feels a bit high and like there should be more room.  This wasn’t something I noticed in the first version.

I’d had my eye on this fabric for a long time, but what I didn’t see until my friend pointed it out, was that the pattern on this fabric almost makes a sort of plaid.  (Thanks, Maggie!)  I haven’t really delved into much pattern matching, but I decided to try to generally match the horizontal lines, and it turned out pretty well!  I’m happy with it.  I’m also really in love with the vintage buttons I used that came from my mother-in-law (Thanks, Mom!).

Simplicity 2255

I’m trying really hard to pay attention to what I most like to wear in each season and what I feel good in.  For summer, I’ve decided I like looser things so the breeze can keep me cool when I’m wearing them.  (In contrast, I find that I want to be wrapped up in blankets in the winter, hence “secret blanket clothing”.)  This shirt is definitely loose and breezy, and I feel super cool when I’m wearing it (literally and figuratively).

Here are a few detail shots.

Simplicity 2255

Simplicity 2255

Simplicity 2255

So, that’s about it for this shirt!  I’ve worn it two times this week, and I washed it yesterday so I can wear it again today.  Don’t judge (or if you have to, keep it on the inside)!  😉

Simplicity 2255

How about some Recommendations?

  • When I get the chance to watch TV these days, I’ve really been enjoying Atelier, a show created by Netflix and Fuji TV about a girl just out of school (college? grad school?) who goes to work in a custom lingerie store in Tokyo.  Unlike an American show, this isn’t smutty or racy, but is a really heartwarming story about learning to take pride in making quality work and to prioritize your customers, co-workers, and friends above your bottom line.
  • Hila’s blue dress over on Saturday Night Stitch is so cute.  I love it!  She copied a ready-to-wear dress, and I’d say she nailed it.
  • Allie J. interviews Deborah Kreiling of Simplicity, and they talk all about Simplicity’s vintage rereleases.  It’s really fascinating to get an inside look at Simplicity’s process.
  • And because I try to share the new things I find with you, I bring you an Olympic sport I missed the first time around:  ballet skiing.  I’ll leave it up to you to decide if the world is better or worse without this in the Olympics.

Tiger Shirt!!!! Simplicity 1538 Perfected

Standard

I’m so excited to share my latest project with you today.  I LOVE this shirt.  There are two reasons I love it so much.  The first is this awesome Cotton + Steel pink tiger fabric.  The second is the fit!

Simplicity 1538

Ping of Peneloping was my inspiration for this project.  Her tiger shirt is amazing (as is everything she makes), and it set me on the quest for my own tiger shirt.

You may remember my first attempt at this pattern, made from a vintage sheet.  I really loved that shirt.  It was beautiful, except for being too tight across the back.

Simplicity 1538

Simplicity 1538

I also realized, in trying it on before making this one, that the darts were slightly too high.  Luckily, I had just learned both how to do a broad back adjustment AND how to lower darts.  After doing both of these things to this pattern, I think I may have found my perfect casual button-down…and I have worn it a billion times since making it.  I’m actually afraid of wearing it out.

This post is going to get a bit technical in the hopes that it might help someone else out there.  I won’t go into lowering a bust dart because The Curvy Sewing Collective blog just did an excellent post on this.  You can find that here.

I will, however, show you pictures of the major broad back adjustment I did in case anyone else is working on learning how to do this.  I showed how I did this on a princess-seam shirt in this post.  Today’s shirt, Simplicity 1538 does not have princess seams, but does have a yoke in the back.

Simplicity 1538

Simplicity 1538

Now is the time to skim if you don’t care about the technical aspects of this project.

As before, I used the information in The Perfect Fit, part of The Singer Sewing Reference Library.

Singer Sewing Reference Library:  The Perfect Fit

Because I knew my back measurement, I could measure the pattern to see how much width + ease I needed to make the shirt comfortable when sewn up.  The pattern was 15 inches across the back.  I needed 17 1/4-17 3/4 inches in order for this to be comfortable on me.  (I mention how I measured for this in this post.)  This meant I had to add 1 1/8-1 3/8 inches to this pattern piece (since it only represents half of the back).  I decided I would try adding 1 1/4 inches with a major broad back adjustment (rather than a minor adjustment, which just adds a little width to the back armhole curve).

Major Broad Back Adjustment on Simplicity 1538

Here are my pieces before alteration:

Major Broad Back Adjustment on Simplicity 1538

I have a full yoke piece and a half bottom back piece.  I folded the yoke in half so that the edges of each side could be adjusted simultaneously (and hopefully identically).  You’ll see that my yoke is narrower than the back bottom piece.  That’s because there is a little bit of gathering below the yoke on the center back.  As the shirt is sewn, they become the same width.

For the major adjustment, I taped the yoke to the bottom piece of the back so I could work on them as one.  I made sure to overlap them by 5/8 inch to account for seam allowance.

Major Broad Back Adjustment on Simplicity 1538

Then I drew a line from the middle of the shoulder seam down to the waist and parallel to the grainline.  (I’m more or less quoting from the book, but since you may not be able to read the picture in the book, hopefully this will be helpful.)

Major Broad Back Adjustment on Simplicity 1538

 Next I drew two horizontal lines perpendicular to the one I had just drawn.  Line number one went from the middle of the armhole over to my first (vertical) line and line number two went from about 1 inch below the armhole to my vertical line.  Since line number one coincided with where the yoke joins, you can’t see it, but I’m pointing to the two new lines with my fingers in the picture below.

IMG_6Major Broad Back Adjustment on Simplicity 1538967

 Next, cut out along the lines you just drew so it looks like this:

Major Broad Back Adjustment on Simplicity 1538

 That little ‘almost rectangle’ you have is what you will slide out the amount you need for that half of your shirt (so, it’s half the total amount you need across your back).  In my case, I slid that piece over 1 1/4 inches.  The book notes that the maximum you should slide it out for sizes smaller than 16 is 1 inch.  For 16 and up, you can slide it a maximum of 1 1/2 inches.  Since I had cut a 16 at the bust and an 18 at the waist and hips, this worked for me, and would give me a total amount of 2 1/2 inches across my whole back when the shirt was cut out.

Once you slide that piece out the amount you need, place some paper beneath it and tape it down.  It helps if the paper extends out beyond the edges of your pattern by the armhole and side seam since you will have to redraw those areas now.

I found this part kind of tricky.  I felt like I was making it up as I went along, but here is what I did.  I used my curved ruler to redraw the seamline itself, and then I added my seam allowance in afterward.  I just sort of slid the ruler around until it seemed right.

Major Broad Back Adjustment on Simplicity 1538

Major Broad Back Adjustment on Simplicity 1538

I also had to redraw the area below the armhole, blending the armhole into the side seam.  Again, I felt like I didn’t know what I was doing, so I took my best guess.  Then I cut out my altered pattern pieces (back bottom and yoke).

Major Broad Back Adjustment on Simplicity 1538

Major Broad Back Adjustment on Simplicity 1538

Because my yoke piece was actually a full piece that I had folded in half to do my alterations on, I had to make sure that I had the correct and identical alterations on both edges.  Don’t forget to move any markings (like notches and dots) to an equivalent place on your altered pattern pieces.

A really great thing about this alteration is that it doesn’t change the length of the shoulder seam.  If it did, I would have to adjust the front shoulder seam as well.  The length of that seamline wasn’t my problem, and neither was the size I had chosen.  The width of the shoulders in the back was the issue (and one I also have with store-bought clothing in woven fabrics).  This alteration completely fixed that, and now the shirt is wonderfully comfortable across my shoulders.

Simplicity 1538

The other thing that I did was to lower the front dart by an inch.  I found my information for how to do that in The Perfect Fit as well.  As I mentioned above, The Curvy Sewing Collective did a great tutorial on this very thing.  If you find that dart height is an issue for you, you should check out that post.

Even thought I’m not going into the details, I will show you how my front pattern piece looked after I moved the dart down.

Lowering a bust dart on Simplicity 1538

Lowering a bust dart on Simplicity 1538

I’m glad I didn’t go any lower, and I was a little nervous that the inch had been too much, but after wearing the shirt often, I think it turned out great.

Simplicity 1538

Technical details now finished.  Time for pretty pictures!!!

We found the best background for these shots, and it was actually sunny, too.  All that color + sunshine makes me happy.

Simplicity 1538

Simplicity 1538

Simplicity 1538

And one little fabric and topstitching close-up.  Love those tigers!

Simplicity 1538

Wow!  That was the most technical post I’ve written in a long time (or ever?).  How about some fun?

Recommendations:

  • I’ve got another podcast for you!  Now that I’m out of school, I’m discovering that history is interesting.  😉  I can see how valuable it is to know the past because then you understand why things are the way they are today and how you can avoid the mistakes of the past (hopefully).  It’s also just interesting.  I have long loved “Stuff You Missed in History Class”, but now I have to add “The History of English Podcast” to my list as well.  I realized I was really into it when I went back to episode one and started binge-listening.  It’s not about technical things like grammar, but more a broad history lesson about how languages are related and how the English of today came to be.
  • Have you heard about Me Made May?  If you are a seamstress/stitcher/sewist you should check it out.  It’s a personal pledge to wear your handmades throughout May.  You can challenge yourself to wear one for the month, one every day, or all handmade all month.  It’s whatever you choose.  I participated last year and loved it, and I’m planning on doing it again this year.
  • One of my librarian friends recommended the movie “The Woman in Gold” to me.  (Thanks, Laura!)  It’s the story of one of Gustav Klimt’s most famous paintings, the family it belonged to, and justice long after a wrong had been committed.  Here is the trailer:

Rainbow Skirt: Simplicity 2215

Standard

Let’s pretend that Jackson Pollock was a finger-painter instead of a paint flinger.  Then, we can pretend he painted the fabric for my skirt.

Simplicity 2215; Skirt

This is not what happened since Jackson Pollock is no longer with us and I don’t think the little I know of his personality matches up with a rainbow skirt, but oh well.  Sometimes it’s fun to imagine things.

So how about a new skirt?  🙂  Here’s what I’ve got for you today.

After the beloved outfit I created to wear to my friend’s wedding in January, I decided that I really wanted to find a pattern that was similar to that skirt.  The original skirt has pockets, pleats, a waistband, and is just the right length.  I could teach myself how to copy or draft this, but I don’t want to!  Right now, I just want to sew.  I came up with a few contenders, but one of the most promising was Simplicity 2215, a Cynthia Rowley design.  I was able to get this pattern at a Jo-Ann’s pattern sale for a few bucks.  I love those pattern sales for building my pattern library (and I do think of it as a library!).

Simplicity 2215; Skirt

Simplicity 2215; Skirt

I decided to pair that pattern with some stretch twill that I got at Hancock Fabrics in Indiana last summer.  I kind of wish I had more of that fabric.  It would be great for a pencil skirt or some close-fitting pants AND it contains nearly every color of the rainbow in the hues that I like to wear.  It does NOT contain purple, but it just so happens that purple looks great with it!

Simplicity 2215; Skirt

The details (a.k.a. a good time to skim if you are not into sewing details):

I made a size 18 with no adjustments, and I made View C, the skirt.  (You can also use this pattern to make a sleeveless button down shirt or dress).

Simplicity 2215; Skirt

There is a note in the pattern that states that the pleats are uneven on purpose.  I was glad for that note, so I didn’t have to waste time wondering what was going on with them.  After cutting out the fabric, I took a long time to mark each pleat and even to draw in the arrows so that I would know which way to fold the fabric.  This was really helpful.

Simplicity 2215; Skirt

Simplicity 2215; Skirt

The only other necessary items beyond fabric that you need for this skirt are some interfacing, a little bit of lining fabric for the pockets (I think I used a scrap of handkerchief linen because I liked the white color), an invisible zipper, a hook closure, and thread.  I bought my zipper at Jo-Ann’s, but everything else was in my stash.  The one great thing that I have never had before but had this time was my new invisible zipper foot!  I got that at Marie’s Sewing Center in Woburn, MA, which is where my Mom got my sewing machine a bunch of years ago.  They gave me a 25% discount on the zipper foot!  🙂

After the cutting, which wasn’t hard, and the marking, which took awhile, the sewing was pretty easy.  I was nervous as I put in the zipper, hardly believing that the whole invisible thing would really work, but it did!  I was so happy!  One sort of odd thing (to me, at least), was that the zipper, rather than being in the back, is right next to one of the pockets.

Simplicity 2215; Skirt

I think I would prefer it in the back, but it’s not really a big deal.  The fit is very comfortable, but maybe on the slightly looser side.  The nice thing is that this allows it to sit a little bit below my natural waist, which I like, but I could potentially size down.  That’s a decision for another time, though.  I also added a little ribbon tag because I was afraid I would put the skirt on the wrong way otherwise!  😉

Simplicity 2215; Skirt

And that was it!  New skirt!  (I may not look excited in these pictures, but don’t worry, I am.  I was just under the weather on photo day.)

Simplicity 2215; Skirt

Simplicity 2215; Skirt

I realized at the end of last spring/summer that I didn’t have many skirts in my wardrobe for those seasons, so I’m very happy to add this one.  I can see wearing it with both my purple button-down, as pictured, and my pink and white gingham shirt (both Butterick 5526).  That last one will be some crazy pattern on pattern…which will be great!  I’d recommend this pattern to anyone who is interested in this type of skirt.  The other views in the pattern look pretty cool, too.

Now for some fun recommendations to enjoy over the weekend (or any time!):

  • I know I’ve reviewed it before, but it’s still a favorite for me:  The King Arthur Flour Whole Grain Baking cookbook.  It doesn’t help you hide gross-tasting, “healthy” whole grains in your food…it has delicious recipes made with whole grains.  In fact, I have a Peach-Blueberry Cobbler in the oven right now!
  • I just checked out Gertie’s Ultimate Dress Book by Gretchen Hirsch from my library.  It’s her newest book, and it looks really good so far.  Whether or not you are a big dress wearer, this book is full of amazing reference material.  I feel that this is a bit beyond my current sewing skills in an exciting way that makes me want to learn more.
  • Spring!  Want to know my favorite source for really interesting seeds?  Baker Creek Heirloom Seeds.  I discovered them through a Martha Stewart Living magazine article years ago.  Their catalogue is one of the highlights of  my winter.  Sadly, this year, garden planning has gone by the wayside (Surprisingly, it is not actually possible to sew all the things, cook and bake all the things, forage for all the things, grow all the things, and decorate all the things plus be a phenomenal wife, mother, and friend!  Who knew?), but most years I order in January or February because it’s just so exciting to think about spring.
  • As an American who wishes we had more bike paths, I find this video on Bicycle Rush Hour in Utrecht (Netherlands) really fascinating:

Happy weekend!

A Vest from a Men’s Shirt, Secret Christmas Pillowcases Revealed, and Sewing Ideas for 2016!

Standard

Nothing like a long title, right?  😉  There are plenty of projects and ideas for projects floating around my head these days, so I think it’s time to power-share!  (There’s another word for the dictionary.  Makin’ up new words all the time over here!)

When I think about new projects to share, I keep forgetting to post this vest that I made.

Simplicity 1499 (vest)

My original plan for it was to be an additional entry in the Refashioners Contest last year, just to pad out my entry, but I’m glad now that I took it off my list.  It wasn’t too hard to make, but it isn’t anywhere near the quality of the jacket I made as my one and only entry.

When the cooler weather sets in, I start thinking of polar fleece and really anything warm, so when I found this oversized men’s fleece-lined flannel shirt at the thrift store, originally by L.L. Bean, I knew I wanted to use it (similar shirt here).  I found this pattern:

Simplicity 1499 (vest)

Simplicity 1499 (vest)

After reading the reviews on Patternreview, I convinced myself that I could create a J.Crew-esque style vest.  Well, that didn’t exactly happen, but it’s cozy!

The good and bad part of getting better at sewing, is that now I am less satisfied when my own sewing is of a lower quality.  What a problem to have, right?  I know I am “supposed” to match up plaids and make things look pretty inside, etc., etc., maybe make sure my pockets are on the same level, but you can’t have it all.  I made this out of a shirt.  That’s cool!  I’ll learn to match plaids another day.

As far as any other details the sewing people among you might be interested in…I made View A, minus the quilting.  I cut a size 16 and graded out to an 18 in the waist and hips.  This may not have been necessary.  It’s fairly boxy and loose, but I wanted to be able to wear it over sweaters.  Instead of putting in the zipper, I left the buttons from the original shirt.  I also took off the original chest pockets.  In the process, I may have made a few holes, but that was an opportunity to return to my old standby of running over any sewing problems with my machine, and I just sewed over them until they blended in.  Problem solved!

The other problem I ran into was that I ended up with “wings” at the front of the armholes.

Simplicity 1499 (vest)

Simplicity 1499 (vest)

I did actually go back and take off the bias binding and try to take the princess seams in a little bit.  It worked better on one side than another, and I’m a lot happier having tried.  It definitely fits better now.

Learning to do a sway-back adjustment is on my mental list of things to learn, but I’m trying not to tackle too many new techniques at once, so that one is for the future.  Dealing with the armholes was my fitting experiment for this pattern.

Simplicity 1499 (vest)

Simplicity 1499 (vest)

Overall, I think the pattern is good.  This isn’t my favorite thing that I have ever made, but I like it and I’ve worn it and will wear it again.  I don’t know that I will keep it in my closet for the ages and pass it down to my children, but I guess you never know.  More fleece is always better than less fleece in the winter, so it may survive longer than I think.  I would try the pattern again if I decide I want another vest.

On another topic, I wanted to give you a quick look at a few pillowcases I made as Christmas presents.  I used a tutorial on the Sew Mama Sew blog that is actually an excerpt from a book by Shea Henderson called School of Sewing.

Pillowcases

Pillowcases

I bought the border print for the first pillowcase as well as the panda seersucker in Michigan over the summer at The Material Girls in Dearborn, MI.  The coordinating fabric on each pillowcase is from Joann’s.  These really were easy to sew and I’m sure I could use the tutorial to make fancier ones in the future as well.  I keep telling myself that if I would just make a billion pillowcases and cloth napkins, I could use up my stash and replace my worn pillowcases and napkins, but so far clothes are too much fun.  Except for these two pillowcases, clothes have won out every time.

Lastly, do you have sewing plans for 2016?  I have ideas.  I’m not calling them plans because my ideas of what I want to make often change throughout the year, but here is what I have so far.  I saw the #2016makenine challenge on Instagram, and decided to jump in…except I ended up with ten.  This makes me sound like a total overachiever but, like I said, these plans will flex and change throughout the year, and I doubt everything will get made.

#2016makenine

Top row, left to right:  Butterick 5526, Megan Nielsen Briar Sweater and Tee, Simplicity 1538

Middle row, left to right:  Jalie 3134, Megan Nielsen’s Mini Briar, Jalie 3023

Bottom row, left to right:  Strathcona Henley by Thread Theory, Coco by Tilly and the Buttons, Jutland Pants by Thread Theory

(most links to these patterns are below)

+

#2016makenine

Ginger Skinny Jeans Pattern by Closet Case Patterns

 I’ve already cut out some Jutland Pants by Thread Theory for my husband (I’m actually doing a muslin/test garment for this one), and I’ve traced out the Strathcona Henley for him, too.  Lest you start to think I’m abandoning my really good streak of selfish sewing, you should probably know that I LOVE henleys, so once I make him one, I plan to adapt the pattern into one for me as well.  (And how about a girl version of some fleece-lined Jutlands?  Sounds like wintry heaven to me!  I’m saving that idea for the future!)

In the top row are some shirts I’ve tried before, and I still have fabric from the summer to do additional renditions of those.  My first version of the princess seam button down on the top left (Butterick 5526) should make an appearance on the blog soon since I made it to wear to a wedding.  I already whipped up a quick Briar fleece shirt (still to be blogged) to wear for travelling to the wedding, and I need to make a broad back adjustment to the pattern for the button-down on the right (Simplicity 1538) before remaking that one.

You can see I still have bathing suits on my list, maybe some kids’ Briars, and a shirt version of the Coco pattern by Tilly and the Buttons.

AND…JEANS!  I think it’s time to start learning to sew more fitted bottoms, so jeans are on the list.  I’ll keep you posted on that!

Do you have any sewing or other project ideas for this year?  I’d love to hear about them!

Simplicity 1538, The Button-Down Shirt

Standard

One of my current sewing goals is to learn to make button-down shirts.  I’ve tried drafting one before, courtesy of the instructions in Cal Patch’s pattern drafting book, but I wanted to learn how to sew one from a commercial pattern and, hopefully, fit it.

My first long-sleeved attempt is Simplicity 1538, View A, minus the studs they recommend on the front yoke.  I made a size 16 in the bust and graded out to an 18 for the waist and hips.

Simplicity 1538

Simplicity 1538

Simplicity 1538

Simplicity 1538

Simplicity 1538

Because this is my first attempt at this pattern, I found a bed sheet in my stash that I liked, and used that for fabric.  It seemed like the best way to go before trying out more costly fabric.  Interfacing came from my stash, but I think the time is soon approaching when I’ll actually have to go out and buy more of that!  The buttons (and they are buttons, rather than snaps) were a drama all their own.

These are the same buttons that I used in my orange shirt, and I had one left.  I really loved how it looked on this shirt, so I went to Joann’s to get more.

And they had one package of three buttons.

I needed 10 buttons.

So, several days later, I drove down to another Joann’s and looked through all their buttons.  I didn’t see a single package.  I was nearly ready to leave with my other supplies, when I decided that, since I had come all the way down here, I should just ask.  And I got the lady who stocks the buttons!  She explained how the buttons were organized and helped me find what I needed.  They actually had four packages that I had managed to overlook.  I know!  Sad on my part.  I only needed two packages…but I bought all four since they were on sale (and I was worried something would happen and I would need/want more).  So that’s my story.  😉

Now back to the pattern!  The fit is great, except…the shoulders are too narrow for me.  You can see the strain at the edges of the yoke and in the shoulders in the front.  The next time I make this, I’ll try out a broad back adjustment.  I’m tempted to do it on this pattern and try turning it into a popover shirt, which would mean cutting the front piece on the fold, rather than as two pieces, and inserting a partial placket down the front.  I know they are kind of sewing-blog-trendy at the moment (check out Dixie’s and Sallie’s), and I pretty much got sucked in.  Now I want one, and I keep envisioning some of my fabric in popover form.  It doesn’t hurt that Indiesew just posted a tutorial on putting in a partial placket.  Maybe it’s destiny.  😉

Simplicity 1538

Simplicity 1538

Simplicity 1538

Despite the shoulder width problem this is a very wearable shirt.  I really like it, and it fits my style.

The one change I might make to the directions is on step 47 (yes, there are A LOT of steps–I will never take a button-down shirt for granted AGAIN!).  It tells you to press under 5/8″ on the neck band facing, but I think next time I’d try just pressing under 1/2″.  When sewing from the outside, I didn’t catch hardly any of the facing in my top-stitching , and I had to go back and sew the facing down by hand.

Despite that, making this shirt was fun and I’d do it again.  It was a billion steps, but skill-wise, it was at my level, and I’m proud of my work.  The inside looks great with a few French seams and a few bound seams (similar to the orange shirt, but just a little better), and I think the topstitching turned out well, too.  Also, the way they have you do the yoke is pretty darn cool.

Simplicity 1538

Simplicity 1538

I’ve traced out a pattern for a princess seam button-down (I blame Lladybird/Lauren–she makes me want to copy her ALL THE TIME.), and I’ve been looking into the popover option.  These plans may get sidetracked by Christmas and *gasp* sewing for others, but we’ll see if that really happens.

In case you want a look at what is tempting me to sew for someone beside myself, you can check out Thread Theory’s Jutland Pants and their Strathcona Henley.  Maybe I’ll actually sew something for my husband! 

The other big temptation is the new sewing patterns for girls that Megan Nielsen just released.  I was a pattern tester for the Mini Tania Culottes.  Check out what I and others made in this post on Megan’s blog.  She also released patterns for Mini Virginia Leggings and, my favorite, the Mini Briar Sweater and Tee.  I think that Mini Briar pattern is calling to me, especially since Megan gave her testers all three patterns as a thank you.  I love a new pattern!


The Last Shirt of Summer

Standard

Hi, Friends!  I hope you are doing well on this rainy fall day.  I have several unblogged projects to share with you in the coming weeks as well as, hopefully, a favorite children’s book of mine, but today is all about finishing up my last summery make.

One of my sewing goals this year is to learn to make button-up/button-down shirts (which one is it?).  In the “big batch of sewing” that I took on this summer, there was a short-sleeved button-up shirt on the list:  Simplicity 2255.

Simplicity 2255

Simplicity 2255

I have some lovely pink voile from Pintuck & Purl set aside for this (unless I change my mind, of course–don’t hold me to that!), but first up was a wearable muslin so I could see if the pattern needed any tweaking.  Luckily, my friend’s mother gave me some fabric when she cleaned out her stash, and one piece was an orange fabric similar in weight to the pink voile.  Perfect!

The only alteration I did initially was to grade from a 16 in the bust to an 18 for the waist and hips.  Since I trace my patterns onto tracing paper, this is pretty easy to do.  It’s also pretty standard in that I normally wear a smaller size up top than I do on the bottom in both sewing patterns and ready-to-wear clothing.  I made View D which has short sleeves and a single pocket with a banded collar.  That seems like a good first step in making button-down shirts.  (I have drafted my own button down shirt before, but then I changed sizes, so it ended up not being quite as wearable, and I really wanted to learn to follow sewing directions in a pattern for button-downs.)

Simplicity 2255

Simplicity 2255

I had a few ups and downs with this shirt, but overall, I’m really happy with how it turned out.  I was also really happy that I finished in time for the last warm day in a strange warm week we had in November, so I even got to wear it despite the fact that it’s fall and I live in New England.  The shirt does have a few mistakes, but luckily they are the kind that only I will see (If anyone else is looking closely enough to see them, I think we have other issues.).

So, the parts that tripped me up were using binding on the seams that join the sleeves to the body.  I am most familiar with double fold bias binding, but this was single fold.  I think I sort of treated it like double fold and, in the end, I fudged it because I didn’t feel like redoing it.  That resulted in a few stitches that you can see from the outside on the sleeve, but whatever!!!  Better done than perfect and unfinished.  I also had a little trouble putting in my first buttonhole, but I’m ignoring that, too.  🙂  I was unsure if I had the orientation correct when I attached the collar, but it looks good, so I must have gotten it right.  I think I may have forgotten to draw one of my notches on my traced pattern.  Otherwise, mission accomplished with quality sewing.  I wrote myself some notes about where I made mistakes so I would remember for next time.  Now I’ll just have to see how much I wear this next summer.  I really loved it for the one day I wore it this fall, though, and I’m excited to wear it again when the weather is warmer.

Simplicity 2255

As far as the style goes, I’m a bit unsure about if I like the sleeves or not (my husband called them “awnings”), but I think they may be growing on me.  I also think that I may need to teach myself how to do swayback adjustments at some point since I tend to get a little bit of pooling fabric on my lower back pretty frequently when I make shirts.

Simplicity 2255

The buttons and other notions like thread and bias binding are from Joann’s.  I was hoping to take some close-up pictures of everything for you, but it is super dark here today and now the sun sets before 4:30 in the afternoon.  Isn’t that crazy?

From here on out, I venture into colder weather sewing.  I only have one thing left on my “big batch of sewing” list (a long-sleeved button-up shirt), and then it’s whatever strikes my fancy + Christmas presents (shhh!!!)!

Update:

I wanted to give you a few pictures of the inside of the shirt, and finally got some on a sunnier day.  I tried to finish all my seams, but you can see my trouble spot on the sleeve.  Still, I got through it and I hope to do even better on my next shirt.  Onward and upward!

Simplicity 2255

Inner front

Simplicity 2255

Inner back

Simplicity 2255

Inner sleeve detail