Tag Archives: jacket

Winter Sewing, Part Two: The Green Pepper #507 Polar JACKET in Polartec Fleece

Standard
Winter Sewing, Part Two:  The Green Pepper #507 Polar JACKET in Polartec Fleece

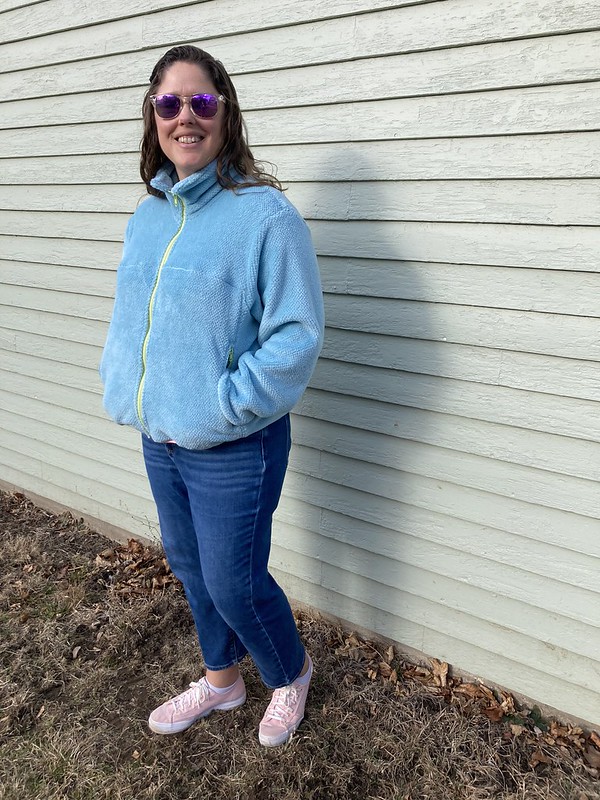
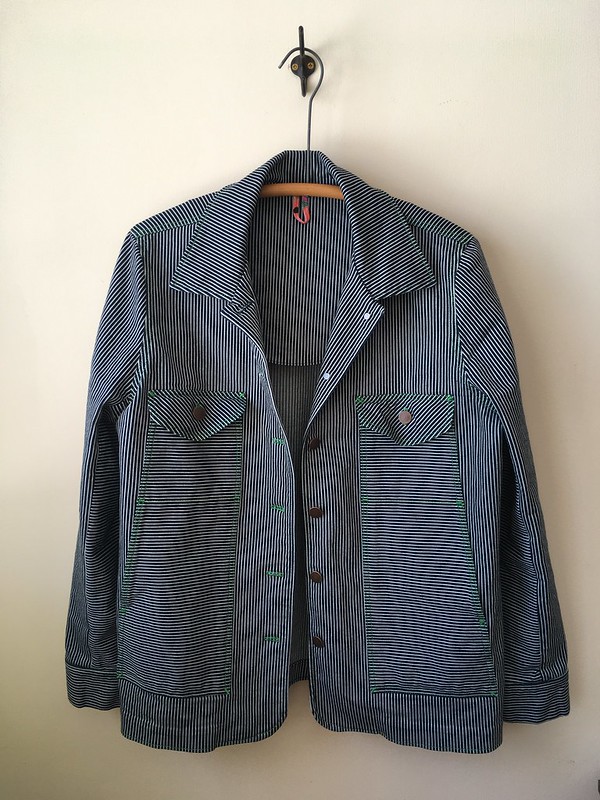
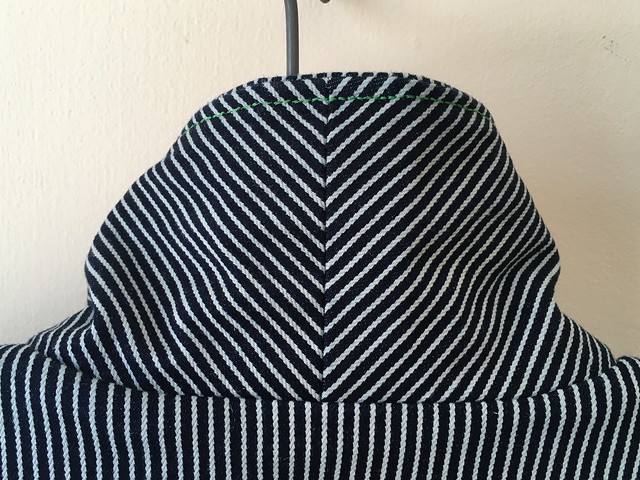
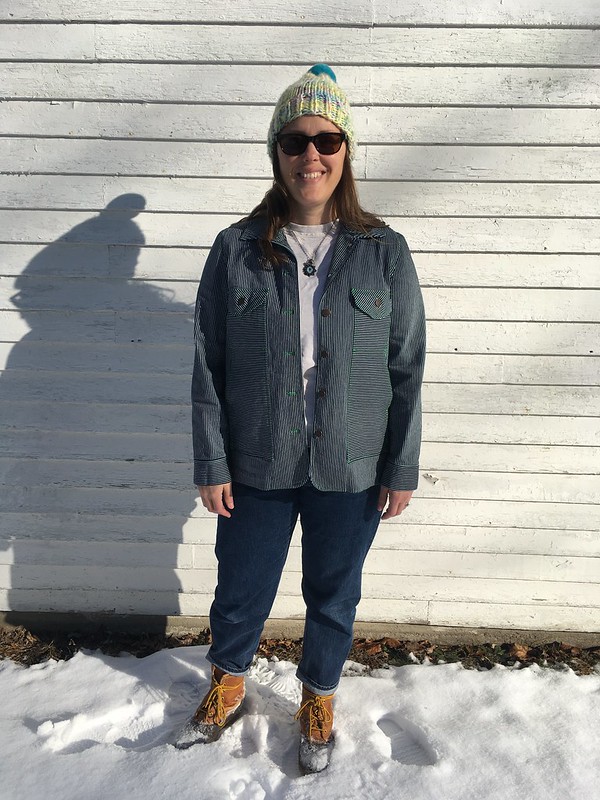
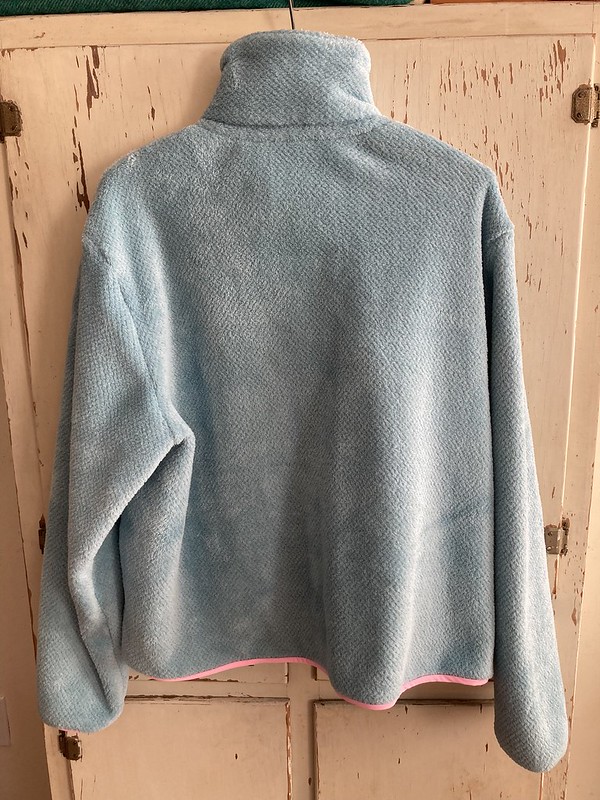
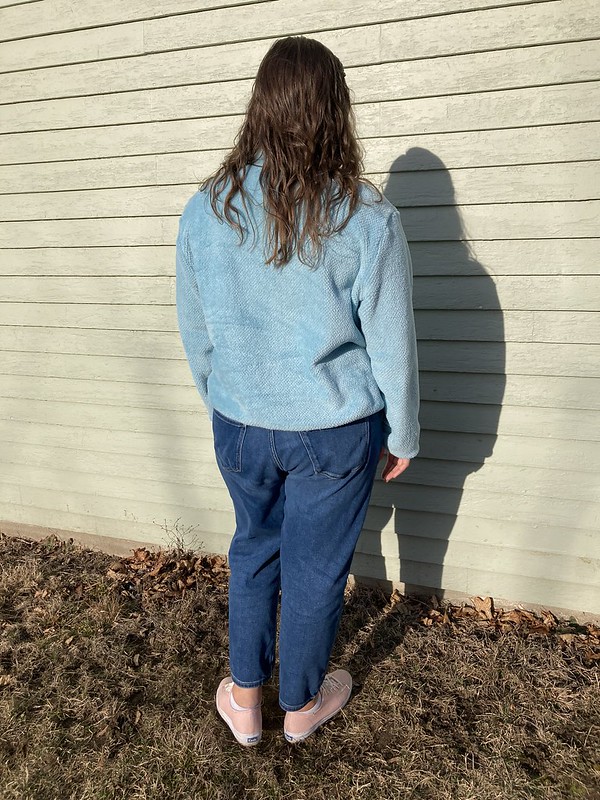
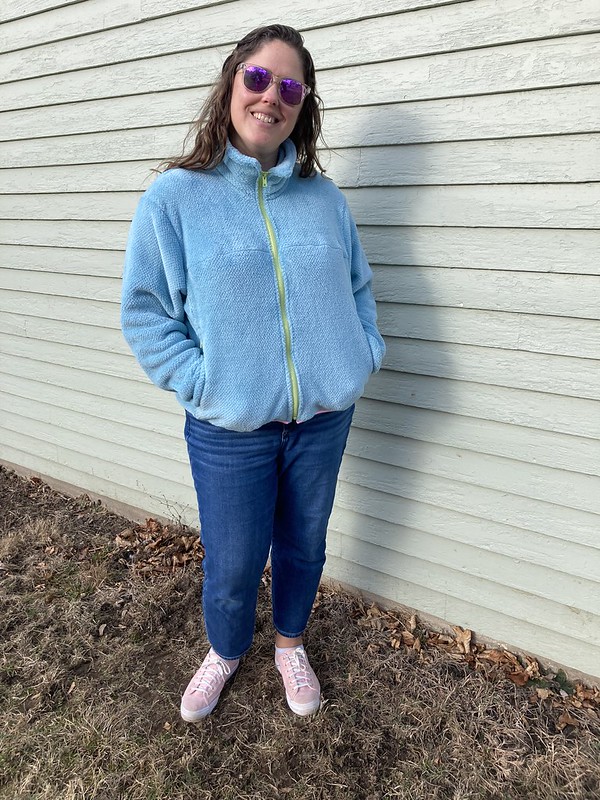
Hi! I’m back with the same pattern I talked about last week, but a different view, in a different fabric. Yep, this is The Green Pepper #507 Plush Polar Jacket in a wonderfully soft Polartec fleece from Field’s Fabrics in Holland, Michigan. Last week was all about the vest view, and this week I’m coming back older and wiser, having had a much more enjoyable sewing experience because I learned from all those pinch points on the vest. Yay!

Winter Sewing, Part Two:  The Green Pepper #507 Polar JACKET in Polartec Fleece
Couldn’t pass up a photo op in front of this fun wall on my first day wearing my jacket out and about!

l

Winter Sewing, Part Two:  The Green Pepper #507 Polar JACKET in Polartec Fleece

I’ve felt the need for a lightweight fleece zip-up jacket for awhile. I have one from Old Navy that I thrifted, but have you ever thrifted something and then realized you might now understand why it ended up at the thrift store? Yeah, this was one of those situations. It’s a nice jacket, but the fit in the shoulders is not my favorite. Luckily, I had found some Polartec “Micro Plush” fleece at Field’s Fabrics (often labelled as Malden Mills fleece) in Holland, MI this past summer. It was a pretty sky blue, and so very soft.

Winter Sewing, Part Two:  The Green Pepper #507 Polar JACKET in Polartec Fleece

Technically, I think this is a pile fabric rather than an actual fleece fabric, which is part of what makes it so soft, but either way, it is still produced by Malden Mills/Polartec, which means it has the quality that I love. Polartec produces many, many kinds of really interesting fabrics, and I love trying out different types when I get a chance. While I don’t always care about fabric brands, when it comes to fleece (and related fabrics), I tend to go for Polartec because I know the quality will be high, even in their seconds. And whenever I get a chance to go to Field’s I take a look to see what they have.

Winter Sewing, Part Two:  The Green Pepper #507 Polar JACKET in Polartec Fleece

I don’t typically do the same pattern back to back, but it was a great experience doing that this time because it really helped me improve my skills and figure a few things out! Along with my notes last week on the pattern and the importance of trusting it, one thing I was surprised by is that you don’t always use a zigzag stitch when making this pattern. Sometimes a straight stitch is what you need, and the directions always tell (and/or show) you when to use each stitch. You also don’t use any interfacing–but it works! I was wondering how that would go in the zipper area in particular, but it was fine. The final product is no more or less wavy than on any store-bought fleece jacket–so trust those directions! Along those lines, I had plans to put my sleeves in flat rather than setting them in, but that really doesn’t work for this pattern, because the armscye is shaped differently than what you find on most patterns, so you’ll have to trust the directions on that, too.

Winter Sewing, Part Two:  The Green Pepper #507 Polar JACKET in Polartec Fleece
Green Pepper #507 Plush Polar Jacket in Polartec Micro Plush, front

l

Winter Sewing, Part Two:  The Green Pepper #507 Polar JACKET in Polartec Fleece
Green Pepper #507 Plush Polar Jacket in Polartec Micro Plush, back

l

Winter Sewing, Part Two:  The Green Pepper #507 Polar JACKET in Polartec Fleece

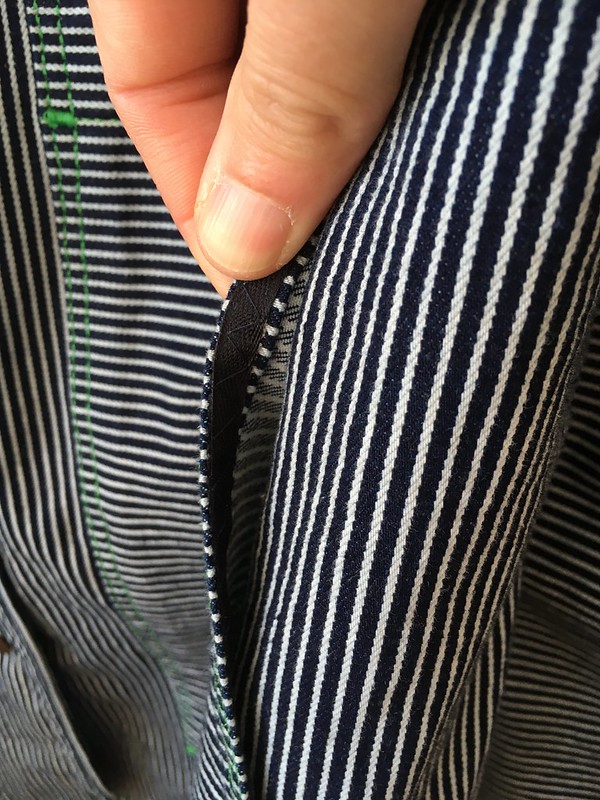
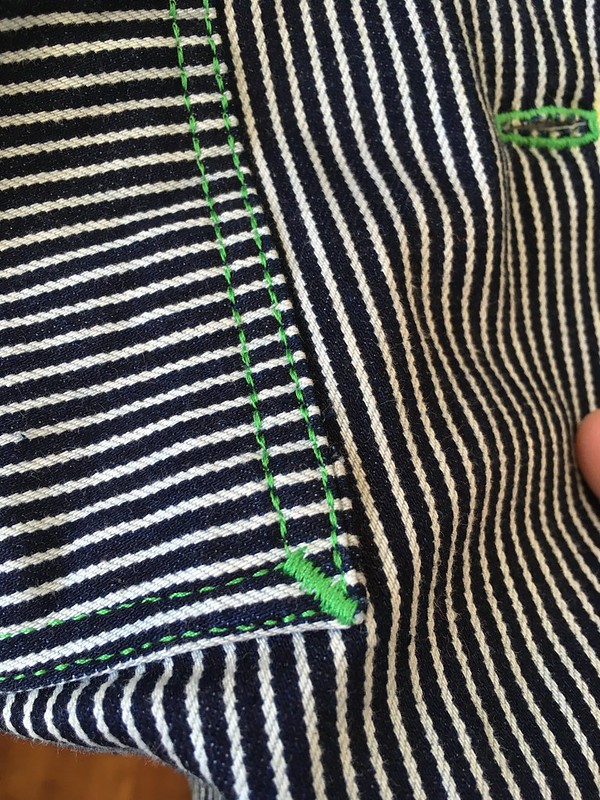
One thing I did change was binding the sleeve hems as well as the jacket hem with nylon/Lycra, as I did for the vest hem in last week’s post. I cut 9″ x 2″ strips of nylon/Lycra for each sleeve hem and cut off the sleeve hem allowances. If I did it again, I would bind my sleeve hems flat before sewing the sleeve seam. I used the same nylon/Lycra swimwear fabric as on my vest and also used the same binding technique (“Lycra Wrapped Edges–The Cheater’s Way”) found in Adventures with Polarfleece: A Sewing Expedition by Nancy Cornwell. I had a few spots on the jacket hem where I didn’t catch quite enough of the fleece in my serging, so I just went back with a straight stitch and sewed a bit higher up on the jacket. It’s really important that you secure those bottom layers together because the hem is also the bottom of your pockets, and you don’t want your things falling out! This time, I also left a little nylon/Lycra hanging off the edges by the zipper, which I hand-tacked into place before doing the final sewing step.

Winter Sewing, Part Two:  The Green Pepper #507 Polar JACKET in Polartec Fleece
Hem detail, view from the inside. There’s room for improvement, but overall my hem binding isn’t bad!

I did all the hand-basting of the zipper and collar/facing area that I did with my vest, and it was definitely worth the time investment to have a smooth experience sewing in my front zipper and sewing on the neckline facing. My results weren’t perfect, but they were good enough that I was happy with them.

Something I wish I had done with the jacket (and maybe the vest) was to round off the corners of my collar as Nancy Cornwell suggests in her book. I think it would have looked nice.

Winter Sewing, Part Two:  The Green Pepper #507 Polar JACKET in Polartec Fleece

l

Winter Sewing, Part Two:  The Green Pepper #507 Polar JACKET in Polartec Fleece
Green Pepper #507 Plush Polar Jacket in Polartec Micro Plush, inside front

l

Winter Sewing, Part Two:  The Green Pepper #507 Polar JACKET in Polartec Fleece
Green Pepper #507 Plush Polar Jacket in Polartec Micro Plush, inside back

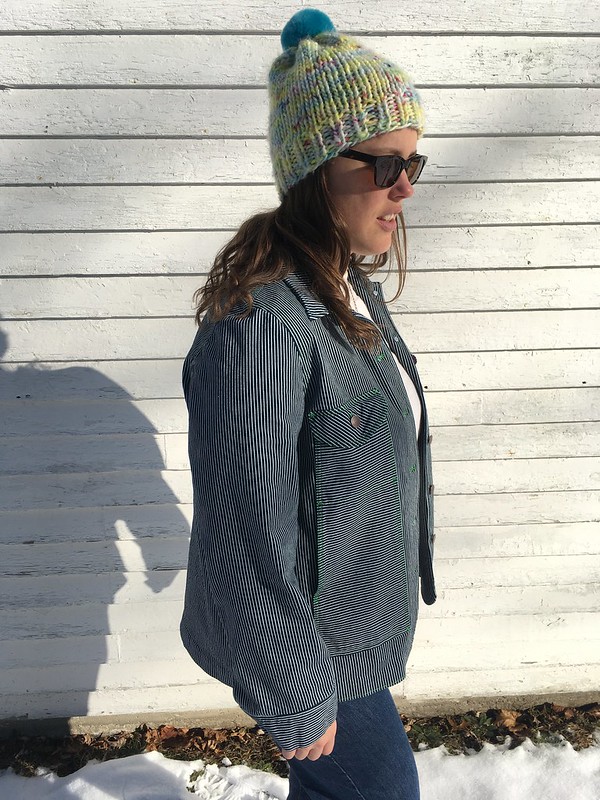
Other than a different main fabric, I used all the same materials (with color changes for zippers and serger thread) and references for this that I did for my vest. You can find links for all those sources in last week’s post. It was great to have just made a version of this pattern so I could be smarter about when and where to serge–mainly just in the spots where I wanted an extra internal flash of color–and how to tackle all the parts I found tricky the first time around. Like last week, I wish I had some sort of little tag for the front, but otherwise, I’m really happy with this jacket. Since it’s still winter in these parts, I have worn it a lot around the house, and I really love it. I even had to fight off one of my kids who wants to steal it from me, which is a pretty high compliment in my book. 😉

Winter Sewing, Part Two:  The Green Pepper #507 Polar JACKET in Polartec Fleece

I definitely recommend this pattern, but if you haven’t sewn it before, it probably wouldn’t hurt to read the two posts I have written plus any other reviews you can find on it to avoid the pitfalls I struggled with. Really, though, the sky is the limit as far as how you customize this. You can knock off your favorite Patagonia, L.L. Bean, or REI jacket, or make something no one has ever seen before! If you do, I would love to hear about it! 🙂

Winter Sewing, Part Two:  The Green Pepper #507 Polar JACKET in Polartec Fleece

Vogue 8932 Jacket in Black Ponte

Standard
Vogue 8932 Jacket in Black Ponte

Another week, another sewing project.  🙂  This is the last garment I planned to make during the winter and, luckily, it makes a great transitional garment.  It’s Vogue 8932.  I have had this pattern for so long and was looking for just the right fabric for it.  The copyright on the back says 2013, which is around the time I got serious about sewing.  What brought it to my attention in the first place was Bianca’s very cool version from around the same date.  I’m pretty sure that it was her jacket that made me seek this pattern out at Joann’s.

Vogue 8932 Jacket in Ponte

I wasn’t quite sure how I wanted to make my version, so this pattern sat in my growing pattern library over the years waiting for its turn.  Finally, I decided that a black ponte would be a great first fabric to give this a try.  The one I ordered was a rayon/nylon/spandex from Fabric Mart, and is very nice.  I rarely sew with black, although I do like it–I just prefer the brighter colors.  This time, though, I ordered enough black ponte for a few garments and got to work on this one, choosing to make View B.

Vogue 8932 Jacket in Ponte

l

Vogue 8932 Jacket in Ponte

l

Vogue 8932 Jacket in Ponte

This particular pattern says “Easy” on the back.  I don’t think that’s very accurate.  They may have given it that designation because there’s no real tailoring or a lining or any of that, and the fabrics they call for have stretch, which helps a lot with fitting.  However, matching up the various corners and seams is not exactly “easy”, so I would put this at a more intermediate level.

Vogue 8932 Jacket in Black Ponte

The style lines are very cool and the construction is interesting, although I found it hard to get the corners on the back right.  Mine have little holes that I just sort of sewed over and added Fray Check to.  I think they’ll be alright, but I wish it were better.

I had the (in my mind) brilliant idea of using Eloflex thread in my needle and woolly nylon in my bobbin because I wanted to use a straight stitch that still had some give.  Eloflex is a thread made by Coats & Clark that is slightly stretchy.  Woolly Nylon is a fluffy thread that also has some give and is often used for sewing bathing suits, etc.  I have been using woolly nylon in my bobbin a lot when sewing knits in general.  So, my grand plans were a pretty big failure.  I tried needle type after needle type and my thread just kept breaking.  It seemed the Eloflex and this ponte were a bad match.  Finally, I swapped out the Eloflex for Gütermann All-Purpose polyester thread, and it worked great with a Universal 80/12 needle.  I also found that fine silk pins worked better with this fabric than the pins I normally use, which are actually quilting pins.  So, with all that thread breakage, the sewing is a bit rough, but I wasn’t about to unpick black on black unless absolutely necessary.

Vogue 8932 Jacket in Ponte

Toward the end, I added these fun flower-shaped snaps, adjusting their position as necessary.

Vogue 8932 Jacket in Ponte

l

Vogue 8932 Jacket in Ponte

Hopefully they will work as closures.  So far, so good, anyway.  I also discovered something quite interesting:  my waist is about 1″ higher than the marked waistline on this pattern, but the bottom of the jacket seems to hit in just the right spot.  So what does that mean?  Should I be raising the waist of my patterns while keeping the overall length the same?  So far I haven’t noticed the waist area being too much of a problem, but I’m going to pay attention to this with other patterns and give it some thought.

Vogue 8932 Jacket in Ponte

Outside front (this view has exposed seams).

Vogue 8932 Jacket in Ponte

Outside back

Vogue 8932 Jacket in Ponte

l

Vogue 8932 Jacket in Ponte

The different bias tape colors on the inside were a result of working with what I had on hand.

Vogue 8932 Jacket in Ponte

The little patches at the corners on the inside of the jacket are bits of knit interfacing, something the pattern instructs you to use in those areas.

Vogue 8932 Jacket in Ponte

I like the fit of this jacket overall.  It’s fitted, but not tight.  I would love to tell you that I have worn it a ton and it’s a wardrobe staple, but it has still been a little bit cold here and I’ve sort of been living my best loungewear life lately.  I can probably count on one hand the number of times I have worn jeans in recent weeks, so we’ll have to see if this ends up being as good as I hope it will.

And now I’m ready for spring sewing!

Simplicity 4109 Jacket in Railroad Denim

Standard
Simplicity 4109 Jacket in Railroad Denim

Hi, everyone.  I’m excited to share this jacket with you today now that I have pictures!

Simplicity 4109 Jacket in Railroad Denim

Today’s project is Simplicity 4109, an out-of-print Built by Wendy/Built by You sewing pattern from 2006.

Simplicity 4109 Jacket in Railroad Denim

l

Simplicity 4109 Jacket in Railroad Denim

l

Simplicity 4109 Jacket in Railroad Denim

I found my copy on Etsy.  What drew me in were the cool front pockets on View A and the potential to create different looks based on your fabric and hardware choices.  It looked like a pattern that would make a great chore jacket or jean jacket.  Originally I had planned to make this last year, maybe in an olive green cotton twill, but that fabric became my recent pants overfitting drama.  Instead, I finally made this pattern from some railroad denim I got this past summer at Field’s Fabrics in Holland, Michigan.

Simplicity 4109 Jacket in Railroad Denim

l

Simplicity 4109 Jacket in Railroad Denim

l

Simplicity 4109 Jacket in Railroad Denim

The label said it was 100% cotton as far as I can remember, but there is definitely some stretch, even if only good mechanical stretch.  I would say this is probably a midweight.  I traced View A with a 16/18 bust, 18/20 waist, and 20 hip.  I also did a major broad back adjustment.

Simplicity 4109 Jacket in Railroad Denim

l

https://flic.kr/p/2hY9jxJ

The pattern instructions were really good, and this was an enjoyable project to make.  I didn’t have topstitching thread, so I chose to use a triple stitch with a normal weight thread.  If I had planned ahead a bit more I could have ordered topstitching thread in green from Wawak, but my local fabric stores didn’t have any (and I didn’t plan ahead), so regular weight was what it had to be!

Simplicity 4109 Jacket in Railroad Denim

Let’s talk pattern details.  The most intriguing part of this pattern was the front pockets.  I really like them, but I did change a few minor things.  For some reason, the top pocket wasn’t supposed to have a real buttonhole–you were just supposed to sew a button to the flap, which seems silly.  I wanted the real deal, so I made a buttonhole in the flap and installed a jeans tack instead of a button.

Simplicity 4109 Jacket in Railroad Denim

Because my fabric was kind of stretchy, I also sewed twill tape to the inside of the lower pocket opening, doing a decorative zigzag on the outside to hold it in place.  I was hoping this would keep the pocket openings from stretching out.

Simplicity 4109 Jacket in Railroad Denim

l

https://flic.kr/p/2hY9chb

I also added bartacks at the corners of the pockets and the lower pocket opening because I like that look.

Simplicity 4109 Jacket in Railroad Denim

I did a double line of topstitching on the top of the flap, even though the directions only say to do one.  If you do a double line, you need to be very careful not to sew the top of the pocket underneath the flap shut.  I also did a little extra topstitching on the sleeve vents because I thought it would look nice.

For some secret fun, I added Rifle Paper Co. rayon scraps to the insides of the pocket flaps as well as using bias tape from the same fabric to make a hanging loop and to finish some of my inner seams.  I did an ugly but effective version of bias bound seams; however I think Hong Kong seams would have been better.

https://flic.kr/p/2hYahS3

l

Simplicity 4109 Jacket in Railroad Denim

l

Simplicity 4109 Jacket in Railroad Denim

I had a lot of fun playing with the stripes on this jacket.  I tried to take every opportunity to flip things around, and I’m really happy with how it turned out.

Simplicity 4109 Jacket in Railroad Denim

l

Simplicity 4109 Jacket in Railroad Denim

I thought I would like it, but I REALLY like it.  It’s got a good amount of ease, so you can easily wear a sweater underneath (nice since I finished this just as the weather got even colder).  I also think this pattern could be a good candidate for a lining as it would be easy to hide the edges under the facings.

https://flic.kr/p/2hY9d9B

You should know that I have very little experience with lining things, so that’s a guess based on near total inexperience.  🙂  What got me thinking about it is these very inspiring denim jackets made by Ginew that are lined with an exclusive Pendleton wool.  They’re beautiful!

I find denim very inspiring and I also really like workwear.  There are so many details that are both interesting and functional in work clothes, not to mention you can do actual work in them.  I may not be a farmer or a construction worker, but I like having clothes that I don’t have to worry about messing up and that wear beautifully as they age.

Simplicity 4109 Jacket in Railroad Denim

All that to say, I’m happy with this jacket.  I definitely recommend this pattern, and could see making it again if I found a fabric that was inspiring.


A Linen Jacket for my Friend: Simplicity 8172

Standard
A Linen Jacket for my Friend: Simplicity 8172

It’s not too often that I sew for someone else, but today’s project is one of those rare ones.  I can probably count on one or two hands the people I’m willing to sew for, and my friend Jo-Alice definitely makes the cut.  If I listed all of her wonderful qualities, this blog post would become a book, but let’s just say that she’s one of those rare people who manages to be both very real and very loving—not an easy feat.

A Spring Jacket in Linen:  Simplicity 8172

When she mentioned that she liked some of the views of Simplicity 8172 after I made it last year, I mulled it over and then asked her if she still liked the pattern and would want me to make one for her.  She said she did still like it, and after I convinced her that I really wanted to make her something for her birthday, she agreed.  Being a maker of things herself (you can see some of her pottery and knitting here), she knows the time that goes into creative projects, and she didn’t want to pull me away from my personal to-make list, but this was a gift I was happy to spend the time on.

A Spring Jacket in Linen:  Simplicity 8172

l

A Spring Jacket in Linen:  Simplicity 8172

I found some beautiful Limerick Linen by Robert Kaufman Fabrics at Pintuck & Purl as well as a floral rayon by Rifle Paper Co. for Cotton + Steel (this one I think?).  Jo-Alice chose View C, because it had some nice waist shaping, and I made a muslin out of an old sheet to check the fit.  We thought we were going to have to shorten the pattern, but the muslin showed that the length was good as drafted.

A Spring Jacket in Linen:  Simplicity 8172

It was important to think about seam finishes on this project since the pattern doesn’t always specify what you should use.  Because the linen was on the lighter side, I chose to use French seams throughout.

A Spring Jacket in Linen:  Simplicity 8172

The fabric itself is a slightly loose weave, which made it a bit shifty, but it was such a beautiful fabric, that I loved working with it regardless.  I kept my eye on things to make sure that everything stayed on-grain, and it was fine.

A Spring Jacket in Linen:  Simplicity 8172

l

A Spring Jacket in Linen:  Simplicity 8172

I decided to make my bias tape from the rayon which, admittedly, I stalled on.  I really wanted to teach myself how to make continuous bias tape, but I was intimidated by learning a new process.  My co-worker, Bea, an accomplished quilter, gave me a few tips on using starch on my fabric, which was the push I needed to keep going.  She let me borrow some Linit starch, which she said to mix 1:1 with water in a spray bottle.

A Spring Jacket in Linen:  Simplicity 8172

Next she told me to spray the back of the fabric (testing in a small area first) and then press the fabric.  I didn’t use steam.  This stiffened the fabric enough to make it really easy to work with.  It was still flexible, but wasn’t overly shifty or slippery.  After that, I used the tutorial for making bias tape in Learning to Quilt:  A Beginner’s Guide by Lori Yetmar Smith.

A Spring Jacket in Linen:  Simplicity 8172

I made single fold bias tape to the size I needed using a bias tape maker (I got assorted sizes on Amazon—similar to these).  One yard of 44″ wide fabric make A LOT of bias tape.  I definitely could have used less, but you don’t know until you try.  And…it’s not like I mind having all this beautiful leftover bias tape.

A Spring Jacket in Linen:  Simplicity 8172

While my bias tape was uniform on the visible side, the edges that were folded under weren’t perfectly even.  To help myself out when applying it, I sewed a line of basting stitches 3/8″ from the edge where I was going to attach the bias tape since that was the seam allowance there.  Then I lined up the folded edge with my basting stitches so that everything would look nice and even.

A Spring Jacket in Linen:  Simplicity 8172

l

A Spring Jacket in Linen:  Simplicity 8172

The one area where I wasn’t quite sure what seam finish to use was the cuffs.  I did a quick experiment with some scrap fabric just to see if all those layers would be too bulky, but with the lighter weight of the linen it seemed OK to me, so I was able to use French seams there as well.

A Spring Jacket in Linen:  Simplicity 8172

Overall, this was a very simple and pleasant project.  I was worried at the end that the fit would be different than it had been on the muslin, but Jo-Alice loved it, and it looked beautiful on her.  I like this longer view much better than the short view (View A) that I chose the first time I made this.  And, although I told her that she didn’t have to pose for blog photos, she has always been a huge supporter of my creative projects and assured me that she was more than willing.  She makes a great model.  We had lots of fun shooting these pictures even though it was gray and rainy out.

A Spring Jacket in Linen:  Simplicity 8172

l

A Spring Jacket in Linen:  Simplicity 8172

l

A Spring Jacket in Linen:  Simplicity 8172

l

A Spring Jacket in Linen:  Simplicity 8172

l

A Spring Jacket in Linen:  Simplicity 8172

l

A Spring Jacket in Linen:  Simplicity 8172


Sapporo Coat in Wool

Standard
Sapporo Coat in Wool

Today’s post is almost the last winter clothing post.  (Oh, wait.  I just realized I’m sewing sweatshirts right now.  Well…this is one of the last ones I sewed during the winter.)  I saved this one for early spring because it’s a great transitional garment…the Sapporo Coat from Papercut Patterns.

Sapporo Coat in Wool

This is a pattern I have had my eye on for awhile, so I put it on my Christmas list, and my husband was kind enough to order it for me from Pattern Review. (He’s the best.)  Papercut always has really interesting patterns, and this one is no different.  Cocoon coats are sort of a funny shape, but I like trying new types of clothing, and the possibility of color-blocking and highlighting the cool seamlines really drew me in.  It was an added benefit that I had fabric in my stash that I could use, so I didn’t have to get any new fabric for this.

Sapporo Coat in Wool

l

Sapporo Coat in Wool

I chose gray and black wools from my stash for the outside with a polyester lining.  The wool was given to me by friends ages ago, and the lining was purchased for another project, but never got used.  It’s originally from Fabric Place Basement in Natick, MA.

Sapporo Coat in Wool

l

Sapporo Coat in Wool

l

Sapporo Coat in Wool

l

Sapporo Coat in Wool

When choosing a pattern size, I nearly always have to grade up a size for the waist and hip.  According to my measurements, I should have done that for this pattern as well, but it’s not the easiest pattern to do that with, so I went with my bust size (S/M) and hoped for the best.  It helps that this coat is oversized and meant to be worn open.  I think it turned out alright.

Sapporo Coat in Wool

l

Sapporo Coat in Wool

l

Sapporo Coat in Wool

l

Sapporo Coat in Wool

The sewing itself was pretty easy and enjoyable.  I saw online that many people used different tailoring techniques and interfacing to make this more like a coat, and less like a lightweight jacket, but I decided to mostly trust and follow the instructions as written.  The one thing I did change was the sleeves.

Sapporo Coat in Wool

The pattern has you line the sleeves with the same fabric as the outside, but I noticed that the seam that joins the sleeves to the body really stood out from the body on many Sapporo coats that I saw online, and I hoped that using lining in the sleeve would soften that area so it didn’t stand up so much.  It didn’t actually have the effect I had hoped for, but I did learn how to bag a lining after a few missteps.

In order to line my sleeve, I created a facing for it using the sleeve pattern piece and then a shorter piece for my lining.  In step 12, I pinned my lining to my sleeve facing and stitched, thinking I could flip everything right side out.  I came out with a tangled mess, so I consulted the Easy Guide to Sewing Linings by Connie Long, and followed her directions.  That helped me fix everything.  I just have to say…bagging a lining is MAGIC!  I can’t even remember how I did it, but now I know where to find the information (and you do, too!)!  (By the way–that link is to an eBook, but you can find used copies of this book pretty easily.  Mine came from Amazon, I think.)

Sapporo Coat in Wool

I really like this strange and interesting coat.  I like the hidden pockets and the unique shape.  I wasn’t sure if I would like the shorter sleeves, but I do.  They work with the silhouette.  And I LOVE the color-blocking.  Originally I had planned to do a lot of topstitching, but decided against it when I started making the jacket.  I still think it would be interesting to add topstitching near the seam lines and edges, but that will have to be an experiment for another time.  The top of the collar seems like it wants to roll out, so topstitching would probably help with that.

Sapporo Coat in Wool

l

Sapporo Coat in Wool

It will be interesting to see if this jacket becomes a staple of my wardrobe or more of an occasional piece.  I really enjoyed making it and would consider making it again someday.  One of my goals is to make more jackets in general, so this is a good start.

The Refashioners 2015 Contest Submission

Standard

It’s finally time to show you all my secret project!  Are you ready?  I’ve been putting a ton of time in on my submission for the 2015 Refashioners Challenge, and I finished on Tuesday morning at 1 a.m.  Hooray!

Oh!  You want to know what I actually made?  That does seem important!  Here it is:  I made a jacket using Simplicity 1699 as my base pattern.

The Refashioners Challenge 2015

The challenge was to make something out of a men’s button down shirt.  Several bloggers were asked to participate and show off their refashions.  Then the contest for the general public began.  I like turning old things into new things, but the original deadline wasn’t one I could meet.  However…when the deadline changed to September 27, I was IN!

Now you know there must be an onslaught of pictures.  Ready?

I began my process with Simplicity 1699 and four men’s button down shirts from the thrift store.

The Refashioners Challenge 2015

The Refashioners Challenge 2015

The Refashioners Challenge 2015

The Refashioners Challenge 2015

The Refashioners Challenge 2015

The Refashioners Challenge 2015


I wanted a fairly simple silhouette for my garment so that I could do some interesting piecing with the fabric.

The Refashioners Challenge 2015

My husband helped me take a screen shot of the line drawings on the fabric so I could draw in style lines.  I lengthened the sleeves from 3/4 to long and then worked on color blocking on the body and sleeve.  You can see that faintly on the tracing paper.  I put a lot of thought into how the various parts would interact with one another visually from different angles.

I also decided I wanted all my seams covered in some form or other.

The Refashioners Challenge 2015

The Refashioners Challenge 2015

The Refashioners Challenge 2015

The original sleeve placket from the cuffs became a secret detail on the inside.

The Refashioners Challenge 2015

It took a little head scratching to figure out the sleeves because I also decided that I wanted to learn how to put in some exposed zippers for added interest (a.k.a. “flair”).

The Refashioners Challenge 2015

The Refashioners Challenge 2015

The pattern originally had pleats in the shoulders, which just seemed off with the look of the jacket.  They always bothered me, but I didn’t know how to get rid of them.  When I asked for critiques from my husband and my Moms’ Group (we’ll call them my “design group” from here on out 😉 ), they all agreed the pleats would have to go.  Luckily, my friend Maggie from Pintuck & Purl knew what to do and helped me understand the steps I needed to take to chop off those pleats!

The Refashioners Challenge 2015

I also wanted to learn to do bound seams for the insides of the sleeves.

The Refashioners Challenge 2015

The sleeves were a ton of work, but I am so happy with how they came out.  Look at the finished sleeve binding!  I love it!  I can definitely see why people love this finish in jackets.

The Refashioners Challenge 2015

The Refashioners Challenge 2015

The Refashioners Challenge 2015

As for the body of the jacket, I added color blocking for interest and practicality.  I was worried that I might not have enough fabric in each shirt to do a solid color.  I’m so glad I did the color blocking.  I love how is looks and it’s so awesome when you line of those angles just right.

The Refashioners Challenge 2015

The Refashioners Challenge 2015

I also added a lining to the body, per the pattern instructions, which I did manage to get out of one shirt.  I even preserved the pocket in just the right spot.  It was nice to have that lining to cover all the seams in the main part of the jacket.

The Refashioners Challenge 2015

The Refashioners Challenge 2015

The back seam also required some attention when, after piecing it, I realized that the button placket on the seam did not look as cool as I’d thought it would.

The Refashioners Challenge 2015

My solution was to add a strip of red, which also made a nice design detail.  I basted it with a washable glue stick (So awesome!  You should try it!), and then topstitched it.

The Refashioners Challege 2015

The Refashioners Challenge 2015

After some thought and discussion with my design group, I realized the front needed…something.  How about some more exposed zippers?!  Perfect!  I was learning how to put them at an edge; why not in the middle of fabric, too?

The Refashioners Challenge 2015

It got pretty crazy over here.  At one point, I even had two machines going so I could go back and forth between them without changing thread.  I always thought that was crazy, but…it’s more like CRAZY AWESOME!

The Refashioners Challenge 2015

When I finally finished and cleaned up on Tuesday (not at 1 a.m.–after I had actually slept), I made myself a little pattern envelope for all my pieces.  It seemed like this was now its own pattern, rather than a slightly altered version of the original.

The Refashioners Challenge 2015

Because I’m sure you haven’t had enough pictures yet, here are the fancy, polished-looking ones, so you can get a full view of everything.

The Refashioners Challenge 2015

The Refashioners Challenge 2015

The Refashioners Challenge 2015

The Refashioners Challenge 2015

How about some outside shots?  Let’s do the calm ones first.  🙂

The Refashioners Challenge 2015

The Refashioners Challenge 2015

The Refashioners Challenge 2015

The Refashioners Challenge 2015

What do you think?  Reversible?  I’ve had several people say yes.

And now for how I really feel about this project:

The Refashioners Challenge 2015

I’m hoping to revisit that face (with happy jumping and screaming) if I win, but either way, I decided that I needed to define how this could still be successful no matter what.  In order to do that, I needed to create a garment that I would love and be proud of whether or not it was chosen as the winning piece.  I’m happy to say that I’ve met that goal!  I really like this jacket.  It’s some of my very best work.  I didn’t cut corners, and I made something of a higher quality than most of my past makes, not to mention all the new skills I’ve learned.  Of course, I still hope to win the contest, too.  🙂  Keep your eye on the Makery blog to see how things progress.

Oh!  And of course I’ll update you, too.  🙂