Tag Archives: fast

Silk “Secret Pajamas”: McCall’s 6848

Standard
Silk “Secret Pajamas”: McCall’s 6848

It’s time for another garment from my 2017 Summer Sewing list!  McCall’s 6848, View C is a top I’ve made before (in pre-blogging days, maybe?)…and one that I love!  I really wanted to make this simple top out of a flowy fabric to wear to work and church as well as with casual bottoms.  When I saw that Fabric Mart had black silk crepe de chine on sale, I knew that I had found my ideal fabric.

Silk "Secret Pajamas":  McCall's 6848

l

Silk "Secret Pajamas":  McCall's 6848

l

Silk "Secret Pajamas":  McCall's 6848

Now I know that silk is often viewed as a fabric that needs a lot of special care, but that is really up to you.  If you want to dry clean your silk, you can, but you can also throw it in the washer and even the dryer if you want to.  It does change the look of the fabric a bit if you wash it, but it doesn’t damage the fabric in any way.  So, while I actually prefer the look of the prewashed silk, I knew that I wouldn’t dry clean it due to cost and inconvenience, so I prewashed and dried.

Silk "Secret Pajamas":  McCall's 6848

l

Silk "Secret Pajamas":  McCall's 6848

Sewing up this pattern was really fast and easy.  I made it in a size large this time.  It only has three pattern pieces:  a front, a back, and a neckband.  It was easy to sew the side and shoulder seams with French seams, and the neckband encloses the raw edge around the neck.  For the sleeves, I just did a basic hem with the raw edge turned under so that it was enclosed.  Fast and easy with no exposed edges left to fray in the wash!

Silk "Secret Pajamas":  McCall's 6848

(front view, above)

Silk "Secret Pajamas":  McCall's 6848

(back view, above)

I love the boxy cut and drape of this shirt and, while I wear it as an everyday shirt rather than as pajamas, I can feel how lovely this would be as a silk pajama top.  If you are looking for a basic drapey, boxy shirt pattern that is quick and easy, this is for you!  I’ve already got another cut out in rayon.  Highly recommend!

Silk "Secret Pajamas":  McCall's 6848

Recommendations

  • Proceed with caution if you try this one out!  Cooking Fever is a fun (and addictive) game where you have to serve your customers food as quickly as possible.  The better you do, the more (virtual) money you’ll have to upgrade your appliances and restaurant.  My fast food establishment is pretty awesome by now, I have to say!  😉
  • The Refashioners blog series and competition is up and running again this year with a theme of suits.  If you love refashioning, you can remake a suit into a new garment to compete for prizes (rules and prizes can be found here).  Right now, Portia, owner of the Makery blog which is hosting the event, is posting inspiration by various bloggers.  I was completely blown away when I saw Joost’s zebra-inspired coat.  You HAVE to check it out!
  • I just finished the audiobook version of Wonder by R. J. Palacio.  It was a great kids’ fiction book about the power of kindness.

Vacation! And a Deer and Doe Datura Blouse

Standard

Hey, friends!  Happy July!  I can’t believe it’s July already.  I feel like summer is just starting.  I’m going to take the rest of the month of July off from blogging (although you can still find me on Instagram @lisa.poblenz).  I’m coming off a number of complicated sewing projects (Refashioners 2016–which you’ll get to see in the not-too-distant future, bathing suit sewing, jeans, etc.), and it’s time to regroup, create some new garments, and do family stuff.  I don’t know about you, but when I finish a big batch of projects, I feel a little discombobulated for a while until I figure out what direction I’m going to pursue next and get going down that road.

I finished one wonderfully quick project on Wednesday, however–a Deer and Doe Datura Blouse.

Deer and Doe Datura Blouse

Deer and Doe Datura Blouse

I’m finding that while I am most drawn to bright colors and fun prints, I need a few neutral garments to wear with the fun and crazy stuff.  So, to test out this pattern, I chose the most basic view and made it up in a white linen-look fabric from Joann’s that I’ve had forever, and a khaki linen that a good friend gave me.  I also took the opportunity to use some vintage buttons from my mother-in-law.

Deer and Doe Datura Blouse

Before beginning, I measured myself to see how high the dart should sit on my body and then checked it on the flat pattern.  It seemed perfect, so other than grading up a size for the waist and hip, I used the pattern as it was.  There were a few tricky parts, mainly having to do with sewing together the shoulders, but once I weathered those, it was a quick sew.  (I used Part 1 of this sew-along to help me out, in case you are considering making this top as well.)  The only potential issue is that the neckline seems to gape just a bit, but I’m going to wash and wear the shirt a few times before I decide if I need to deal with that in any future versions.  They’ve updated the pattern since I bought this one, so maybe they fixed that.  I’m not sure.

Deer and Doe Datura Blouse

Deer and Doe Datura Blouse

Deer and Doe Datura Blouse

(Thanks to my Instagram Husband for taking these pictures of me!)

Expect future versions of this, though.  I want to try the one with the triangle cutouts next…and in crazy fabric.  One neutral garment at a time is about all I can handle!  😉

Deer and Doe Datura Blouse

Deer and Doe Datura Blouse

Do you ever wish you could sew at super speed?  I’ve never really had a handle on my summer wardrobe, but after sewing for a few years, and thinking seriously about what I actually wear (rather than just what I like to look at in fashion, which are often two very different things), I think I’m getting closer to the essence of how I like to dress in summer.  And now I want to sew it all up!!!!  I’ve been stocking up on fabric, but I can’t yet sew at lighting speed or fit garments to myself with shocking perfection.  Alas, my reach exceeds my grasp (but I think they are getting closer!).  Ah, sewing problems!  Ha!

Well, have a great July.  I look forward to more writing and talking with you in August.  We’ll find out then if I spent my time sewing or not!  😉

Recommendations

  • This Piped Floral Shirt Dress from Making It Well is amazing.  I’ll have to pick up some tips from Jo when I finally dive into the wonderful world of shirt dresses.
  • I just have to recommend The Great British Sewing Bee.  As much as I love Project Runway, sometimes it’s just so…ruthless!  The GBSB has a much kinder tone as well as an educational one.  I’ve only watched Season/Series 1 in its entirety, but Series 4 is on now!  You can look at the show’s website here.
  • If you are in the greater Boston area, I highly recommend the magazine edibleBOSTON.  If you aren’t in greater Boston, you may have an edible magazine covering an area near you.  edibleBOSTON is a fun way to learn about farmers, restaurants, small batch food makers, and other foodie things in your locale.  Magazines are free from subscribing businesses and come out quarterly.  You can also read issues online.
  • Aaannnddd…..we’re TOTALLY making this spaghetti and meatballs recipe this summer!

Esme Top from Everyday Style by Lotta Jansdotter

Standard

How are you?  I hope, if you are in the Northern Hemisphere, that spring has arrived.  Spring is trying to happen here, but it’s still a little cold.  Despite that, I’ve got warmer days on my mind, and after some complicated projects just finished and several other tricky ones in progress, I needed a simple, fast, and summery pattern.  I found just the right thing in Lotta Jansdotter’s new book Everyday Style.  It seemed like just the right thing to go with the lovely pink voile I got at Pintuck & Purl when they opened.

Esme Top from Everyday Style by Lotta Jansdotter

I made Variation 2 with the three-quarter length sleeves in a size large.  My only regret (and I find it equally annoying and funny that I did this) is that I didn’t measure the back pattern piece to see if it would need a broad-back adjustment.  The shirt turned out to be quite comfortable, but if I had checked ahead of time, I would have done a broad-back adjustment and it would have been even more comfortable.  After all my recent blog posts about broad-back adjustments (here and here), I didn’t even check.

Esme Top from Everyday Style by Lotta Jansdotter


Esme Top from Everyday Style by Lotta Jansdotter

Ironically enough, I did check the dart height, and that turned out to be fine.  Thankfully, there is good ease in this pattern, and it’s still wearable.

Esme Top from Everyday Style by Lotta Jansdotter

Living in New England where the weather changes several times throughout the day, I’m looking forward to having this for summer when a breeze springs up or the air gets cooler in the evening.

Esme Top from Everyday Style by Lotta Jansdotter

The Esme top gets my stamp of approval as a quick and simple make, especially since there are numerous variations if you want to change things up a bit.

Before we get to the recommendations,  I wanted to mention Me-Made-May 2016 one more time.  I’m participating because I really enjoyed it last year.  Here is my pledge:

‘I, Lisa of patternandbranch.wordpress.com and @lisa.poblenz, sign up as a participant of Me-Made-May ’16. I endeavour to wear at least one me-made garment each day for the duration of May 2016. I will try not to repeat any articles of clothing within a single week and I’ll try to wear at least two me-made things together at least once a week.’

I decided that this year I wasn’t going to worry about daily photos, so I won’t be doing weekly outfit round-ups on the blog.  You may see a few photos if you follow me on Instagram, but my focus for this year is the challenge itself.  The only downside so far is that I might forget what I wore earlier in the week without the photos to remind me!  😉  Check out Zoe’s blog for more information on this year’s Me-Made-May.

Recommendations

  • OK, my friends!  It’s nearly time for one of my FAVORITE events of the year:  BRIMFIELD ANTIQUE SHOW!  Brimfield is the largest outdoor antique show/market in the US.  It takes place three times a year in the town of Brimfield, MA and people come from all over the country (and the world) to shop for antiques, upcycled antiques, and unique materials for creating.  This year, for the very first time, I know one of the vendors!  My friend Laurel, of Retromat Vintage is going to be at Booth 22 of New England Motel, which is one of my favorite fields.  She sells great vintage items.  I’m always really impressed by her clothing, but she has much more than that.  If you go to Brimfield, stop by and show her some love.
  • Have you ever tried a magnetic pincushion?  After buying more pins awhile ago, my little pin jar was full and hard to use, so I bought a Zirkel magnetic pincushion at Pintuck & Purl.  I missed the main selling point until I got home and started using it.  If you drop your pins in the middle of the square magnet, it fans them out around the edges in a circular pattern.  It’s so cool and fun to use!  I knew I would like it, but I had no idea I would like it this much.  Here’s a link to a 14 second video that shows how it works.
  • I’ve mentioned them before, but I think it’s time to officially recommend to you The Curvy Sewing Collective.  This is a great site for so many things!  I find myself returning to it frequently to read their helpful tutorials, pattern reviews, and to look at the great projects from their contributors.  This site also gets two thumbs up for body positivity.  We can all use that!
  • Finally, the Batman vs. Superman trailer…reimagined by kids:

A Quartet of Briar Tops

Standard

And here’s the last of my unselfish sewing…EVER.  Ok, just kidding.  At least for now.  I made myself another Briar top (by Megan Nielsen patterns) as well as two Mini Briars and one mash-up of an adult Briar and a kids’ Briar.

Megan Nielsen Briar and Mini Briar Tees

Megan Nielsen Briar and Mini Briar Tees

This is now my third Briar (number one in a double-layer knit is here and number two in Polartec is here), but it’s my first time making a Mini Briar.  I received all three of Megan’s children’s patterns as a thank you for being a pattern tester for the Mini Tania culottes (which are super-cute, by the way).  The children’s Briar is similar to the adult version, although not identical.  It came together very easily.  One thing I love about Megan Nielsen patterns is their visual clarity.  When I first started sewing garments, I was always intimidated by the busy and complicated look of the standard patterns you find in chain fabric stores.  Megan’s patterns are completely opposite to that.  They have a clean look to them that makes you feel confident you will be able to understand them.  Actually, I think that is the case with a lot of the independent pattern companies, which is a big plus.

Megan Nielsen Briar and Mini Briar Tees

It is a great advantage to have the same pattern in a kids’ version and an adult version when you are sewing for someone who doesn’t quite fit in either range, but is somewhere in the middle.  This was the case with the aqua and pink shirt.  It was great to be able to pull both patterns out, compare sizes and make a custom pattern from the two of them.  It was a bit of a head-scratcher at times, trying to figure it all out and make the best-fitting pattern possible, but all the problem-solving is one of the things I really like about sewing, so I enjoyed the challenge.

Megan Nielsen Briar and Mini Briar Tees

Megan Nielsen Briar and Mini Briar Tees

I ordered all of the deer fabric from Girl Charlee.  It’s a poly/cotton blend, so we’ll see how it wears over the long run.  The fabric for the short-sleeved Mini Briar is left over from a long ago project and is from Jo-Ann’s.

Sewing all these up reminded me that while I really love sewing knits because they are so forgiving, I still have a lot to learn.  I’m getting better at choosing stitches that work well, but I still get wavy collars that don’t sit right.  Part of the problem is that, in most cases, I’m not quite sure what I’m doing wrong.  In the aqua and pink shirt, I raised the neckline, but still used the original pattern piece for the neckband, which I should have shortened.  Lesson learned.  As for the other ones, they are pretty close, but not quite right.  Ironing helped, but I think I still need more practice.  Oh, well!

Overall, these are great shirts and they have been getting lots of wear.  It’s nice to see my t-shirt collection slowly getting more interesting and colorful, and it was fun to try out a kids’ pattern.  I think the recipients of the kids’ shirts were happy, too.  🙂

Megan Nielsen Briar Tee

Megan Nielsen Briar Tee

Megan Nielsen Briar Tee

Megan Nielsen Briar Tee

Recommendations

Here’s some fun stuff to check out over the weekend.

  • You have to see this dirndl on the Draped in Cloudlets blog.  I’m so impressed by the fit, subtle details, and sheer amount of work that must have gone into this!  The results are so beautiful, and really inspiring.  I think I may need a reason to sew a dirndl…
  • I’ve been listening to a lot of the folk/bluegrass music of Sarah Jarosz lately.  I don’t have a broad knowledge of music, but when I find someone I like, I tend to play their music to death.
  • I always figured that the one everyday clothing item I couldn’t make was shoes.  Then I saw these ballet flats that Jodie of Scared Stitchless made.  I’m happy to be proven wrong.  These are amazing.
  • Here’s another cool music video for you this week:  Wintergatan–Marble Machine.  The music is made by marbles being run through a machine by the artist.  Fascinating and lovely.

Take Two: Megan Nielsen Briar T-Shirt

Standard

Today’s project is a second take on a shirt I’ve made once before.  It’s Megan Nielsen’s Briar t-shirt and sweater, this time made from a fleece-backed fabric.  You can see my first version of this pattern here.

I made this one for my trip to Colorado last month.  Since I was planning to wear my other Briar sweater on the plane ride out, this seemed like a good choice for the ride home.  I suppose you could call that dorky, but I call it awesome.  I already had the pattern ready, the fabric waiting to be used, and I really needed a quick project to whip through after all the time I spent on the outfit I wore to the wedding in Colorado.  With all that ready and waiting, it was such a fast project.  Super satisfying!

Here are the details:

As mentioned, I used the pattern below.

My awesome Briar

My imperfect but awesome Briar sweater

These days I trace out my patterns on tracing paper, which gives me a nice, clean pattern to work with, especially if I am grading between sizes, which I usually do.  It was so nice to already have this traced out from the last time.  I chose to make a medium at the bust and grade out to a large for the waist and hips.

Megan Nielsen Briar T-shirt (MN2303)

Megan Nielsen Briar T-shirt (MN2303)

I made Version 4, which is the long-sleeved t-shirt in the longer length.  I really like the high-low hem.

Megan Nielsen Briar T-shirt (MN2303)

Megan Nielsen Briar T-shirt (MN2303)

The fabric for this is pretty cool.  I got it this summer at Field’s Fabrics in Kalamazoo, MI.  Man, that place is great!  This fabric is, I think, made by Polartec.  The quality is really great, and makes me only want to sew with their fleece (However if some other company wants to try to convince me their fleece is better, send over the free fabric!  I’ll try it, but it’s going to take A LOT to convince me.).  It’s got a fleece inside and a stretchy, smooth outside.  It would be perfect for an athletic jacket, but I wanted to try it in another context.  When I thought of pairing it with this pattern, it seemed perfect.

Here are some detail shots.  This time around, I made sure to stabilize the shoulders with ribbon, rather than trying to do that after the fact.  I’ve since stabilized the shoulders and back of the neck on my first version of this pattern, but I don’t think it was a huge help since I did it after the fact.  I wasn’t going to make that mistake this time (See?  Sewing is LEARNING!).

Megan Nielsen Briar T-shirt (MN2303)

Megan Nielsen Briar T-shirt (MN2303)

A nice thing about working with knits is that you don’t have to do a lot of finishing of seams and edges.  The hem and sleeves are just turned up and zigzagged.  I made sure to use a jersey needle and a walking foot to help with the sewing.

Megan Nielsen Briar T-shirt (MN2303)

Megan Nielsen Briar T-shirt (MN2303)

You may notice in the photo above that my sleeve seam isn’t flat.  I sometimes hem the sleeves before sewing the sleeve up.  I’m always afraid it will be hard to hem it afterward, even though my machine has a free arm.  I haven’t decided if I like this better or not.  It’s definitely easier, but I don’t think it looks as nice as sewing the sleeve seam first and doing the sleeve hem after.  It doesn’t bother me when I wear it, though, so I keep doing it.

Megan Nielsen Briar T-shirt (MN2303)

Megan Nielsen Briar T-shirt (MN2303)

Here is the shirt from the inside:

Megan Nielsen Briar T-shirt (MN2303)

Megan Nielsen Briar T-shirt (MN2303)

And that’s about it!  I have one more of these shirts cut out in a jersey knit, so it will be interesting to see if that fits at all differently, since I have noticed some wrinkles that radiate out from the underarms in the versions I’ve already made.  I can’t tell if there is a fit issue there that I don’t know about or if it is the fabric I’ve chosen.  I guess I can compare them all when the t-shirt is finished.

And, last but not least…This is fun now!  Here are my fun things for you to check out.

  • Hillcraft Designs on etsy.  This one belongs to my friend who is an amazing potter, knitter, and all-around fabulous maker of a billion things.  Jo-Alice is a one in a million person and a one in a million maker.  My parents have ordered pottery from her and I bought some for my best friends for Christmas.  It was beautiful, and they loved it.  She has helped me in my knitting, my baking, and in all of life, really.  I highly recommend her work!
  • For your reading pleasure, check out Ask the Past by Elizabeth P. Archibald.  I really love funny things.  The author of this book found advice throughout history and has compiled it, with comments for all of us.  It contains gems like the usefulness of bacon for curing wounds, how to get sympathy after giving birth (hint:  scream really loud!), and a caution to not smell too much basil (you might end up with a scorpion in your brain!).  We checked out a copy from our library, so you can check yours to see if they have it, too.
  • Last, but not least, and continuing on the “funny” theme, this is currently my favorite sketch from The Tonight Show with Jimmy Fallon.  Makes me laugh so hard I cry pretty much every time.

A Vest from a Men’s Shirt, Secret Christmas Pillowcases Revealed, and Sewing Ideas for 2016!

Standard

Nothing like a long title, right?  😉  There are plenty of projects and ideas for projects floating around my head these days, so I think it’s time to power-share!  (There’s another word for the dictionary.  Makin’ up new words all the time over here!)

When I think about new projects to share, I keep forgetting to post this vest that I made.

Simplicity 1499 (vest)

My original plan for it was to be an additional entry in the Refashioners Contest last year, just to pad out my entry, but I’m glad now that I took it off my list.  It wasn’t too hard to make, but it isn’t anywhere near the quality of the jacket I made as my one and only entry.

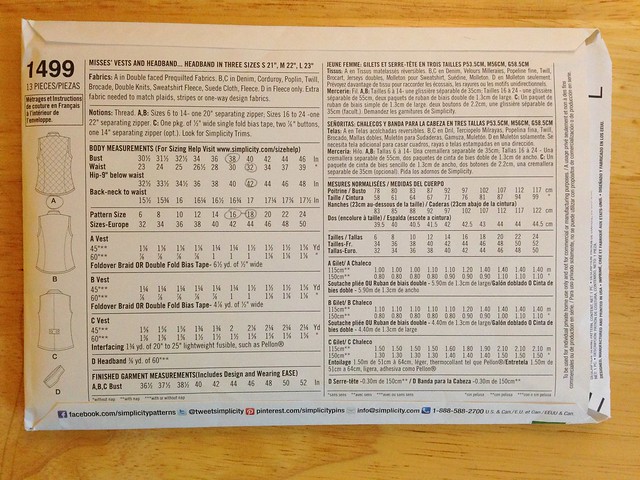
When the cooler weather sets in, I start thinking of polar fleece and really anything warm, so when I found this oversized men’s fleece-lined flannel shirt at the thrift store, originally by L.L. Bean, I knew I wanted to use it (similar shirt here).  I found this pattern:

Simplicity 1499 (vest)

Simplicity 1499 (vest)

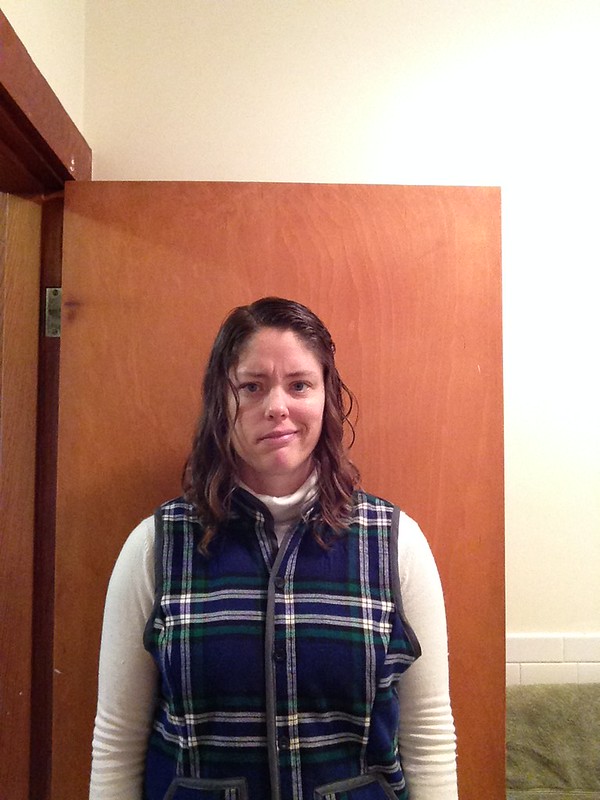
After reading the reviews on Patternreview, I convinced myself that I could create a J.Crew-esque style vest.  Well, that didn’t exactly happen, but it’s cozy!

The good and bad part of getting better at sewing, is that now I am less satisfied when my own sewing is of a lower quality.  What a problem to have, right?  I know I am “supposed” to match up plaids and make things look pretty inside, etc., etc., maybe make sure my pockets are on the same level, but you can’t have it all.  I made this out of a shirt.  That’s cool!  I’ll learn to match plaids another day.

As far as any other details the sewing people among you might be interested in…I made View A, minus the quilting.  I cut a size 16 and graded out to an 18 in the waist and hips.  This may not have been necessary.  It’s fairly boxy and loose, but I wanted to be able to wear it over sweaters.  Instead of putting in the zipper, I left the buttons from the original shirt.  I also took off the original chest pockets.  In the process, I may have made a few holes, but that was an opportunity to return to my old standby of running over any sewing problems with my machine, and I just sewed over them until they blended in.  Problem solved!

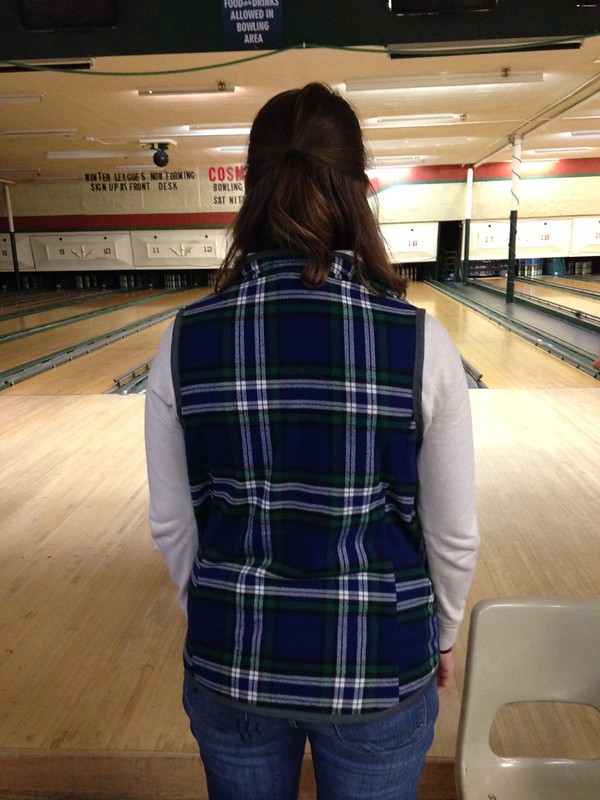
The other problem I ran into was that I ended up with “wings” at the front of the armholes.

Simplicity 1499 (vest)

Simplicity 1499 (vest)

I did actually go back and take off the bias binding and try to take the princess seams in a little bit.  It worked better on one side than another, and I’m a lot happier having tried.  It definitely fits better now.

Learning to do a sway-back adjustment is on my mental list of things to learn, but I’m trying not to tackle too many new techniques at once, so that one is for the future.  Dealing with the armholes was my fitting experiment for this pattern.

Simplicity 1499 (vest)

Simplicity 1499 (vest)

Overall, I think the pattern is good.  This isn’t my favorite thing that I have ever made, but I like it and I’ve worn it and will wear it again.  I don’t know that I will keep it in my closet for the ages and pass it down to my children, but I guess you never know.  More fleece is always better than less fleece in the winter, so it may survive longer than I think.  I would try the pattern again if I decide I want another vest.

On another topic, I wanted to give you a quick look at a few pillowcases I made as Christmas presents.  I used a tutorial on the Sew Mama Sew blog that is actually an excerpt from a book by Shea Henderson called School of Sewing.

Pillowcases

Pillowcases

I bought the border print for the first pillowcase as well as the panda seersucker in Michigan over the summer at The Material Girls in Dearborn, MI.  The coordinating fabric on each pillowcase is from Joann’s.  These really were easy to sew and I’m sure I could use the tutorial to make fancier ones in the future as well.  I keep telling myself that if I would just make a billion pillowcases and cloth napkins, I could use up my stash and replace my worn pillowcases and napkins, but so far clothes are too much fun.  Except for these two pillowcases, clothes have won out every time.

Lastly, do you have sewing plans for 2016?  I have ideas.  I’m not calling them plans because my ideas of what I want to make often change throughout the year, but here is what I have so far.  I saw the #2016makenine challenge on Instagram, and decided to jump in…except I ended up with ten.  This makes me sound like a total overachiever but, like I said, these plans will flex and change throughout the year, and I doubt everything will get made.

#2016makenine

Top row, left to right:  Butterick 5526, Megan Nielsen Briar Sweater and Tee, Simplicity 1538

Middle row, left to right:  Jalie 3134, Megan Nielsen’s Mini Briar, Jalie 3023

Bottom row, left to right:  Strathcona Henley by Thread Theory, Coco by Tilly and the Buttons, Jutland Pants by Thread Theory

(most links to these patterns are below)

+

#2016makenine

Ginger Skinny Jeans Pattern by Closet Case Patterns

 I’ve already cut out some Jutland Pants by Thread Theory for my husband (I’m actually doing a muslin/test garment for this one), and I’ve traced out the Strathcona Henley for him, too.  Lest you start to think I’m abandoning my really good streak of selfish sewing, you should probably know that I LOVE henleys, so once I make him one, I plan to adapt the pattern into one for me as well.  (And how about a girl version of some fleece-lined Jutlands?  Sounds like wintry heaven to me!  I’m saving that idea for the future!)

In the top row are some shirts I’ve tried before, and I still have fabric from the summer to do additional renditions of those.  My first version of the princess seam button down on the top left (Butterick 5526) should make an appearance on the blog soon since I made it to wear to a wedding.  I already whipped up a quick Briar fleece shirt (still to be blogged) to wear for travelling to the wedding, and I need to make a broad back adjustment to the pattern for the button-down on the right (Simplicity 1538) before remaking that one.

You can see I still have bathing suits on my list, maybe some kids’ Briars, and a shirt version of the Coco pattern by Tilly and the Buttons.

AND…JEANS!  I think it’s time to start learning to sew more fitted bottoms, so jeans are on the list.  I’ll keep you posted on that!

Do you have any sewing or other project ideas for this year?  I’d love to hear about them!

My Imperfectly Awesome Briar Sweater

Standard

This wasn’t the post I had planned to write to accompany these pictures.  This, my first attempt at Megan Nielsen’s Briar pattern, didn’t turn out exactly right.  I was going to fix it and then show you my before and after pictures.  But I didn’t fix it.  I might, but I haven’t yet, and I decided it was better to show you the shirt as it is and update you if I ever do alter it.  Because I actually love it how it is even though it didn’t turn out the way that I planned.

My imperfect but awesome Briar sweater

So here are the details.  I got this super-cool fabric at Pintuck & Purl in Exeter, NH a few months back.  It’s a double layer combination of a wool knit (or it may be a wool-blend; I can’t remember) and a cotton jersey layer.  It was originally smooth on both sides, but I took a small bit and threw it in the washer and dryer to see what would happen.  It shrunk, but the wool layer didn’t completely felt, and the jersey scrunched up in a cool way due to the shrinkage of the wool.

Double layer fabric from Pintuck & Purl in Exeter, NH

You can imagine that this made for a pretty stretchy fabric, and I knew I was taking a risk with it, not only because of the stretch factor, but because the shrinking had really thrown the grain off.  It just seemed like the perfect fabric for a super cozy Briar, though, so it had to happen.

The Briar pattern has been my favorite Megan Nielsen pattern since I discovered that company, and when I heard it was coming out in paper form, I bought a copy as soon as it was available.  That’s pretty rare for me.  I don’t have a ton of “sewing money”, so I tend to window shop for ever and buy very carefully.  I knew I wanted this pattern, though.

My awesome Briar

My imperfect but awesome Briar sweater

 I thought that a Briar in this fabric had a lot of potential for a relaxed, rough look with some exposed seams and unhemmed edges.

My imperfect but awesome Briar sweater

I really love knits and I sew with them pretty frequently, but despite that, I’m not really awesome with them yet.  This is a pretty well-explained, straightforward pattern, but I ran into some problems with the neckline very quickly because of my fabric and what I thought I wanted to do with it.  I didn’t stabilize the shoulders although I see now that I should have.  I also tried to simply sew a strip of fabric cut on the cross-grain around the neckline so it would have a raw-edged look.  The neckline seemed to sort of get wavy, though, and grow.  That’s when the frantic internet-answer-searching began.  I finally left a blog comment for Lauren (of the blog Lladybird) to ask about the wavy neckline, and she gave me some great tips, but it was already a little too late for this shirt.  The waviness was there (because by that time, I had taken off the strip of fabric and just zig-zagged the edge) and I was afraid to mess with it any more.  I do have to thank Lauren, though.  I don’t know her at all.  I just follow her blog, but whenever I have needed an answer (how to use Flickr for my blog photos; how to fix my knit fabric disasters), she has always gotten back to me.  Thanks, Lauren!

My imperfect but awesome Briar sweater

My imperfect but awesome Briar sweater

My imperfect but awesome Briar sweater

At that point, I decided to leave the neckline alone and just finish.  I thought about putting a sparkly zipper (also from Pintuck & Purl) in the back, but once I got to the point of adding it, it didn’t look right, so I skipped it.  This is a really quick and easy pattern, so I just resigned myself to wearing the sweater with a tank top underneath until I could figure out how to fix the neckline.  I bought twill tape to sew into the shoulders and around the back of the neckline after the fact to sort of hold things in place…but I haven’t done it yet……and I just love the sweater.  It’s a little chilly around the neck when it gets cold out, but that’s a great opportunity to wear the cowl my friend knitted for me (thanks, Audrey!).

All in all, even with its “imperfections”, I love this sweater.  I’ve already made a second one (still to be worn, photographed, and blogged), and this time I made sure to stabilize the shoulders.  Gotta learn the lessons, right?  I think more Briars (and mini-Briars) are in my sewing future.

My imperfect but awesome Briar sweater

My imperfect but awesome Briar sweater

My imperfect but awesome Briar sweater

The Chunky Cable Knit Hat by Lula Louise

Standard

Hi, friends!  Today will be a little different, since I have a knitting project to share!  Like many sewing people, I also like to knit, although after a few sweater disasters (for the most disastrous, click here), I’ve slowed down considerably.  Before I really came to sewing, knitting was my passion, but for the past three years, I haven’t done much of anything in that arena.  I’ve been missing it, though, so the search has been on for a pattern that is fast and easy enough to do while watching TV or chatting with other people, but also interesting.  And I think I found it:  the Chunky Cable Knit Hat, a free pattern by Lula Louise.

Chunky Cable Knit Hat

 I can’t remember exactly how I found this–it may have been through Google or Pinterest, but it was just right.  I still have some great chunky yarn left from this awesome yarn sale in Vermont, and I wanted a fun, super bulky, chunky hat.

Chunky Cable Knit Hat

 I’m so thankful to my husband for taking these pictures.  (Thanks, Babe!)  We had just taken the pictures for my button-down shirt, when I realized we could get these done, too.  This explains the funny awesome hairstyle I’ve got going on, but then, once we had taken all our pictures and were ready to run back inside (it was getting cold, and we were hungry), we realized one of our daughters had photo-bombed all of our pictures, and we had to shoot them again.  That really endeared my husband to blog photography.  Now it is his favorite thing!  OK, no.  That’s a lie.

Chunky Cable Knit Hat

This picture shall be titled I love taking blog pictures!

Now we’re just getting silly.  Let’s get back to the pattern at hand.

Chunky Cable Knit Hat

 We should talk details.  Because I tend to knit all things that are elephant-sized, I made the small.  This was a good choice for me.  I used size 13 needles, and my chunky wool yarn from the Yates Farm Yarn sale (you can see a post from another blog on this sale here).  I have minor cabling skills, and these were just right for me, especially as my knitting skills are pretty rusty.

Chunky Cable Knit Hat

The pattern is knit flat and then you sew it up at the end.  You may be able to see my seam in the back in the picture above.  This probably took me two shorter nights of knitting.

Chunky Cable Knit Hat

After I was done I also remembered one reason I stopped knitting so much.  I’ve gotten into the bad habit of knitting with my shoulders hunched, so I had a huge tension headache the next day.  Time to redevelop good habits!

Chunky Cable Knit Hat

The pom-pom on top was really fun to make.  Now I’m on a bit of a pom-pom kick.  I made this one removable by tying it onto the hat with some string in case I ever need to clean the hat and want to protect the pom-pom.

Chunky Cable Knit Hat

The only issue I had with the pattern was what I think is a typo in the small size directions on Row 9.  I think that after “p2tog*,” it should say “repeat to end”  rather than just “p2tog*, end”.  As far as fit, I do have to push it onto my head just a little bit.  I don’t know if this is because of the pattern or my knitting, but the ribbed section is a little looser than I would like, so maybe I will run a few rows of elastic thread through it at some point.  Once I push/pull it on, though, it’s nice and cozy.

Chunky Cable Knit Hat

So, my final analysis is that I like the hat a lot and would knit it again.  This is a really fun free pattern because it knits up quickly and would be an easy first cabling project.

The Brumby Skirt from Megan Nielsen Patterns

Standard

Today I’m happy to share with you one of my latest projects, the Brumby Skirt from Megan Nielsen Patterns!

Brumby Skirt pattern by Megan Nielsen

I really went back and forth on this one before starting and did lots of “research” checking out others’ versions of it around the web.  I’m still not super sure if I like the high-waisted skirt look on me, but I thought I would give it one more try before deciding for certain, especially since I won this pattern in the Refashioners contest and had the perfect fabric for it–some linen from Pintuck & Purl!

Brumby Skirt pattern by Megan Nielsen

Brumby Skirt pattern by Megan Nielsen

 I made Version 1, the shortest version, in a large.  My original thought was to make it longer.  If I’m wearing a closer-fitting skirt, like a pencil skirt, I feel ok with this length because I can feel the skirt on the back of my legs and I know I’m not exposing myself.  In a fuller skirt, though, you can’t always feel the back of the skirt, which worries me at times…

So, I planned to make it closer to knee-length.  I had, however, read Lauren/Lladybird’s post on her Brumby skirt and remembered that she said she had been underwhelmed before hemming, but loved the skirt when it was the specified length.  Well, my experience was exactly the same.

Brumby Skirt pattern by Megan Nielsen

I made it up but didn’t hem it, and it was very blah.  So, I decided to pin it up to the length in the pattern…and that’s when it happened.  I don’t know how she did it, but Megan Nielsen put some magic in this pattern.  When you hem it, it transforms!  I love it!

Brumby Skirt pattern by Megan Nielsen

So, here are some details and design decisions I made.  Initially I was going to put in this gorgeous silver zipper that I bought at Pintuck & Purl, but I would have had to shorten it…and it was a metal zipper.  I know it’s possible, but not having ever tried this, I didn’t think I wanted to try it for the first time on a very fancy zipper.  I also thought about topstitching in silver (I was really getting wooed by that silver thread!), but in the end, I decided on black thread and a metal zipper with black tape (that I wouldn’t have to shorten).  I realized this would make the skirt more every-day in a good way (i.e. it will get worn more).  I’ll save my fancy zipper for a future project.

Brumby Skirt pattern by Megan Nielsen

Back view with exposed zipper

Brumby Skirt pattern by Megan Nielsen

Front view–it’s hard to see the topstitching, but it’s there!

 Things I wondered about before starting this project had to do with ease around the waist and the depth of the pockets.  Having only made the one high-waisted skirt (the apple skirt), I wasn’t sure how things would work out if the finished measurement was the same as my actual waist measurement.  I wondered this with the apple skirt, too, so I actually added a few inches to the waistband to be safe.  With this pattern, I decided to risk it and just made it as it was printed, and it worked out great!  It’s very comfortable and not too tight at all.

Brumby Skirt pattern by Megan Nielsen

I noticed in my travels around the web that the pockets looked deep enough that they weren’t actually supporting anyone’s hands–which is the case.  It’s like your hands are straight down at your sides…but I still love those huge pockets.  I can keep things in them and you can’t even tell!

Brumby Skirt pattern by Megan Nielsen

I did end up doing just a little topstitching at the edges of the pockets (which was an optional suggestion) so that they wouldn’t stand out as much, and that has been great.  I also managed to catch the bottom edge of the pockets in my hem on the inside, which tacks them down nicely.

Brumby Skirt pattern by Megan Nielsen

Brumby Skirt pattern by Megan Nielsen

Brumby Skirt pattern by Megan Nielsen

As far as seam finishing goes, I just zigzagged in the seam allowance and then trimmed the seam with pinking shears.  This does lead to some strings and fraying after washing, but I think that will stop soon.  This fabric is a nice, substantial bottom weight, and French seams didn’t sound like fun on this one.

This was a fun and easy pattern.  I am sort of curious about how it would look in wool–I have a few pieces that were given to me.  With these cozy fleece-lined tights, I wore this skirt four out of seven days.  Yes–I totally do that, especially if I’m not going to see the same people every day, but don’t worry–there were some laundry days in there.  😉  I think this will be a great early fall, late spring, and summer skirt.  The more I see of Megan Nielsen’s company, the more impressed I am.

Brumby Skirt pattern by Megan Nielsen

Brumby Skirt pattern by Megan Nielsen

Brumby Skirt pattern by Megan Nielsen

Before I go, I want to let you know that I updated my last post with a few more pictures of the inside of the shirt I made.  Go on over and check it out if you want to see more.  🙂

The Apple Picking Skirt

Standard

It was time for a crazy-sewing-lady skirt.  What came from this determination was “The Apple Picking Skirt”!

Pink Apples Dirndl Skirt

As I’ve sewn more and more, I’ve used awesomely patterned quilting cotton less and less, but let’s be honest:  quilting cotton has the MOST FUN prints!  So, I decided that I needed a skirt (or a dress or a…something) out of some really cool quilting cotton.  Who should step in the fill the gap but Melody Miller of Cotton + Steel and her super cool Picnic collection.

Melody Miller:  Picnic (Apples Pink)

This was the project I chose after finishing my jacket for the Refashioners challenge.  I still had/have a few projects on my “big ‘ol batch of sewing” list (good name, right?), but I needed something quick and easy…and with only one or two new concepts to learn.  So, I checked out Gertie’s New Book for Better Sewing by Gretchen Hirst from my library for the billionth time (I really need to buy a copy!) and used her instructions to create a dirndl skirt, which is basically two rectangles sewn together with a rectangular waistband at the top.  I’d never made one of these types of skirts before, and I wanted to try it.  I also wanted to try using horsehair braid to make the hem stand away from my body.

Pink Apples Dirndl Skirt

And it was fun!  And easy!

So, let’s talk about a few details.  I ordered my fabric from fabric.com, and got my horsehair braid from Pintuck & Purl.  Maggie, the shop owner, gave me some information on using it, and between that and Gretchen’s book, I was golden.  I got the pink zipper at Joann’s, and in my button collection (a gift from my in-laws’ attic), I found the BEST button!  Check this out!

Pink Apples Dirndl Skirt

It’s a squirrel!  And it looks like it’s holding the apple!  Thanks, Mom!

This was certainly a project of details.  It’s such a simple skirt, that I had fun on those extras.  I’m really convinced that the things that make clothing special (besides quality construction and style lines) are fabric and details.  Even in the thrift store I use fabric as a guide, looking along the rows of clothing for stand-out fabric, and only then considering the garment.

Since I mentioned details, I have another favorite detail on this skirt–the tag!

Pink Apples Dirndl Skirt

I didn’t realize until the last time I was up at Pintuck & Purl and was talking to some of the other ladies at the Sip & Stitch night that Cotton + Steel always has cool selvedges.  This fabric had all the information about the designer and the line and all that, but it also had this cute little section that said, “I made something pretty for you!”  Well, selfish seamstress that I am, I changed “you” to “me”, and I sewed it to the back of my skirt.

Now is when fantasy clashes with reality.  Would I really wear this apple picking?  No.  But I did wear it to church, and it’s making the beginning of fall feel pretty fun (I was having a hard time letting go of summer after the last winter we had.).

Pink Apples Dirndl Skirt

While I was making this, I spotted Jenny’s cool skirt featuring fabric with a map of London on her blog, Cashmerette.  I felt we were thinking on the same wavelength, which I liked, since she’s pretty cool.

Now that all is said and done, I’m not sure this is my favorite silhouette on me, but I think I’m going to try at least one more high-waisted, gathered skirt (from a different pattern) before I decide for sure.  Sometimes new silhouettes just take a little getting used to.

So, what about you?  Do you try to go incognito with your sewing projects so everyone will think they are store-bought or do you like to stand out and embrace looking “homemade”?

Whatever you are sewing, I hope it makes you excited for the season ahead and drives you on to make more projects in the future!

Pink Apples Dirndl Skirt