I’m so excited to share my latest project with you today. I LOVE this shirt. There are two reasons I love it so much. The first is this awesome Cotton + Steel pink tiger fabric. The second is the fit!

Ping of Peneloping was my inspiration for this project. Her tiger shirt is amazing (as is everything she makes), and it set me on the quest for my own tiger shirt.
You may remember my first attempt at this pattern, made from a vintage sheet. I really loved that shirt. It was beautiful, except for being too tight across the back.


I also realized, in trying it on before making this one, that the darts were slightly too high. Luckily, I had just learned both how to do a broad back adjustment AND how to lower darts. After doing both of these things to this pattern, I think I may have found my perfect casual button-down…and I have worn it a billion times since making it. I’m actually afraid of wearing it out.
This post is going to get a bit technical in the hopes that it might help someone else out there. I won’t go into lowering a bust dart because The Curvy Sewing Collective blog just did an excellent post on this. You can find that here.
I will, however, show you pictures of the major broad back adjustment I did in case anyone else is working on learning how to do this. I showed how I did this on a princess-seam shirt in this post. Today’s shirt, Simplicity 1538 does not have princess seams, but does have a yoke in the back.


Now is the time to skim if you don’t care about the technical aspects of this project.
As before, I used the information in The Perfect Fit, part of The Singer Sewing Reference Library.
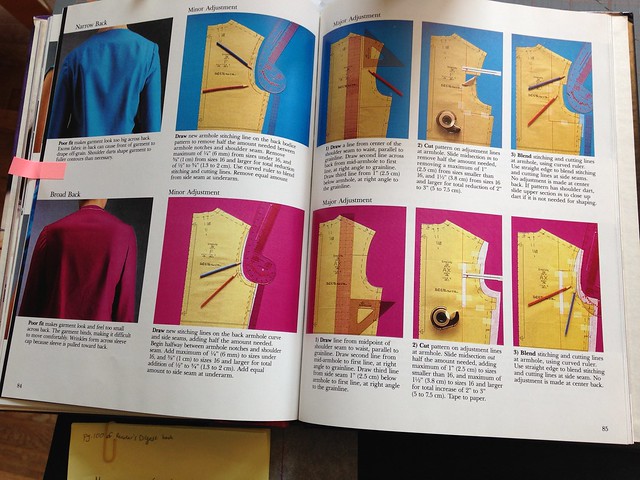
Because I knew my back measurement, I could measure the pattern to see how much width + ease I needed to make the shirt comfortable when sewn up. The pattern was 15 inches across the back. I needed 17 1/4-17 3/4 inches in order for this to be comfortable on me. (I mention how I measured for this in this post.) This meant I had to add 1 1/8-1 3/8 inches to this pattern piece (since it only represents half of the back). I decided I would try adding 1 1/4 inches with a major broad back adjustment (rather than a minor adjustment, which just adds a little width to the back armhole curve).
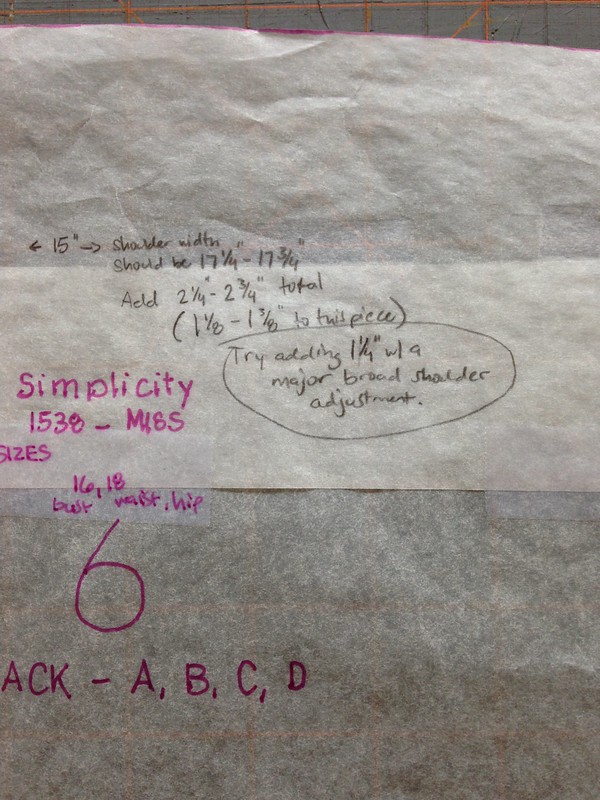
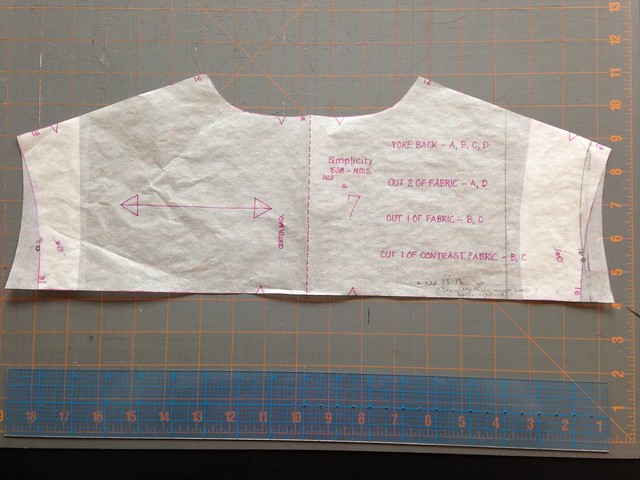
Here are my pieces before alteration:

I have a full yoke piece and a half bottom back piece. I folded the yoke in half so that the edges of each side could be adjusted simultaneously (and hopefully identically). You’ll see that my yoke is narrower than the back bottom piece. That’s because there is a little bit of gathering below the yoke on the center back. As the shirt is sewn, they become the same width.
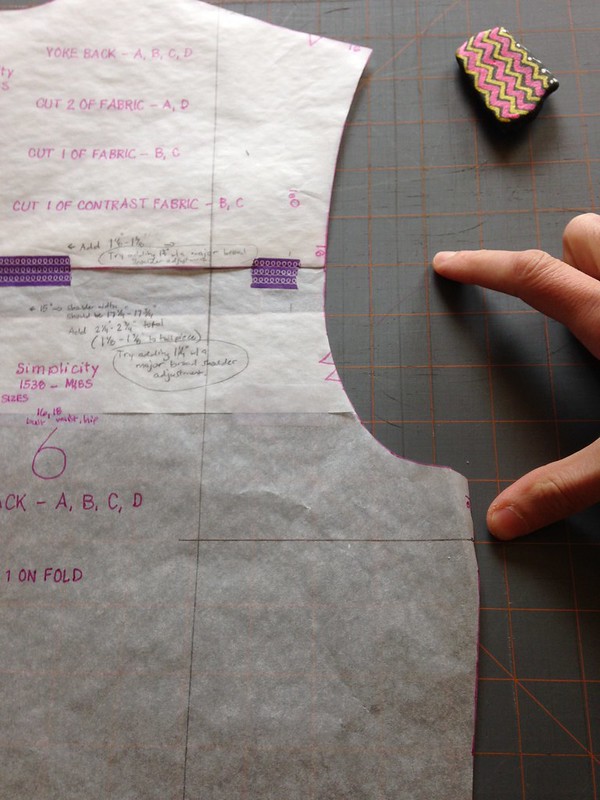
For the major adjustment, I taped the yoke to the bottom piece of the back so I could work on them as one. I made sure to overlap them by 5/8 inch to account for seam allowance.

Then I drew a line from the middle of the shoulder seam down to the waist and parallel to the grainline. (I’m more or less quoting from the book, but since you may not be able to read the picture in the book, hopefully this will be helpful.)

Next I drew two horizontal lines perpendicular to the one I had just drawn. Line number one went from the middle of the armhole over to my first (vertical) line and line number two went from about 1 inch below the armhole to my vertical line. Since line number one coincided with where the yoke joins, you can’t see it, but I’m pointing to the two new lines with my fingers in the picture below.
Next, cut out along the lines you just drew so it looks like this:

That little ‘almost rectangle’ you have is what you will slide out the amount you need for that half of your shirt (so, it’s half the total amount you need across your back). In my case, I slid that piece over 1 1/4 inches. The book notes that the maximum you should slide it out for sizes smaller than 16 is 1 inch. For 16 and up, you can slide it a maximum of 1 1/2 inches. Since I had cut a 16 at the bust and an 18 at the waist and hips, this worked for me, and would give me a total amount of 2 1/2 inches across my whole back when the shirt was cut out.
Once you slide that piece out the amount you need, place some paper beneath it and tape it down. It helps if the paper extends out beyond the edges of your pattern by the armhole and side seam since you will have to redraw those areas now.
I found this part kind of tricky. I felt like I was making it up as I went along, but here is what I did. I used my curved ruler to redraw the seamline itself, and then I added my seam allowance in afterward. I just sort of slid the ruler around until it seemed right.
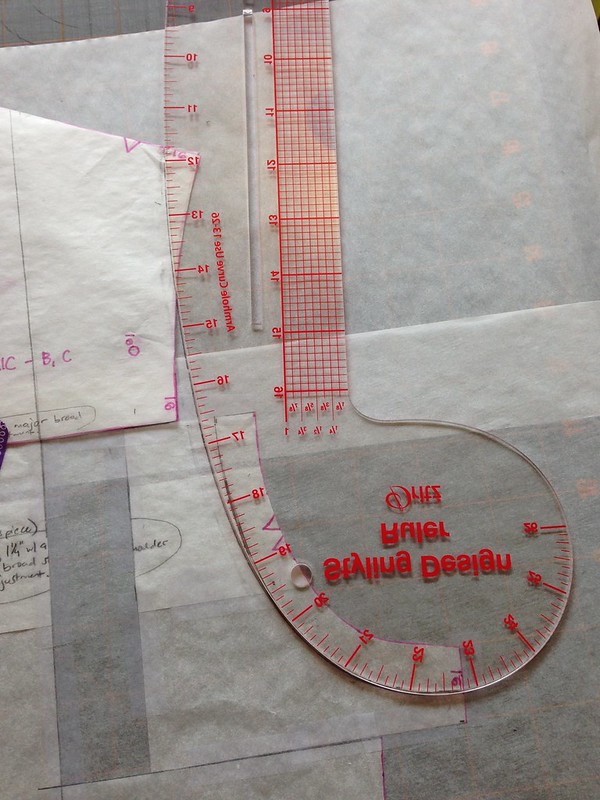

I also had to redraw the area below the armhole, blending the armhole into the side seam. Again, I felt like I didn’t know what I was doing, so I took my best guess. Then I cut out my altered pattern pieces (back bottom and yoke).

Because my yoke piece was actually a full piece that I had folded in half to do my alterations on, I had to make sure that I had the correct and identical alterations on both edges. Don’t forget to move any markings (like notches and dots) to an equivalent place on your altered pattern pieces.
A really great thing about this alteration is that it doesn’t change the length of the shoulder seam. If it did, I would have to adjust the front shoulder seam as well. The length of that seamline wasn’t my problem, and neither was the size I had chosen. The width of the shoulders in the back was the issue (and one I also have with store-bought clothing in woven fabrics). This alteration completely fixed that, and now the shirt is wonderfully comfortable across my shoulders.

The other thing that I did was to lower the front dart by an inch. I found my information for how to do that in The Perfect Fit as well. As I mentioned above, The Curvy Sewing Collective did a great tutorial on this very thing. If you find that dart height is an issue for you, you should check out that post.
Even thought I’m not going into the details, I will show you how my front pattern piece looked after I moved the dart down.

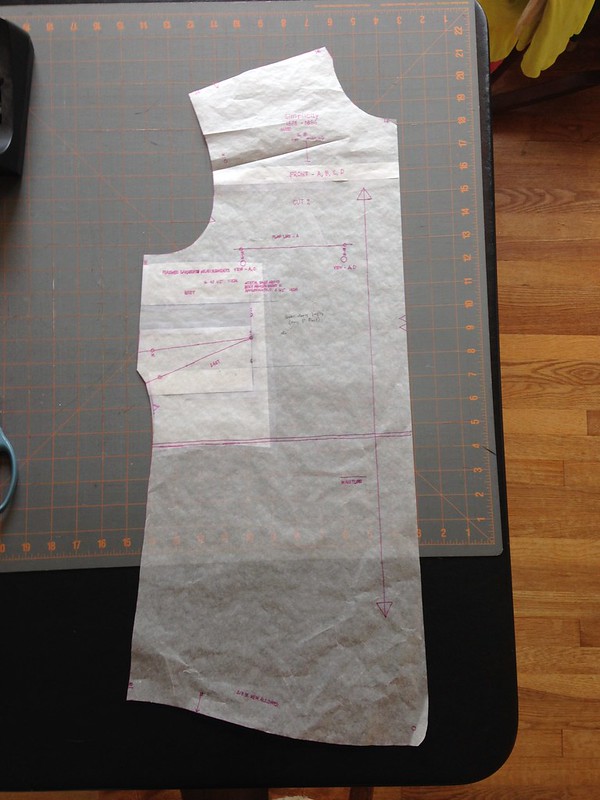
I’m glad I didn’t go any lower, and I was a little nervous that the inch had been too much, but after wearing the shirt often, I think it turned out great.
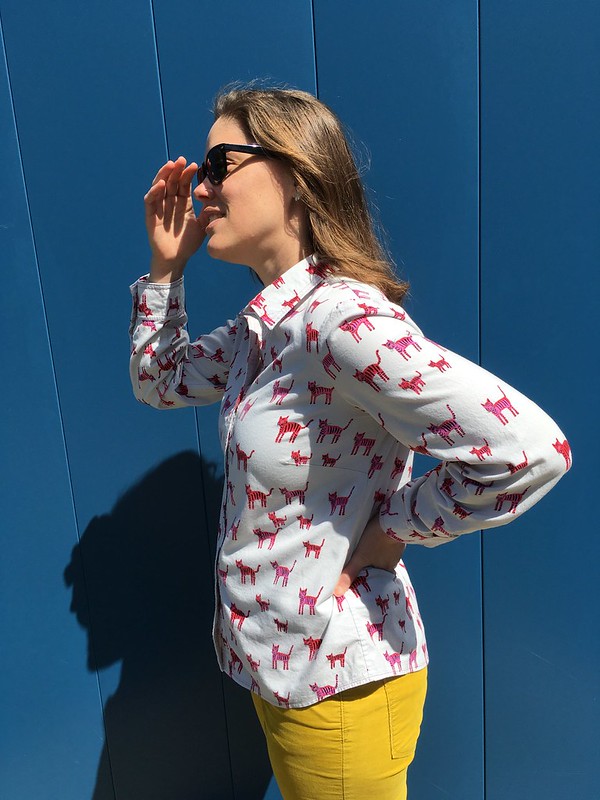
Technical details now finished. Time for pretty pictures!!!
We found the best background for these shots, and it was actually sunny, too. All that color + sunshine makes me happy.


And one little fabric and topstitching close-up. Love those tigers!

Wow! That was the most technical post I’ve written in a long time (or ever?). How about some fun?
Recommendations:
- I’ve got another podcast for you! Now that I’m out of school, I’m discovering that history is interesting. 😉 I can see how valuable it is to know the past because then you understand why things are the way they are today and how you can avoid the mistakes of the past (hopefully). It’s also just interesting. I have long loved “Stuff You Missed in History Class”, but now I have to add “The History of English Podcast” to my list as well. I realized I was really into it when I went back to episode one and started binge-listening. It’s not about technical things like grammar, but more a broad history lesson about how languages are related and how the English of today came to be.
- Have you heard about Me Made May? If you are a seamstress/stitcher/sewist you should check it out. It’s a personal pledge to wear your handmades throughout May. You can challenge yourself to wear one for the month, one every day, or all handmade all month. It’s whatever you choose. I participated last year and loved it, and I’m planning on doing it again this year.
- One of my librarian friends recommended the movie “The Woman in Gold” to me. (Thanks, Laura!) It’s the story of one of Gustav Klimt’s most famous paintings, the family it belonged to, and justice long after a wrong had been committed. Here is the trailer:

Thanks for taking the time to do this tutorial. The broad back issues plague me everytime. I’m saving this for future reference! And I love those tigers 🙂 What a great combination of fabric, pattern and your smile!
LikeLiked by 1 person
Thanks! I’m really glad you found it helpful. The fit is so wonderful now. It makes me want to try to remake some of my favorite store-bought clothing that is tight in the shoulders. Good luck with your future projects!
LikeLike
Great shirt – You did a good job on the adjustments, the fit looks great. My daughter is in love with this material and has already requested I get some to make something for her!
LikeLiked by 1 person
Thanks! I’m sure you’ll make something great.
LikeLike
Love this…you did an awesome job!!!! I am amazed at your ability to adjust and re-draw patterns!!!
LikeLiked by 1 person
Thank you! I’m always amazed if the redrawing works, too. Thanks for the reference books!
LikeLike
I LOVE your shirt! Looks great, and that is the coolest fabric ever. Seriously, when are you going to start making me clothes?! I’m currently ordering from StitchFix and getting a lot of cute things that don’t fit properly. Seeing as you are clearly a fit expert, why don’t I start ordering things from LisaFix instead!?
Miss you and love reading your blog.
LikeLiked by 1 person
Hahahaha! You are the best and I really miss you, too!!! Why don’t YOU start sewing? I would love to bring you into the obsessive sewing world! 😉
LikeLike
Love your cats! and thanks for the great tutorial!
LikeLiked by 1 person
Thanks so much!
LikeLiked by 1 person
Well my friend, I agree with Barbara J; I’m saving this tutorial for future reference! Love the tiger print. The custom fit looks fabulous on you. You’re practically ready for Project Runway!!
LikeLiked by 1 person
Thanks, Gretchen. You are an awesome cheerleader. 🙂
LikeLike
Thank you for posting this. I’m using the same book to make a 1 inch broad back adjustment and couldn’t figure out how to redraw the armscye smoothly over such a distance. Your pictures are so helpful! And you do lovely work. I enjoy your blog quite a bit.
LikeLiked by 1 person
Thank you so much! What a nice comment. I know what you mean, though. Those books have just enough info to help, but I always wish they had a little more for stuff like that. Good luck on your project!
LikeLike