Tag Archives: jeans

Sailor-Inspired Pants! Simplicity 8391 in Denim

Standard
Sailor-Inspired Pants!  Simplicity 8391 in Denim

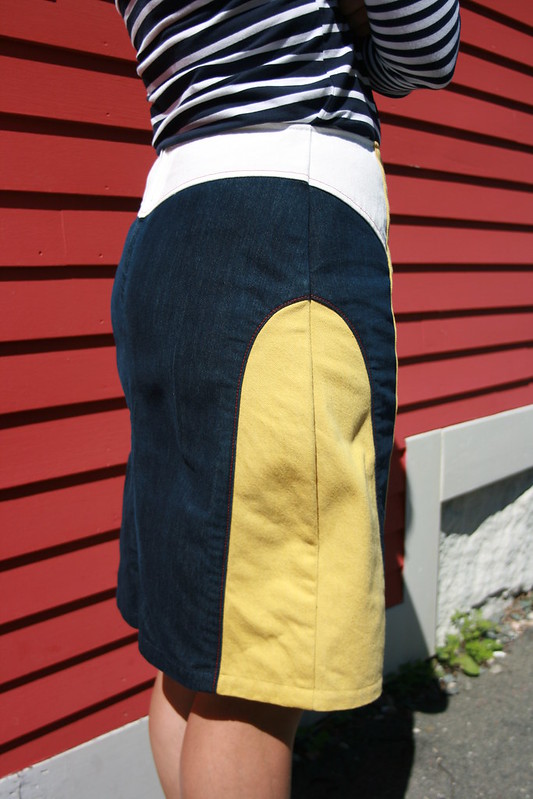
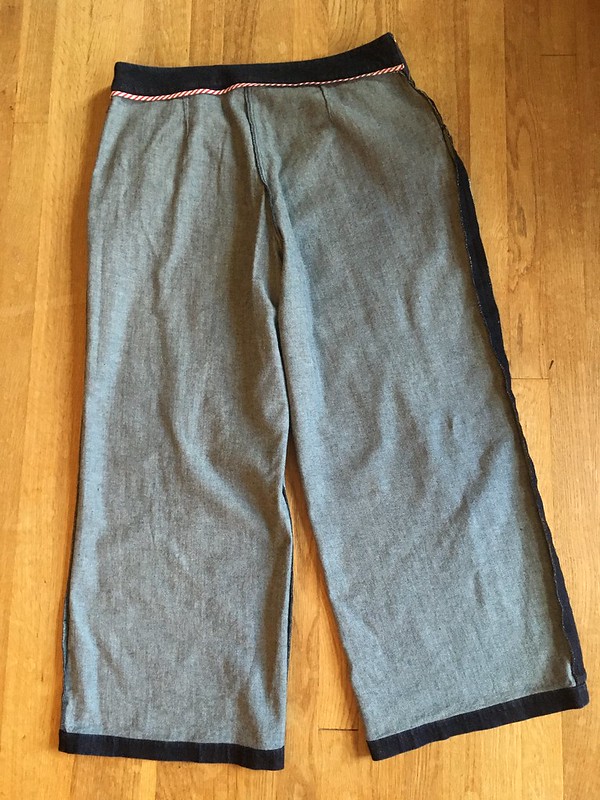
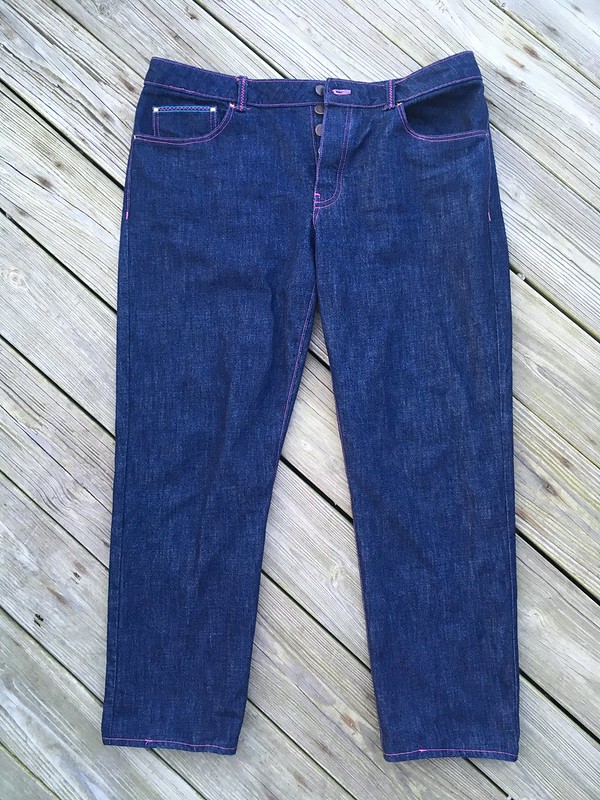
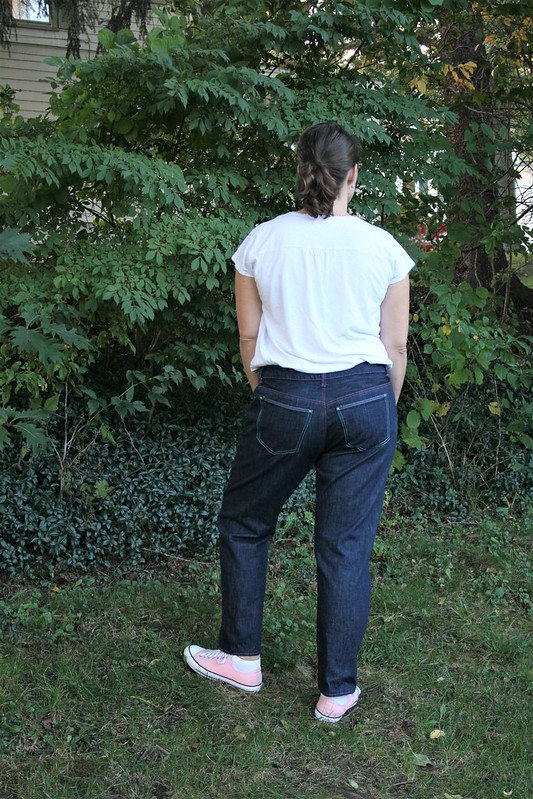
I’ve met some serious secret pajama goals with this pair of pants. In making these wide-legged, comfortable, sailor-inspired jeans, I’m revisiting a pattern I tried for the first time last summer: Simplicity 8391, view C.

Sailor-Inspired Pants!  Simplicity 8391 in Denim
Simplicity 8391
Sailor-Inspired Pants!  Simplicity 8391 in Denim

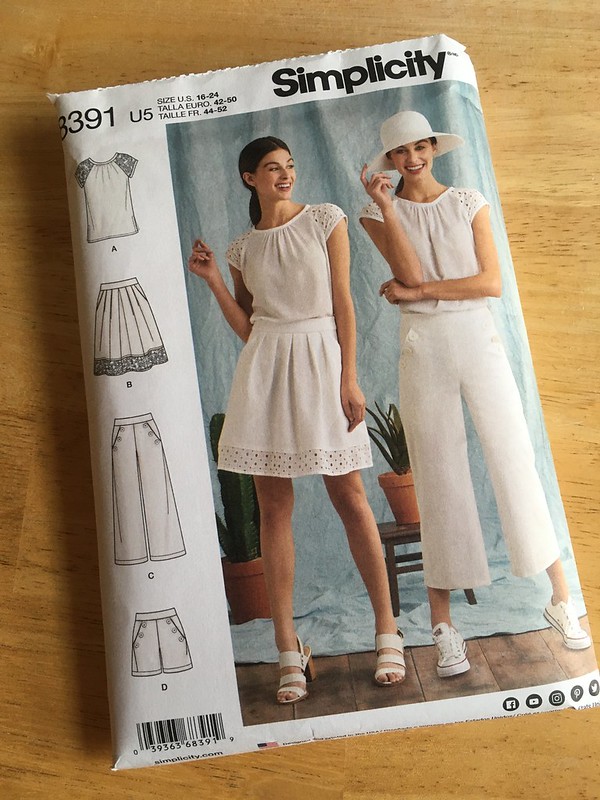
Only this time I added seven inches to the length of the cropped pants in the pattern to make full-length pants/trousers, and I made them in denim because after several years of skinny jeans, I’m ready to let my legs out of prison, at least some of the time. Plus, these feel about as great as a nice pair of pajama pants.

Sailor-Inspired Pants!  Simplicity 8391 in Denim
Family help with pictures means things get silly.

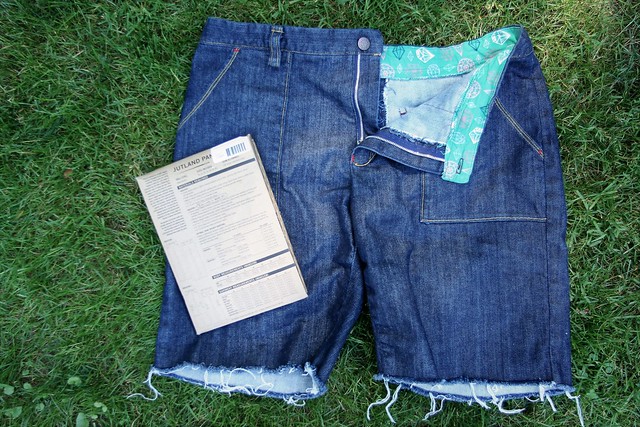
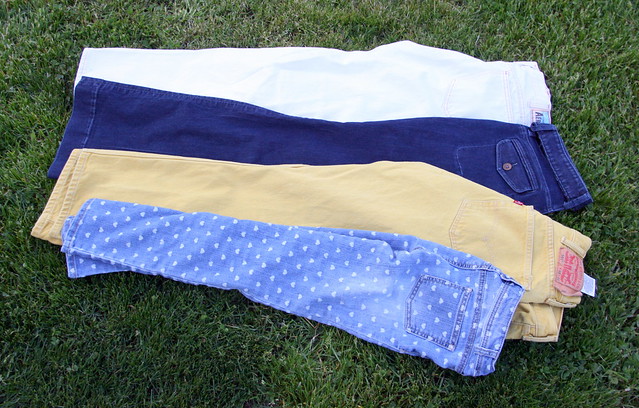
I made these from a lighter midweight denim from Fabric Place Basement in Natick, MA. Fabric Place Basement is turning out to be a good source of denim for me. This denim was nicely drapey rather than stiff, perfect for wide leg pants.

Sailor-Inspired Pants!  Simplicity 8391 in Denim

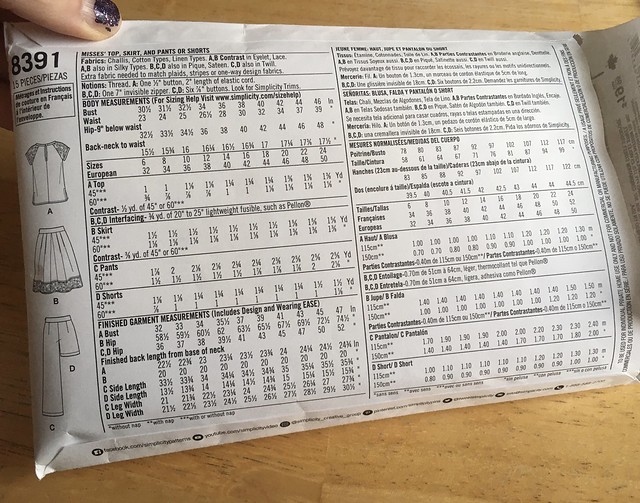
I cut a 22. Really, I just altered the pattern I used this summer by adding length. My hem is 1.25 inches, but next time, I think I would make it an inch deeper, so I’d add one more inch to the length, allowing me 2.25 inches for my hem.

Sailor-Inspired Pants!  Simplicity 8391 in Denim
Pants, inside front
Sailor-Inspired Pants!  Simplicity 8391 in Denim
Pants, inside back

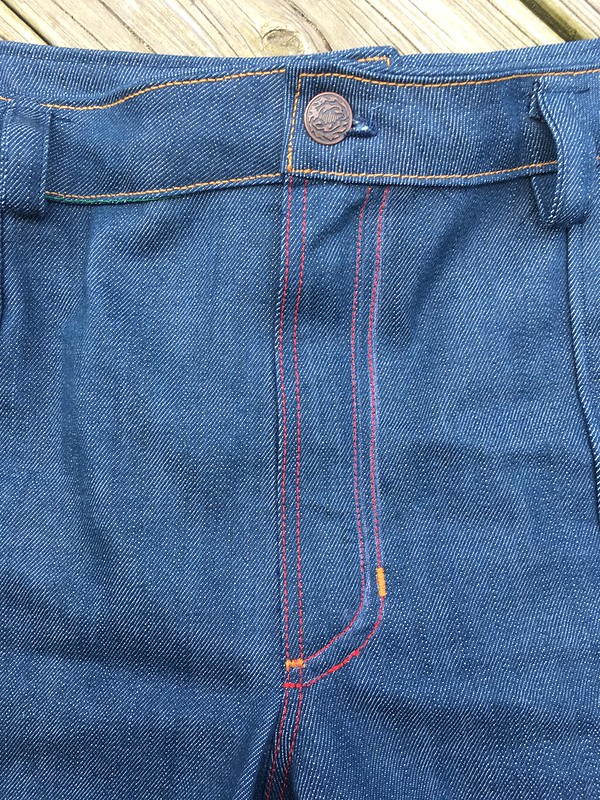
I changed the invisible zipper the pattern calls for to a lapped zipper with the help of Gertie’s New Book for Better Sewing by Gretchen Hirsch (the machine-sewn lapped zipper directions). I wanted to use a larger, more heavy duty jeans zipper.

Sailor-Inspired Pants!  Simplicity 8391 in Denim

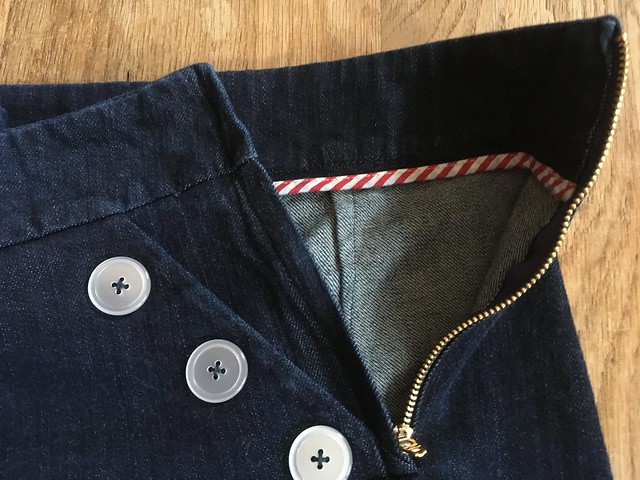
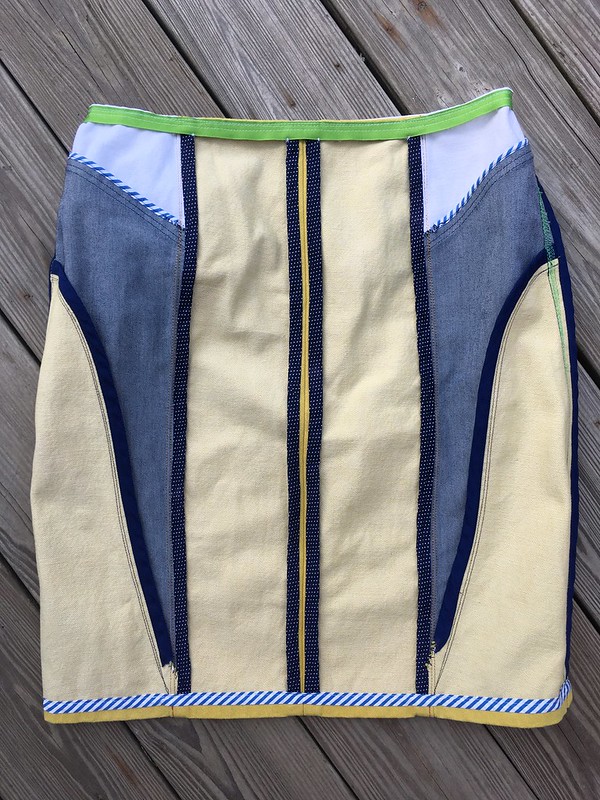
That went pretty well, but I didn’t think about the best way to attach everything, so I sewed the zip to the pants and waistband, and then had some trouble figuring out how to secure the waistband facing without it interfering with the zipper. I got it in the end, but there’s probably a better way to do it. I also had some trouble closing the rest of the seam below the zip, so I used a combination of hand and machine sewing.

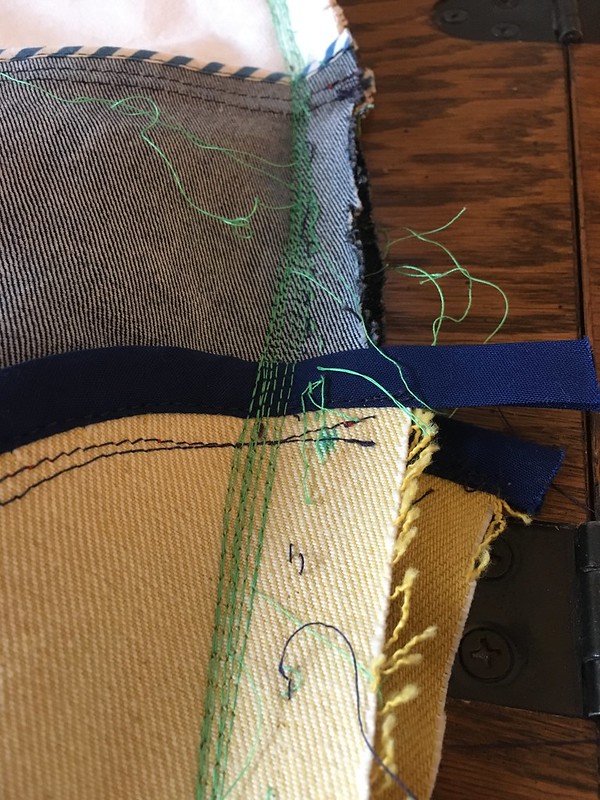
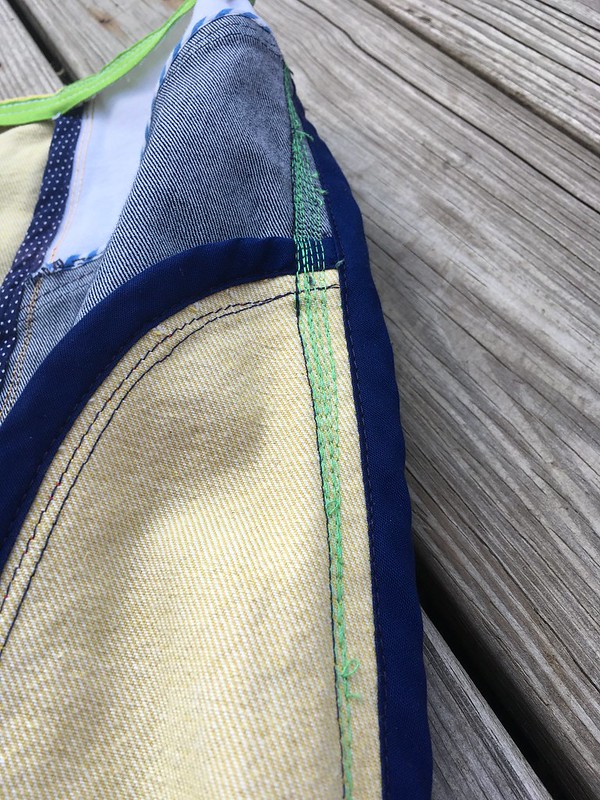
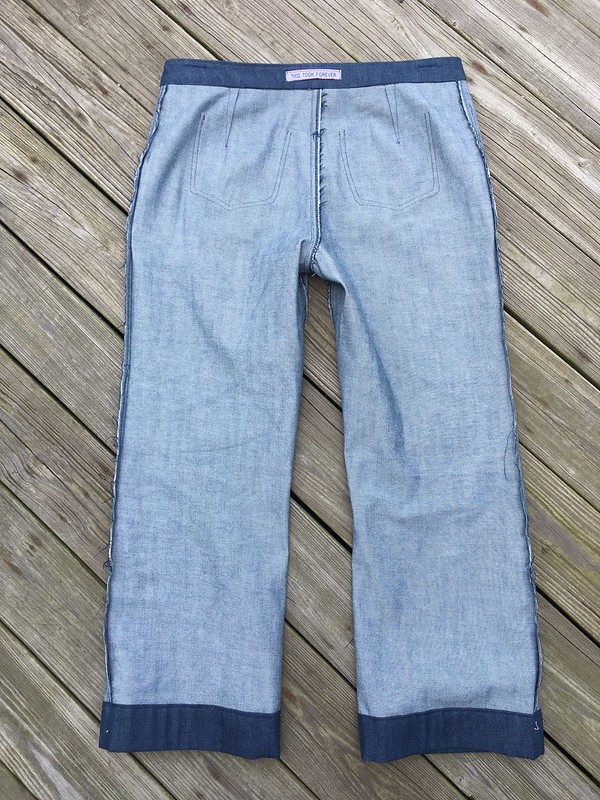
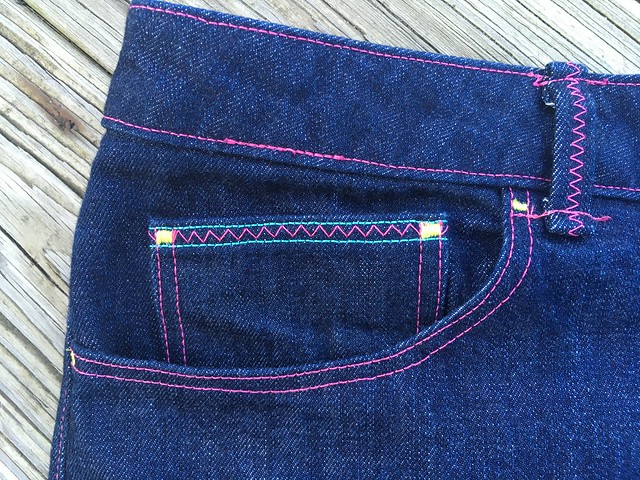
I covered the bottom edge of the waistband facing with a cute, striped vintage bias tape. I should have used double fold bias tape rather than single, or just done a Hong Kong seam finish rather than binding the edge, but I really wanted those stripes.

Sailor-Inspired Pants!  Simplicity 8391 in Denim

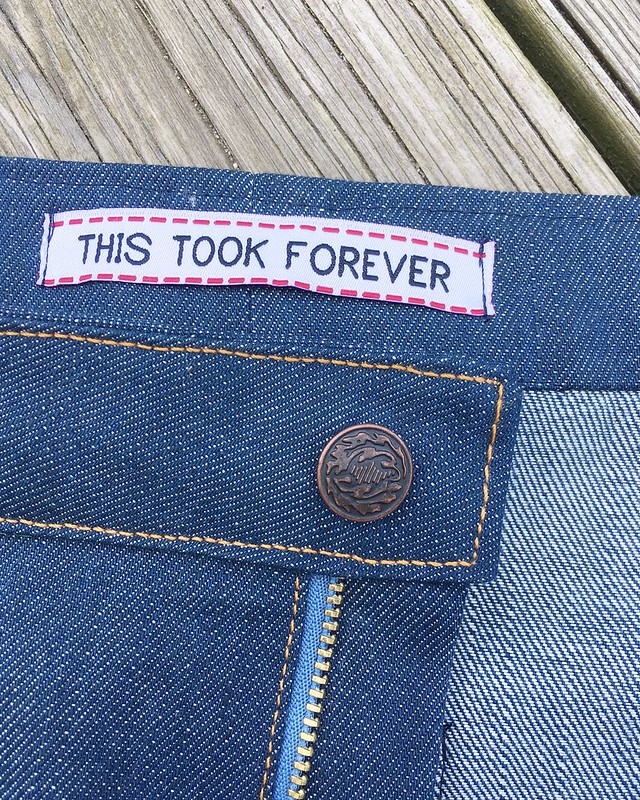
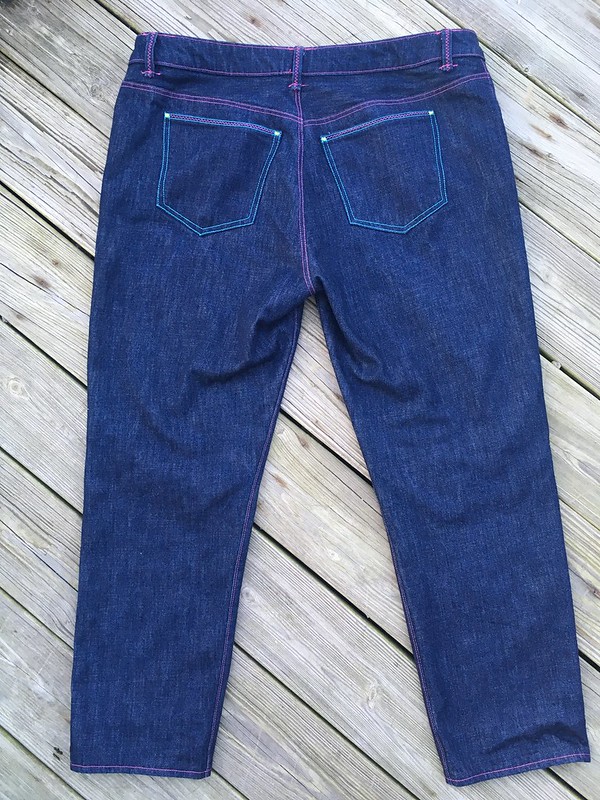
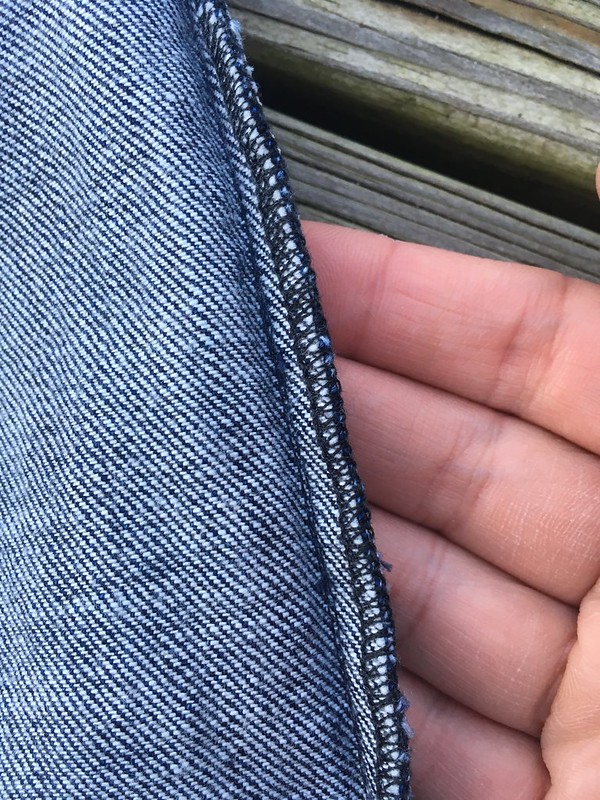
Normally, with jeans, I use a zigzag stitch to finish the seams, but now that I have a serger, I serged all my seam allowances, which looks a lot neater. I’m really happy with that.

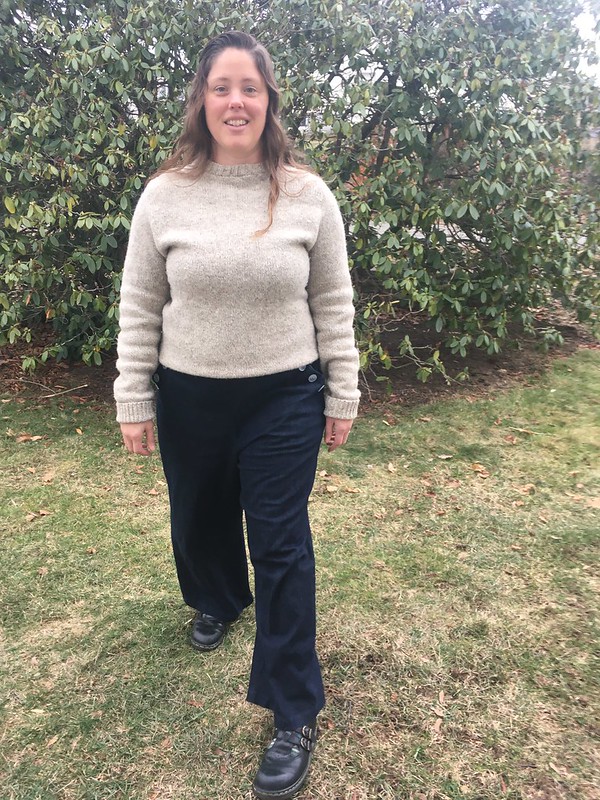
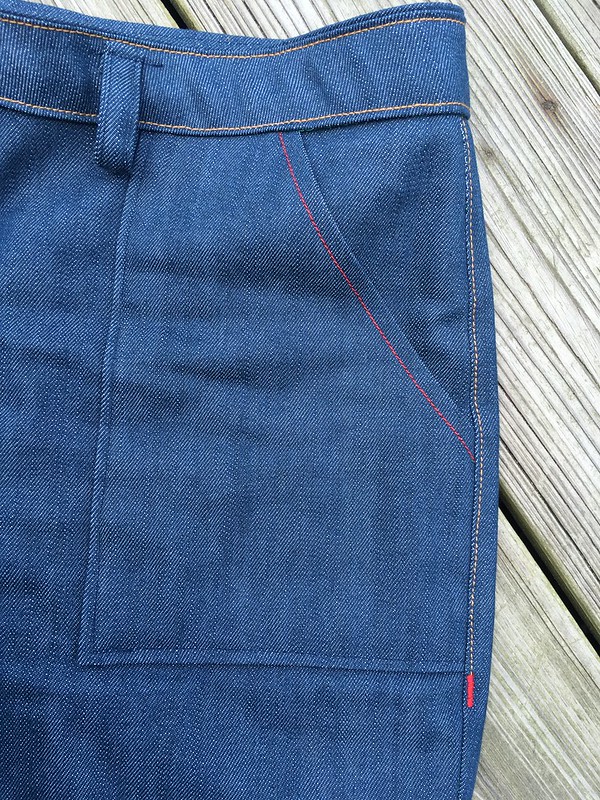
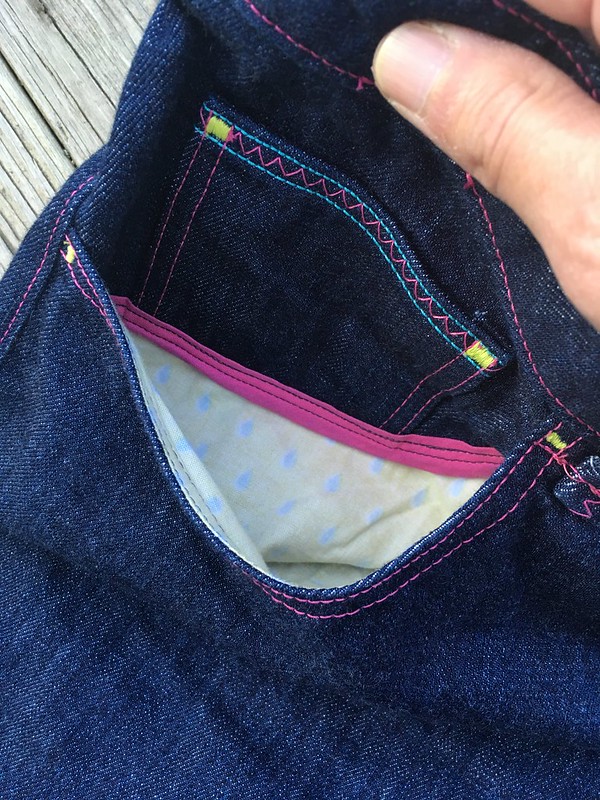
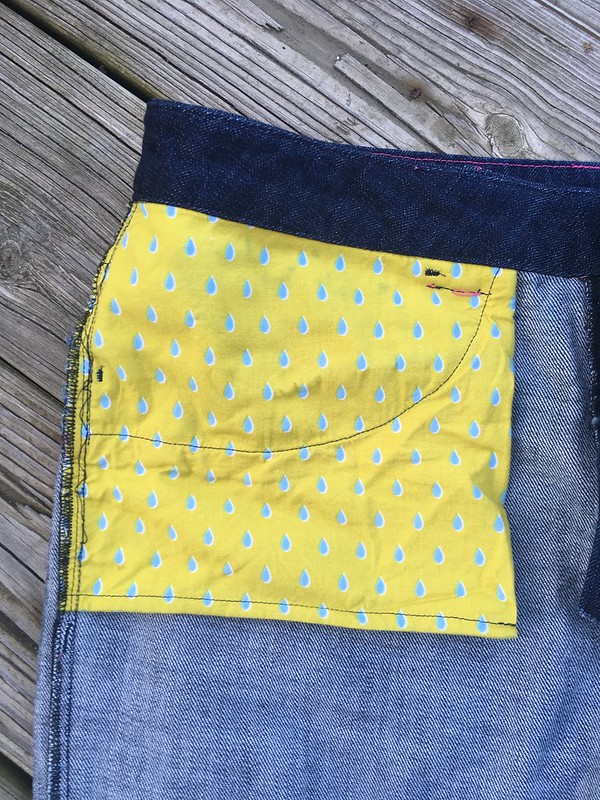
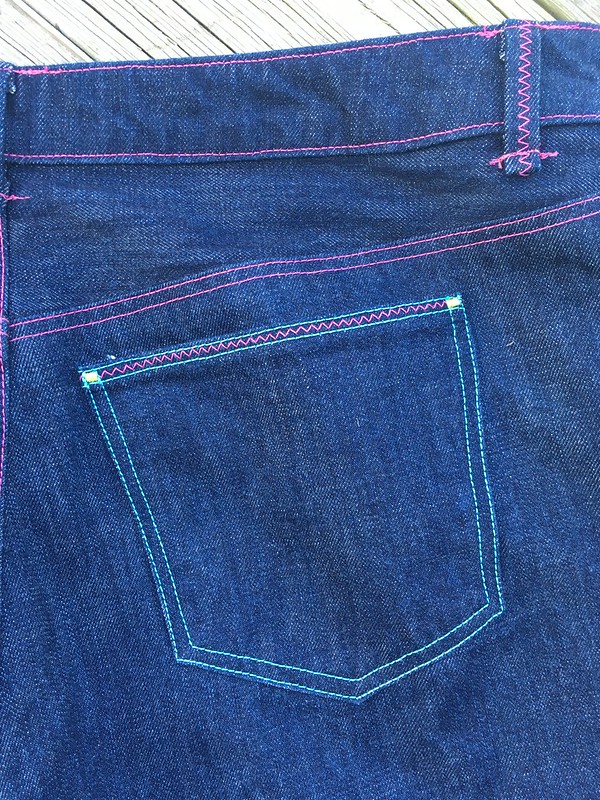
I love the large pockets and the comfortable straight leg in this pattern. The denim I used also seems to have a good amount of mechanical stretch, which adds to the comfort, and the jeans zipper feels much more secure than the invisible zipper in my last pair.

Sailor-Inspired Pants!  Simplicity 8391 in Denim

I really love looser pants in the winter so I can fit a pair of long underwear underneath whenever necessary, but I think these will actually work year-round.

Sailor-Inspired Pants!  Simplicity 8391 in Denim

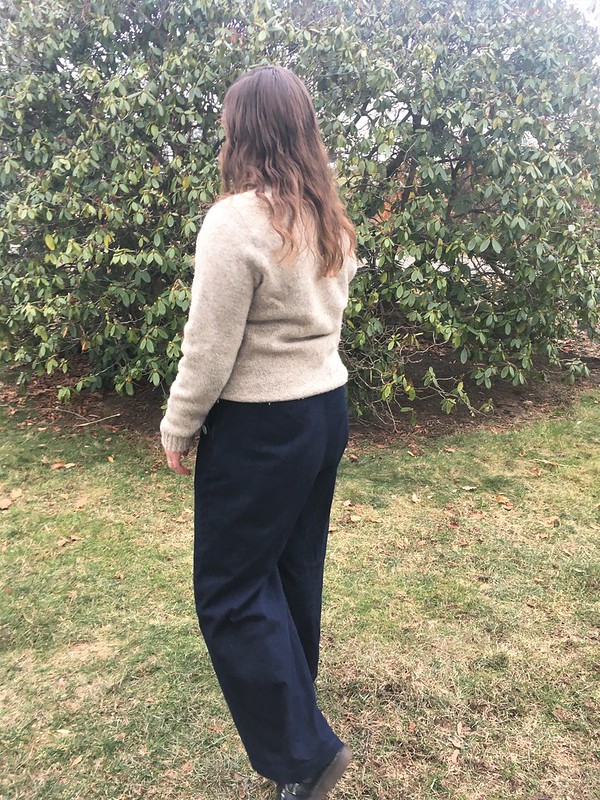
While I’m starting to think that, overall, I like a straight leg pant better than a wide leg style, as a straight leg is slightly narrower, this pattern is so cute and comfy that I would definitely make it again.

Sailor-Inspired Pants!  Simplicity 8391 in Denim

It’s also really nice to have more than one style of jean in your closet, you know? So, I’ll keep a pair or two of skinny jeans around while adding all the other fun cuts and styles I feel like making, too. 🙂

Sailor-Inspired Pants!  Simplicity 8391 in Denim

New Jeans! A Four-Pattern Mashup in Japanese Selvedge Denim

Standard
New Jeans!  A Four-Pattern Mashup in Japanese Selvedge Denim

I finally finished my jeans!!!!!! I’m so excited!

New Jeans!  A Four-Pattern Mashup in Japanese Selvedge Denim

Since I tend to do batches of patterns, moving them as a group through the tracing, cutting, and sewing stages, I suppose most of my projects take awhile, but once I get to the sewing part of things, I want the garment to fly off my machine.

But this one got held up.

New Jeans!  A Four-Pattern Mashup in Japanese Selvedge Denim

It wasn’t some dramatic life event that did it (thankfully), it was just the fact that I decided I would work out some of the fitting and design choices at the end, in the sewing phase, instead of deciding everything up front like I usually do.

Some fiddling with fitting can happen in the sewing portion of any project, but these had more the than the usual, and the longer they took, the more frustrated I became, which was increased by the fact that I wasn’t always sure which way I wanted to go.

My initial goal was to make some slightly flared jeans, similar to a pair I got from the thrift store.

To keep this post (and me) from running on forever, let’s tackle this in list form.

Patterns + How I Used Them:

New Jeans!  A Four-Pattern Mashup in Japanese Selvedge Denim

  •  Jutland Pants from Thread Theory, View 2
    • let out pants to full length (normally I shorten them by 1″) and added 2″ at the bottom for a deep hem
    • tapered in from hip to knee on outseam by 1/4″ on front and back
    • added 1/2″ at bottom to outseam and inseam on front and back tapering to nothing at the knee
    • gave all side seams 1″ seam allowances for fitting by adding 3/8″ to existing seam allowances
    • taped pocket facing behind front pant piece so that I could add patch pockets to front

New Jeans!  A Four-Pattern Mashup in Japanese Selvedge Denim

  • Simplicity 1020, View D, scrub pants
    • I used the front pockets as my front patch pockets
    • lined pockets with bits of an old sheet

New Jeans!  A Four-Pattern Mashup in Japanese Selvedge Denim

  • Morgan Boyfriend Jeans from Closet Case Patterns
    • used the curved waistband from this pattern instead of the straight waistband from the Jutland Pants since I needed something that would hug my back rather than gaping; the Morgan Jeans are a non-stretch denim pattern so this seemed like a good choice
    • I did not interface my waistband
  • Ginger Jeans from Closet Case Patterns
    • I used the back pockets as a starting point for my back pockets

Fitting and Style Changes

  • I let the inseams out slightly at the crotch, using a 3/8″ seam allowance and tapered back in to my 5/8″ seam allowance about 10″ down the leg; I did this because even though the pants were comfortable, there were a lot of drag lines showing that I needed more thigh room in the front and back
  • I widened the flare at the outseams just a little bit more, making my seam allowance at the bottom of the outseam 5/8″ and tapering in to a 1″ seam allowance partway up the leg
  • shaped the back pockets to be a little bit different; I had a lot of fun looking at Viapiana Custom Denim for inspiration–Ben’s jeans are works of art!

New Jeans!  A Four-Pattern Mashup in Japanese Selvedge Denim

  • I used a combination of the directions for the Jutland Pants and the Ginger Jeans.  This time I used the front fly directions for the Ginger Jeans.  The Jutland directions have always left me with a strange little fold of fabric at the bottom of the zipper, but using the Ginger directions eliminated that.  Yay!!!  That is something that has always bothered me, and now I know how to eliminate it.  It’s an important lesson for me–sometimes I need to try a different method on a pattern I am used to just following the directions on.

New Jeans!  A Four-Pattern Mashup in Japanese Selvedge Denim

Fitting Changes to Make Next Time

  • Add to the back inseam starting at the crotch and tapering down to nothing by a bit more; this will give me more thigh room in the back which is the one place where I still have a lot of drag lines
  • Do a full seat adjustment, maybe 1/2″ to 1″ to see if that will raise the top of the back of the pants a bit; I’m trying to eliminate any hint of “Plumber’s Butt” when I sit or crouch 😉
  • If making the same style, consider letting out the bottom of the inseam slightly to widen the flare; I meant to do that on this pair, but forgot and finalized the seam by finishing, trimming, and topstitching them before I remembered

New Jeans!  A Four-Pattern Mashup in Japanese Selvedge Denim

l

New Jeans!  A Four-Pattern Mashup in Japanese Selvedge Denim

There were a lot of missteps along the way.  I tried to use the selvedge in decorative ways that didn’t really work out, had to change out the waistband, and almost covered my pockets in bandana fabric, but decided against it in the end.  My pants were a bit long as well, so instead of turning them up twice, they are turned up three times, which gives a nice weight, but is probably as thick as I could go without things looking strange.  I also forgot to interface the area where my jeans tack/button and buttonhole would go, so I put a little patch of iron-on mending tape on the inside before installing the jeans tack.  You can see that below.

New Jeans!  A Four-Pattern Mashup in Japanese Selvedge Denim

l

New Jeans!  A Four-Pattern Mashup in Japanese Selvedge Denim

And…I may have cut through some of my buttonhole stitching.  Oops.  Time will tell if that holds up.

Resources

  • For help in figuring out how to get the leg shape I wanted, I used a tutorial called “Creating a Flare Pant Pattern”, specifically the section entitled, “Pant Flared from the Knee”.
  • Once I hit fitting problems, I consulted Pants for Any Body by Pati Palmer and Susan Pletsch (revised and expanded edition, copyright 1982).
  • It was Erica Bunker’s post on her Butterick 6691 jumpsuit where she mentioned the full seat adjustment that helped clue me in to that as a possible solution for the back of my pants being lower than I wanted.  I’ve used this adjustment in the past, but had completely forgotten about it.
  • The back pocket topstitching templates from Closet Case Patterns were also really helpful.  I almost always use these to find fun topstitching designs for my back jeans pockets.  Note that you need to sign up for their newsletter to get access to these.

New Jeans!  A Four-Pattern Mashup in Japanese Selvedge Denim

And of course I have to mention the amazing fabric that I used for these pants.  It was a birthday present from a friend, and is Japanese Selvedge Denim in a vintage wash/color from Fashion Fabrics Club.  (The link goes to all their Japanese Selvedge Denim since I’m not sure which is the exact one I used.  It is not an affiliate link.)  It’s a nice midweight, and I LOVE it.  Fashion Fabrics Club has a lot of selvedge denim at some pretty great prices (and it sometimes goes on sale) if you are looking for some.

The fun tag I used was a gift from a classmate of mine in a class at Pintuck & Purl a few years ago.  If you look around on the internet, you can still find these tags from various sellers.

New Jeans!  A Four-Pattern Mashup in Japanese Selvedge Denim

These pants feel great.  They aren’t perfect, but after all the struggle and time, they are just what I want.  I think my biggest lesson from this project is that I prefer to have my details worked out on the front end of things rather than figuring out as I go in the sewing part of the project.  I’m sure there will be projects where I’ll need to make design decisions as I go, but I think I will enjoy my projects more if I can make those choices earlier in the process.

New Jeans!  A Four-Pattern Mashup in Japanese Selvedge Denim

l

New Jeans!  A Four-Pattern Mashup in Japanese Selvedge Denim

I am SO GLAD these are finished, and I can wear them.  I’m finally wrapping up my spring sewing, on the first official day of summer, no less.  Happy Summer Solstice!

New Jeans!  A Four-Pattern Mashup in Japanese Selvedge Denim


Morgan Jeans!

Standard
Morgan Jeans!

I’m working through a batch of transitional garments as we go from warm to cool weather, and first up is a pair of Morgan Jeans from Closet Case Patterns.

Morgan Jeans!

I made a short pair this summer, and wanted to try a full-length pair, hoping for some pants that would be good for daily wear and that I could layer over long underwear in the cold weather.

Morgan Jeans!

l

Morgan Jeans!

My measurements put me in a 14 waist and 16 hip, but as I discovered this summer, that 14 waist is just too small.  I ended up adding extra fabric at the top of those pants, so I wrote myself a note to make a straight 16 next time.  Well…as I read the description, I noticed that these are drafted to fit closely, assuming that the non-stretch denim will relax over time.  I don’t love tight jeans and I wanted these to fit over long underwear in winter when layering is an act of survival, so I chickened out on the sizing and decided to trace an 18 to be safe.

Morgan Jeans!

I was lucky enough to be visiting Fabric Place Basement in Natick, MA when they were having a denim sale and, after vacillating between some non-stretch selvedge denim that was 30″ wide and a 60″ wide non-stretch denim, I went with the wider fabric, not least because I could make two pairs of jeans for the price of one in selvedge denim.  The more thrifty I can be, the more projects I can make!  That’s a huge consideration for me.  Happily, I managed to get enough denim to make a pair of jeans for about $15.

Morgan Jeans!

l

Morgan Jeans!

l

Morgan Jeans!

l

Morgan Jeans!

The pattern and topstitching thread came from Pintuck & Purl, as did the Cotton + Steel fabric I used for my pockets.  It was left over from this shirt.

Morgan Jeans!

My jeans buttons are from Wawak.

Morgan Jeans!

As far as the pattern goes, here are my notes:

  • I bound the edges of the pocket facings with bias tape, because I think it looks really nice.Morgan Jeans!

    l

    Morgan Jeans!

  • I also like the look of French seams at the bottom of the pockets (this is a suggestion in the pattern).Morgan Jeans!
  • I recommend sewing your buttonholes, slicing them open, and using Fray Check on them before you sew the fly placket into your pants, just in case you have issues.  It’s not such a big deal to recut the piece and redo it before sewing it in.  I accidentally sewed my bright thread on the bottom of my fly placket, so next time if I want contrast stitching, I’ll put it for my top thread and in the bobbin.Morgan Jeans!
  • One thing to note, my button fly placket extended above the top of my pants.  I think I should have matched the top of my fly shield to the top of my button fly placket, because I matched the top of it to my pants and it was weirdly low.  I had to trim it and finish it with my serger.  Incidentally, I have a new-to-me vintage serger that is working!!!  I was able to use it to finish my seams. A billion thanks to Pintuck & Purl for servicing it!Morgan Jeans!

More tips:

  • When putting the back together, wait to trim the seam joining the yoke and back legs until after you have topstitched it–then you don’t have to worry about missing the seam as you topstitch.
  • As Heather, the designer, suggests in her Ginger Jeans sewalong (in this post), it makes sense to finalize your back pocket placement at the end so you can put them in the optimal spot for your unique back side.  In the end, I moved the pockets a little bit, but not too much. Morgan Jeans!

    l

    Morgan Jeans!

  • One other new thing I tried was installing the waistband using Lladybird’s tutorial (skip to the end of the linked post).  It was really helpful and makes so much sense.  The gist of it is that you sew your inside waistband seam first so that when you are turning under the seam allowance and finishing the waistband, you are topstitching from the outside, and you never have to worry about catching an inner facing–it’s already attached.  It makes more sense in the post, but it’s a very logical order of steps.  I like it.
  • I interfaced my waistband this time to make it less stretchy, but I really should have graded my seams better around where my buttonhole was going to go.  I had to sew through so many layers to make my buttonhole that I ended up fudging things to make it longer and it still takes a good amount of effort to get that top button buttoned and unbuttoned.  You don’t want to have a bathroom emergency in these pants!Morgan Jeans!

Last tip:

  • Use Fray Check on the edge of your belt loops to keep them from fraying every time you wash them.  It doesn’t take care of the fraying entirely, but it helps.

All right, now after all of that, what’s the final consensus?  Well…my jeans are really comfy…they will fit over long underwear…but they do look a little big.

Morgan Jeans!

They’re perfect when they come out of the dryer…for about 5 minutes, and then they are comfortably loose.  Also, it may be the style with boyfriend jeans, but I’m not sure that I like them cuffed.

Morgan Jeans!

So I guess I’ll have a better take on them after wearing them during cold weather, but my gut feeling is that, especially if I were to make these in a thinner denim, I should go down to a 16.  Or maybe I should just look for a pair of pants with a straighter, wider leg.  I think I convinced myself that these were like that, but they really are a closer fitting, non-stretch jean, which is actually obvious from the cover art and the sample photos.  Well, live and learn!  That one’s on me!  😉

Morgan Jeans!

The good news is that whether or not these are the perfect jeans for me, the pattern itself is high quality and well done, which is consistently true with Closet Case Patterns.

Knee-Length Morgan Boyfriend Jeans, or: Making Jeans Without Enough Denim

Standard
Knee-Length Morgan Boyfriend Jeans, or: Making Jeans Without Enough Denim

Today’s project was a struggle!  Thankfully, I can report that it ended happily, but it was a long process getting there.

The challenge:  could I make jeans I liked using the denim I had, which was less than what the pattern called for?  Armed with my Denim Pinterest board and ideas from the Refashioners 2016 jeans challenge, I was ready to take this one on!

I decided to use the Morgan Boyfriend Jeans Pattern from Closet Case Patterns since I had non-stretch denim.

Knee-Length Morgan Boyfriend Jeans, or: Making Jeans Without Enough Denim

l

Knee-Length Morgan Boyfriend Jeans, or: Making Jeans Without Enough Denim

Idea one was all about a casual, patchy look.  I love clothes that are casual, lived in, and durable.  I decided to cut as much of the top of the jeans as I could from the denim I had left over from my Jutland cutoffs from last year and my Lander Pants.  I would use the worn out jeans we had around the house (kept for patch jobs) to construct the bottoms of the pants.

Knee-Length Morgan Boyfriend Jeans, or: Making Jeans Without Enough Denim

This seemed like a great idea, and looked really cool on my sewing table.

Knee-Length Morgan Boyfriend Jeans, or: Making Jeans Without Enough Denim

Unfortunately, when I put them on, my cool, patched legs became something akin to denim leg warmers attached to jeans made of thin and much more flexible denim.

Fail.

On the advice of some very wise friends who, although not sewists themselves, often help me troubleshoot my projects, I took the pants bottoms off, and moved them up higher so the pants would end around my ankles.

Everything looked good on the work table again, but when I put them on, the denim leg warmer look was back, and it wasn’t a good thing.  It was time to abandon that idea.

Option two was cropped pants with a raw edge, back slightly longer than the front.  One look told me this wasn’t a good option on these particular jeans.

Fail.

Time to come up with a third option.  At this point, my eldest daughter had a great idea. I could use some of the anchor fabric I was using for my pocket bags on the inside bottom of my pant legs so that I would have cropped pants that could be rolled up to reveal the cute print on the fabric.

I loved this idea!  It wasn’t too hard to execute, and it looked great.  The fabric, with its cute anchors and hearts is directional, so I had to think about that as I planned it out.  Thankfully, I got it right the first try.  The pants are shorter than most cropped pants you see today, but I like them.  They are great for spring and cooler summer days.

Knee-Length Morgan Boyfriend Jeans, or: Making Jeans Without Enough Denim

Things were finally on track.  I just had to put on my waistband and back pockets.  I put the waistband on and…they didn’t fit.  And I had trimmed my side seams.  Oh no!

I tried letting the side seams out the little bit that I could, but it just wasn’t enough.  I couldn’t understand it.  I thought they had fit, but when I really examined what I had done, I realized that I must have been close to a 14 waist or between sizes, so I traced a 14 waist and 16 hip when I should have just done a straight size 16.

I wanted to give up, but I was so close to being done.  I decided to try one more thing, and if that didn’t work, I would give the pants away.  I added little triangle wedges at the top of each side seam using the same striped fabric I had used in my pocket facings, but turning the stripes perpendicular.

Knee-Length Morgan Boyfriend Jeans, or: Making Jeans Without Enough Denim

l

Knee-Length Morgan Boyfriend Jeans, or: Making Jeans Without Enough Denim

l

Knee-Length Morgan Boyfriend Jeans, or: Making Jeans Without Enough Denim

I lengthened my waistband at the end so that I wouldn’t change the curve (I had also added a dart at the center back to prevent gaping, and I didn’t want to change that either).  Then I finished everything up, tried them on, and…THEY FIT!  They fit well!  And they were pretty cute!  I was so happy.

Knee-Length Morgan Boyfriend Jeans, or: Making Jeans Without Enough Denim

l

Knee-Length Morgan Boyfriend Jeans, or: Making Jeans Without Enough Denim

l

Knee-Length Morgan Boyfriend Jeans, or: Making Jeans Without Enough Denim

l

Knee-Length Morgan Boyfriend Jeans, or: Making Jeans Without Enough Denim

l

Knee-Length Morgan Boyfriend Jeans, or: Making Jeans Without Enough Denim

l

Knee-Length Morgan Boyfriend Jeans, or: Making Jeans Without Enough Denim

I think I seam-ripped everything on those pants at least once–more in a lot of places.  I am so, so glad they are done, but also really happy to have a pair of fun jeans that I like, AND to have used up so many scraps.  Not only was my denim left over from other projects, so was the anchor fabric (I used it to make this shirt) and the striped fabric (I used the other side as my right side when I made the striped shorts in this post).  I even used a leather scrap to make a little patch.  Yay!

Knee-Length Morgan Boyfriend Jeans, or: Making Jeans Without Enough Denim

l

Knee-Length Morgan Boyfriend Jeans, or: Making Jeans Without Enough Denim

l

Knee-Length Morgan Boyfriend Jeans, or: Making Jeans Without Enough Denim

l

Knee-Length Morgan Boyfriend Jeans, or: Making Jeans Without Enough Denim

As for the pattern itself, I liked it, and would make it again.  I like the button fly, which is different from other jeans that I have, and the comfortable fit (once I got the sizing right).

Knee-Length Morgan Boyfriend Jeans, or: Making Jeans Without Enough Denim

l

Knee-Length Morgan Boyfriend Jeans, or: Making Jeans Without Enough Denim

I have a few more detail-oriented projects in my queue, but after that, I might need a palate-cleanser of easy projects!  With family sickness (now better), projects that weren’t straightforward, and several muslins (still unsewn), spring sewing has been a bit of a slog.  Even with that, though, I still love sewing.  I’m excited to finish up these last few things and get down to easy and/or summer sewing!  Bring it on!  (If only I can narrow down my ideas!)

Lander Pant, Take One

Standard
Lander Pant, Take One

After making three pairs of Ginger Jeans (1, 2, 3) as well as a few other pairs of pants, I’m finally getting in my pants-sewing groove.  I still don’t feel like I have pants-fitting down, but I’m not afraid to try any more.  When the Lander Pant & Short pattern from True Bias came out, I was excited (ok, really excited).  I had already given away all my thrifted skinny jeans, and was feeling the need for some looser pants, or at least nothing tighter than the stovepipe leg view of the Ginger Jeans.  These looked like just what I was after, so I did something I’ve never done before–I preordered the paper pattern.

Lander Pant from True Bias in Denim

l

Lander Pant from True Bias in Denim

l

Lander Pant from True Bias in Denim

I already had some inexpensive non-stretch denim in my stash from Fabric Place Basement in Natick, MA, and plenty of thread, interfacing, and jeans buttons, so I was ready to go.  When I got the pattern, I decided on View C, the boot length pant and traced a size 12 waist and size 16 hip.  I also decided to lengthen the pattern by 4″ since I’m 5′ 8.5″ and this pattern was drafted for someone who is 5′ 5″ tall (I ended up only needing 2.5″ of extra length, however).  I told myself this was a wearable muslin, in the hopes that it would work out and I could wear it.

Lander Pant from True Bias in Denim

l

Lander Pant from True Bias in Denim

The instructions are very clear and helpful, although I did a few things differently.  Like with the Ginger Jeans, I opted to put my back pockets on last, so I could place them while wearing the pants.  I also changed the method for making belt loops, which I felt was just too tricky.  Using a loop turner on denim is not for me!  It’s much easier to cut your fabric strip for your belt loops, turn your seam allowances in and press them, and then topstitch everything closed and cut the long strip apart into belt loops.  These things are minor personal preferences.

The part I really had trouble with was the waistband and crotch seam.  The pants fit great until the point where I added the waistband.  Despite using my measurements to determine my size in that area (and I double checked to make sure I had them right), the waistband was uncomfortably tight.  It was also very high, sitting above my belly button, at my natural waist.  This is what the pattern promises as far as the waist height.  After trying it on, though, and feeling how uncomfortable the waistband was, I decided to go off-book and lower the rise and recut the waistband.  This is not the correct way to lower the rise of pants, but with the jeans near complete, it was the only option.

Lander Pant from True Bias in Denim

I decided I wanted to lower them about 1.75″ (or the finished width of my  original waistband), so I marked new stitching and cutting lines and cut a new waistband 7″ longer, and sewed that on.  I decided to cut the pants down after sewing so I could make sure I was on the right track before crossing the point of no return.

Lander Pant from True Bias in Denim

l

Lander Pant from True Bias in Denim

l

Lander Pant from True Bias in Denim

This was more comfortable, but it also meant I needed to curve the waistband a bit.  I added some darts (which added a few drag lines, but what are you gonna do?), and this seemed workable.

Lander Pant from True Bias in Denim

l

Lander Pant from True Bias in Denim

I tried the pants on and was pretty happy with them.  They are SUPER wide-legged as drafted, but I decided to keep the width and try them out for a while.  Mine also have more ease in the hips than many other versions I’ve seen online, but I chose my hip size according to my measurements, and find the fit in the hips really comfortable.

Lander Pant from True Bias in Denim

l

Lander Pant from True Bias in Denim

I liked the back view, and was happy with them when standing, but after wearing them for a few days, I realized I COULD NOT wear them any longer.  Something is up with the crotch seam such that it cuts into me in the front when sitting, and I cannot wear them any more until I figure that out.  I really hate going back into a project once it’s done, but I put them in my mending pile, and I’m going to compare the crotch seam of this pattern with the crotch seam of the Ginger Jeans, which are very comfortable, and see what the difference is.  I’m hoping I can add in a (hopefully invisible) patch to lengthen the front seam or something so that these can at least be wearable.  I think my Jutland pants actually need this adjustment too, although they are not nearly as uncomfortable (in fact, this is something I have only noticed recently).  It looks like I have a little sleuthing to do, which means I get to learn more about pants fitting.  Right?

Lander Pant from True Bias in Denim

l

Lander Pant from True Bias in Denim

l

Lander Pant from True Bias in Denim

l

Lander Pant from True Bias in Denim

l

Lander Pant from True Bias in Denim

My overall analysis is that this is a good pattern, the instructions are well done, and Kelly of True Bias has actually put out a design that is different from what everyone else is doing (in a really good way).  As more and more pattern companies come on the scene, it seems to be harder and harder to find unique patterns, so I like that these aren’t available in 1,000 iterations from every company.  If you are thinking about this pattern, I would say: go for it.  Every pattern will have to be fitted to your unique body, and as hard as that can be at times, it also helps us learn and become better at this craft that we love.

Lander Pant from True Bias in Denim

Recommendations

  • Have you seen the Google Arts & Culture app?  I haven’t explored it fully, but my family and I did have some fun with the selfie feature that pairs your picture with a piece of art the app thinks looks like you.  I managed to get two pairings to different selfies:Matching people to art:  Google Arts & Culture

    and

Matching people to art:  Google Arts & Culture

You can read all about this in this article on Google’s blog.

  • I’ve really been enjoying listening through some of the fiction works of writer Wendell Berry (most recently Hannah Coulter and That Distant Land).  He creates a community that isn’t perfect, but still manages to make me want to be my best self.
  • I think I could make a coat like this men’s wool shirt jacket from L.L. Bean by using Simplicity 4109.  One day, I WILL realize my shirt jacket dreams! 😉
  • Funny stuff from Jimmy Fallon and Will Ferrell:

McCall’s 6848 Top (Again!) in Watercolor Rayon

Standard
McCall’s 6848 Top (Again!) in Watercolor Rayon

I feel like the title of my post makes me sound like I’m rolling my eyes because I’m sick of this pattern, when actually the opposite is true.  I love it!  This simple shirt is the meeting of this beloved pattern and the remnants of some beautiful fabric.  This is McCall’s 6848 which I also made in black silk crepe de chine, and it’s actually a pajama pattern!  In a fabric with some drape, however, like this watercolor rayon, left over from my Hannah Dress, this pattern also makes a perfect drapey shirt.

McCall's 6848 Top in Watercolor Rayon

McCall’s 6848 comes together quickly and easily with only three pattern pieces, one of which is the bias neck binding.  It’s a quick sew and a great palette cleanser after a more complicated project like the Hannah Dress or Thurlow Shorts.

McCall's 6848 Top in Watercolor Rayon

l

McCall's 6848 Top in Watercolor Rayon

I didn’t do anything different on this iteration of the shirt.  Like last time, I used French seams to finish the insides and double turned hems on the bottom and armholes.  The rayon I used is a little harder to work with than the silk crepe de chine was, but it’s so soft and beautiful that it makes up for it.  It was also nice to compare the two fabric types on the same pattern.  So far, crepe de chine is my preference to work with–both are excellent to wear.

McCall's 6848 Top in Watercolor Rayon

l

McCall's 6848 Top in Watercolor Rayon

This was one of my 2017 Summer Sewing projects.  I only have one more of those to blog, and then I’m all caught up with summer.  😉  It all works out, though, because I’m planning to slow down a little for fall and experiment with various areas of sewing that I’ve been interested in.  We’ll see how that all works out.

McCall's 6848 Top in Watercolor Rayon

l

McCall's 6848 Top in Watercolor Rayon

I highly recommend this pattern to anyone looking for a quick and easy project that will make a great top for every day (or pajamas) in the right fabric.

McCall's 6848 Top in Watercolor Rayon

Recommendations

    • Mary of Birch Dye Works is really knocking it out of the park with all the cool yarn she has been dying lately.  Her color names are pretty great, too.
    • I was reading the Oliver + S blog and Liesl pointed out all the creative quilting influences she found in the September issue of Vogue.  Check out her post here.
    • I love cheese so much, and I have to recommend brie to you.  I tried some brie with mushrooms at Costco, which combines two foods I absolutely love. (I can’t find it on their website to link to but, trust me, it was GOOD.  I wish I had bought some…)
    • Are you thinking about sewing skinny jeans?  Judith Dee compares three patterns on her vlog.

The Perfect Summer Cutoffs: Thread Theory Jutland Pants as Boyfriend Jeans

Standard
The Perfect Summer Cutoffs:  Thread Theory Jutland Pants as Boyfriend Jeans

It’s late summer here, and I think it’s time I introduced you to my most-worn shorts of the season.  This year I finally realized that the shorts I’ve been making myself are kind of…well, short.  This may have been obvious to everyone around me, but it really wasn’t obvious to me until I realized that I wanted some longer shorts and only had one pair that I had thrifted.  But I know how to sew, so that’s a problem I can fix!  😀

Thread Theory Jutland Pants as Boyfriend Jeans

Enter what is quickly becoming a favorite pattern not only for my husband (see versions one and two of his cargo pants from this pattern), but also for me (my pants version is here):  Thread Theory’s Jutland Pants pattern.

Thread Theory Jutland Pants as Boyfriend Jeans

l

Thread Theory Jutland Pants as Boyfriend Jeans

My husband loves this pattern because he loves cargo pants, but I love this pattern because, for some reason, it fits me!  It doesn’t fit me to the sewing world standard of “perfect fit”.  It fits me in the way women would want a pair of men’s jeans to fit for that authentic “boyfriend jeans” look or in the way that you want a pair of work pants to fit.

Thread Theory Jutland Pants as Boyfriend Jeans

This summer, I dreamed of a pair of long cutoffs that weren’t tight, but were loose and comfortable.  More and more, I realize that I want my summer clothes to be loose and breezy, and my winter clothes to feel like a warm hug.  😉

Thread Theory Jutland Pants as Boyfriend Jeans

l

Thread Theory Jutland Pants as Boyfriend Jeans

l

Thread Theory Jutland Pants as Boyfriend Jeans

Before our trip out to visit family earlier in the summer, I cut these jeans out of a non-stretch denim that I bought at Fabric Place Basement, and flew through the sewing!  I wanted these done FAST, so I didn’t do much extra top-stitching or any seam finishes beyond zigzagging my seam allowances.  I didn’t even hem them, because I wanted them to look like cutoffs.  I figured that I was making them secure enough to last, but if they showed some fraying and wear and tear, they would have even more of that authentic look.  And let me just say, I LOVE these shorts.  In fact, I have to hold myself back from wearing them every day.

The only thing I did differently from my pants version (besides the length) was to use the actual Jutland Pants back pockets rather than the back pockets from the Ginger Jeans.  I knew that the Jutland Pants back pockets were bigger and more square, but I just wanted to try them to see if I would like them.  And I do!

Thread Theory Jutland Pants as Boyfriend Jeans

l

Thread Theory Jutland Pants as Boyfriend Jeans

Another thing I like about these shorts is that you can wear them long or roll them up one or two times, giving you some different options.  I probably wear them rolled up twice most often, but I really like all the different lengths I can achieve.  Now I’m beginning to wonder if they would look good in canvas and if I have enough left over from other Jutland pants I’ve made…

Thread Theory Jutland Pants as Boyfriend Jeans

l

Thread Theory Jutland Pants as Boyfriend Jeans

l

Thread Theory Jutland Pants as Boyfriend Jeans

That might be a job for next summer, though.

Recommendations

    • After going to New Hampshire’s White Mountains, I would definitely recommend them!  Now I want to go back and go camping!  (You can see my last post for some pictures of our trip.)
    • I just finished listening to the audio version of Willpower:  Rediscovering the Greatest Human Strength by Roy Baumeister and John  Tierney.  It was a really fascinating psychological look at what willpower is and how you can cultivate it in your life.  I think I need to go back and listen through it again.
    • Devon Iott (@missmake on Instagram) does it again!  I’ve got her version of Style Arc’s Josie Hoodie in my head, and now I want to make my own!
    • This video is a little longer than what I usually post, but it was interesting to learn about the “Pros & Cons of Common Fabrics” both for everyday and as far as environmental impact.  I definitely learned some things!

Ginger Jeans with Exposed Zippers

Standard
Ginger Jeans with Exposed Zippers

I’m really excited about the jeans I have to share with you today.  I love all the details I put into them!  Just like the gingham shirt from last week, jeans provide a fun chance to experiment with details.

Ginger Jeans with Exposed Zippers

l

Ginger Jeans with Exposed Zippers

l

Ginger Jeans with Exposed Zippers

l

Ginger Jeans with Exposed Zippers

I made the decision to swap one of the tops (Simplicity 2255) on my 2017 Make Nine plan for some Ginger Jeans, partly because I needed some jeans, but also because I was no longer sure if that top was the right use for the precious fabric I had planned for it.

I knew that Me-Made-May was coming up, and I needed more pants, AND, last but not least, Pintuck & Purl was hosting a Jeans Sewing Master Class with Heather Lewenza of Closet Case Patterns, maker of the Ginger Jeans pattern…and, you know, I thought that warranted a new pair.  😉

Ginger Jeans with Exposed Zippers

I am both completely in love with these jeans and slightly annoyed by the subtle fit issues that I didn’t notice until after these were finished.  We can leave the annoyances until later–let’s talk about the fun stuff!

Ginger Jeans with Exposed Zippers

I knew before I even had the fabric that I wanted to use yellow exposed zippers on these (partly because I completely forgot to put them in my green pair), and I knew I could do it because I learned how when making my Refashioners 2015 jacket (worn in the picture above).  The instructions come from the Reader’s Digest Complete Guide to Sewing (1976 edition), my favorite sewing reference.

Ginger Jeans with Exposed Zippers

l

Ginger Jeans with Exposed Zippers

l

Ginger Jeans with Exposed Zippers

I’ll give you a quick rundown of the other supplies I used and where they are from, in case you are curious (I’m always curious about these sorts of things.).  Also, I know there are a billion links in this post.  I love information, and I want you to have all the information I have in case it will help you.  None of these are affiliate links, although I do work part-time at Pintuck & Purl.

  • Ginger Jeans pattern by Closet Case Patterns:  Pintuck & Purl
  • stretch denim: Pintuck & Purl
  • yellow exposed zippers:  ZipIt Zippers on Etsy (a really great shop for zippers!)
  • sparkly gold fly zipper:  Pintuck & Purl
  • jeans button:  Wawak
  • yellow Gutermann topstitching thread and navy Gutermann construction thread:  Jo-Ann Fabrics
  • red Coats topstitching thread: either Pintuck & Purl or Jo-Ann’s
  • interfacing:  Jo-Ann Fabrics
  • Amy Butler Daisy Chain fabric for pockets, waistband lining, and bias tape on the hem:  ?? (I can’t remember where I got this!  It’s been in my stash for a long time.)
  • gold leather patch:  a gift from Elizabeth Berthoud of Sac A main

One great discovery with this pair of jeans is that my Singer Featherweight sewing machine does great with Gutermann topstitching thread.  I was ready to swear that thread off because it didn’t do well in my Elna 3005 the last time I made jeans, but this time I set up both machines so I could use my Elna for construction and my Featherweight for topstitching, and both machines did great with their respective threads.  I used the red Coats topstitching thread in the Elna and it worked great.  It’s so rare that anything disagrees with my Elna that I assumed the problem was with the thread, but I’m glad I tried the Gutermann with the other machine (admittedly, I only did this because it was the only yellow/gold topstitching thread I had on hand and I didn’t want to run out to get more).

Ginger Jeans with Exposed Zippers

So, with the exception of the exposed zippers, which I had to put in before doing the pockets, I followed the directions as written.  I made a size 14, View A (low rise, stovepipe legs).  The back pocket topstitching design came from a bunch of topstitching designs Heather sent out to newsletter subscribers.  It was really fun to pick one out.

Ginger Jeans by Closet Case Files

l

Ginger Jeans by Closet Case Files

I was also inspired by my coworker Lauren to add bias trim to the hem of the my pants and a contrasting thread color on my buttonhole as well as some contrasting bartacks.  She makes cool clothes.

Ginger Jeans with Exposed Zippers

l

Ginger Jeans with Exposed Zippers

l

Ginger Jeans with Exposed Zippers

l

Ginger Jeans with Exposed Zippers

So let’s talk fabric.  I chose this great stretch denim, and I really love it.  It’s very different (in a good way) from the inexpensive denim I used for my first pair.  It has a great hand and feels substantial, yet still stretchy.  What I DIDN’T do (but should have) is wear my jeans around for a few hours after basting them.  I was impatient.  I admit it.  I basted them, wore them around for a few minutes, and called them good.  And they were.  They were just right.  So, I sewed them up, and finished them off.  I washed them to get any chalk marks off and hung them up to dry (by the way, I did wash and dry the fabric in the dryer more than once before making these).  Then, I put them on and…they seemed a little looser than I remembered…and a little longer than my other two pairs.  Hm.  In my concern about not making them too tight (you know I love some ease!), I didn’t account for differences in fabric.  This stretch denim is stretchier than my other two pairs.

Ginger Jeans with Exposed Zippers

I also asked Heather to take a look at my jeans during a lull in the jeans class (I was around to help out on day one), and she gave me a few fitting tips that she said could remove the excess fabric in the back and my need for a belt.  Her advice was both generous and helpful, and might also apply to my gray pants with the mysterious extra fabric in the back.  She is a fitting master.  It was amazing to see her help everyone.

Ginger Jeans with Exposed Zippers

So, final analysis:  I LOVE these jeans.  I think they are my coolest-looking jeans to date (the green pants are sort of in their own category, I think), and I am always mystified when people don’t stop me and tell me how awesome they are.  😉

Ginger Jeans with Exposed Zippers

That being said, I really wish the fit was as perfect as I thought it was when I basted them together and tried them on.  They are a little looser than I want them, and I definitely have to wear a belt.  BUT…this is all part of the learning curve for making pants, right?  As much as I wish I had all pants-fitting knowledge magically deposited in my brain, that is never going to happen, and I really do remember fitting things better when it is something I’ve had to learn the hard way (Darn it!  WHY is there no silver bullet/magic potion/easy answer?  Learning and skill development actually takes WORK!  Shocking!).

Ginger Jeans with Exposed Zippers

If you are thinking about making jeans, the Ginger Jeans pattern is a GREAT pattern.  It was much less scary than I thought it would be and the directions plus the sew-along are really, really helpful and well done.  Heather clearly does her research.  Go for it!

Recommendations

  • I just found out about @tinycarpenter_ on Instagram.  It’s a little Lego guy who uses big people tools for his carpentry work.  Fun!
  • I love sewing inspiration, and I find a lot of it in catalogues from companies like J.Crew and Boden.  Often when I see clothing that I really like, I can think of a pattern that matches it.  I think of this as shopping for inspiration.
  • And, um, here is a little prom dress inspiration for you (hahaha!):

Ginger Jeans Hack Inspired by Meggipeg

Standard
Ginger Jeans Hack Inspired by Meggipeg

Today’s project has been a long time in the  making.  And the inspiration for it comes totally and completely from an amazing seamstress on the other side of the world:  meggipeg.

Ginger Jeans Hack

Ever since I saw her version of a pair of Balmain jeans made from the Jamie jeans pattern by Named, I wanted my own.  But, like a lot of projects that I knew were going to take some work, I had to psych myself up.  I didn’t own the Jamie Jeans pattern and, like most indie patterns, it wasn’t cheap.  I kept thinking about it, and almost committed to buying the pattern before realizing that with just a little more work, I could use a pattern that I already had.  And then came the perfect impetus to get going on making my dream a reality:  I had signed up for a class.  And not just any class, but a choose-your-own-sewing-adventure kind of class where you pick what you want to work on.  The time was now.

Class Projects!

All my class projects ready to go!

I had verbally signed up for Lauren Taylor’s (a.k.a. Lladybird’s) Sewing Master Class at Pintuck & Purl way back in May, when I first heard about it.  I love seeing all the things that Lauren sews, and I knew it would be a great opportunity to work on some projects that I found intimidating.  So, along with a few other projects, I came up with my pants scheme.  It was time to finally make some super-cool pants a la meggipeg and Balmain of my own.

However…I didn’t love the idea of figuring out how to fit a new jeans pattern, especially when I also had so many other project supplies to buy, and that’s when I realized:  I could use the Ginger Jeans pattern.  All I needed to do beyond what I was already going to do was change the front pocket and add front leg seams.  I don’t hack patterns much.  But this seemed worth the time investment.  In addition to the aforementioned changes, I drew up some parallelograms for the sides of the front legs and divided up the back pocket.

Ginger Jeans Hack


Ginger Jeans Hack

Adding a seam to the front leg.

Ginger Jeans Hack

Changing the front pocket shape.

I had plans to add zippers to the front of my jeans as well, similar to Papercut Patterns’ Starboard Jeans, but these didn’t make it into the final pants (because I forgot to put them in before doing the pockets).  Oh, well!  I also contemplated zippers at the bottom of the jeans, but decided against those before beginning.

Ginger Jeans Hack

Ooops!  I forgot the zippers!

I didn’t get a lot done on these in the class, because this was the third of my several projects (not all of which will show up on the blog–sorry), but preparing for the class forced me to make the necessary pattern changes beforehand.  It got me going on the pants and I managed to cut out the pattern and get started during class.

Ginger Jeans Hack

Just in case you’re wondering about supplies, I’d love to share.  Here’s where everything came from:

Ginger Jeans Hack

I love this vintage sheet as pocket material!

I did one or two things differently on the construction side of these than on my first pair of Ginger Jeans.  This time around, I interfaced my waistband (good idea!) and used true topstitching thread (so-so).  I do think I’ll interface the waistband in the future, but I might try a different alternative for the topstitching thread.  Maybe I’ll use upholstery or button/craft thread, or maybe I just need a bigger needle and different tension on my machine.  I had a lot of thread nests with the topstitching thread and it just wasn’t my favorite overall.

Time for less talk and more pictures, right?

Ginger Jeans Hack


Ginger Jeans Hack


Ginger Jeans Hack


Ginger Jeans Hack


Ginger Jeans Hack


Ginger Jeans Hack


Ginger Jeans Hack


Ginger Jeans Hack

The pants themselves?  I LOVE them!!!!!  So far I’ve worn them about five days out of the last two weeks.  Yep!  I hope I’m not the only one that calculates how many people I’ll see more than once in a week so I can rewear outfits!  But even if I am–oh, well!

I love these pants so much.  The ease is great, the fit is great, the stretch is great, and the fabric is great.  It was definitely worth the effort to make these.  Thanks for the idea, meggipeg!  I hope you take my emulation of you as a compliment.  I’m always impressed with your style.

Ginger Jeans Hack

I even made a flannel shirt to go with it!  Stay tuned for more details on that…

Recommendations

  • I really love these Carhartt’s socks.  This isn’t an affiliate link or anything (I don’t do those currently.), just some socks I like.  I like the colors, and they keep my feet warm without making them sweaty, which means I can wear my Converse All-Stars or moccasin booties without getting numb toes when the weather is cold.
  • Robert Kaufman fabric.  I love Robert Kaufman fabric (in fact, I have some of their Mammoth Plaid that I just made into the flannel shirt of my dreams).  The fabric is moderately priced and great quality–and they have so many options.
  • The Imagine Gnats online shop.  I have a really hard time getting myself to buy fabric online, always preferring to see it in person first, but I have to recommend this shop.  The customer service is great and so is the curated fabric selection.  I’ve probably ordered twice from here and I have to give owner Rachel Gander props for the extra little sticker and piece of candy she put in my orders and for ending what has felt like an age-long search for the perfect olive green stretch twill.
  • And because candy corn is one of my favorite fall treats, here is a video that shows how candy corn is made:

The Refashioners 2016

Standard

It’s finally time to talk about The Refashioners 2016!

Refashioners 2016

I’ve been waiting a long time to share my #jeanius project with you.

The Refashioners is a challenge created by Portia Lawrie of Makery that showcases creative ways to refashion whatever the chosen garment for that year’s challenge is.  If you’ve been following along, you already know that this year’s garment of choice is jeans (#jeanius!).  Check out what I made!

Refashioners 2016:  Jeanius

Refashioners 2016:  Jeanius

Refashioners 2016:  Jeanius

I’ve written about my creative process over on Makery, but if you want more details on working with the particular pattern I chose, Vogue 8750, you’ve come to the right place.

Refashioners 2016:  Jeanius

Refashioners 2016:  Jeanius

As soon as Portia sent us our brief for this year’s Refashioners challenge, the gears in my mind started turning.  My local big box fabric store was having a pattern sale, so I went down there with notebook and pencil in hand, sat down in front of the big pattern catalogue books, and started making list.  Lists and lists of patterns that I might be able to create out of different pairs of jeans.  I decided to look for something that had multiple narrow pieces so I could cut them out of jeans legs.  I finally settled on Vogue 8750, a skirt pattern.  I chose View A, which is the shorter (but not actually short) pencil skirt.  This looked like it had a lot of possibility for color-blocking, and I was hoping to find some super-cool denim at my local thrift store.

With the help of a pattern and all the inspiration on my then-secret Denim Pinterest board, I went to my thrift store looking to find some railroad denim or…something inspiring. (I have a little railroad denim obsession at the moment).  No railroad denim.  But I did find…THIS!  Yellow denim, white, denim with hearts, and my own older pairs of dark blue.  Now it was all coming together!

Refashioners 2016:  Jeanius

Last year’s Refashioner’s contest helped me make a move up from beginner to intermediate sewist. However, still not being super experienced, I don’t always make a muslin.  (Who am I kidding?  I skip it whenever I can.)  I know…I know…  It’s helpful, and I’m moving in that direction, but I’m not there for every project.  I actually DID make a practice garment for this one, though.  I made two, even!

Refashioners 2016:  Jeanius

The first showed me that I needed to size down.

Refashioners 2016:  Jeanius

A lot of people say they find this with Big 4 sewing patterns–I typically don’t, but in this case it was necessary, so it’s a good thing I made a muslin.  I used the second muslin to try lowering where the skirt sat on my hips and practice putting it all together a bit more.  The pattern tells you to ease the top of the skirt to the ribbon facing, but I had a lot of trouble with this and didn’t really want the skirt up at my natural waist.  I found that skipping the easing and just cutting a ribbon to match the top of the skirt solved both problems.

Muslins can also be a great way to procrastinate on cutting into your final fabric while appearing busy.  😉  I finally got up my courage, though, and found that I could easily fit my pattern pieces onto the jeans I had chosen (large men’s jeans for the white and yellow).  I tried out using one pair of children’s jeans for my middle panel, but had to backtrack when I saw that it just didn’t work.

Refashioners 2016:  Jeanius

The thing I wish I had done (and I’m still not sure how or why I didn’t after two practice garments) was think about how and when I was going to finish my seams.  I realized part way into my final draft that I really wanted to bind the edges of the seams with bias tape.  This is something best done as you go along and before you join various parts.  You can see a few places where my bias binding doesn’t go all the way to the edge of the seam.  Lesson learned.  I actually contemplated starting over when I realized that (plus, I was getting pretty good at making this pattern after a couple of versions), but it seemed to defeat the purpose of refashioning to throw an otherwise good garment-in-the-making out because of one little detail.

Refashioners 2016:  Jeanius

The other interesting thing I discovered was that sometimes, in matching up seamlines (namely on the sides), it wasn’t about moving the pieces up or down to get them to match, but making the seam allowances the correct width for them to match. One of my sides matched immediately, and the other took several passes through the machine, taking the side in millimeter by millimeter in order to get it to match.  The skirt in-progress looked messy and crazy, but as I got things lined up, trimmed and bound my seams, and finished edges, it came together into something that looked polished.

Refashioners 2016:  Jeanius

Refashioners 2016:  Jeanius

Refashioners 2016:  Jeanius

Refashioners 2016:  Jeanius

When I finally finished, I had a thing of beauty.  It’s certainly not perfect, but I’m proud of it.  I think the best compliment I got was when I was in Rockport, Massachusetts shooting pictures, and I stopped in an art gallery.  Rockport is famous for its artists, and one of the artists in the gallery complimented me on my outfit.  When a person who spends their life looking for beauty compliments you on your outfit, you know you’ve done something right!  😉

Refashioners 2016:  Jeanius

Refashioners 2016:  Jeanius

Refashioners 2016:  Jeanius

Refashioners 2016:  Jeanius

Refashioners 2016:  Jeanius

Refashioners 2016:  Jeanius

My favorite thing about this challenge is that it makes me think like an artist. You get your parameters, but within them you have freedom.  How far can you push it?  What will you do to make your garment distinctive?  Will it be simple and sleek or heavily embellished?  This is what I talk about in more depth in my post on the Makery blog.  If you haven’t already, I hope you check it out and look through all the other posts as well to get some inspiration.  What do you think?  Will you be diving in?  There’s a pretty tempting prize package!

Last, but never least, thank you to my photographers–my husband Scott and my friend Colleen.  I appreciate your help SO MUCH!