Tag Archives: shorts

Elizabeth Suzann Clyde Work Pant and Clyde Work Shorts in Cotton Twill

Standard
Elizabeth Suzann Clyde Work Pant and Clyde Work Shorts in Cotton Twill

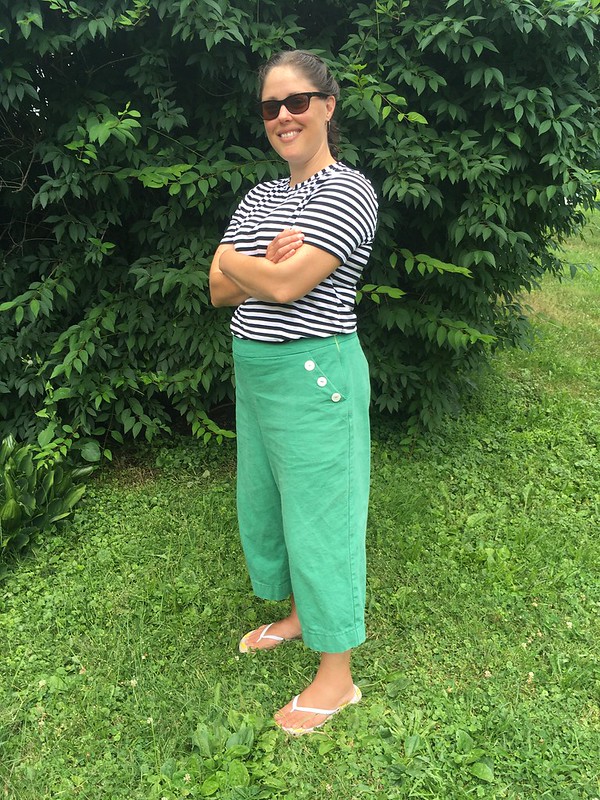
Let’s talk pants and shorts–specifically, the Elizabeth Suzann Clyde Work Pant and the shorts I made from the same pattern.

Elizabeth Suzann Clyde Work Pant and Clyde Work Shorts in Cotton Twill

These two clothing items were a lot of fun plus a little frustration to make, but more on that in a bit. I made both of them as options for my May trip to the Brimfield Antique Show on a tight deadline. Normally I shy away from such timelines, but I decided to challenge myself…and I did it!

Elizabeth Suzann Clyde Work Pant and Clyde Work Shorts in Cotton Twill

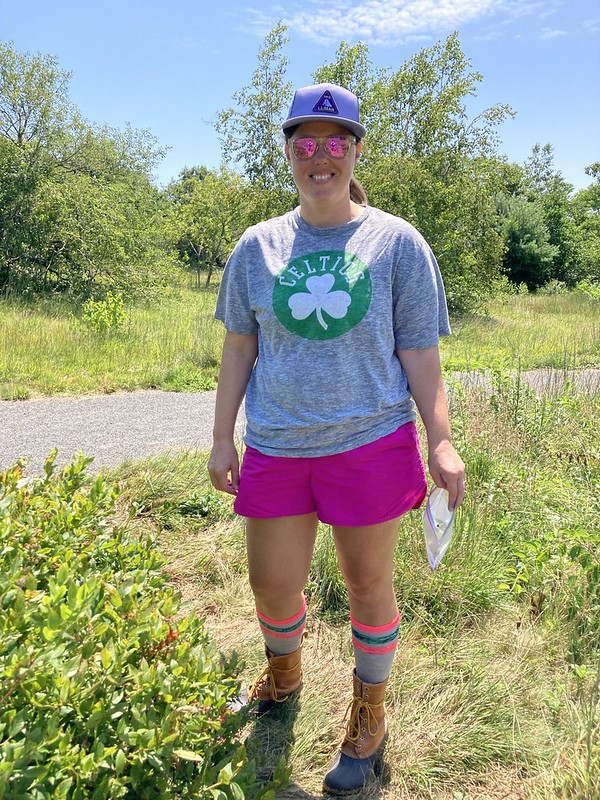
I made pants, shorts, and a t-shirt, which I’ll tell you about in another post. It was so much fun to try to sew as much and as fast as I could, and actually succeed. It really revved up my sewjo, and now I want to sew all the things EVEN MORE THAN I DID BEFORE. Sigh. I love making clothes for myself.

Elizabeth Suzann Clyde Work Pant and Clyde Work Shorts in Cotton Twill

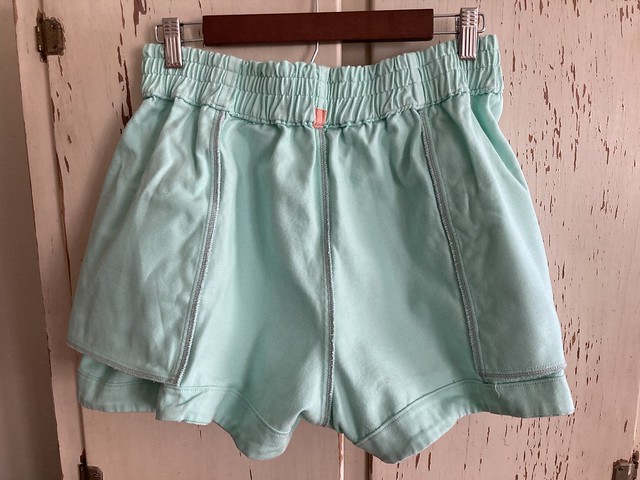
I have made the Clyde Work Pant pattern before, in a rust colored linen. That pair of pants was not without its problems, but nevertheless, I really like them and enjoy wearing them. I have wanted to try the pattern again with modifications for some time now. I’ve even had the fabric (a gift from my husband) since last fall. He bought me some “Mint Green” Robert Kaufman Ventana Twill on Amazon, which arrived not in continuous yardage, but in pieces. Not good. So, he told me to get a replacement at Pintuck & Purl’s Makers’ Day sale, which I was very happy to do (in the color “Fox“). 😉 Also, Amazon later sent us continuous yardage, so that was really lovely. I could make at least two pairs of pants or shorts. Yay!

Elizabeth Suzann Clyde Work Pant and Clyde Work Shorts in Cotton Twill

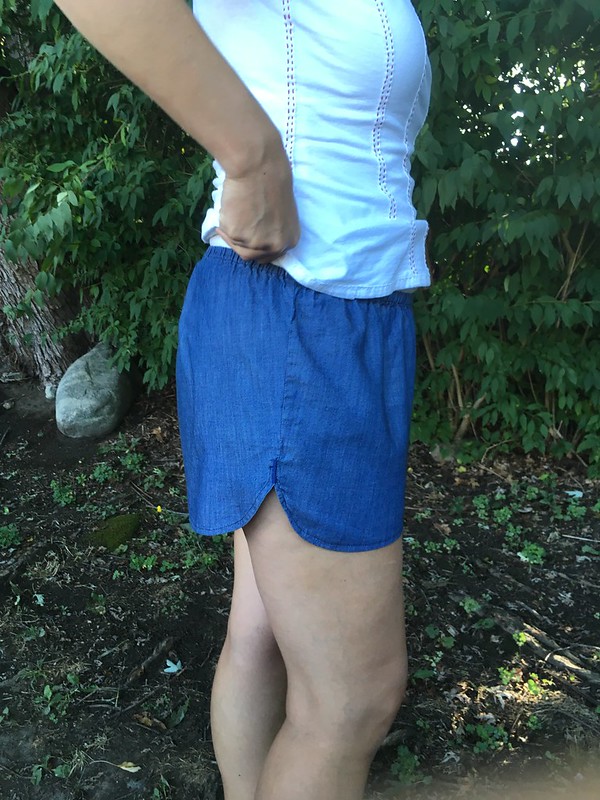
While I love my first pair of Clyde pants in a size 16, average length, the rise was always a bit too long for where I wanted to wear them, so I made plans to shorten the rise by two inches and add that length back into the legs since the overall length was good. I adjusted my pattern, using Sewing Pants That Fit from the Singer Sewing Reference Library (pages 52 and 53 in my edition), hoping that I hadn’t forgotten anything, but I ran into a curious problem. I didn’t walk my seams, which is when you compare seamlines that will be sewn together to see if their lengths match after altering them. If I had, I would have found that my vertical seams didn’t actually match. After sewing everything together, the back and the corners of the front panels were higher than the side panels.

Elizabeth Suzann Clyde Work Pant and Clyde Work Shorts in Cotton Twill
The back was almost an inch higher than the sides.
Elizabeth Suzann Clyde Work Pant and Clyde Work Shorts in Cotton Twill
The edges of the front panels were also taller than the sides.

I trimmed them off my pants, but this gave me a bit of a too-low-in-the-back situation. They were still wearable, but not quite optimal. HOWEVER, I could tell I was on the right track, and that was encouraging. It turns out I should have only shortened the side panels by an inch, while shortening the backs and fronts by two inches. I still don’t completely understand why, but that’s what would have worked.

Elizabeth Suzann Clyde Work Pant and Clyde Work Shorts in Cotton Twill
Front
Elizabeth Suzann Clyde Work Pant and Clyde Work Shorts in Cotton Twill
Back

The other issue I had was with my elastic. I used two inch wide underwear and pajama elastic because I had it in my stash, and even though I tightened it much more than called for, the pants don’t feel quite secure.

Elizabeth Suzann Clyde Work Pant and Clyde Work Shorts in Cotton Twill

This made me realize I really need to learn more about elastic. I found this helpful post on the Melly Sews blog after I had finished and hope to use the information in the future. This is definitely an area I can improve in.

Elizabeth Suzann Clyde Work Pant and Clyde Work Shorts in Cotton Twill
Inside front
Elizabeth Suzann Clyde Work Pant and Clyde Work Shorts in Cotton Twill
Inside back

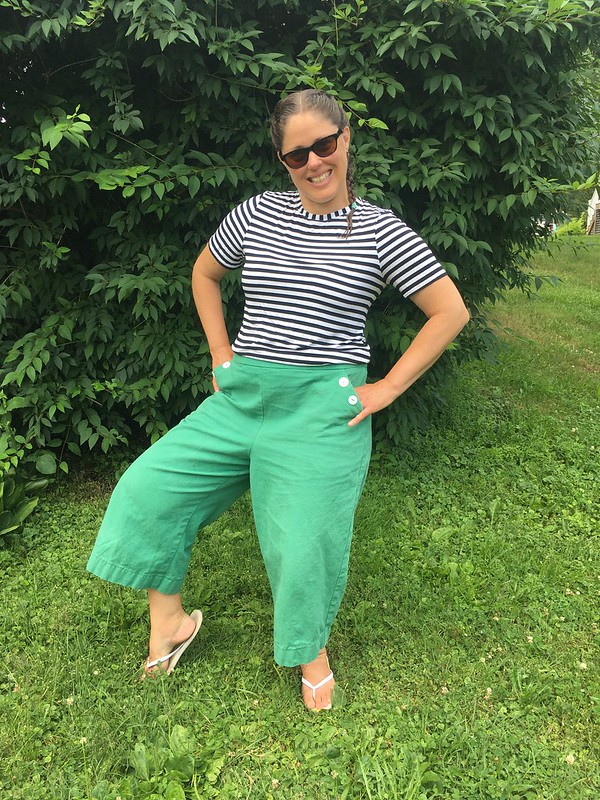
After finishing my pants, I felt that I had a handle on what I wanted from the fit, and I wondered if I could crank out a pair of shorts in the time I had left. This time I made the rise length adjustments just right. I was so happy. But guess what? I didn’t walk my inseams, and they didn’t match. Ugh. I hadn’t learned my lesson after all.

Elizabeth Suzann Clyde Work Pant and Clyde Work Shorts in Cotton Twill
Front
Elizabeth Suzann Clyde Work Pant and Clyde Work Shorts in Cotton Twill
Back

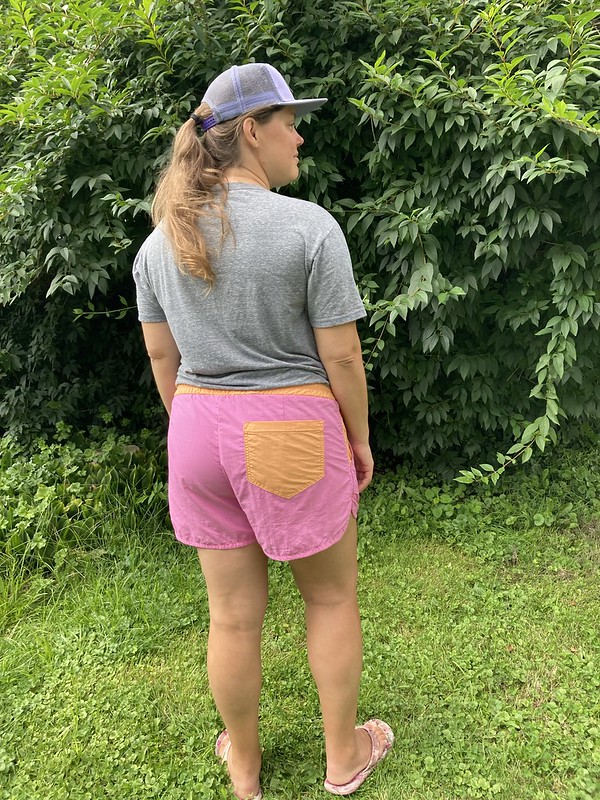
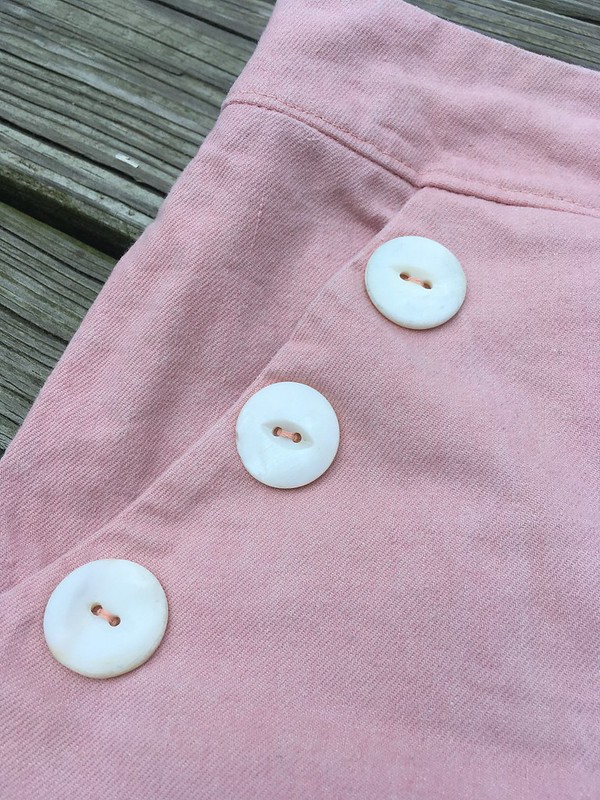
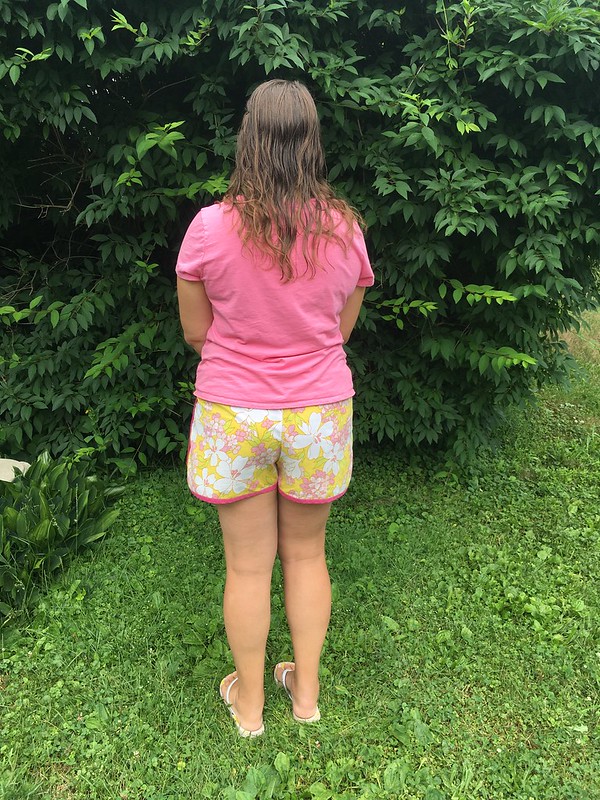
Maybe you’re wondering how I made the shorts? Here are the details: I shortened the pockets by drawing a straight line across from bottom corner to bottom corner, removing the curve at the bottom.

Elizabeth Suzann Clyde Work Pant and Clyde Work Shorts in Cotton Twill
Inside front
Elizabeth Suzann Clyde Work Pant and Clyde Work Shorts in Cotton Twill
Inside back

I had planned to hem them at the original pocket length, but when I realized that my inseams didn’t match up, I essentially made slightly wedge-shaped facings that I turned under to hem the legs. This made the finished length slightly longer than the original pocket length and fully enclosed the various seams of my patch job.

Elizabeth Suzann Clyde Work Pant and Clyde Work Shorts in Cotton Twill

That was fortuitous, because I found I liked this length better.

Elizabeth Suzann Clyde Work Pant and Clyde Work Shorts in Cotton Twill

The rise was much better on these shorts than it had been on the pants, and whatever elastic I used seems better, too. I can’t remember what elastic I used, so maybe I got it right, or maybe it has to do with the fact that shorts don’t have as much fabric weight as pants do. For a size 16 pair of shorts, I used about 1.5 yards. This fabric is 44″ wide.

Elizabeth Suzann Clyde Work Pant and Clyde Work Shorts in Cotton Twill

As far as the Ventana Twill goes, I really love how it looks and feels for this pattern. It’s much more durable than the linen I used last time, and is substantial without being heavy. The only downside has been that the high friction area has pilled after only a few months. Luckily, it’s not in an area anyone can see.

Elizabeth Suzann Clyde Work Pant and Clyde Work Shorts in Cotton Twill

Of course, now that I have these almost right, and because I do actually love these fun pants and shorts, I kind of want to make another pair of each to see if I can really nail the fit and elastic choice. I’d also love to write up real directions for how to make the shorts for the blog, but I have no idea if I will actually ever do either of those things.

Elizabeth Suzann Clyde Work Pant and Clyde Work Shorts in Cotton Twill

Maybe if I find just the right fabric, though…

Hey June Handmade Vero Beach Shorts in Woven Supplex

Standard
Hey June Handmade Vero Beach Shorts in Woven Supplex

Hi, everyone! I hope this finds you well. As you may have noticed, posting to the blog gets a bit patchy in the summer, so after taking July off, I’ll probably post a bit in August, although not as regularly as usual. It matches my sewing though. Even though I LOVE summer sewing, I also love being outside with my family and cooking and baking with summer produce, so the summer sewing never ends up being quite as plentiful as I imagine it will be.

Last summer, my youngest daughter and I spent a lot of time exploring the area around where we live. Sometimes we were in the woods, sometimes we were at the beach or by a river where we might want to swim. I hoped that by making us some shorts in woven Supplex, a texturized nylon fabric that feels a lot like cotton, but is wicking and breathable (etc., etc.), we would have bottoms we could wear on our adventures this summer that could get wet and then dry quickly. It was all about versatility! The shorts from the Vero Beach Set by Hey June Handmade seemed perfect for this.

Hey June Handmade Vero Beach Shorts in Woven Supplex

During the winter, I ordered several cuts of woven Supplex from The Rainshed with the intention of making our adventure shorts, as well as a few other things I had in mind.

Hey June Handmade Vero Beach Shorts in Woven Supplex
Newly washed and dried woven Supplex and Taslan (the generic name for Supplex) ready and waiting to be sewn up!

(You can see the “sweatshirt” I made with the yellow Taslan/Supplex as part of my Spring Outfit here.) Normally when I batch sew, it is groups of different patterns, but this time, I made three of these pairs of shorts at once–two for me, and one for my daughter.

For my shorts, I sized up one size from where my measurements put me. The instructions suggest doing this if you have a fabric with no give to it, and that definitely applies to this Supplex. I also like a good bit of ease, and sizing up made these fit just right. For my daughter, I chose a size based on her waist and hoped the shorts would fit, as she isn’t quite in adult sizes yet. We used the line drawing as a coloring page, since we had gotten two colors for her shorts, and she colored in everything the way she wanted it as a guide for me.

Hey June Handmade Vero Beach Shorts in Woven Supplex

One thing to note, that I didn’t initially realize, is that the binding for the shorts is not visible on the outside if you follow the pattern directions. Of course you could reverse the directions around Step 19 if you want it to show.

Hey June Handmade Vero Beach Shorts in Woven Supplex

After cutting out her shorts and mine, I realized that I still had enough fabric left from hers to cut out another pair, and since I liked her colors, and she didn’t mind, I cut out some shorts with her fabric, but with the colors in the opposite positions for me.

Hey June Handmade Vero Beach Shorts in Woven Supplex
Front of the Vero Beach Shorts. Mine are top left and bottom. Top right are for my daughter.
Hey June Handmade Vero Beach Shorts in Woven Supplex
Back of the Vero Beach shorts.

When it came time to sew, I started with a Microtex 90/14 needle, but that made my machine sound like it was punching through the fabric, so I switched to a Microtex 70/10 needle, and that was better. I also found that my thinner silk pins were easier to use than the pins I normally use (which are actually quilting pins). I threaded my serger for finishing seam allowances since this fabric doesn’t press well, and frays a fair amount, and was careful to choose thread colors for both my sewing machine and serger that would look good on all three pairs of shorts so I wouldn’t have to switch (plus I love a good contrast thread color). As far as elastic, I bought what Joann’s had in the appropriate width, which turned out to be Underwear and Pajama Elastic.

Hey June Handmade Vero Beach Shorts in Woven Supplex
Inside front of Vero Beach shorts
Hey June Handmade Vero Beach Shorts in Woven Supplex
Inside back of Vero Beach shorts

A slightly higher machine tension (five on my machine, rather than the normal four) gave me more balanced stitches. I rarely change my tension, but it did help on this project. I ran into a little bit of trouble part way through with skipped stitches. Everything had been going fine, and then I started to have problems. After trying a bunch of things, I didn’t know what else to do, so I called the sewing help hotline (i.e. my Mom) and she suggested cleaning my machine and then changing thread brands. So, I cleaned everything out and switched from Coats & Clark to Gütermann, and it worked! I hadn’t thought of that, but after she said it, I remembered that my machine has the same issue, but in the opposite direction with topstitching thread–Coats & Clark works, but Gütermann doesn’t. Funny, huh?

Hey June Handmade Vero Beach Shorts in Woven Supplex
An up-close look at some of the topstitching and fun details on these shorts
Hey June Handmade Vero Beach Shorts in Woven Supplex
I used leftover yellow Taslan from the windbreaker/sweatshirt in my Spring Outfit to add fun pops of color to my magenta shorts.

When it came to interfacing, I attached self fabric with a washable glue stick, since I didn’t want to try fusing interfacing to this fabric. Ironing nylon fabric like this sounds like a recipe for melted fabric!

Hey June Handmade Vero Beach Shorts in Woven Supplex

I also serged the top edge of the back pockets since my serger is set at a 1/4″ wide stitch width (Have I ever actually changed that? No! Haha). At the time, I wondered if I should have serged other areas in the pockets to eliminate fraying, but after having worn the shorts a lot, it hasn’t been an issue, so I guess whatever I did was fine.

Hey June Handmade Vero Beach Shorts in Woven Supplex
I double stitched around the edges of my back pockets to cut down on fraying and add strength.

Here are a few tips for this pattern: make sure when you trim your seam allowances in step 20, that you use a washable marker or chalk to mark the notches on the curved sides/bottoms of your shorts in a way you can still see after trimming–you will need those marks to help you line up the sides.

Hey June Handmade Vero Beach Shorts in Woven Supplex

I also recommend marking the drawstring holes even if you aren’t inserting a drawstring, just so you know where the front of the waistband is for when you are attaching it to the shorts. I had planned to insert drawstrings in mine, but changed my mind. I was still glad I had those markings, though.

So…how did they turn out? Well, I wish I had about five more pairs, so they are great! And my daughter’s fit well, too. I wasn’t sure how hers would fit since they are a women’s size, but she loves them and they fit great! We have worn them to the beach, wild blueberry picking, for exercise, and as every day wear. I usually wear them as soon as they are out of the wash. I love them. I was afraid the pink and orange ones would be a bit see-through (something I began to worry about after I had cut them out since they seemed fine before that), but unless you are wearing really dark or patterned bottoms underneath it’s not an issue, and if it’s a swimsuit, well, who cares? The magenta ones are completely opaque.

I didn’t take pictures of my daughter since I don’t share pictures of my kids on my blog, but here are some she took of me when we went wild blueberry picking. Try not to be jealous of my outfit–fashion + protection against ticks and mud! What more could you want?! Hahaha

Hey June Handmade Vero Beach Shorts in Woven Supplex
I feel so New England-y! L.L. Bean boots and hat, Celtics t-shirt, anti-tick knee socks, and picking wild blueberries!
Hey June Handmade Vero Beach Shorts in Woven Supplex
These shorts were just right–I never got too hot in them and the big pockets were awesome.
Hey June Handmade Vero Beach Shorts in Woven Supplex
Here’s a picture of some of the wild blueberries–they’re teeny tiny, about the size of a pencil eraser–but delicious! I’ll never reveal our not-very-secret secret spot on the internet, but if you know me in person, feel free to ask. 😉

These shorts are so versatile and comfortable, I would love to sew them up in a bunch of different fabrics–everything from linen to lightweight denim and maybe even athletic knit (worth a try!). They would also make great pajama shorts. The instructions were excellent and the pockets are so nice and large. I really, really recommend these. Knowing my love for nearly always trying new patterns, I can’t say for sure that I will circle back to these, but I hope I do, because they are great.

Hey June Handmade Vero Beach Shorts in Woven Supplex
Picture-taking motivation has been pretty low this summer, so I ran outside when I was already wearing these one day, and had my daughter snap a few pictures of them.
Hey June Handmade Vero Beach Shorts in Woven Supplex

The pullover that’s included in this pattern looks nice, too, so we’ll see if I try that someday. Wouldn’t it be great in double gauze? The more I sew with patterns from Hey June Handmade, the more I love them. The instructions are so good, many of the styles are a great match for me, and I am coming to really trust Adrianna’s expertise and advice in each pattern. She knows what she is talking about!

I’m also really glad that I have tried out woven Supplex. Sometimes I want to sew a garment because the pattern is intriguing and new, and sometimes it’s the fabric I find tempting. I still have some uncut blue-gray yardage that I hope to make into the Itch to Stitch Sequoia Cargos so I will have some woven hiking pants, but we’ll see what happens. Technical fabrics are so interesting, and being able to make your own outdoor gear feels like such a win!

And what’s up next in the queue? I’m working on a rash guard and bathing suit now and am hoping to make the Fibre Mood Lola Top and Elizabeth Suzann Clyde Work Pant pattern in linen after that, but we’ll see! I’ll keep you posted although it may be a bit patchy through the end of summer. 🙂

Simplicity 8391 Sailor-Inspired Shorts and Pants

Standard
Simplicity 8391 Sailor-Inspired Shorts and Pants

Summer sewing is in full (albeit slow) swing, and these pants are one of the most recent projects I finished.  I really like the look of sailor pants.  I actually have a pair of wool 13-button sailor pants that I love from an Army Navy store, but sadly they don’t fit right now.  I have noticed that I’m drawn to that style, though, so I decided to make some of my own.  First, I tried the Persephone Shorts by Anna Allen.  The pattern and instructions are excellent, but I really, really didn’t like the look of the shorts on me, even though I think they look great on other people.  Rather than fiddling with the fit to try to get something I might like, I moved on to Simplicity 8391.  The Persephone Pants are actually based on sailor pants from the 1920’s-1940’s, whereas Simplicity 8391 is more of a cute take on the idea of sailor pants.  I have to say, though, that I really, really like these.

Simplicity 8391 Sailor-Inspired Shorts and Pants

l

Simplicity 8391 Sailor-Inspired Shorts and Pants

First I made the shorts version (View D) to get an idea of the fit.  I made them up quickly without worrying much about interior perfection or getting things just right.  These were my wearable muslin.

Simplicity 8391 Sailor-Inspired Shorts and Pants

l

Simplicity 8391 Sailor-Inspired Shorts and Pants

Cute, right?

My measurements put me in between two sizes, so I traced that out and sewed them up in some leftover Tinted Denim by Cloud9 Fabrics that I got long ago at Pintuck & Purl.

Simplicity 8391 Sailor-Inspired Shorts and Pants

I am finding that in most, if not all, Big 4 pants, I need to do a full seat adjustment and possibly even lengthen the back crotch point.  I didn’t do any of that for the shorts, and while they came out cute, they aren’t super comfortable on me, and I have already given them away.

Simplicity 8391 Sailor-Inspired Shorts and Pants

l

Simplicity 8391 Sailor-Inspired Shorts and Pants

Aside from giving me wedgies, sitting was really uncomfortable and I wanted a lot more ease, so I decided to try again and just sort of guess at the amount of adjustment to make and hope for the best.

For version two, I made the pants (View C) from Delaware Grass Green 10 oz. cotton canvas from Big Duck Canvas that I had originally bought to make into Persephone Pants.  This was my first time ordering from Big Duck Canvas.  The price was good and so was the quality of the fabric.  Interestingly, when I washed these, they faded a fair amount.  They also softened a lot as I’m sure they had some sizing on them while on the bolt.  They remind me of one of my favorite pairs of pants from years ago, so I loved how the fabric came out of the wash, but keep the fading in mind if you give this fabric a try at some point.  I have also noticed this sort of fading when I bought duck canvas from Joann’s, so maybe it’s just something that happens with this fabric?

Simplicity 8391 Sailor-Inspired Shorts and Pants

As far as adjustments, I really wanted some comfy pants, so I decided to go big or go home with the fitting.  I retraced the pattern half a size larger, and then did a 1.5″ full seat adjustment, as well as adding 1.5″ of length to the back crotch point.  I used The Perfect Fit from the Singer Sewing Reference Library series to figure out how to do this.  I’m always a little confused about which adjustments to do and how in the world to know what I need in each case.  It helps that I sew a lot of Big 4 patterns and can use a lot of similar adjustments on those, but what about when I sew a pattern from another company?  Isn’t there some way to measure the flat pattern and know if I will need to adjust things?  I still need to finish reading Pants Fitting:  The Crotch and Pants Fitting:  The Crotch Part 2 from the Winmichele blog and do the exercises she mentions because I think that will answer those questions for me.  I understand how to measure the back of a shirt pattern to see if I need a broad back adjustment, but I still don’t fully have pants figured out, even after making a number of different types.

Simplicity 8391 Sailor-Inspired Shorts and Pants

Back to these pants.  When hemming, I took 2″ off the length of the pants.  I think if I had left the size the same as the shorts, the pants would have fit closer and been higher on my waist, and then maybe that 2″ would have been too much, but with the adjustments I made, they sit just below my navel and taking 2″ off looked better to me than just hemming them at the normal hem allowance (for reference, I’m 5′ 8.5″ tall and I don’t usually make length adjustments).  I had to stretch the fabric as I hemmed so that everything was nice and flat.

Simplicity 8391 Sailor-Inspired Shorts and Pants

l

Simplicity 8391 Sailor-Inspired Shorts and Pants

I got to use a few vintage buttons on both the pants and the shorts.

Simplicity 8391 Sailor-Inspired Shorts and Pants

l

Simplicity 8391 Sailor-Inspired Shorts and Pants

I used whatever invisible zippers I had around.  The zipper on these is on the left side.

Simplicity 8391 Sailor-Inspired Shorts and Pants

One other thing I changed was on the inside of the waistband.  I covered the inside edge of the waistband with bias tape, which made catching the waistband SO MUCH EASIER when stitching in the ditch from the outside.  I do have to be careful when zipping and unzipping because the bias-covered edge likes to get in the way a little bit, but it’s not too bad.

Simplicity 8391 Sailor-Inspired Shorts and Pants

The adjustments I made to this pattern made the finished product feel WONDERFUL.

Simplicity 8391 Sailor-Inspired Shorts and Pants

l

Simplicity 8391 Sailor-Inspired Shorts and Pants

I’m really thinking hard to analyze how I want to feel in my clothes during each season, and so far what I have come up with for summer is loose and breezy, which means no tight clothes (except things like bathing suits), lots of breathable cotton and linen wovens, and plenty of elastic waists.  Even without an elastic waist, I love these pants for summer.  They’re nice and loose, and I would definitely consider trying to lengthen them to full length and make them in linen or some other great fabric.  I think I have worn them almost every day this week (don’t worry–they’re going in the wash after today).

Simplicity 8391 Sailor-Inspired Shorts and Pants

I know that’s the picture you were all waiting for.  😉 Have a great weekend.

I Finally Tried It: City Gym Shorts from Purl Soho

Standard
I Finally Tried It:  City Gym Shorts from Purl Soho

Hi, everyone!  It’s been a little while, but I finally have some finished projects to share that are slowly getting photographed.  I usually work in batches and I love it when I get to the sewing part of a batch because it feels like I’m quickly turning out projects.  What it really means is that I spent a lot of time planning, tracing, and cutting a bunch of things, but it still feels great to finish several projects in a row.  One of the projects in this latest batch is a popular free pattern that has been around for almost six years, but that I hadn’t tried.  This year it was finally time to jump on board since I really need some shorts…and elastic-waist shorts sound amazing.  The pattern is the City Gym Shorts for All Ages from Purl Soho.

City Gym Shorts made from vintage sheets

l

City Gym Shorts made from vintage sheets

l

City Gym Shorts made from vintage sheets

This pattern comes in a range of kids’ and adult sizes.  It was published before PDF patterns were as popular as they are now, so it and the directions look a little different from what you might commonly see today, but I think they are still good.  I used the largest women’s size.  Although I’ve purchased a small amount of fabric in the last several months, I’m mostly trying to use what I have on hand as much as possible, so I pulled out some vintage sheets and some bias tape I had as well as whatever thread was closest in color to my fabric, and got started.  I had to buy some elastic, but that was it.

City Gym Shorts made from vintage sheets

The directions were pretty straightforward, although the seam allowance is only 1/4″, so keep that in mind or your shorts won’t fit as expected.  The nice thing about this smaller-than-usual seam allowance is that you won’t have to trim your seams.  I didn’t bother too much with making my sewing look pretty for this version, except where I sewed on the bias tape.  The goal was to finish these quickly so I could try them out.

City Gym Shorts made from vintage sheets

The one thing I changed was the waistband.  I plan to follow the directions if I make this pattern again, but for this pair, I wanted to use the folded over edge at the top of the sheet as my casing.  That did make the casing a bit wider than what is called for, so I anchored my elastic by sewing through the waistband at the sides, front, and back so it wouldn’t flip around in the wash or while I’m wearing the shorts.

City Gym Shorts made from vintage sheets

l

City Gym Shorts made from vintage sheets

Once I finished the shorts and tried them on, my initial thoughts were that these were pretty good!  I liked the length and found them pretty comfortable.  I thought that if I made them again, they should have pockets (of course!) and possibly a bit of a full seat adjustment and back crotch length extension as well as possibly a bit more ease (maybe I would grade up one size).  After wearing them for awhile, though, I think all those things (except the pockets) are things that might improve this pattern slightly for me, but aren’t things I absolutely have to do to enjoy wearing these shorts.  I’m really happy with them.

City Gym Shorts made from vintage sheets

Speaking of pockets, if you have tried this pattern or want to try it, but also want somewhere to hold your keys or phone, I found this post on the Zaaberry Handmade blog that covers her variation of this pattern and includes how to add pockets (she links to a tutorial she created for adding pockets).  In her version, she eliminates the bias binding.  If you want slash pockets, but want to keep the bias binding, you could check out this post over on the All Wrapped Up blog.  What I haven’t found is anyone who added inseam pockets and kept the bias binding.  Those are the lines I was thinking along, although I also really like what each of the these women did, so I would be open to either pocket style (slash or inseam).

One tip I have is that if you are running short on matching bias tape, attach what you have to the front side seams first as most of the back side seams will be covered and you could easily hide mismatched bias tape there if you wanted to.

City Gym Shorts made from vintage sheets

I think the City Gym Shorts pattern would be a good one for a beginner.  It doesn’t have too many pieces or things like buttons or zippers, and you can make it out of quilting cotton or even old sheets, like I did.  You can purchase bias tape or learn to make your own, so it’s a good skill builder while still being completely doable.  And for the seasoned sewist, it’s a fun and quick project with lots of possibilities to customize the end product.

The Last Summer Project: Simplicity 1887 Shorts (in Sparkly Linen!)

Standard
The Last Summer Project:  Simplicity 1887 Shorts (in Sparkly Linen!)

Today is the last full day of summer in the Northern Hemisphere.  Tomorrow, September 22 is the Autumnal Equinox, the official beginning of fall.  But until then, it’s still summer!!!  So let’s talk about this last summer project, a pair of elastic-waisted, deep-pocketed, SPARKLY linen/cotton shorts:  Simplicity 1887.

The Last Summer Project:  Simplicity 1887 Shorts (in Sparkly Linen!)

This pattern is a good one.  I would make it again, and I recommend it to you. 🙂

At some point this summer, I realized (or re-realized) that I really want easy-wearing, elastic-waisted shorts and skirts for summer.  I had other projects already planned, but these shorts managed to get squeezed in right at the end.  I had hoped to make them last year and didn’t, so I was determined to sew them this summer.

The Last Summer Project:  Simplicity 1887 Shorts (in Sparkly Linen!)

I made View C, the shorts, in a size 20 with no changes.  I didn’t even really come up with my own fabric idea.  I loved the sparkly fabric Simplicity used on the sample on the envelope, so I bought a Sand-colored linen/cotton/Lurex blend (Essex Yarn Dyed Metallic) by Robert Kaufman Fabrics from Pintuck & Purl.  The sparkle is hard to photograph, but I gave it a try.  ↓

The Last Summer Project:  Simplicity 1887 Shorts (in Sparkly Linen!)

l

The Last Summer Project:  Simplicity 1887 Shorts (in Sparkly Linen!)

l

The Last Summer Project:  Simplicity 1887 Shorts (in Sparkly Linen!)

This pattern ticked all the boxes I wanted:  something that looked a little bit nicer so I could wear it to work, shorts that were a little longer than what I had been making previously, an elastic back waist, deep pockets, and a loose fit for those hot days.

The Last Summer Project:  Simplicity 1887 Shorts (in Sparkly Linen!)

l

The Last Summer Project:  Simplicity 1887 Shorts (in Sparkly Linen!)

l

The Last Summer Project:  Simplicity 1887 Shorts (in Sparkly Linen!)

I decided I would try out the tie on the front, knowing it would be easy to remove if I didn’t like it.  It’s only stitched onto the front (not inserted into the waistband), so if I didn’t love it, I could take it off quickly and easily with my seam ripper.  The good news is that so far, I like it.

The Last Summer Project:  Simplicity 1887 Shorts (in Sparkly Linen!)

l

The Last Summer Project:  Simplicity 1887 Shorts (in Sparkly Linen!)

I also wondered if I would like the front pleats, and I do!

The Last Summer Project:  Simplicity 1887 Shorts (in Sparkly Linen!)

The fabric was very easy to work with and while it is slightly less soft than a lot of linen/cotton is, (I think that’s because of the Lurex), it’s still very comfortable.  Once I finished these, I felt the temptation to make more in other sparkly colors (there are many color options), but I’m going to wear these for the rest of the warm days to get a gauge on how they fit into my wardrobe and if I want to make further pairs next summer.

The Last Summer Project:  Simplicity 1887 Shorts (in Sparkly Linen!)

l

The Last Summer Project:  Simplicity 1887 Shorts (in Sparkly Linen!)

l

The Last Summer Project:  Simplicity 1887 Shorts (in Sparkly Linen!)

I was happy to note that the crotch curve was a good fit, further cementing my suspicion that Simplicity’s crotch curve is one that works for me.  After making this view of the pattern, I would consider making the longer pants as well as the longer skirt.  We’ll see what next summer holds, but I’m glad I finally tried this pattern, and I recommend it for a relatively quick and satisfying sew.

The Last Summer Project:  Simplicity 1887 Shorts (in Sparkly Linen!)

Thanks to my husband for the pictures.  And if you want to read up on the shirt that I’m wearing, you can find that project here.

And now?  On to projects that will transition into fall!  I already have several cut out.  I’ll report back soon!  What are you working on for fall?  What is inspiring you?


Adventures in Shorts Fitting: McCall’s 6930

Standard

We’ve been talking a lot about shorts lately, haven’t we?  I’ve noticed that in my sewing, I tend to make tops.  I have a lot of me-made tops in my closet, but not a lot of shorts and pants.  Why is that?  Fear.  That’s it.  Silly as it sounds, I have been afraid of making shorts and pants because I don’t know how to fit them.  But this was the year of sewing first jeans and then, this summer, shorts.  I’m so glad I finally plunged in because now I have a better grasp of some of the fitting issues I might face and how to fix them.

McCall's 6930 Shorts

So let’s talk about this particular pattern, McCall’s 6930 (View A).  There are a couple of shorts options in this one, as well as capris.  They have a flat front, shaped waistband, back zipper, and pockets, with optional belt carriers.  It actually took me three tries to get this right, and I took pictures of each of them, so you could see some of the things I had to fix and the mistakes I made.

McCall's 6930 Shorts


McCall's 6930 Shorts

Last summer, I began my first version of this pattern.  I could tell that something was wrong with it, but I wasn’t sure what to do, so I put it away until this summer.  I nearly threw these shorts out when I was cleaning up one day, but I tried them on first and realized that they weren’t as terrible as I remembered.  So, I finished them, and came up with ideas on what I wanted to improve.  The front was baggy and went up too high, and the back felt like it needed more length in the crotch seam.

McCall's 6930 Shorts

The baggy front was no good.

McCall's 6930 Shorts

McCall's 6930 Shorts

I looked in my trusty book, Sewing Pants that Fit from the Singer Sewing Reference Library, and decided to try taking a wedge out of the front and add a wedge into the back.  After I had done this, I saw that the book said not to take wedges out of the front, but there was no explanation as to why, so I decided to try it anyway.  I took out the wedge and redrew the top of the front crotch seam, making sure it was straight like before.  When I asked a friend who used to work as a pattern drafter what was up with the book’s advice, she asked if I had redrawn the center front line and, when I told her I had, she said it ought to work.  Her other suggestion was to take some of the length out of the top of the front, thereby leaving that front seam intact.  She also told me that the new grainline should be more or less perpendicular to the top of the shorts so that they would hang straight down.

McCall's 6930 Shorts

The front pattern piece, above.

McCall's 6930 Shorts

The back pattern piece.

Version two came out much improved.  There was one main problem, however.  I had made these out of a stretch denim…but the pattern didn’t call for a fabric with stretch.  So, as you may imagine, these shorts tend to “grow” throughout the day until they are a bit large by the end of the day.  Another minor thing that I noted was that using a lighter weight fabric for the back of the pocket is not as good as using a fabric of the same weight.  I did this in versions one and two.  It creates wrinkles and doesn’t hang as well–not super critical, but important to note.

McCall's 6930 Shorts

This picture makes me look excited about the hugeness of these shorts, but I’m really just making funny faces for my photographer.  This photo shoot got a little silly by the end…

McCall's 6930 Shorts


McCall's 6930 Shorts

Fabric the same weight as my denim would have worked better than the lightweight denim scrap I used.

I cut into some of my precious fabric from Pintuck & Purl for my third version…and it came out great!  When I put these on, they just feel right.  The one thing I will probably tweak if I make this pattern again (which I’ll probably do) is to lengthen the back crotch point just a bit as the front of the legs feel closer to the body than I think they should.  The leg openings aren’t too small, it’s more like they are tilted toward the back when they should be more balanced.

McCall's 6930 Shorts

Front view.  There’s a little yellow on the darts from my chalk markings, but that washed out easily.

McCall's 6930 Shorts

Back view.

Each of the adjustments I made were the same as those I made on McCall’s 6848, the pajama-turned-everyday shorts I recently blogged about.  It feels good to know I am on the right track.  Now the question is, will these be standard adjustments for me, or will they be limited to McCall’s patterns?  Either way, I feel like I’m making progress in learning to fit pants and shorts, and a lot of the scariness is dissipating.  It’s such a pleasure to occasionally wear an outfit that I’ve made–not only the top, but both the top and the bottom.  I’m really happy that I tried despite my fear.

McCall's 6930 Shorts


McCall's 6930 Shorts

McCall's 6930 Shorts

And…..guess what?  Today is this blog’s third birthday!  That’s pretty cool!  I thought about doing a round-up of past posts, but I wanted to talk shorts one more time instead.  I’m so thankful for this blog, which has helped me grow in confidence as a writer, seamstress, and photographer.  I think I have a good groove, have seen some improvements in those areas, and I hope for more improvements in the future in both sewing and blogging.  I’m also thankful for you, my readers, some of whom have been with me from the very beginning.  Thank you for encouraging and supporting me in this.  Learning these skills goes far beyond sewing–the confidence and happiness that comes from sewing has expanded into other areas of my life as well.  So, I’m thankful for the blog, for you, and to God for the skills, time, resources, and frame of mind to grow.  Thank you.

And last but not least, let’s have some Recommendations!

  • Another fun post in the Cotton + Steel substrate series is the one all about rayon, which is new to me.  I’m looking forward to trying it out in the near future.
  • Have you ever wanted to turn your favorite button up shirt pattern into a popover top (a top with a button placket that only goes partway down the shirt)?  I have!  I just wasn’t looking forward to figuring it out on my own.  Luckily, Craftsy did it for me.  You can read all about it here.
  • Did you know it’s National Sewing Month?  It is!  To celebrate, Pintuck & Purl is doing a fun Q & A with various bloggers and pattern designers over on their blog, and I’m one of the bloggers!  You can read their blog here.
  • When knitting takes over…

Finally Just Right: McCall’s 6848 Shorts

Standard

It may be September, but summer isn’t over until the first day of fall on September 22, so it’s been shorts-land over here lately.  Yes, Shorts-Land is a place, and that place has been my house, where I’ve been sewing up a ton of basic and not-so-basic shorts this summer.  Like many aspects of sewing, I’ve been putting shorts and pants off because I didn’t know how to fit them, but I also know that I really need to try if I’m ever going to learn.

IMG_9938

McCall’s 6848 is a pattern I’ve been tweaking little by little, and I think I finally have it right.  This is actually a pajama pattern, but after making my first pair of shorts from it (View D), I realized this it was going to be more of a summer staple than pajamas.

McCall's 6848

McCall's 6848

One thing I’ve found in the little bit of pants/shorts sewing I have done is that bottoms sometimes feel as though they are too high in the front and too low in the back for me.  This was definitely the case with my first pair of these shorts.  So, I got out the good ol’ Singer Sewing Reference Library books and looked up fitting, until I came up with some ideas.  For my second pair of shorts, I took a wedge out of the front and added a wedge into the back.  This got my shorts really close to what I wanted, but the front legs felt just a little…well, not tight, but not quite right–a little like they were pressing against me too much in the front of the legs.  So, for this last pair, I lengthened the back crotch point just a bit and…finally just right!!!

McCall's 6848


IMG_9981

They feel exactly like I want them to.  For this pair, due to my need for basics, I decided to try out the new Art Gallery Fabrics Denim.  I got it at Pintuck & Purl in Exeter, NH (who, by the way, I’ve started doing some social media for, which is super cool).  I was kind of skeptical about this thin fabric.  I didn’t really believe it was denim, because the weight is closer to a quilting cotton, although it’s much drapier.  When you look at the weave, though, it really is a denim weave.  All that to say, I was pleasantly surprised when I tried it.  I managed to make these up before the road trip we went on in July, and they were perfect in the car.  I guess it’s always a good day when you can wear something designed as pajamas in your everyday life.

IMG_8764-001


IMG_8774

IMG_8776

I even put a little lace flower in there as my back tag.

The one extra thing I did (besides that flower) was add some long bartacks at the sides.  I know from experience that these shorts can catch on things…and rip.  It’s no fun ripping a hole in the side of your new shorts.

IMG_8777

The only other thing I would change if I made these again would be to add pockets.  It’s pretty annoying not to have any, but I think, at this point, I want to focus more on fit than modifying patterns with extra features.  So, I’ll save it as a future idea.

Recommendations

  • I’ve got to recommend it again–BRIMFIELD!  It’s going on now, and if you are an antique-lover anywhere near western Massachusetts, I highly recommend you go.  Brimfield is the largest outdoor antique market in the US and it’s going on this week until Sunday.  You can find all the details at the above link.
  • I tried one of the best recipes EVER on Monday.  It was Bostocks from the Seven Spoons cookbook.  It’s an amazing combination of day old brioche (like challah bread), orange simple syrup, and almond cream.  It’s totally worth the work, and you can make the various elements ahead of time.  Check your library…I bet they have it!
  • How about more learning about fabric?  Here’s a link to another of the Cotton + Steel substrate series.  This time it’s all about their cotton/linen canvas fabric!  Interesting!
  • And finally, I’ve got one more video from Cotton + Steel about how their fabric is manufactured and printed over in Japan.  It’s pretty cool to see how it’s all made:


Pleasant Pathways Shorts, or I Need Some Basics

Standard

Hi, guys!  I hope you’ve been having a good week.

Today’s project is brought to you by the need for basics.  I’m like a lot of sewing people.  I get drawn in by the pretty, happy, shiny prints and end up with a closet full of crazy, crazy fun…that doesn’t all go together.  I also tend to make a lot of tops, because I’m still trying to get over my fear of sewing pants due to my lack of fitting knowledge.

Well, you can’t learn if you don’t try, right?  So, along with the tops, I’ve been working on shorts this summer.

Pleasant Pathways Shorts

This pair, however, was more of a known quantity, so I made them up earlier this summer when I went nuts sewing easier, known stuff after all the complex things I’d been doing.  I’ve made this shorts pattern before, back when I started sewing seriously, and the fit has always been great.  I never needed to alter them.  Besides the fit, the other great thing about this pattern is that it is free, free, FREE!  You can find it here.  It’s one that Anna Maria Horner made for Janome.

Pleasant Pathways Shorts

I still wear my first pair of shorts from this pattern (the green ones in this post).  In looking at my measurements now, I should probably grade out at the hip, but I used some stretch denim that was left over from my Ginger Jeans extravaganza, so the fit turned out great, and they’re very comfortable.

Pleasant Pathways Shorts

I didn’t have a navy zipper, so I used what I had, which happened to be red, but thanks to my fairly new invisible zipper foot, you can’t see the red much.  Plus…I don’t actually mind.  I like little surprising details and contrasting colors.

Pleasant Pathways Shorts

Someday I’d love to add pockets and maybe a waistband to this, but for now, this pattern was just what I needed as far as sewing a known pattern and something basic that fit well and matched with most things.  I highly recommend it.

So that’s it!  I hope you give these a try if you are looking for some simple shorts.

I’ve still got some summer sewing to fit in, so you’ll likely be seeing more of that here for a bit.  Summer isn’t officially over until September 22!

Pleasant Pathways Shorts

Recommendations

  • As an art lover and a surfing…spectator, I love seeing the boards at Album Surf.  Check them out for some serious eye candy.
  • I thought Hila’s Nautical Outfit turned out great!  Striking colors and patterns!
  • Cotton + Steel Fabrics teamed up with Colette Patterns awhile back to explain some of the different fabric substrates they use.  If you’ve ever wanted to learn about double gauze, check it out on Cotton + Steel’s site here.
  • Here’s a video about Cotton + Steel’s double gauze collection, Bespoke.  It was interesting to hear about their thought process and to learn more about double gauze itself.

Another Pair of Shorts! McCall’s 6848

Standard

Thanks to my attempt at batch sewing, I have a nice little backlog of projects to share with you.  Of course everything took a backseat to the Refashioners contest and some fun pattern testing I did for Megan Nielsen, but now I’m back to my regularly scheduled projects and I want to share these summer makes with you before summer is too far gone from the northern hemisphere and we all start to wonder if it really happened at all.

Shorts by Pattern and Branch

I’ve made the shorts from McCall’s 6848 before and it’s fast becoming my most used pattern (knit versions of the tanks here: #1 and #2; woven shirt here).  One of the next frontiers in sewing for me is fitting.  It’s something I don’t really know how to do.  Some of the “how” is starting to trickle into my brain, but it’s the doing that needs to be done before I can really understand it.

Here’s what my pattern looks like:

Shorts by Pattern and Branch

Shorts by Pattern and Branch

What I’ve found with the few patterns I’ve tried for bottoms is that the front half often has too much fabric for me and the back half not enough.  These shorts, with all their ease and comfort, seemed like a safe pattern to try out some fitting ideas on.  If my attempts aren’t spot on, the relaxed nature of the pattern should be forgiving so that I can wear them anyway.

My Mom is so awesome in feeding my sewing habit (Thanks, Mom!) and donated all of her apparel-related volumes of the Singer Sewing Reference Library to me.  I cannot recommend these books enough.  I looked through them and got some ideas about what to try to remedy my fitting problem.  Here’s what I came up with:

Shorts by Pattern and Branch

I measured the extra fabric on my first pair of shorts and used that number to get an idea of how much fabric I wanted to take out of the front.  As you can see above, I took out a wedge, and then redrew my grain line.  This makes it sound like I know what I am doing–I don’t.  I’m trying out some ideas I found and hoping for the best.

Shorts by Pattern and Branch

On the back pattern piece, I tried to figure out how much I needed to add, then slashed to the edge and opened up a wedge, taping extra paper behind the wedge.  Then I redrew the grainline and hoped I did it right.  I’m really not sure how to tell if I’m doing that step correctly, so I just try to keep it similar to how it was in the beginning.

After doing this, I cut out my pieces* and made the shorts like I normally would.  Then I tried them on, and I have to say that they were much better!

Shorts by Pattern and Branch

Shorts by Pattern and Branch

Shorts by Pattern and Branch

They still felt great after a full day of wear.  The only thing I noticed that might be improved upon is that they may need a small amount of fabric added to the back crotch point.  They felt very slightly off in the front when I first put them on, so this is what I hope to try when I make these next.  I wrote myself a note to try that next time, and put the pattern away.  I think summer sewing is winding up for this year.

I had to add some little bar tacks to the side seams because the shorts from this pattern and the handles on my kitchen drawers seem to have an unhealthy attraction to one another that always results in rips.  Even this pair hasn’t escaped it’s fate, but you can try…

Shorts by Pattern and Branch

Looks like I left a few marker dots on there, too!  Oops!

What I will say about this pattern is that these are the shorts I reach for time and time again.  If I’d had more summer sewing time, I probably would have made a few pairs in more neutral fabrics because they are just so comfortable.  I suppose that might have something to do with this actually being a pajama pattern…but you know I love secret pajamas as much as the next person.

*In case you are wondering, the fabric is an Amy Butler quilting cotton from her Soul Blossoms line called Passion Lily.  Thanks to my sister and brother-in-law for the gift of this fabric which I have been hoarding holding onto for a long time! 

Me-Made-May ’15: Week One

Standard

I can’t believe Me-Made-May ’15 has only been going on for eight days!  It seems like a lot longer.  It’s hard to come up with something me-made to wear every day!  It’s also a fun challenge.  So, while I do have other things to show you, we’ll be doing a fair bit of week-in-review stuff this month, so you can see if I’m keeping up with the challenge.  So far I haven’t had to resort to counting the me-made leggings I’m wearing as pj’s as a day’s outfit, but I think that is probably coming.  That’s my fallback.  😉  Here’s week one:

Me-Made-May '15 (Pattern and Branch) #mmmay15

Day 1: Alabama Chanin style shirt #mmmay15

Me-Made-May '15 (Pattern and Branch) #mmmay15

Day 1: Alabama Chanin style shirt close-up #mmmay15

Me-Made-May '15 (Pattern and Branch) #mmmay15

Day 2: raglan t-shirt #mmmay15

Me-Made-May '15 (Pattern and Branch) #mmmay15

Day 2: raglan shirt close-up #mmmay15

Me-Made-May '15 (Pattern and Branch) #mmmay15

Day 3: kimono sleeve dress #mmmay15

Me-Made-May '15 (Pattern and Branch) #mmmay15

Day 3: kimono sleeve dress close-up #mmmay15

Me-Made-May '15 (Pattern and Branch) #mmmay15

Day 4: pink t-shirt and altered jean shorts #mmmay15

Me-Made-May '15 (Pattern and Branch) #mmmay15

Day 4: altered jean shorts close-up #mmmay15


Me-Made-May '15 (Pattern and Branch) #mmmay15

Day 5: Summer Blouse #mmmay15

Me-Made-May '15 (Pattern and Branch) #mmmay15

Day 5: Summer Blouse Close-Up #mmmay15


Me-Made-May '15 (Pattern and Branch) #mmmay15

Day 6: exercise shirt #mmmay15


Me-Made-May '15 (Pattern and Branch) #mmmay15

Day 7: Ankara/wax print shorts #mmmay15

Me-Made-May '15 (Pattern and Branch) #mmmay15

Day 7: Ankara/wax print shorts Close-Up #mmmay15

Wow!  I feel like I’m writing a post that says, “HEY, EVERYBODY!  LOOK AT ME!!!!”  I guess I kind of am…  So, after you LOOK AT ME!!! and my outfits, look around me!  We have flowers!  We have leaves!  We have grass!  Spring is finally here and we even had some warmer weather which is awesome because it’s warmer weather and because it means I got to add a little more variety to the clothing I could wear that I had made.  There’s no way I’m making it through this month without repeats, but it’s a great exercise in creativity and it makes me want to sew even more, and that’s a good thing.