Category Archives: Art

Field Trip: Folly Cove Designers Exhibit at the Cape Ann Museum in Gloucester, MA

Standard
Field Trip:  Folly Cove Designers Exhibit at the Cape Ann Museum in Gloucester, MA

Today I have a field trip to share with you, and if you’re local to Gloucester, MA, you can even check it out for yourself! In October, I visited the Cape Ann Museum in Gloucester to see the exhibit, “Designed & Hand-Blocked by the Folly Cove Designers“.

Field Trip:  Folly Cove Designers Exhibit at the Cape Ann Museum in Gloucester, MA

The Folly Cove Designers were a group that formed and created work in Gloucester throughout the 1940’s, ’50’s, and 60’s. They were led by the multi-talented Virginia Lee Burton Demetrios, whose children’s books, like The Little House, Katy and the Big Snow, Mike Mulligan and His Steam Shovel, Calico the Wonder Horse, etc., you may have read.

Field Trip:  Folly Cove Designers Exhibit at the Cape Ann Museum in Gloucester, MA

I learned about the Folly Cove Designers over a decade ago, when a coworker who had grown up in the Folly Cove neighborhood and known the Demetrioses told me about it. But over time, I nearly forgot. Then I listened to the episode “Strong Community Threads” from the Haptic & Hue: Tales of Textiles podcast all about this group and was reminded. It took a British podcast to remind me of what was in my own backyard. Ironic!

My local library had a museum pass I could check out, which gave me free admission to the museum and the exhibit. I’m so glad I went!

This group began with a neighbor asking Virginia for art classes. From there it grew into more classes with more students, and a curriculum that resulted in a diploma.

Field Trip:  Folly Cove Designers Exhibit at the Cape Ann Museum in Gloucester, MA
Folly Cove Designers diploma

l

Field Trip:  Folly Cove Designers Exhibit at the Cape Ann Museum in Gloucester, MA

l

Field Trip:  Folly Cove Designers Exhibit at the Cape Ann Museum in Gloucester, MA
diploma top detail

l

Field Trip:  Folly Cove Designers Exhibit at the Cape Ann Museum in Gloucester, MA
linoleum block detail, diploma

l

Field Trip:  Folly Cove Designers Exhibit at the Cape Ann Museum in Gloucester, MA
diploma detail, bottom

l

Field Trip:  Folly Cove Designers Exhibit at the Cape Ann Museum in Gloucester, MA
linoleum block detail, diploma; you’ll find out what she is doing if you read on…

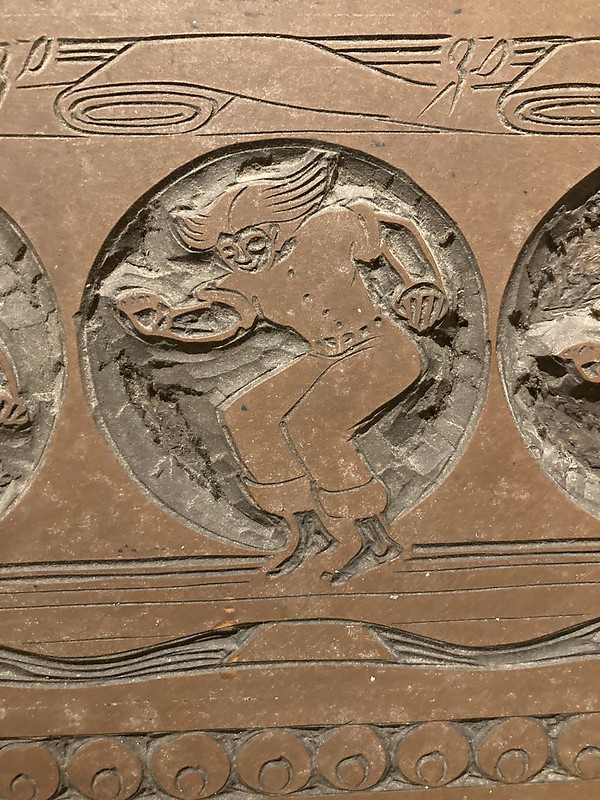
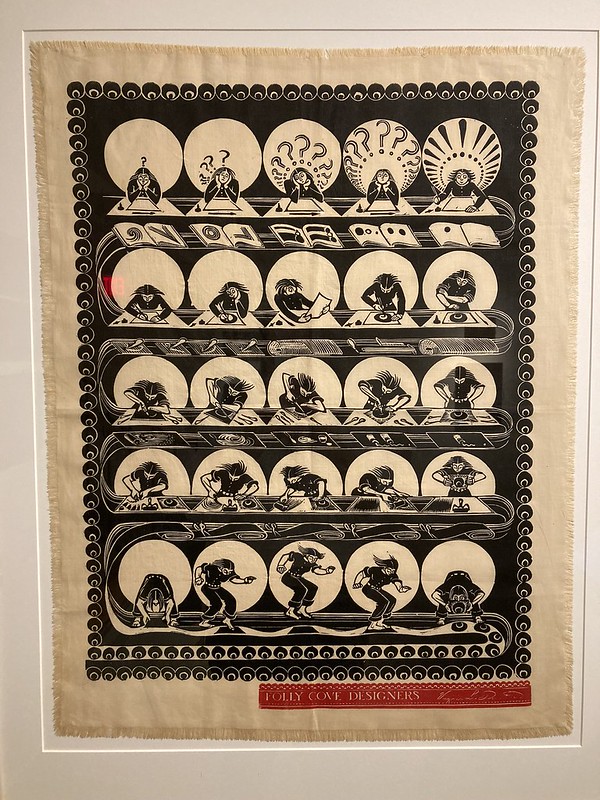
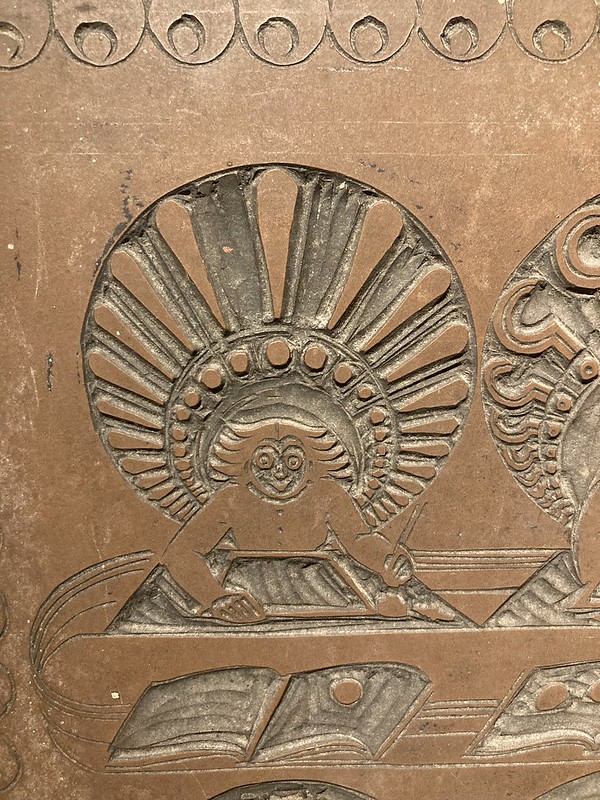
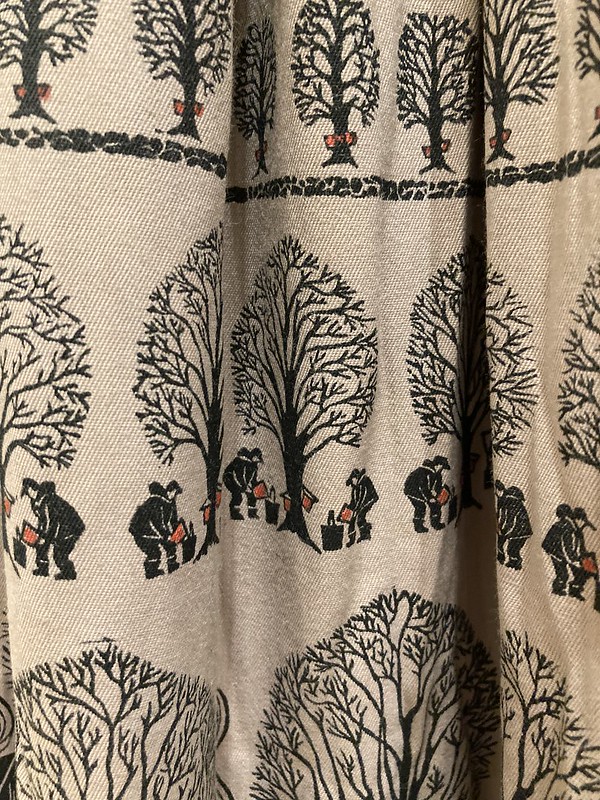
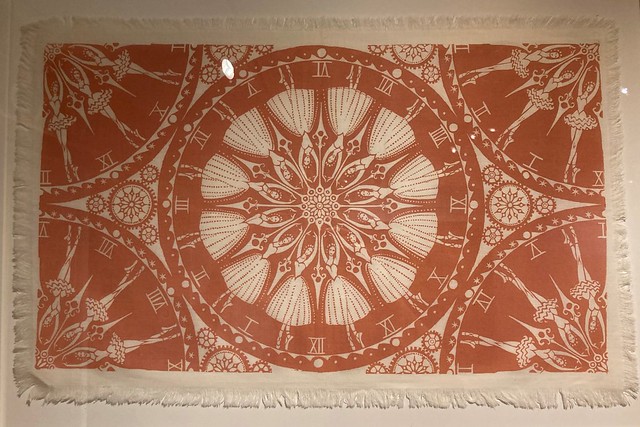
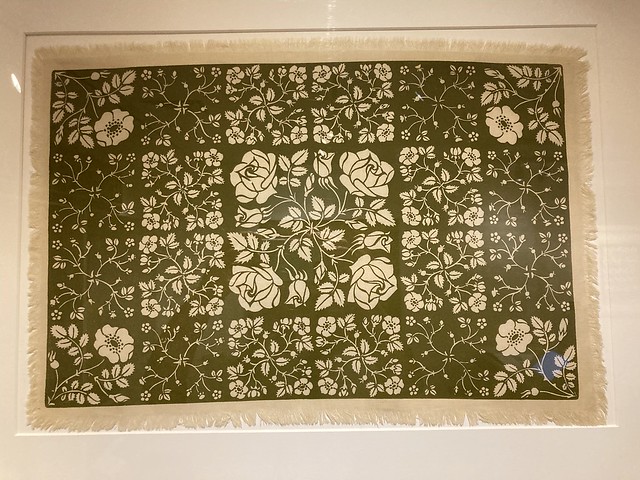
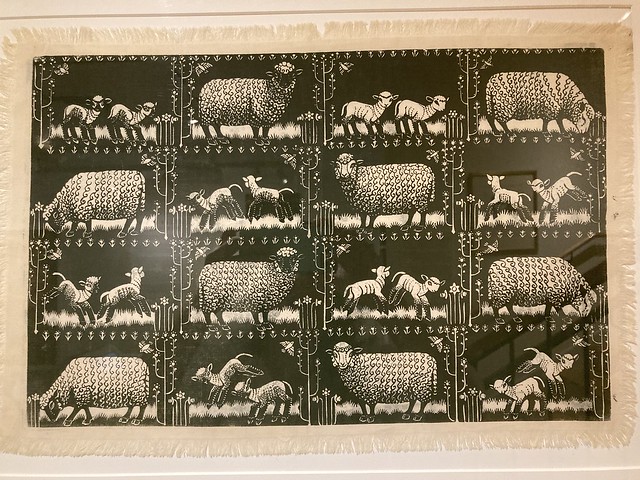
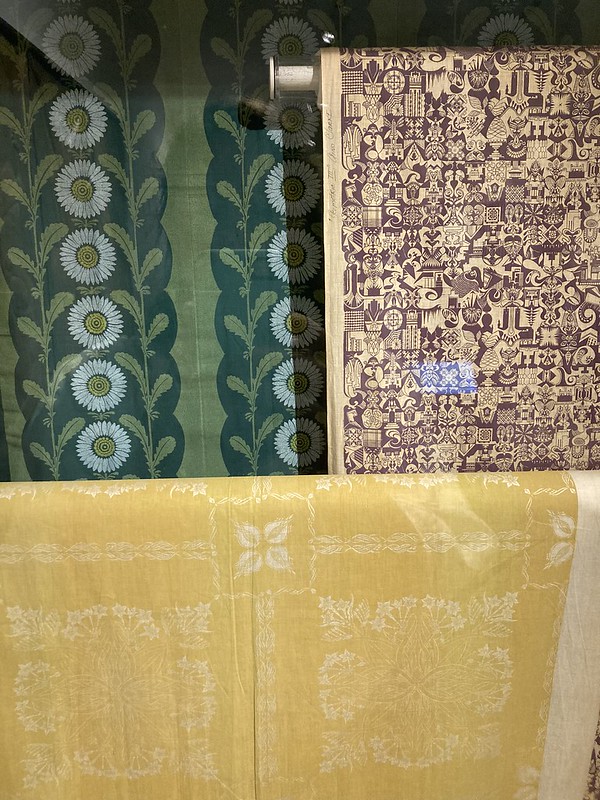
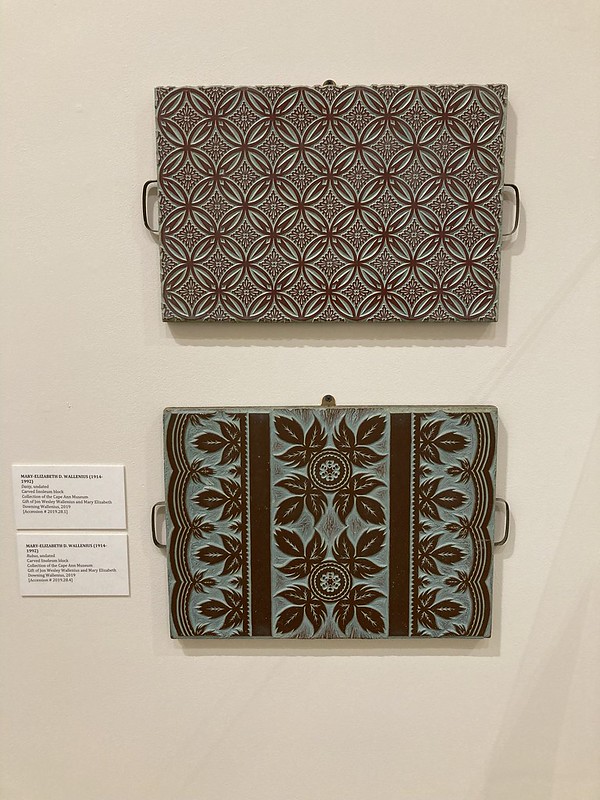
Eventually the students and their teacher formed a design group of accomplished artists who printed with linoleum blocks onto a number of surfaces like paper and fabric. They held exhibitions, showing and selling their work. They depicted what they saw around them in nuanced ways, and in addition to seeing many examples of the prints and finished goods that they created, you can also see the blocks and type of press that they eventually used. Before they got the press? Bodyweight! Because when you don’t have all the “right” tools, you get creative!

Field Trip:  Folly Cove Designers Exhibit at the Cape Ann Museum in Gloucester, MA
Aino Clark jumps on her block to transfer the print in the top picture.

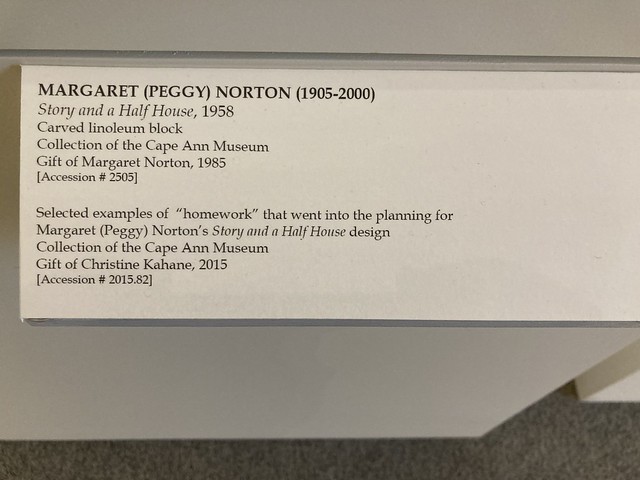
Here are some pictures of the display showing the homework students did in their art courses:

Field Trip:  Folly Cove Designers Exhibit at the Cape Ann Museum in Gloucester, MA

l

Field Trip:  Folly Cove Designers Exhibit at the Cape Ann Museum in Gloucester, MA

l

Field Trip:  Folly Cove Designers Exhibit at the Cape Ann Museum in Gloucester, MA

To make a linoleum block print, you draw your design on your linoleum block, carve out the spaces you don’t want to print, roll ink onto the block, and press the block onto whatever you are printing on.

And here are the tools you use to carve linoleum blocks and make these types of prints:

Field Trip:  Folly Cove Designers Exhibit at the Cape Ann Museum in Gloucester, MA
The top carved block is Seashell and Coral by Ida Corliss; the bottom block is Dandelion by Mary Maletskos

The Cape Ann Museum is a gem. Not only did I go to the exhibit, I also went on the docent-led tour, and learned so much about this beautiful area of Massachusetts. The Folly Cove exhibit really touched me, though. In the vast landscape of history, this group existed so recently, you can almost reach back and touch them. And their work is phenomenal. I studied printmaking in college, and it gives me such an appreciation for their high skill level–certainly a level I never achieved myself. It’s wonderful and exciting to see people who worked hard together and truly excelled at depicting what was all around them–in the most original and surprising ways. Here are some of my favorite parts:

Field Trip:  Folly Cove Designers Exhibit at the Cape Ann Museum in Gloucester, MA
Wouldn’t it have been amazing to wear one of these skirts printed with scenes of Gloucester or other New England life?
Field Trip:  Folly Cove Designers Exhibit at the Cape Ann Museum in Gloucester, MA
I believe this print is Baked Bean Supper by Peggy Norton, 1954

l

Field Trip:  Folly Cove Designers Exhibit at the Cape Ann Museum in Gloucester, MA
I think this print is Sugar Bush by Elizabeth Holloran, 1961
Field Trip:  Folly Cove Designers Exhibit at the Cape Ann Museum in Gloucester, MA
check out this detail of the skirt above depicting maple sugaring; I love the red buckets

l

Field Trip:  Folly Cove Designers Exhibit at the Cape Ann Museum in Gloucester, MA

l

Field Trip:  Folly Cove Designers Exhibit at the Cape Ann Museum in Gloucester, MA

l

Field Trip:  Folly Cove Designers Exhibit at the Cape Ann Museum in Gloucester, MA

l

Field Trip:  Folly Cove Designers Exhibit at the Cape Ann Museum in Gloucester, MA

l

Field Trip:  Folly Cove Designers Exhibit at the Cape Ann Museum in Gloucester, MA

l

Field Trip:  Folly Cove Designers Exhibit at the Cape Ann Museum in Gloucester, MA
Virginia Lee Demetrios, Spring Lambs II–1951

l

Field Trip:  Folly Cove Designers Exhibit at the Cape Ann Museum in Gloucester, MA
fabric with print by Ruth Hendy: Seaside, 1964

l

Field Trip:  Folly Cove Designers Exhibit at the Cape Ann Museum in Gloucester, MA
Back left: Lazy Daisy by Louise Kenyon, 1950; back right: Geometric III by Aino Clarke; front: Narcissus by Eleanor Curtis, 1957

l

Field Trip:  Folly Cove Designers Exhibit at the Cape Ann Museum in Gloucester, MA
these linoleum blocks are works of art in and of themselves; top: Daisy by Mary Wallenius; bottom: Rubus also by Mary Wallenius

l

Field Trip:  Folly Cove Designers Exhibit at the Cape Ann Museum in Gloucester, MA
linoleum block: Queen Anne’s Lace by Mary Maletskos, 1967

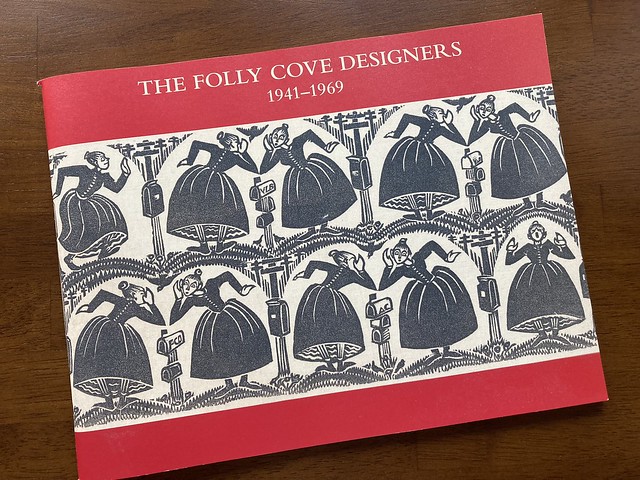
If you are going to be in the area and want to check out this exhibit for yourself, you should! It runs until March 25, 2023. The museum will be closed from January 24th to February 6th for renovations, and it is always closed on Mondays. If you live locally, see if your library has a pass that will give you free or reduced admission. I also highly recommend buying the exhibition booklet. I bought mine soon after the exhibit opened.

Field Trip:  Folly Cove Designers Exhibit at the Cape Ann Museum in Gloucester, MA
cover shows Gossips by Virginia Lee Demetrios

There may be more books on the Folly Cove Designers available at the gift shop now. This exhibit is excellent for those interested in printmaking, Cape Ann history, sewists, pattern lovers, those who like surface design, and anyone who loves Virginia Lee Burton’s children’s books. The museum is right in downtown Gloucester, which has lots of fun shops and a great waterfront to recommend it. One of my favorites? The little rainbow cookies at Caffe Sicilia.

Field Trip: The Georgia O’Keeffe Exhibit at the Peabody Essex Museum in Salem, MA

Standard
Field Trip:  The Georgia O’Keeffe Exhibit at the Peabody Essex Museum in Salem, MA

I went on a field trip last week to the Peabody Essex Museum in Salem, MA to see Georgia O’Keeffe:  Art, Image, Style.  I heard this exhibit was coming way back in May on the Thread Cult podcast.  It was exciting because the exhibit isn’t just about her paintings, but also contains her clothing, some of which she sewed.  I had a free pass to the museum and I saved it just for this show.

Georgia O'Keeffe at the Peabody Essex Museum in Salem, MA

Georgia O’Keeffe is not one of my favorite painters, but having studied art, and now applying my artistic side through making clothing for myself, this exhibit sounded exciting to me.  I certainly wasn’t disappointed.  I loved it.  The funny thing is, it wasn’t the paintings that I loved or her exact clothing style.  I loved seeing the two together with images of her by various photographers, seeing her tiny, tiny stitches, seeing how she created her own style.  I’ve never read a biography of Georgia O’Keeffe, so I don’t know what her personality was like, but going through the exhibit gave me a sense of someone who found out what she liked and quietly went with it (feel free to set me straight in the comments if she was loud and dramatic or something).

Georgia O'Keeffe at the Peabody Essex Museum in Salem, MA

Because sewing has become my own form of creative expression, I was moved to see how she created her own style that exemplified who she was…and she did it at an amazingly high skill level.  The miniscule and beautiful stitches, pintucks, and mending on her clothing was wonderful to me.  She sewed her clothing by hand!

Georgia O'Keeffe at the Peabody Essex Museum in Salem, MA

l

Georgia O'Keeffe at the Peabody Essex Museum in Salem, MA

These tiny lines in the fabric are pintucks–small folds of fabric that she created and stitched down by hand.

Georgia O'Keeffe at the Peabody Essex Museum in Salem, MA

Garments shown above are all believed to have been sewn by Georgia O’Keeffe.  These pictures really cannot convey the beautiful and precise hand stitches she used.

The exhibit was divided into two parts–before she went to New Mexico and after.  Sewing wasn’t her main mode of expression, and as she went on in her career, she started to have others make her clothing, but even when she wasn’t sewing for herself, she used her apparel to express who she was.  It wasn’t a loud explosion of color or attention-grabbing fashion.  She quietly found her style and stayed with it, but when you see her fashion choices in the time after she began visiting New Mexico, things start to feel very contemporary.  Some of the clothing she was choosing then is what people wear every day now.

Georgia O'Keeffe at the Peabody Essex Museum in Salem, MA

These garments weren’t sewn by Georgia O’Keeffe.  The styles are still in vogue today.

It wasn’t about being sexy, grabbing attention, or screaming at other people to follow her.  It was just about what she liked.  And you know what?  We are following her.  The show ends with a recent Dior fashion show that has numerous elements obviously inspired by O’Keeffe.

There is something really compelling about someone who quietly does their thing.  I’m tired of the loud and blustery.  I’ve done it, but I think I respect this more.  Even if my take on this show isn’t a clear and accurate picture of who she was, it certainly caused me to think.  It’s ok to carve out a unique path in fashion and in art.  It doesn’t have to be overly sexualized, because we’re more than that as people.  It doesn’t have to be loud to be compelling.  It doesn’t have to be in-your-face to make a difference.  Sometimes quiet diligence is what prevails.

This exhibit is showing through April 1, 2018.  You can see more pictures of the exhibit at the Peabody Essex Museum’s website as well as on my Flickr page.

Recommendations

  • The Peabody Essex Museum has an excellent gift shop.  They have all sorts goods related generally to art and specifically to their exhibits, currently including black hats as that was a distinctive item of apparel that O’Keeffe adopted in her New Mexico years.  I found my own black hat that really felt like me.  Fashion and art take courage because both involve putting yourself out there.  I’m going to wear this until it doesn’t feel awkward any more, because I LOVE it.

Georgia O'Keeffe at the Peabody Essex Museum in Salem, MA

  • O’Keeffe was influenced by the writing and art of Arthur Wesley Dow, which reminded me of how much I love his work.  Some of his landscape paintings and his use of color really stop me in my tracks.
  • Since we were talking about fashion, I really like some of Dansko’s ankle boots lately.  Comfortable and good-looking!

Outside (and Inside) in October and November

Standard

Well, my friends, I have two new sewing projects and one new knitting project waiting in the wings to share with you, but…I’ve been missing photography.  It feels like things are moving quickly…and I want to slow down just a bit.  I’m finally settling in to the fact that it is fall, and I don’t want it to race by without really looking at it.  Being outside always helps me get grounded and I love, love, LOVE taking pictures of things outside (and, in this case, in greenhouses), so here are my best shots from October and November.  There aren’t many, but hopefully they are good.

October

Horses on the beach

Horses on the beach

November

Trees in Autumn

Trees in fall

Mill Building and Dam

Mill building and dam

Trip to a Greenhouse

Plants in the greenhouse

Trip to a Greenhouse

Plants in the greenhouse

Trip to a Greenhouse

Succulents

I think missing photography has been a good thing for me.  A few months ago, a friend introduced me as someone who had a sewing blog.  I was momentarily surprised, until I realized that my nebulous “creativity blog” had morphed into a sewing blog.  I love to sew.  I love making creative things that I can use, but I also love things other than sewing, photography being one of them.  I don’t have the technical knowledge of photography that I do of sewing.  Past photo classes have seeped out of my brain, but living in this beautiful place makes it easy to capture things.  So I think that, for the present, this blog will have a lot of sewing, but also some non-sewing photography.  We all need beauty in our lives, and photography helps me to stop and look.  I hope it brings beauty into your life, too.


Joseph Had a Little Overcoat

Standard

I don’t make much menswear (yet), but when I saw the exciting announcement that Thread Theory was opening an online supply shop for menswear and general sewing materials (which is now live), I got to thinking about children’s books with sewing in them.  Morgan (the owner) said that she was stocking one such book, and I suggested one of my own favorites:  Joseph Had a Little Overcoat by Simms Taback.

Joseph Had a Little Overcoat by Simms Taback

Joseph Had a Little Overcoat by Simms Taback

In our house, we have a lot of children’s books…but they don’t all belong to my children.  Most of them do, but a few are mine and can only be used with permission.  These are books with illustrations and/or stories that I love for various reasons.  When I discovered this book, I was entranced by the super cool cutouts that led from one page to another (and also appear on the dust jacket, which I didn’t photograph).  I didn’t really sew at the time that I got it, but I made a lot of things, and I love clever and surprising art.

Joseph Had a Little Overcoat by Simms Taback

Joseph Had a Little Overcoat by Simms Taback

Joseph Had a Little Overcoat by Simms Taback

Joseph Had a Little Overcoat by Simms Taback

Joseph Had a Little Overcoat by Simms Taback

As I thought through my books, I realized something that is BEYOND OBVIOUS to me now that I have noticed it.  This is the PERFECT book for anyone who sews and anyone who refashions or makes do (or wants to secretly indoctrinate their children in the ways of sewing and making do–you know who you are!).

The story in this book starts out with a man with an overcoat.  It gets old.  It gets worn out.  Rather than tossing it or donating it and buying a new coat, he cuts off the bottom and makes it into a jacket.  When this begins to wear, he makes it into something else.  He goes on and on reusing and changing up the garment, until…

Joseph Had a Little Overcoat by Simms Taback

SPOILER ALERT–don’t read on unless you are ok with knowing how this book ends!!!

He loses the last little bit of it.  What will he do now?

Write a book about it!

Joseph Had a Little Overcoat by Simms Taback

This is such a creative, inventive story, both on the level of the character in the story and on that of the author and illustrator himself.  The copy I have is a second take on his original version (which I haven’t seen), and it’s just brilliant.  I don’t know the author.  I don’t get a kickback from telling you about this.  I just think this is the best book for those who love handmade, and I think the kids in your life will love it as well.  There is even a song about the story printed in the back for extra fun.  Check it out from your library and see what you think!

Pysanky

Standard

Ever heard of pysanky?  Yes?  No?  Pysanky are Ukrainian Easter eggs.  (You can find more information here and here.)  They are made using a wax resist technique much like batik.  Every year around this time, St. John the Russian, a Russian Orthodox church in Ipswich, offers a few pysanky workshops.  I was able to make it to both of them this year, once with some friends, and once with my eldest daughter.  Check out what we made:

Pysanky

At the beginning of each workshop, Julianna and Xennia Scheider explain some of the history and technique behind making pysanky.  They both have decades of experience, and it’s really amazing to see the eggs they and Julianna’s sister, Seraphima, have created over the years.

To decorate the eggs, you begin with white eggs and a small tool called a kistka that is like a stick about the length a pencil with a very small funnel attached to the end.  You heat the funnel over a flame and then scrape beeswax into it, heat it again until the wax melts, and then use it to draw whatever you would like to remain white onto your egg.  Once you’ve done that, you put the egg into the lightest color of dye you plan to use.  After a few minutes, remove the egg, dry it, and cover whatever areas you want to remain the color you just used  Then submerge it into the next color, and so on, until you finish with the darkest color you want to use.  It involves a bit of planning backwards and a good combination of aiming for a certain design and letting go of creative control.  You never know quite how the colors will come out.

Pysanky

In the picture above, you can see the three eggs I made over two weeks on the left.  The fourth from the left was a Jackson Pollock inspired collaboration between my daughter and myself.  She made the two eggs on the right.  The first egg on the left I had planned to make purple, but in the end it became a deep blue.  The next one over was going to be green, turquoise, and royal blue, but it came out a little different.  If you can approach the process with a little planning and a little letting go, you can really enjoy making the eggs and seeing the surprise of how they turn out in the end.

There is a lot symbolism you can incorporate into your eggs, or you can just experiment.  This year I used some of the example pictures they gave us to cobble together designs I liked.  The collaboration egg was pure experiment.  My daughter’s red egg was her trial egg, and she made the Batman egg for my husband.  Her first version smashed on the floor, but she put aside her disappointment and started again, finishing with plenty of time.

Pysanka

Once you go through the process of drawing with the wax and dying the egg, you put your egg on a rack of some sort in a warm over to soften the wax.  When it has softened enough, you wipe the wax off, revealing your creation!  It’s so exciting to see everyone’s eggs coming out of the oven and being revealed.

Pysanka

Pysanka

Pysanka

Pysanka

Pysanka

You can see a faint “S + L” that my daughter drew on the egg we worked on together.


Pysanka

Pysanka

Pysanka

Pysanka

I have yet to buy a kit and try this at home, but it wouldn’t be hard to do.  You can find kits in many places, including amazon.  Julianna told me that the dyes will usually last about three years if you add a bit of vinegar to top them off each year.  You can also find all kinds of books with examples of amazing eggs at your library or online.  One of the oddest parts for me was that we didn’t blow these eggs out.  Xennia said that over the years, it just feels like the insides turn to dust.  If you aren’t comfortable with this, however, you can blow them out first.  If you choose not to, just make sure you store them where air can circulate around them or they may crack (and stink).  I learned that lesson the hard way last year after storing the ones I had made the year before in a Ziploc bag.  Eggs may make us think of spring, but that smell certainly won’t remind you of a flower-filled day.

Have you ever tried this?  If you never have, I hope you do, but watch out!  It’s pretty addictive.  😉


Innovation

Standard

“Without tradition, art is a flock of sheep without a shepherd.  Without innovation, it is a corpse.” –Winston Churchill

I read this quote for the first time on Thursday, while watching this video of art student David Popa (Gordon College, Wenham, MA) .

I was struck by the quote itself, but also by how perfectly his work embodies it.  It inspired me to keep studying art history, and to continue to explore.

 "Girl with a Pearl Earring" by Johannes Vermeer

VERMEER, Johannes “Girl with a Pearl Earring” c. 1665 Oil on canvas, 46,5 x 40 cm Mauritshuis, The Hague

Artwork courtesy of Web Gallery of Art.

Learn more about David Popa, Peter Huang, and their art co-op Bumbing Happens at the link.

Nursery Rhyme Art Project: Painting!

Standard

This is the last post on my latest art project based on the nursery rhyme “Sing a Song of Sixpence”.  You can find the earlier posts here, here, and here.  I hope you are ready for a lot of pictures!  I tried to catch each step of the painting so you can see what I did.  (If you feel impatient, just scroll to the end.)  First up, preparation!

Nursery Rhyme Art Project:  Painting!  (Pattern and Branch)First I had a friend cut some hardboard/Masonite into a circle for me.  I traced the Hex sign from the first post to get the circle shape and size that I wanted.  I gathered advice on how to prepare the surface, and then sanded it a little bit and covered it in gesso.  I also painted an X on the back in gesso to keep it from warping. (Thanks, Tanja!)

Nursery Rhyme Art Project:  Painting!  (Pattern and Branch)Once that was dry, I transferred my sketch onto the prepared board.  You can see I did this before I colored in parts of my large sketch.  I wanted you to get an idea of the process, even if things are a bit out of order.

Nursery Rhyme Art Project:  Painting!  (Pattern and Branch)

I also made myself a little color key.  Once I found the colors I liked in pencil, I tried to match them to paint colors.  Because I don’t usually paint, I wanted to avoid having to mix colors in order to keep things consistent.  I was pretty fortunate to find the colors I wanted fairly easily.

Nursery Rhyme Art Project:  Painting!  (Pattern and Branch)Finally getting started!  I’m usually behind the camera, but I love to see pictures of people working on creative projects, so I had my husband shoot a few pictures of me painting.

Nursery Rhyme Art Project:  Painting!  (Pattern and Branch)Here are the center circle and the second circle.  The center is an imaginary sixpence.  I took some elements from real sixpences to create the image.  The second circle is the rye in the nursery rhyme.  I liked blue as a background because it made me think of a blue sky over a rye field.

Nursery Rhyme Art Project:  Painting!  (Pattern and Branch)Next was the yellow stripe on the blackbirds’ wings.

Nursery Rhyme Art Project: Painting! (Pattern and Branch)Then came the bottom of the pie.  I tried to apply the color on this ring in order from lightest to darkest.

Nursery Rhyme Art Project:  Painting!  (Pattern and Branch)

Nursery Rhyme Art Project:  Painting!  (Pattern and Branch)

Nursery Rhyme Art Project:  Painting!  (Pattern and Branch)

Nursery Rhyme Art Project:  Painting!  (Pattern and Branch)

This was the beginning of the outer crown ring.

Nursery Rhyme Art Project:  Painting!  (Pattern and Branch)

Nursery Rhyme Art Project:  Painting!  (Pattern and Branch)

I liked the red jewels, but wasn’t sure about my second color.  I knew I wanted two jewel colors, so I tested out the idea on my color key (several pictures above) before trying the green on the actual crown.  I was happy with how they looked in the end.

Nursery Rhyme Art Project:  Painting!  (Pattern and Branch)Here it is before the final varnish.  I got nervous at this point.  What if the varnish somehow messed everything up?  I would have to give the library a photo and say, “Well, here’s what you were supposed to get!  Sorry!”  Luckily, my vivid imagination doesn’t often play out in reality (Thank God!  Do you know how many bridges would have collapsed just behind our car or how many medical emergencies I would have lived through?!)

Nursery Rhyme Art Project:  Painting!  (Pattern and Branch)Getting ready to varnish…(Having a child in preschool taught me that produce trays make great paint/craft trays.)

Nursery Rhyme Art Project:  Painting!  (Pattern and Branch)Finally finished!  It took awhile for that to sink in for me.  Here’s one more shot.

Nursery Rhyme Art Project:  Painting!  (Pattern and Branch)

Do you think it looks slightly convex?  My husband and I think that every time we look at pictures, even though the surface is flat.

I sort of wish I had added up the hours that this took, but sometimes I’m glad I didn’t.  It made my life very busy, but it was so great to be busy with something I loved.  It made me excited to get up each morning.  I haven’t always had that feeling, so it was a real gift.  I hope the library and the kids there like it.  I loved working on it.


Nursery Rhyme Art Project: Full Scale Sketch

Standard

I’m back to show you the next step in the art project I’ve been working on based on the nursery rhyme “Sing a Song of Sixpence”.  You can see the first two posts covering inspiration and preliminary sketches by clicking the links.

After working out my ideas in the small sketches I showed you last time, I made a large, full-scale sketch with my final ideas.  The goal was to get things just how I wanted them to look so I could see the ideas and also so that I could transfer the drawings to the board I was going to work on just as I had drawn them.  I also hoped to experiment with color in the full-scale sketch.  Let me show you:

Sing a song of sixpence

Nursery Rhyme Art Project (Pattern and Branch)

A pocketful of rye


Nursery Rhyme Art Project (Pattern and Branch)

Four and twenty blackbirds

Baked in a pie.

When the pie was opened

The birds began to sing.

Nursery Rhyme Art Project (Pattern and Branch)

Wasn’t that a dainty gift

To set before the king?

(That outer ring is crown.)

When the pie was opened

You can see that by the end, I had taken out the words “Six Pence” and the extra grains of rye that were scattered about.  Since the audience for this work is children ages 0-2, the words seemed unnecessary, and the scattered rye took away from the more simplified, clean look that I was going for.

I got excited about color once I finished the drawing, but soon realized that doing just a quarter of the piece in color would help me figure out the colors that I needed.

Nursery Rhyme Art Project (Pattern and Branch)

It was a good thing I did this because I decided to change the crown in the outer circle to be more recognizable as a crown.  You can see both versions in the same sketch below.

Nursery Rhyme Art Project (Pattern and Branch)

Yay for color!  That’s how I almost always feel about color, actually.

Next up:  preparing the board and painting!