Tag Archives: Cotton + Steel Mystery Food

Grainline Studio Portside Duffle

Standard
Grainline Studio Portside Duffle

It’s finally time to post this project.  Here is the big takeaway for me:  I love this bag.  I did not love making this bag.

I made the Portside Duffle from Grainline Studio to take on a weekend retreat, and it was perfect for that.  I finished with time to spare, and it was so much fun to have handmade luggage to take along with me.  I really love how it turned out. (I also learned that both “duffle” and “duffel” are correct ways to spell this word, so I’ll go with “duffle” for this post.)

Grainline Studio Portside Duffle

l

Grainline Studio Portside Duffle

l

Grainline Studio Portside Duffle

l

Grainline Studio Portside Duffle

I was inspired in my color choices by this excellent bag on the Skirt As Top blog.  Mine is a little different, but the influence is pretty clear.  Her version is great!

The process of making it presented a number of challenges, however.

Materials

The first challenge for me was my inexperience with bag-making.  I decided to only make the duffle, as I was under a deadline, but because I’ve made so few bags, I was really stuck on how to choose things like interfacing and my zipper.  You know how it is when you are just starting out–you really need things spelled out.  I know how to shorten a zipper on a pair of pants or a skirt, but what if you can’t find the exact zipper length for a bag?  And do you need a separating or non-separating zipper?  Does it even matter?

As it turned out, the length specified (21 inches) is very hard to find.  What I did find out is that when you run into this situation, you can buy a longer zipper and shorten it, and a separating zipper is just fine (I’m pretty sure you can use separating or non-separating).  This may seem obvious, but it was something I didn’t know and had to learn.  Luckily I had a longer zipper in my stash, so I was able to use that.

Grainline Studio Portside Duffle

The other area that confused me was the interfacing.  I looked around online for ideas, but it was all so overwhelming!  I had no idea there were so many kinds of interfacing (and stabilizer!) or so many things you could do with the interfacing.  You can even combine interfacings!  Here is what I ended up using:  for the bottom, I bought 2/3 of a yard of 20″ wide Pellon Peltex 71F Single-Sided Fusible Ultra Firm Stabilizer.  (The bottom pattern piece of this bag is 21 5/8″ x 12 3/8″.) For the sides/top of the bag I used Pellon 809 Decor Bond (Firm Iron-on Backing with Extra Crispness).  My bottom fabric (the gold) was heavier than my top fabric (the off-white), so I used one layer of interfacing on both, but also added a layer of quilting-weight fabric to the top portion, like the way you might underline a garment.  I did not interface the striped pocket on the outside or my lining fabric.  I bought all my interfacing and stabilizer at JoAnn Fabrics.

Grainline Studio Portside Duffle

In case you also struggle with the interfacing/stabilizer question, I found some helpful information in this article on sew4home.com:  “Top Interfacing Solutions For Bags and Totes:  Fabric Depot“, as well as this one from Sew Sweetness: “All About Bag Interfacing“.  Sew Sweetness had a lot of good information for bag-makers of all experience levels.

Cost-Saving Strategies

The other area that I struggled with was the overall cost of this project.  I tend to have a pretty limited budget, so cost is always a factor.  When I started to realize how much the pattern, fabric, and hardware could cost, I decided to get creative and see where I could save money.  Here is what I did.

I decided to make my own straps all with a width of 1.5″, rather than some at 1.25″ and some at 1.5″.  This would also allow me to use the 1.5″ D-rings I had in my stash rather than buying 1.25″ D-rings which I didn’t have (and which were harder to find).  There were two books that I found really helpful as I dug into the details of this project.  The first was On-the-Go-Bags by Lindsay Conner and Janelle MacKay, which helped me see that I actually could make my own straps (something I didn’t know as a newbie to bag-making).  The other book, which was the most helpful, was The Better Bag Maker by Nicole Mallalieu, which was filled with all sorts of helpful information.  If you sewed through this book, you would come out the other side with a lot of bag-making knowledge and skills.

I also realized that since I had so many D-rings (I have no idea why I have so many!), I could use those instead of the swivel bolt snaps/hooks the pattern called for, and join them with a carabiner since we had a few little carabiners in the house.  I didn’t end up making the leather zipper pulls.  I was kind of hoping I would find something in the jewelry section of the craft store to go with my lining, but I didn’t find anything I liked, so I skipped it.

The next thing to consider was fabric.  In case you are wondering, Fabric A on the pattern is your lower fabric and Fabric B is your upper fabric.

Grainline Studio Portside Duffle

The off-white and striped fabrics came from my stash, and I ordered the gold bottom fabric from Fabric Mart when it was on sale (love that store!).  I think that 2/3 of a yard of 54″ or 57″ fabric for the bottom (Fabric A) would have been enough, although if you use a print, you may want more so that you can position it just how you want it.  The pattern calls for 1.25 yards of 54″ wide fabric.  This amount of fabric turned out to be helpful in making my straps, so I’m glad I had extra for that (I probably ordered 1.5 yards).

I also used a quilting cotton from my stash (with octopi!) for the lining, which saved me money.  I had been looking for just the right thing to use this fabric on and now I have both octopus pants and a bag with a surprise lining!  (This fabric, by Cotton + Steel, and my pattern came from Pintuck & Purl.)

Grainline Studio Portside Duffle

Construction

I’m going to share some technical details in this section, so feel free to skip it if that isn’t helpful to you.

***One important note:  I think there may be an error on pattern piece #4 (the side, bottom piece).  I would think that where it says “strap placement”, it would line up with the strap on the piece above it, but as printed, it looks like that text is on the bottom of the piece…where no strap is supposed to go.  I decided to ignore the strap placement marking and assumed that was the bottom of the piece (so that the words are right side up as printed).

Grainline Studio Portside Duffle

Also, you can skip the part in the directions about choosing your size.  This duffle only comes in one size.

In Steps 6 and 8, I used Steam-A-Seam 2, 1/4″ (double stick fusible tape) to hold things in place before sewing them down.  This wasn’t perfect because the bond was pretty light, but it was still helpful.

In Step 11, I used a zipper foot to sew the zipper in.

For Step 12, I found this blog post from Handmade By Carolyn very helpful.  She suggests leaving the last half-inch at the bottom of your sides and end panels unsewn to help with attaching the bottoms.  Press your seams toward the end panels after sewing.

In Step 13, sew the long sides first and then the short sides.

Before beginning Step 14, I think you should flip the bag so right sides are out (at least that is what I did).  The tip in the instructions about using your machine’s free arm is helpful here.  Even with that, though, this step is hard if you have heavy interfacing in the bag!  What worked for me was to sew a side, backstitch, cut the threads, and then move on to the next side.

For Step 16, as in Step 12, do not sew the bottom 1/2″ of each seam so it will be easier to attach to the bottom in the next step.

I did not do Step 18 as written.  Instead, I used Steam-A-Seam 2, 1/4″ to baste the lining to the zipper and used Wonder Clips to help hold it because the Steam-A-Seam isn’t very strong (something different would have been better, I think).  Then I basted outer fabric, zipper, and lining togewith my machine, with the lining up.  I just sort of tacked the ends because my machine didn’t love sewing over the zipper.  Then I sewed the long sides with a zipper foot and the bag’s outside facing up (in other words, I topstitched).  I tried to sew over the zipper ends, which was somewhat successful, so I also hand-tacked the lining to the zipper tape by the zipper ends.  Use a thimble for this!

In Step 19, I wasn’t able to fold the raw edges under, since the straps I had made were so thick.  I used Fray Check on both ends and then zigzagged over them before stitching them down as in the directions.  It’s not as professional as I would like, but it should work.

Grainline Studio Portside Duffle

In Step 20, I think it should say “tops of the rings” rather than “top of the top ring” in the second sentence.

Grainline Studio Portside Duffle

l

Grainline Studio Portside Duffle

At this point, I used more D-rings rather than swivel clips.  I attached the D-rings to each other with mini carabiners.

Grainline Studio Portside Duffle

After Step 20, I tried to tack the lining to the bag by sewing two parallel lines across the width of the bag on the bottom and by sewing for an inch or two on top of one of my stitching lines on each strap.  The lining doesn’t look smooth inside, but at least it won’t billow out now.

Grainline Studio Portside Duffle

I didn’t do Step 21, even though I think the leather zipper pulls are a nice touch.

Random Issue

One thing that happened that was unrelated to the pattern was that when I used my yellow Chaco Liner on the off-white part of my bag, it didn’t wash off afterward (I ran it through the washer and dryer).  I saw this once before when I was at a jeans workshop and someone used yellow Chaco Liner on white denim, and it also didn’t brush off.  Normally I don’t have any problems with the yellow, and it doesn’t bother me too much in this case, but it’s something to be aware of.  (You can faintly see it in the picture below.  It’s faint, but it’s there.)

Grainline Studio Portside Duffle

So, there you go!  I hope this is helpful to someone out there.  I know I spent a lot of time hunting down blog posts about this pattern and searching the web for information and materials.  Hopefully this will save someone some time should you decide to go for it and make this bag.

Grainline Studio Portside Duffle

Recommendations

This week’s recommendations are all bag-related!

Do you have any favorite bag patterns?  I still enjoy sewing clothing the most, but I’m opening up to the idea of sewing a bag here and there.

Simplicity 1696 Slim Pants…in Octopus fabric

Standard
Simplicity 1696 Slim Pants…in Octopus fabric

Hi, everyone!  Let’s talk sewing!

Today’s project is Simplicity 1696, a slim pant/trouser pattern that comes with different pattern pieces for slim/average and curvy fit.  (I think it may be out of print, but you can still find it in various places on the internet.)  I’ve made this pattern once before in a gray stretch sateen, but this time, I decided to go beyond basic and use a fun print for my pants–octopi!  This fabric is a quilting cotton called Mystery Food by Cotton + Steel.  I’ve had some serious yardage of this from Pintuck & Purl for a long time now, and it was time to start using it.  I can always sew (or buy) normal clothes, but I’m not here to only sew normal clothes.  Sometimes, I just have to make the crazy stuff.  It takes more courage to wear, but it’s also really fun.

Simplicity 1696 Slim Pants...in Octopus fabric

So, let’s talk pants (or trousers, if you prefer)!  This is a great pattern.  The directions have a little worksheet for you to help you figure out if you need the slim/average or curvy back piece.  I really like the teaching aspect of this pattern.

Simplicity 1696 Slim Pants...in Octopus fabric

l

Simplicity 1696 Slim Pants...in Octopus fabric

I took all my measurements and found that the curvy piece would be best.  This time around I used the size 20 because my measurements have gone up a bit and because this quilting cotton is a non-stretch fabric, whereas the fabric I used last time had stretch.  I really like the ease that’s included in most of the Big 4 patterns because I like my clothes a little looser-fitting, however I think I probably could have stayed with the 18 on this one.  When these come out of the washer and dryer, they fit close, but they loosen up right away and can get a little baggy by the end of the day.  The good news is, they are very comfortable.

Simplicity 1696 Slim Pants...in Octopus fabric

Although I really like this pattern, and think it’s a great basic, there were a few parts of the directions that I had trouble with, so this is the part to skip if you’re not here for the details.

Details

The main issue I had was with the fly.  It’s not hard to put it in, but it really doesn’t overlap enough.  I want the zipper to sit deeper in the fly so that it doesn’t show when it’s closed.  I think next time I might study the Ginger Jeans directions (from Closet Case Patterns) to see how they did it and see if I can adapt it to this pattern.  I have a really hard time going “off-book” sometimes and not using the directions given.  It’s an area I can stand to grow in, so this may be a good opportunity.  My zipper went in ok, but there’s stitching all over the place, which looks ugly to me.  Who knows?  Maybe I missed something.

Simplicity 1696 Slim Pants...in Octopus fabric

l

Simplicity 1696 Slim Pants...in Octopus fabric

l

Simplicity 1696 Slim Pants...in Octopus fabric

I did depart from the directions in Step 20.  Rather than hand-basting the fly in place, I pinned on the outside and carefully stitched over the marked seamline with a clear embroidery foot.

I also did something funky with the waistband, cutting off some excess that I needed, which I soon realized, and sewed back on.  You can see it in the first zipper picture above.  Haha!  Sometimes I make ridiculous mistakes.  I have no idea what that was about, but the crazy print camouflages a lot, so it’s ok.

I omitted the faux welt pockets on the back.  Maybe someday, if I try to perfect this pattern, I’ll add real welt pockets.  The fake welts just look too fake to me.

Simplicity 1696 Slim Pants...in Octopus fabric

Fitting

This is definitely an area I have to work on, but one great thing about this pattern is that there is a “Fine Tuning as You Sew” section that gives you an order for your fitting and different things you might need to tweak.

Simplicity 1696 Slim Pants...in Octopus fabric

I took in the center back seam by 1/2″.  I needed more back thigh room (at least that was my guess, judging by some of the lines in the back), so I minimized the inseam seam allowances at the top.  I also sewed a deeper crotch curve in the back.  Sometimes when you do that, you have to add more width at the hip, but these were roomy enough that I didn’t have to.  There are still some lines radiating out from the back at the top of the thighs, but I just left them.  The additional thigh room helped a little, but I’m not sure how to make them disappear completely, so for now they are good enough.  Pants fitting is still not something that I have down, but I’m learning!

Simplicity 1696 Slim Pants...in Octopus fabric

Final Thoughts

I like these pants a lot, but they do look a bit like pajama pants to me.  It’s hard to see the darts and the pockets because everything just blends together with the print.  I’d be curious to see how these look in a twill bottomweight fabric.  By the way–in case you are wondering–the pockets on these pants are great.  They are nice and roomy, and don’t stick out too much.

Simplicity 1696 Slim Pants...in Octopus fabric

l

Simplicity 1696 Slim Pants...in Octopus fabric

I still feel like I have a little work to do in the fitting department.  I have my usual fitting quandary with these, which is that I think something is off, but I don’t know what it is or how to fix it.  It might be that I need a heavier fabric or maybe something that I’m not yet aware of.  Fitting in general feels a little bit like reaching around in the dark and hoping you can figure out what it is you just bumped into.  Every little light that you manage to shed on it helps, though.

Overall, I’m glad I made these pants, and will be curious to see how well this fabric holds up as pants and how much I wear these.  I would definitely make this pattern again in the future.

Simplicity 1696 Slim Pants...in Octopus fabric

front

Simplicity 1696 Slim Pants...in Octopus fabric

back

Simplicity 1696 Slim Pants...in Octopus fabric

Recommendations

  • This one is for those who are local to the North Shore of Massachusetts (or for anyone traveling here).  My husband and I tried George’s of Gloucester (I guess it’s technically called George’s Coffee Shop) a little while ago, and it was great!  The menu was really creative, you definitely won’t leave hungry, and the people working there seem to be happy to be there.  I’m really noticing places like that these days–you can tell when the employees are happy, and it affects everyone around them in a good way.
  • I just saw “Night Sky” petunias at one of my local nurseries and found them really striking.  They make me think of speckled enamelware or splatter painting (or, of course, a night sky).  I’m not usually a petunia fan, but these might end up in my garden this year.  Clearly I’m in a speckle phase.
  • I love Erica Bunker’s version of McCall’s 7330.  I just bought this jumpsuit pattern, and I love how she made the waistband with elastic and used industrial snaps.  So smart!
  • And now it’s time for some tiny hands!  Check out this tiny hands makeup tutorial.  I don’t wear makeup, but this is so funny, it doesn’t even matter.

McCall’s 7561 Knit Octopus Dress

Standard
McCall’s 7561 Knit Octopus Dress

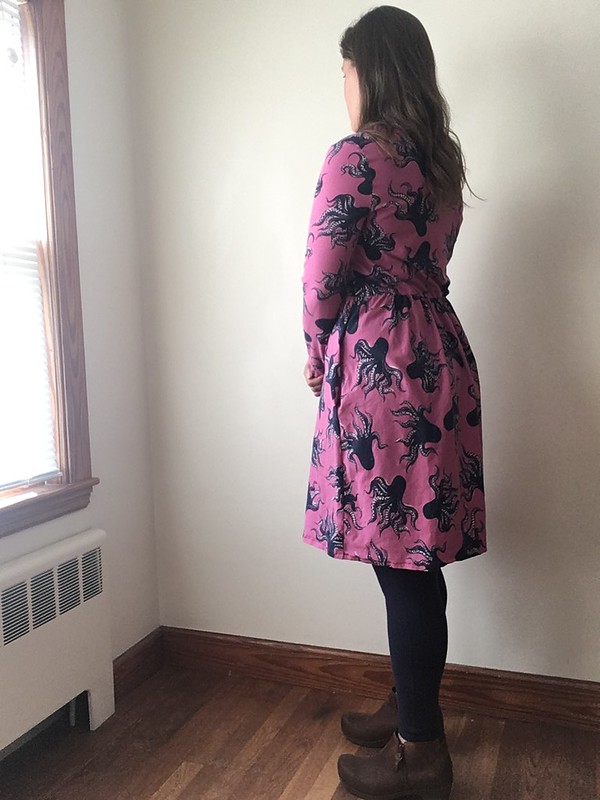
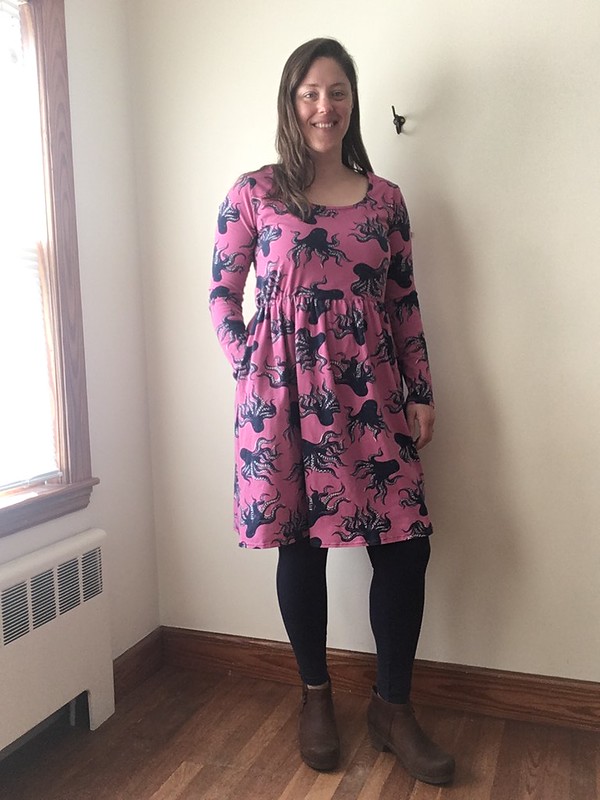
Do you wear dresses?  If so, do you like knit or woven dresses?  I was a tomboy growing up and after a few years in a school where I was required to wear skirts or dresses every day, I was pretty happy to mostly leave them behind for the rest of my growing-up years.  I feel different about dresses now, though.  I still don’t wear them often, and when I do wear them, it’s mostly in warmer weather, but I can’t resist great-looking dress patterns!  I have so many that I’ve never sewn.  I’m so glad I attempted McCall’s 7561, however.  It was a pattern that I had put in my own Christmas stocking 😉 because I really wanted to try it.

McCall's 7561 Knit Octopus Dress

l

McCall's 7561 Knit Octopus Dress

When there was a sale at Pintuck & Purl before their big move, I bought some of this pink Cotton + Steel cotton/spandex jersey with octopi all over it.  It’s called “Mystery Food Orchid” and even has a fun selvage.  The selvage is easy to turn into a fun tag.  🙂

McCall's 7561 Knit Octopus Dress

I had some of it in a quilting cotton in my stash, but I really wanted to try the knit, too.  Does it look a little juvenile?  Maybe.  But I like it, and I’m not here to sew all “normal” clothes.

McCall's 7561 Knit Octopus Dress

When my parents were here visiting, we had a trip planned to the New England Aquarium and, like any sewist who likes an unrealistic deadline, I put two and two together the day before we went, and thought, “Maybe I could make an octopus dress tonight!”  I’m not the world’s fastest sewer, but I had the pattern traced, it was a knit (which can make fitting easier), AND I wouldn’t have to finish any seams.  It was on!

And I did it!  Not only did I make it, but I made it with pockets, too!  And you know what?  It was really fun to wear my dress to the aquarium the next day.  It’s comfortable and very easy to wear with leggings when the weather is cold.

McCall's 7561 Knit Octopus Dress

Details

This pattern was (happily) so quick and easy.  It took me 45 minutes to cut out including pockets (which are a free pattern from Tilly & the Buttons, not a part of the McCall’s pattern).

McCall's 7561 Knit Octopus Dress

I made Dress B and lengthened it about 5″ since I knew that would feel more comfortable when I wear it without leggings.  I made a large in the bust and graded out to an extra large for the waist and hip.

McCall's 7561 Knit Octopus Dress

l

McCall's 7561 Knit Octopus Dress

I sewed clear elastic into the shoulder seams so they wouldn’t stretch out.

McCall's 7561 Knit Octopus Dress

The waist was kind of funny in that you sew the bodice to the skirt and then encase your elastic in the seam allowance so that you don’t do any stitching on the outside of the garment.  It was a little weird, but also creative, so I don’t quite know how I feel about it construction-wise.  As far as wearing, it’s very comfortable.

McCall's 7561 Knit Octopus Dress

The pockets are made following Tilly’s instructions, but I find that they gape sometimes, so I don’t know if I should understitch somewhere or if there is a better method.  Does anyone have any thoughts on that?  For this particular project, speed was the name of the game, so I didn’t think about it too much.

This was all done with a zigzag stitch, jersey needle, and walking foot on a regular home sewing machine.  And that’s about it!  I would definitely make this pattern again, hopefully in a summer version.  We’ll see.  I’d also like to try a t-shirt style knit dress, so if anyone has any favorite patterns, let me know in the comments!  Thanks!

McCall's 7561 Knit Octopus Dress

l

McCall's 7561 Knit Octopus Dress

Recommendations

  • The History of English podcast just had a great episode (#110) called “Dyed in the Wool” that is all about words and phrases in the English language that were originally related to the wool trade.  You’ll be surprised when you find out where some of the last names, terms, and phrases you’ve heard originated from.
  • Have you ever looked at the knitting patterns from Boyland Knitworks?  I’ve seen a few on Instagram and at Pintuck & Purl, and they’re so beautiful!  I’m in love with the Alyeska sweater.  I kind of thinking I could actually make the Glacier Park cowl.  I’ll have to keep it in mind if I need another knitting project.
  • I went on a little trip up to New Hampshire last weekend and stopped at the Tilt’n Diner in Laconia, NH.  It was great!  It was decorated in a fun 1950’s style with paintings of ’50’s scenes on the walls and quirky sayings all over.  I got breakfast, but I think they serve all meal types at all times of day.  Milkshake for breakfast?  That’s up to you!