Hi, everyone! It’s fall! Yay! While I still have a few summer projects to show you, time really got away from me this week, and I didn’t get a chance to take pictures of them. What I do have pictures of, though, are a few projects perfect for the start of fall: two more Twig + Tale leaf blankets and a quick upcycle. All of these projects are almost a year old (yikes!), but just haven’t made it to the blog yet.
I have blogged about Twig + Tale leaf blankets before (maple leaf; monstera leaves; fan, banana, and elephant ear leaf blankets). They are really fun to make and come in a ton of shapes as well as multiple sizes. I love how each finished blanket looks so much like an actual leaf. I know I shouldn’t really be surprised–it says what they are right in the name, but I’m always delighted when I finish one.
Last October, I whipped up a Quaking Aspen Leaf Blanket from the North American collection for a friend that was visiting. I used a golden corduroy left over from some pants I made since aspen leaves turn yellow, and for the other side, I used the last scraps of this bit of green blanket someone gave me years ago.
l
I also used it on my own Monstera Leaf blanket (which I still love and use all the time). This blanket came together really fast, as these blankets all do, and was a fun present to give my friend.
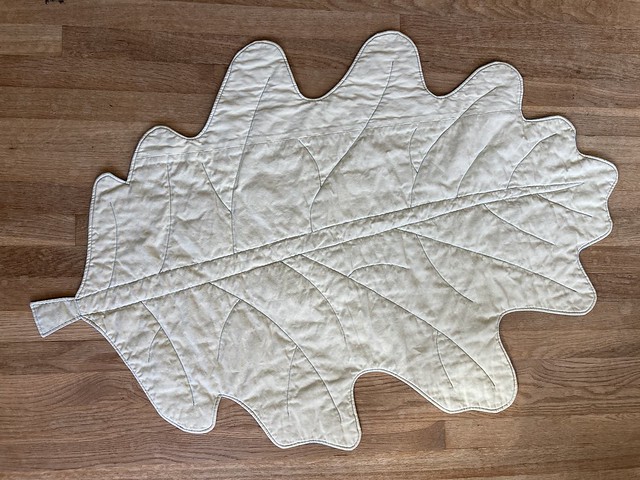
The other leaf blanket I made was the English Oak from the European Collection. I wanted a blanket to use on our couch, and I let my husband pick which leaf shape he liked best since he loves trees. I used a cream twill originally from Fabric Mart that I have used in many projects, and I backed it with a mystery home dec fabric that feels like cotton.
l
My mystery fabric has a herringbone texture to it which I’ve always liked.
I have probably had this fabric since before I began sewing regularly. I really had to piece it together to make it work!
While I like the shape of the oak leaf blanket, I don’t love the finished object as much as the others that I have made. I think it’s something with my fabric choice. It’s good functionally, but it’s just not my favorite one. Still, it works well, and I’m glad I made it.
One other project I did last October was a quick little upcycle. Sometimes it’s the details that make a garment, and that was the case here. I thrifted a nice flannel shirt for my husband, but it wasn’t quite his style, so I kept it for myself. I liked it, but it kind of needed something. I realized that if I just changed out the buttons for some really fun ones, it would give the shirt a distinctive detail without much work required and would make it more interesting and fun to wear.
Of course, this completely dovetailed with my desire to try out some of the super fun buttons by Tabitha Sewer that Pintuck & Purl had in stock. Yes! I chose some that are neon pink with neon orange edges…or maybe neon orange with pink edges? These buttons aren’t cheap, so ironically, my “small details” cost more than the shirt, but oh, well. Tabitha Sewer has so many fun buttons, but so far I have held off buying more until I have a specific project for them. Adding some to this shirt turned it from something a little too normal into something really fun! That also means I wear it a lot more. I am so motivated by good colors in my creative work. I just love the fun they bring.
All these projects are great for fall! Have you tried making a leaf blanket? Do you have favorite details you add to bring a garment from just ok to extra special? Let me know!
Welcome to this issue of Experimental Sewing! Today’s project involves turning the remnants of a down jacket (from this past project) into a scarf.
After seeing the scarves Alabama Chanin and Patagonia made from worn out Patagonia jackets a few years ago, I reallllly wanted to try it for myself. I thought it was a cool idea, and I was intrigued by the thought of recycling a down jacket (plus, I couldn’t pay $90 for one of theirs just because I was curious). It was time to get sewing.
I decided at the outset that my goal wasn’t perfect, heirloom sewing. Undoubtedly the Alabama Chanin + Patagonia scarves are amazing in quality and workmanship, but I didn’t want to worry about that. I just wanted to know if I could do it and what the process would be like.
l
After my first project with this down jacket, which was interesting, but somewhat unpleasant to sew, due to the reality of sewing down in your living room, my husband suggested that I try sewing the scarf outside. That was a game-changer. Sewing outside in October, when it was still somewhat warm but not hot, was heavenly. Any escaping down floated away on the breeze. I felt like I was in a sweet, sweet dream (the weather was really nice), sewing away on my Featherweight in the backyard. 😀
l
Let’s talk process for a bit, and discovery. I looked at what I had left of the down jacket, and marked off pieces with my sewing marker that were as rectangular as possible. Then I sewed a straight stitch on either side of my cutting lines. After that, I cut my pieces up. And then I sewed them back together…as you do. 😉 This left me with something like a long rectangle, but also some exposed, slightly downy edges.
And that’s when I made my discovery. I went to an estate sale and came away with, among other things, fleece binding! I had no idea this was a thing you could buy! It was perfect for my project. Rather than buying more to match things, I just decided to use what I had to cover the seams joining the rectangular pieces and the edges. There was a little hand-sewing involved where the binding crossed from side to side, but not much.
l
l
l
Before I finished, I also sewed a little rectangle to the inside of one end so that you could weave the other end through, helping to keep the scarf on.
l
Some bonuses include the three pockets that are left in the scarf from the original jacket and, weirdly, the fact that the front zipper is still a part of the scarf and you can zip it up so it looks like you are wearing the front of a jacket. It’s weird and cool. (Really! It’s cool! I promise!)
Look out! This could be the next trend coming your way in 2018. You heard it here first! 😉
l
I don’t think, after doing this, that I’m going to set up shop making a million things from down. It was fun, but not so much that it’s going to be my new favorite thing. What IS one of my favorite things in sewing is trying out different fabrics, and this definitely scratched that itch. I’m pushing the boundaries of my sewing knowledge a little more each time! That’s a win.
Recommendations
I just checked out the new cookbook from Deb Perelman of Smitten Kitchen, called Smitten Kitchen Every Day. I’m still reading through it, but after only making it through the Breakfast section, I want to make every recipe. Seriously. I might need this cookbook.
I feel I would be remiss if, after this project, I didn’t recommend Wrights fleece binding.
I can’t get the great fabric/color combination of this Kelly Anorak sewn by Lauren of Guthrie and Ghani out of my head.
Oh! And one more since we’re talking fabric. I LOVE this Neon Neppy fabric from Robert Kaufman, and I can’t decide which one I love best: Blue, Royal, or Charcoal? The internet really doesn’t do it justice–it has little slubs of neon color throughout, and since I’m clearly in a speckle as well as a neon phase, it’s right up my alley.
It was a grey and stormy day when I finally cut into a project I had long been contemplating. It was a refashion, but not just any refashion. This one involved sewing with a material I had never tried before: a down jacket. I had chosen the patterns that were going to help me achieve my goal and planned a little more than half of the project, but there were still questions in my mind about how I was going to finish the rest. Inspiration images had been pinned to my Pinterest board, but still I mulled it over…until the snow day. It was finally time.
I had already been scheming about refashioning a down jacket into a scarf after seeing these ones, which was the product of a collaboration between Patagonia and Alabama Chanin, but my down-sewing plans expanded when we visited Colorado last winter and I saw a woman wearing a down skirt. It was such a brilliant idea.
Google revealed that down skirts are actually a thing, even though the Colorado one was the only one I had seen in real life. So, after a ton of thought, I chose New Look 6843 for the skirt portion, and the waistband from the leggings in McCall’s 7261 for my stretchy waistband. Since I wanted this to be a pull-on skirt, a waistband and some gores/gussets/godets in the side of the skirt were in order (after seeing the skirt, you can tell me which term is the right one for what I did 😉 ).
l
I managed to turn the back skirt into a single piece and eliminate the zipper. All of that fit onto the back of the coat, allowing me to use the bottom of the coat as my hem. It got tricky when I came to the front because that was supposed to be one piece, too. I really wanted to incorporate the coat zipper in a decorative way (although I planned to sew it shut), and I also wanted the pockets both for decorative and functional purposes, but in the end, it was too much of a struggle. I realized that by opening my sleeves and sewing them together, I would have enough for my front piece. I still had plenty of the stretchy fleece left from my Toaster Sweaters for my waistband and gores/gussets/godets. Then it was all construction.
This is probably the point when you are asking how in the world I cut and sewed that crazy stuff. That is a very important question. Here is what I did: I marked my cutting lines with a water-soluble pen and sewed with a straight stitch on either side of my cut line in the hopes that it would hold all the down in.
Do you think it worked?
l
Well, it sort of did. Not ALL of the down came out. But some did. Here’s how I had to sew.
You can’t see it in this picture, but I also had pink-eye (conjunctivitis) at the time. Nice, huh? (Luckily no down got in my eye. That would have been…um…gross.)
I had the BRILLIANT idea of vacuuming off the edges after I cut them. I do not recommend this. Maybe you thought of the problem with this. It actually dislodged things, so it was sort of like it was snowing outside and snowing inside. That was the point at which I realized I really needed to get this finished that same day. We had some sickness in our house that week, and I wasn’t feeling my best, but I decided to power through in the hopes that it was all in my head. (It wasn’t all in my head, but I powered through anyway!)
l
l
I also realized that I needed to cover every seam on the inside if I didn’t want to perpetually shed feathers. This was the point where things got a little…”Becky-home-ecky” (sorry if your name is Becky). The finishing, while functional and necessary, didn’t meet the vision I had in my head, but I was sort of racing against the down and my nausea. The good news is, when I’m wearing it, I think it looks like something I could have bought at an outdoor store. (If you disagree, you don’t have to tell me.) It’s only if you get up close or look inside that you see the craziness, and since people don’t do that when I’m wearing it (thank goodness!), I think I’m safe. Want to see it? Check it out!
l
l
l
l
This skirt has the added benefit of a little puffy booty enhancement up top. It’s too high for people to think you pooped in your pants, so I like to think of it as booty enhancement. Maybe it’s because I sewed all the darts in the skirt, even though I basically negated them with those side triangles. I needed the triangles, though because if you’re going to eliminate the zipper, you need some way to get your skirt on!
Skirt front (above)
Skirt back (above)
Side view (above). I folded the front of the skirt down at the top a bit because it was originally higher in the front and lower in the back, but that feels weird to me. I want it the other way around.
Inside front (above). I covered my seams with fleece, but didn’t sew with a wide enough seam allowance, so I ended up sewing extra lines and hand-tacking things just to get all those feathery seams covered. I also covered my top seams with wide fold-over-elastic (although I didn’t fold it), and used a zig-zag stitch to hold it down and allow for a little stretch at the waist. That doesn’t look great, either, but again, you don’t really notice it that much when I’m wearing it, so whatever!
Inside back (above)
Inside side view (above). Here’s where it started to get ugly, but I just wanted to finish at this point. It was helpful to have the coat lining as a lining for my skirt because I could hand tack the fleece to it.
Despite any deficiencies in the finishing, I LOVE THIS SKIRT!!!! When I wear it, I feel ready to take on winter! The fit is great and it is so cozy that I wore it for two days straight after making it (and vacuuming my work room a.k.a. our living room…twice). In January I made these fleece leggings and the Toaster Sweater that I’m wearing in this picture, and this outfit is pretty much winter perfection. I love it so much.
After I finished, I contemplated making a scarf from the remnant of the jackets, but I decided to just put it away for now. I DID NOT like sewing with all that down. However…my husband had the brilliant idea to make a scarf from it in the summer…while sewing outside. He’s so smart!
Recommendations
On Wednesday I made the Blueberry Poppyseed Snacking Cake from the Seven Spoons cookbook, and now I just want to eat that all the time. I know this would be unwise, so I gave the last piece away before I could eat it.
I have some old gaiters from L.L. Bean that I just love. They don’t sell the exact style I have anymore, so this is the closest I could find, but they are great if it’s snowy out and I don’t feel like putting snow pants on. I can walk through several inches of snow without it getting in my shoes or on my pants. I used them for a walk on Thursday, and it just reminded me of how much I love them.
Is orange the new black? Are doughnuts the new croissants? Do you like to say that _____ is the new ______ ? Then check out this fun and funny website, where each time you click, you get a new ‘this is the new that’.
This week I found out that everything is better with doodles. 😉
Today’s Show and Tell is a little bit of a departure from my normal sewing paths. While in this learning phase of sewing, I’ve been a mostly selfish sewer. A short time ago, however, my friend Mary asked if I would be willing to make some pillows for her. Her father-in-law had passed away and she wanted some of his favorite clothing to be made into pillows for her daughters to have as keepsakes of their grandfather. I thought it sounded like a great idea, as well as a fun challenge for me. I finished them early this week, and I thought you might like a look.
Mary gave me a sweater, two blazers, a flannel shirt, and a pair of pants. She had already washed the sweater, but I washed and dried the other items twice to make them shrink as much as possible so that if her daughters ever needed to wash the pillow covers, they could use the washer and dryer (rather than a dry cleaner) without fear of shrinking them.
I got a little nervous when I did this. Everything looked so frayed and crazy. I thought, “What if I don’t have enough fabric to make these pillows?!!!” But then I turned on American Pickers, got my scissors out, and started deconstructing and ironing. I saved all the buttons, tags, and anything else that seemed useful in case I wanted to incorporate it later. Eventually I got everything into neat little pieces.
At that point I began to see where I wanted to go with the pillows. Mary had given me the pillow forms for the project, so I knew the dimensions I needed to sew to.
Then, I got into a thinking and procrastinating phase with several projects at once: not sure of all the pillow designs, problems with the bathing suit I’m sewing (yes, I’m still making versions of the Soma Swimsuit), and fitting issues with some shorts I had started. Finally, I decided, it was time to FINISH things!
Back to work! (At least on the things I had a clear direction for–the other ideas would come in due time.)
Luckily Mary had given me complete creative license, so I could do what I wanted. I also tried to take the quality up a notch. I don’t go back and fix all my mistakes in my own garments, but I made sure to fix off-center button holes and buttons and finish all my seams in this project. Gotta get professional, here!
Finally, I figured all my design and construction questions out, and I finished!!!
Fronts.
And backs.
This pillow was made from the two blazers (the striped front) and the pants (the gray back).
I made this one from the gray pants and the cotton flannel shirt (the red).
Finally, there is the pillow made from the sweater. The buttons and button holes are stabilized with strips of the gray pants material underneath.
In the end, I was really happy with how these turned out–happy with the quality, happy with the designs, and really happy that I hadn’t ruined the fabric! The best part, though, was that Mary was really happy with them. Hopefully her daughters will love them, too, and enjoy having them as a way to remember their grandfather.